User Manual
Page 2
... the printer on the stand 7 Attaching the paper basket (SC-P6000/SC-P7000 9 Attaching the paper basket (SC-P8000/SC-P9000 16 Installing the optional internal print server 24 Completing setup and connecting the power cord 26 Installing ink ...29 Loading roll paper ...33 Placing roll paper in the printer 33 Loading...
... the printer on the stand 7 Attaching the paper basket (SC-P6000/SC-P7000 9 Attaching the paper basket (SC-P8000/SC-P9000 16 Installing the optional internal print server 24 Completing setup and connecting the power cord 26 Installing ink ...29 Loading roll paper ...33 Placing roll paper in the printer 33 Loading...
User Manual
Page 16
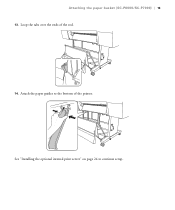
See "Installing the optional internal print server" on page 24 to the bottom of the rod. 14. Loop the tabs over the ends of the printer. Attach the paper guides to continue setup. Attaching the paper basket (SC-P6000/SC-P7000) | 15 13.
See "Installing the optional internal print server" on page 24 to the bottom of the rod. 14. Loop the tabs over the ends of the printer. Attach the paper guides to continue setup. Attaching the paper basket (SC-P6000/SC-P7000) | 15 13.
User Manual
Page 27
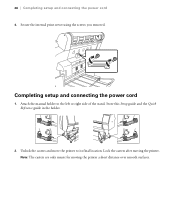
Lock the casters after moving the printer a short distance over smooth surfaces. Note: The casters are only meant for moving the printer. Attach the manual holder to its final location. Store this Setup guide and the Quick Reference guide in the holder. 2. Unlock the casters and move the printer to the left or right side of the stand. Completing setup and connecting the power cord 1. 26 | Completing setup and connecting the power cord 4. Secure the internal print server using the screws you removed.
Lock the casters after moving the printer a short distance over smooth surfaces. Note: The casters are only meant for moving the printer. Attach the manual holder to its final location. Store this Setup guide and the Quick Reference guide in the holder. 2. Unlock the casters and move the printer to the left or right side of the stand. Completing setup and connecting the power cord 1. 26 | Completing setup and connecting the power cord 4. Secure the internal print server using the screws you removed.
User Manual
Page 28
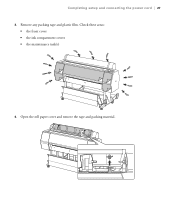
Remove any packing tape and plastic film. Check these areas: • the front cover • the ink compartment covers • the maintenance tank(s) 4. Open the roll paper cover and remove the tape and packing material. Completing setup and connecting the power cord | 27 3.
Remove any packing tape and plastic film. Check these areas: • the front cover • the ink compartment covers • the maintenance tank(s) 4. Open the roll paper cover and remove the tape and packing material. Completing setup and connecting the power cord | 27 3.
User Manual
Page 29
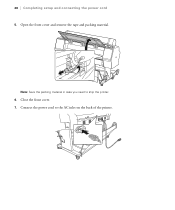
Note: Save the packing material in case you need to the AC inlet on the back of the printer. Close the front cover. 7. Connect the power cord to ship the printer. 6. 28 | Completing setup and connecting the power cord 5. Open the front cover and remove the tape and packing material.
Note: Save the packing material in case you need to the AC inlet on the back of the printer. Close the front cover. 7. Connect the power cord to ship the printer. 6. 28 | Completing setup and connecting the power cord 5. Open the front cover and remove the tape and packing material.

User Manual
Page 43
Visit the support page for a new version of firmware on the screen to run the setup program. Updating your printer firmware To keep your printer features and functionality up to your printer, if necessary. Checking the current ... package: • www.epson.com/support/p6000 (U.S.) or www.epson.ca/support/p6000 (Canada) • www.epson.com/support/p7000 (U.S.) or www.epson.ca/support/p7000 (Canada) • www.epson.com/support/p8000 (U.S.) or www.epson.ca/support/p8000 (Canada) • www.epson.com/support/p9000 (U.S.) or www.epson.ca/support/p9000 (Canada) Follow the instructions...
Visit the support page for a new version of firmware on the screen to run the setup program. Updating your printer firmware To keep your printer features and functionality up to your printer, if necessary. Checking the current ... package: • www.epson.com/support/p6000 (U.S.) or www.epson.ca/support/p6000 (Canada) • www.epson.com/support/p7000 (U.S.) or www.epson.ca/support/p7000 (Canada) • www.epson.com/support/p8000 (U.S.) or www.epson.ca/support/p8000 (Canada) • www.epson.com/support/p9000 (U.S.) or www.epson.ca/support/p9000 (Canada) Follow the instructions...

User Manual
Page 5
......130 Accessing the Printer's Menus ...130 Maintenance Menu Settings...130 Paper Menu Settings...132 Printer Setup Menu Settings ...136 Printer Status Menu Settings...138 Network Setup Menu Settings ...139 Preferences Menu Settings ...140 Administrator Menu Settings ...140 Replacing Ink Cartridges ......142 Checking Cartridge Status with Windows 142 Checking Cartridge Status with OS X 145 Purchase Epson Ink Cartridges...146 Ink Cartridge ...
......130 Accessing the Printer's Menus ...130 Maintenance Menu Settings...130 Paper Menu Settings...132 Printer Setup Menu Settings ...136 Printer Status Menu Settings...138 Network Setup Menu Settings ...139 Preferences Menu Settings ...140 Administrator Menu Settings ...140 Replacing Ink Cartridges ......142 Checking Cartridge Status with Windows 142 Checking Cartridge Status with OS X 145 Purchase Epson Ink Cartridges...146 Ink Cartridge ...
User Manual
Page 10
...• Prints at resolutions up to 2880 x 1440 dpi • Supports variable-sized droplet technology as small as 3.5 picoliter Easy-to-use setup and operation • Intuitive, easy-to-read, color LCD display • Front-loaded media for easy access • Easy-to-use software... print data from an Epson authorized reseller. To find the nearest one, call 800-GO-EPSON (800-463-7766). 10 sales) or epson.ca (Canadian sales). Printer Features Notations Used in the Documentation Printer Part Locations Printer Features The Epson SureColor P6000/P7000/P8000/P9000 Series printers include these...
...• Prints at resolutions up to 2880 x 1440 dpi • Supports variable-sized droplet technology as small as 3.5 picoliter Easy-to-use setup and operation • Intuitive, easy-to-read, color LCD display • Front-loaded media for easy access • Easy-to-use software... print data from an Epson authorized reseller. To find the nearest one, call 800-GO-EPSON (800-463-7766). 10 sales) or epson.ca (Canadian sales). Printer Features Notations Used in the Documentation Printer Part Locations Printer Features The Epson SureColor P6000/P7000/P8000/P9000 Series printers include these...

User Manual
Page 29
Note: The built-in cutter, press the paper feed button until you print, press the Menu button. 2. Select Roll Paper Setup and press the right arrow button. 4. Press the up or down arrow button to cut by hand. Note: If the paper cannot be able to ...select Paper and press the right arrow button. 3. Select Roll Paper Setup and press the right arrow button. 4. Select Page Line and press the right arrow button. 5. Heavy or thick media types may not be cut some...
Note: The built-in cutter, press the paper feed button until you print, press the Menu button. 2. Select Roll Paper Setup and press the right arrow button. 4. Press the up or down arrow button to cut by hand. Note: If the paper cannot be able to ...select Paper and press the right arrow button. 3. Select Roll Paper Setup and press the right arrow button. 4. Select Page Line and press the right arrow button. 5. Heavy or thick media types may not be cut some...

User Manual
Page 40
...and press the paper feed button. Press the up or down arrow button to Wide. Parent topic: Cut Sheet Handling Related references Available Epson Papers Paper Specifications Related tasks Storing the Paper Basket Adjusting the Platen Gap If the print quality is caused by paper curl and print ... the pause/cancel button to select Platen Gap. 4. If that doesn't solve the problem, try changing the Platen Gap setting to select Printer Setup and press the right arrow button. 3. Press the down arrow to the printer and ruined prints. Press the right arrow button to exit the...
...and press the paper feed button. Press the up or down arrow button to Wide. Parent topic: Cut Sheet Handling Related references Available Epson Papers Paper Specifications Related tasks Storing the Paper Basket Adjusting the Platen Gap If the print quality is caused by paper curl and print ... the pause/cancel button to select Platen Gap. 4. If that doesn't solve the problem, try changing the Platen Gap setting to select Printer Setup and press the right arrow button. 3. Press the down arrow to the printer and ruined prints. Press the right arrow button to exit the...

User Manual
Page 41
You can set up to 36 inches (914.4 mm) long (SC-P6000/SCP7000) or 62 inches (1580 mm) long (SC-P8000/SC-P9000), you can configure the paper basket to catch printouts under the printer or in front of the Product Storing the Paper Basket Parent topic: Media ... of the printer. Caution: For fine art and other sensitive prints, do not allow media to catch paper under the product. 41 Related references Printer Setup Menu Settings Using the Paper Basket The paper basket catches printouts and keeps them from getting dirty or scratched. Catching Printouts Under the Product Catching...
You can set up to 36 inches (914.4 mm) long (SC-P6000/SCP7000) or 62 inches (1580 mm) long (SC-P8000/SC-P9000), you can configure the paper basket to catch printouts under the printer or in front of the Product Storing the Paper Basket Parent topic: Media ... of the printer. Caution: For fine art and other sensitive prints, do not allow media to catch paper under the product. 41 Related references Printer Setup Menu Settings Using the Paper Basket The paper basket catches printouts and keeps them from getting dirty or scratched. Catching Printouts Under the Product Catching...

User Manual
Page 113
Note: If you are using. 5. They may look different, depending on the version of OS X and the application you do not see the expanded printer settings window for them in the print window, check for your application before printing. Select the Copies and Pages settings as necessary. You see these settings in your product: Note: The print window may be accessible by selecting Page Setup from the File menu. 113
Note: If you are using. 5. They may look different, depending on the version of OS X and the application you do not see the expanded printer settings window for them in the print window, check for your application before printing. Select the Copies and Pages settings as necessary. You see these settings in your product: Note: The print window may be accessible by selecting Page Setup from the File menu. 113

User Manual
Page 130
... up or down arrow button to completely exit the menu. Accessing the Printer's Menus Maintenance Menu Settings Paper Menu Settings Printer Setup Menu Settings Printer Status Menu Settings Network Setup Menu Settings Preferences Menu Settings Administrator Menu Settings Accessing the Printer's Menus You can use these sections to scroll through the settings...
... up or down arrow button to completely exit the menu. Accessing the Printer's Menus Maintenance Menu Settings Paper Menu Settings Printer Setup Menu Settings Printer Status Menu Settings Network Setup Menu Settings Preferences Menu Settings Administrator Menu Settings Accessing the Printer's Menus You can use these sections to scroll through the settings...

User Manual
Page 132
... Paper menu lets you modify settings for the current paper, or create and customize paper configurations for the loaded media. Remaining Setup Set Length Set Alert Length Description Select the loaded Epson media. Sets the length of paper. Sets the length of custom paper settings. Lets you , from 17 to 327 ft...
... Paper menu lets you modify settings for the current paper, or create and customize paper configurations for the loaded media. Remaining Setup Set Length Set Alert Length Description Select the loaded Epson media. Sets the length of paper. Sets the length of custom paper settings. Lets you , from 17 to 327 ft...

User Manual
Page 133
... is replaced during printing. Reprint: restarts the job from the beginning (available only when you are using the optional internal print server). Setting Roll Paper Setup Options Auto Cut Page Line Roll Paper Margin Roll End Option Roll Paper Tension Refresh Margin Custom Paper Setting options Description Lets you automatically cut...
... is replaced during printing. Reprint: restarts the job from the beginning (available only when you are using the optional internal print server). Setting Roll Paper Setup Options Auto Cut Page Line Roll Paper Margin Roll End Option Roll Paper Tension Refresh Margin Custom Paper Setting options Description Lets you automatically cut...

User Manual
Page 136
... loading thick media. 136 Parent topic: Using the Control Panel Menus Related references Available Epson Papers Related tasks Loading Roll Paper Creating Paper Configurations Related topics Cutting Roll Paper Cut Sheet Handling Printer Setup Menu Settings The Printer Setup menu lets you configure and monitor various aspects of your product. Setting Platen Gap...
... loading thick media. 136 Parent topic: Using the Control Panel Menus Related references Available Epson Papers Related tasks Loading Roll Paper Creating Paper Configurations Related topics Cutting Roll Paper Cut Sheet Handling Printer Setup Menu Settings The Printer Setup menu lets you configure and monitor various aspects of your product. Setting Platen Gap...
User Manual
Page 138
... Checking the Nozzles Using the Product Control Panel Cleaning the Print Head Using the Product Control Panel Printer Status Menu Settings The Printer Setup menu lets you use the Epson Color Calibration Utility. When the optional internal print server is installed, enables the printer to skip any job that will not print...
... Checking the Nozzles Using the Product Control Panel Cleaning the Print Head Using the Product Control Panel Printer Status Menu Settings The Printer Setup menu lets you use the Epson Color Calibration Utility. When the optional internal print server is installed, enables the printer to skip any job that will not print...

User Manual
Page 139
... Status Show total prints Print Status Sheet Calibration Date Options - - - - Prints a sheet listing the current printer settings. Displays the date that the Epson Color Calibration Utility was last run, if applicable. Automatically redirects network traffic sent over HTTP to their default values. Setting IP Address Setting Options Auto... the status of any installed optional accessories. Displays total media printed in feet or m. Parent topic: Using the Control Panel Menus Network Setup Menu Settings The Network Setup menu lets you configure your printer's network settings.
... Status Show total prints Print Status Sheet Calibration Date Options - - - - Prints a sheet listing the current printer settings. Displays the date that the Epson Color Calibration Utility was last run, if applicable. Automatically redirects network traffic sent over HTTP to their default values. Setting IP Address Setting Options Auto... the status of any installed optional accessories. Displays total media printed in feet or m. Parent topic: Using the Control Panel Menus Network Setup Menu Settings The Network Setup menu lets you configure your printer's network settings.

User Manual
Page 140
...Temperature Sleep Mode Power Off Timer Options Various languages m ft/in °C °F 5 to 210 minutes Off 1 to access the Network Setup menu. 140 Selects the interval before the printer turns off automatically when it is up to 20 characters long to access the Administrator menu and... the Network Setup menu (depending on the control panel display. Setting Options Change Password - Parent topic: Using the Control Panel Menus Administrator Menu Settings...
...Temperature Sleep Mode Power Off Timer Options Various languages m ft/in °C °F 5 to 210 minutes Off 1 to access the Network Setup menu. 140 Selects the interval before the printer turns off automatically when it is up to 20 characters long to access the Administrator menu and... the Network Setup menu (depending on the control panel display. Setting Options Change Password - Parent topic: Using the Control Panel Menus Administrator Menu Settings...
User Manual
Page 146
...remains in the product is available for printing. You can purchase genuine Epson ink and accessories at epson.com (U.S. For print quality, a variable amount of ink cartridges and ink supplies are designed for printer setup and not for charging, the rest is broken, incompatible with the printer... settings, paper type, frequency of use up a cartridge within 6 months of opening the package. Note: This product uses only genuine Epson-brand cartridges. After some ink is used for resale. Yields vary considerably based on the screen. Ink Cartridge and Maintenance Box Part Numbers...
...remains in the product is available for printing. You can purchase genuine Epson ink and accessories at epson.com (U.S. For print quality, a variable amount of ink cartridges and ink supplies are designed for printer setup and not for charging, the rest is broken, incompatible with the printer... settings, paper type, frequency of use up a cartridge within 6 months of opening the package. Note: This product uses only genuine Epson-brand cartridges. After some ink is used for resale. Yields vary considerably based on the screen. Ink Cartridge and Maintenance Box Part Numbers...

