
User Manual
Page 29
Close the roll paper cover. 14. On the screen that appears on paper handling. Note: See the Quick Reference guide or the online User's Guide for more details on the LCD, select Keep Settings Above if the paper settings are not printing. To avoid indenting or creasing the paper, remove it from the paper path and roll it up when you are correct, or select Change Settings, then adjust the settings. 15. Pull down on the lock lever to lock the paper in the printer 12. Press OK. 28 | Loading roll paper in place. 13.
Close the roll paper cover. 14. On the screen that appears on paper handling. Note: See the Quick Reference guide or the online User's Guide for more details on the LCD, select Keep Settings Above if the paper settings are not printing. To avoid indenting or creasing the paper, remove it from the paper path and roll it up when you are correct, or select Change Settings, then adjust the settings. 15. Pull down on the lock lever to lock the paper in the printer 12. Press OK. 28 | Loading roll paper in place. 13.

User Manual
Page 3
Contents SureColor P10000/P20000 User's Guide 9 Introduction to Your Printer...10 Printer Features ...10 Optional Equipment and Replacement Parts 11 Notations Used in the Documentation 11 Printer Part Locations...11 Product ... Using the Paper Basket...35 Storing the Paper Basket...35 Creating Paper Configurations ...36 Printing a Paper Configuration List 38 Selecting Custom Paper Configurations 38 Available Epson Papers ...39 Borderless Paper Type Compatibility 46 Using the Optional Auto Take-up Reel ...48 About the Optional Auto Take-up Reel 48 Installing the...
Contents SureColor P10000/P20000 User's Guide 9 Introduction to Your Printer...10 Printer Features ...10 Optional Equipment and Replacement Parts 11 Notations Used in the Documentation 11 Printer Part Locations...11 Product ... Using the Paper Basket...35 Storing the Paper Basket...35 Creating Paper Configurations ...36 Printing a Paper Configuration List 38 Selecting Custom Paper Configurations 38 Available Epson Papers ...39 Borderless Paper Type Compatibility 46 Using the Optional Auto Take-up Reel ...48 About the Optional Auto Take-up Reel 48 Installing the...

User Manual
Page 9
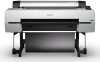
SureColor P10000/P20000 User's Guide Welcome to the SureColor P10000/P20000 User's Guide. For a printable PDF copy of this guide, click here. 9
SureColor P10000/P20000 User's Guide Welcome to the SureColor P10000/P20000 User's Guide. For a printable PDF copy of this guide, click here. 9
Quick Reference
Page 7
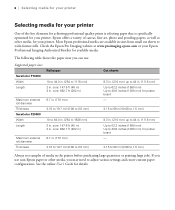
...147.6 ft (45 m) 3 in . See the online User's Guide for your printer. Check the Epson Pro Imaging website at www.proimaging.epson.com or your Epson Professional Imaging Authorized Reseller for your printer. If you use : Supported paper sizes SureColor P10000 Width Length Roll paper 10 to 44.0 in. (254... to wide-format rolls. Most Epson professional media are available in . core: 662.7 ft (202 m) Maximum external roll diameter Thickness ...
...147.6 ft (45 m) 3 in . See the online User's Guide for your printer. Check the Epson Pro Imaging website at www.proimaging.epson.com or your Epson Professional Imaging Authorized Reseller for your printer. If you use : Supported paper sizes SureColor P10000 Width Length Roll paper 10 to 44.0 in. (254... to wide-format rolls. Most Epson professional media are available in . core: 662.7 ft (202 m) Maximum external roll diameter Thickness ...

Quick Reference
Page 10
... manual cutting. 1. Press the d button to rewind the paper using the Manual switch. For instructions, see the online User's Guide. Press the d or u button to select Remove Paper, then press OK • If automatic media tracking is on, the barcode and paper information is printed. &#.... 7. Press the Menu button. 3. Press the d button to select Page Line, then press OK. 6. You can print a trim line (page line) between print jobs as a guide for more details.
... manual cutting. 1. Press the d button to rewind the paper using the Manual switch. For instructions, see the online User's Guide. Press the d or u button to select Remove Paper, then press OK • If automatic media tracking is on, the barcode and paper information is printed. &#.... 7. Press the Menu button. 3. Press the d button to select Page Line, then press OK. 6. You can print a trim line (page line) between print jobs as a guide for more details.

Quick Reference
Page 17
...to optimize your results. However, if print quality is not satisfactory when using the Epson driver, you may also need to change this is flat. If that doesn't solve the problem, you ...notice scuffs on non-Epson media and not using very thin or very thick media, you may need to create a paper ... the u or d button to select the / tab. 1. 16 | Loading poster board 11. See the online User's Guide for thick or thin paper When you print on poster board, push the poster board support back into the printer. ...
...to optimize your results. However, if print quality is not satisfactory when using the Epson driver, you may also need to change this is flat. If that doesn't solve the problem, you ...notice scuffs on non-Epson media and not using very thin or very thick media, you may need to create a paper ... the u or d button to select the / tab. 1. 16 | Loading poster board 11. See the online User's Guide for thick or thin paper When you print on poster board, push the poster board support back into the printer. ...

Quick Reference
Page 19
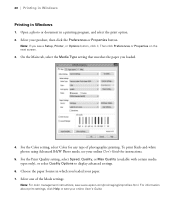
Printing This section describes basic printing from your product as the Printer setting. 3. 18 | Printing 2. Click Show Details. 4. Select the Paper Size setting for the paper size and source you are using. For detailed instructions, see the online User's Guide. Select your Mac or Windows® computer. Printing with OS X 1. Loosely roll the basket cloth and insert the loops into the clamps on the bottom of the printer. Open a photo or document in a printing program, then select the print command in your application. 2.
Printing This section describes basic printing from your product as the Printer setting. 3. 18 | Printing 2. Click Show Details. 4. Select the Paper Size setting for the paper size and source you are using. For detailed instructions, see the online User's Guide. Select your Mac or Windows® computer. Printing with OS X 1. Loosely roll the basket cloth and insert the loops into the clamps on the bottom of the printer. Open a photo or document in a printing program, then select the print command in your application. 2.

Quick Reference
Page 20
... Printer Settings from the pop-up menu. Select the Media Type setting that you loaded. Note: For color management instructions, see your online User's Guide. 9. button. 6. Select an Output Resolution setting (available settings depend on the size and type of paper you usually use. 7. Select ... depending on selected media type). 10. To avoid changing black ink more information about print settings, click Help or see www.epson.com/proimaging/iccprofiles.html. Click Print. For more often than necessary, set the printer to select Advanced before you can select Printer...
... Printer Settings from the pop-up menu. Select the Media Type setting that you loaded. Note: For color management instructions, see your online User's Guide. 9. button. 6. Select an Output Resolution setting (available settings depend on the size and type of paper you usually use. 7. Select ... depending on selected media type). 10. To avoid changing black ink more information about print settings, click Help or see www.epson.com/proimaging/iccprofiles.html. Click Print. For more often than necessary, set the printer to select Advanced before you can select Printer...
Quick Reference
Page 21
... print black-and-white photos using Advanced B&W Photo mode, see www.epson.com/proimaging/iccprofiles.html. On the Main tab, select the Media Type setting that matches the paper you see your online User's Guide for any type of the Mode settings. For the Color setting, select... Select one of photographic printing. Then click Preferences or Properties on the next screen. 3. Note: For color management instructions, see your online User's Guide. For information about print settings, click Help or see a Setup, Printer, or Options button, click it. Choose the paper Source in ...
... print black-and-white photos using Advanced B&W Photo mode, see www.epson.com/proimaging/iccprofiles.html. On the Main tab, select the Media Type setting that matches the paper you see your online User's Guide for any type of the Mode settings. For the Color setting, select... Select one of photographic printing. Then click Preferences or Properties on the next screen. 3. Note: For color management instructions, see your online User's Guide. For information about print settings, click Help or see a Setup, Printer, or Options button, click it. Choose the paper Source in ...

Quick Reference
Page 22
... If one of your printer working properly, make sure to perform basic maintenance on the LCD screen. Or you start printing. Maintaining your online User's Guide for your settings. 12. Checking ink status Before you begin a large print job, you loaded roll paper, create a custom paper size. Replacing... check your printout or print double-sided, click the Page Layout tab and select settings as necessary. (Click Help or see the online User's Guide. Type a name for details.) 11. Make sure you can wait until the ink is expended, replace the cartridge, and then continue...
... If one of your printer working properly, make sure to perform basic maintenance on the LCD screen. Or you start printing. Maintaining your online User's Guide for your settings. 12. Checking ink status Before you begin a large print job, you loaded roll paper, create a custom paper size. Replacing... check your printout or print double-sided, click the Page Layout tab and select settings as necessary. (Click Help or see the online User's Guide. Type a name for details.) 11. Make sure you can wait until the ink is expended, replace the cartridge, and then continue...

Quick Reference
Page 30
... control panel (or from Epson LFP Remote Panel2): normal cleaning, heavy cleaning, and powerful cleaning. Press the button. 2. Press the u or d button until Head Cleaning is ready. 1. The cartridges need to make sure the print head needs cleaning, as described on running a powerful cleaning, see the online User's Guide. Print a nozzle check to...
... control panel (or from Epson LFP Remote Panel2): normal cleaning, heavy cleaning, and powerful cleaning. Press the button. 2. Press the u or d button until Head Cleaning is ready. 1. The cartridges need to make sure the print head needs cleaning, as described on running a powerful cleaning, see the online User's Guide. Print a nozzle check to...

Quick Reference
Page 31
For effective cleaning, always run a nozzle check before aligning the print head (see the online User's Guide for details on the printer. 2. Aligning the print head Properly aligning the print head ensures the best print quality. Make sure the printer is clean. ...
For effective cleaning, always run a nozzle check before aligning the print head (see the online User's Guide for details on the printer. 2. Aligning the print head Properly aligning the print head ensures the best print quality. Make sure the printer is clean. ...

Warranty Statement
Page 5
... services required for in the User's Guide. UNLESS STATED HEREIN, ANY STATEMENTS OR REPRESENTATION MADE BY ANY OTHER PERSON OR FIRM ARE VOID. Any damage to best maintain your investment. 5. Any action for breach of warranty must be held responsible for the Epson products covered by other than an Epson Authorized Servicer. 7. 4. Clean platen...
... services required for in the User's Guide. UNLESS STATED HEREIN, ANY STATEMENTS OR REPRESENTATION MADE BY ANY OTHER PERSON OR FIRM ARE VOID. Any damage to best maintain your investment. 5. Any action for breach of warranty must be held responsible for the Epson products covered by other than an Epson Authorized Servicer. 7. 4. Clean platen...

