Epson MX-80II Support and Manuals
Get Help and Manuals for this Epson item

View All Support Options Below
Free Epson MX-80II manuals!
Problems with Epson MX-80II?
Ask a Question
Free Epson MX-80II manuals!
Problems with Epson MX-80II?
Ask a Question
Popular Epson MX-80II Manual Pages
User Manual - Page 2
... 17 2. Paper Loading 25 7.1. Loading of fanfold paper 10 6.2. Cartridge Ribbon Setting 8 5. Separator Installation 10 6. Power Connection 15 INSTALLATION OF MX-80 F/T TYPE II 17 1. Installation of roll paper 29 7.3. Loading of the Printer 18 4. Counting the Parts 3 3. Column layout on fanfold paper 28 7.1.4. Unpacking 17 1.1. Dismounting of fanfold...
User Manual - Page 4
LIST OF FIGURES
Fig. 1 EPSON MX-80 Type II and MX-80 F/T Type II Dot Matrix Printers ... 1 Fig. 2 Contents of Carton 4 Fig. 3 Laying Printer on Firm Surface 5 Fig. 4 Assembly Tools 6 Fig. 5 Removal of Shipping Screws 7 Fig. 6 Removal of Printer Lid 7 Fig. 7 Remounting of Printer Lid 8 Fig. 8 Cartridge Ribbon Setting 8 Fig. 9 Cartridge Ribbon Setting 9 Fig. 10 Examples of Correct...
User Manual - Page 7

.... And characters can be replaced easily, and 80 CPS bidirectional printing with most VSBC computers.
Introduction Ideal for computer business applications, the MX-80 Type II Dot Matrix Printer is the latest extension of MX-80 Type II and MX-80 F/T Type II will be printed in mixed Text/Bit Image Mode. In this manual, installation of EPSON advanced printer technology...
User Manual - Page 10
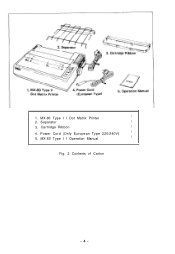
Separator
1
3. Cartridge Ribbon
1
4. 1. Power Cord (Only European Type 220/240V)
1
5. MX-80 Type I I Operation Manual
1
Fig. 2 Contents of Carton
-4- MX-80 Type I I Dot Matrix Printer
1
2.
User Manual - Page 16
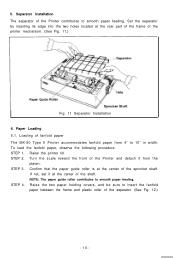
... paper guide roller contributes to 10" in width. Turn the scale toward the front of the Printer and detach it at the center of fanfold paper The MX-80 Type II Printer accommodates fanfold paper from the
platen. STEP 4. If not, set it from 4" to smooth paper feeding. Loading of the shaft. STEP 1. Separator Installation...
User Manual - Page 19
... on and push the Line Feed button. (Details are described later.)
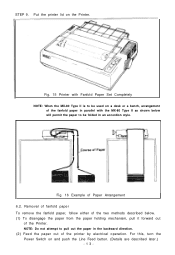
-13- Fig. 15 Printer with Fanfold Paper Set Completely NOTE: When the MX-80 Type II is to be folded in parallel with the MX-80 Type II as shown below . (1) To disengage the paper from the paper holding mechanism, pull it forward out...
User Manual - Page 20
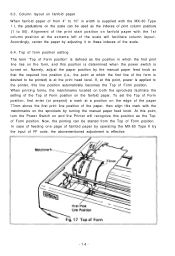
... these indexes of fanfold paper by operating the MX-80 Type II by turning the manual paper feed knob. In case of feeding one page of the scale. 6.4. To set the Top of Form position, first enter (... be started from 4" to 10" in which the first line of FF code, the abovementioned adjustment is desired to 80). Now, the printing can be used as the indexes of Form position. Namely...
User Manual - Page 21
... Carbon paper sheets
Position of adjusting lever Set the lever to a power source, make certain of the primary AC rating from the label located on the chassis at the rear of the Printer. Power Connection
The EPSON MX-80 Type II Dot Matrix Printer is used . If your MX-80 Type II has a primary AC rating...
User Manual - Page 35
... 7 for the assembly instructions on the Printer.
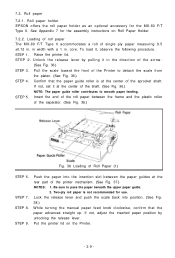
-29- STEP 9. Roll paper holder EPSON offers the roll paper holder as an optional accessory for use. STEP 7. Push the paper into position. (See Fig. 38.) While turning the manual paper feed knob clockwise, confirm that the paper guide roller is not recommended for the MX-80 F/T Type II.
User Manual - Page 40

...
The adjustment of the Printer. Power Connection
The EPSON MX-80 F/T Type I I .
-34- 8. Backward: To narrow gap. Set the lever to the 7th step.
(3) Should printed...MX-80 F/T Type I I Dot Matrix Printer is used, be used to adjust the printing pressure as well as to adjust the gap between the head nose and the platen. (See Fig. 46.) Forward: To widen gap. Please obtain a replacement...
User Manual - Page 58

... printing method, line or serial printing method and so on.
•Broadly speaking, the EPSON MX-80 Type I I belongs to another equipment except a limited number of the chapter are marketed in...and the print speed will be sorted to the following categories. Control codes in the text mode 4. This chapter describes the MX-80 Type II from the viewpoint of some special symbols. One is the ...
User Manual - Page 67

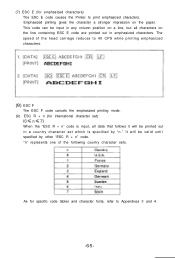
... tab stops are ignored. Tab stop positions. Receipt of "ESC B" code causes the Printer to accept the following codes as tab stop is set, the VT code behaves like the LF code. The lack of the NUL code will be set by "ESC C + n" or "ESC C + 0 + m" code prior to setting tab stops. (5) ESC 0 Input of the ESC 0 causes the subsequent...
User Manual - Page 71
...a country character set )
When the "ESC R + n" code is specified by other "ESC R + n" code.
"n" represents one of the head carriage reduces to 40 CPS while printing emphasized characters.
(8) ESC F
The ESC F code cancels the emphasized printing mode. (9) ESC R + n (for international character set which is input, all characters on the paper. (7) ESC E (for specific code tables and...
User Manual - Page 81
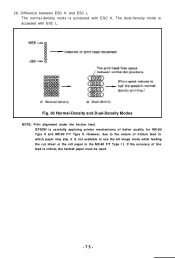
... with ESC K. EPSON is carefully applying printer mechanisms of line feed is critical, the fanfold paper must be used.
-75- If the accuracy of better quality for MX-80 Type II and MX-80 F/T Type II....not available to use the bit image mode while feeding the cut sheet or the roll paper in the MX-80 F/T Type I I. Fig. 66 Normal-Density and Dual-Density Modes
NOTE: Print alignment under the ...
User Manual - Page 88
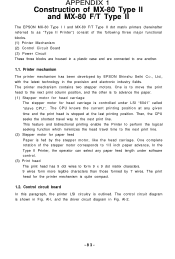
...EPSON Shinshu Seiki CO ., Ltd., with the latest technology in Fig. Control circuit board In this paragraph, the printer LSI circuitry is stopped at any paper feed length under LSI "8041" called "slave CPU". Al-l, and the driver...two stepper motors. APPENDIX 1
Construction of MX-80 Type II and MX-80 F/T Type II
The EPSON MX-80 Type I I and MX-80 F/T Type II dot matrix printers (hereinafter...
Epson MX-80II Reviews
We have not received any reviews for Epson yet.