
Technical Brief (Impact Printers)
Page 1
...EPSON's impact printer tells you if it has a narrow or wide carriage: LLL L Nine-pin printers all begin with tireless printheads and superior quality ribbons. both in their reliability with FX, LX, or DFX Twenty-four pin printers all have finer printhead pins which : Hit the paper hard to Near Letter Quality Twenty-four-pin impact printers - Impact printers... the thickest multi-part forms Offer the fastest print speeds Print from High Speed Draft up Reliability M Ribbon quality M Ribbon cartridge reliability M Total Print Volume vs. L LL L Nine-pin impact printers -
...EPSON's impact printer tells you if it has a narrow or wide carriage: LLL L Nine-pin printers all begin with tireless printheads and superior quality ribbons. both in their reliability with FX, LX, or DFX Twenty-four pin printers all have finer printhead pins which : Hit the paper hard to Near Letter Quality Twenty-four-pin impact printers - Impact printers... the thickest multi-part forms Offer the fastest print speeds Print from High Speed Draft up Reliability M Ribbon quality M Ribbon cartridge reliability M Total Print Volume vs. L LL L Nine-pin impact printers -

Technical Brief (Impact Printers)
Page 6
... sharp printed edges Reduces fraying which gives the printer greater overall reliability. Technical Brief-Multimedia projectors Page 6 Reliability-Ribbon quality EPSON brand impact printer ribbons are superior to every sale 5 Reliability-Ribbon cartridge reliability Most EPSON impact printers use a stationary ribbon cartridge. EPSON's stationary ribbon cartridge offers the following benefits: L L The stationary ribbon cartridge can be larger, since it doesn't have the...
... sharp printed edges Reduces fraying which gives the printer greater overall reliability. Technical Brief-Multimedia projectors Page 6 Reliability-Ribbon quality EPSON brand impact printer ribbons are superior to every sale 5 Reliability-Ribbon cartridge reliability Most EPSON impact printers use a stationary ribbon cartridge. EPSON's stationary ribbon cartridge offers the following benefits: L L The stationary ribbon cartridge can be larger, since it doesn't have the...

Product Information Guide
Page 2
...0' (with cut sheet feeder) Because the family of the following list: Lx FX EX RX MX Epson printer Standard printer Draft printer To "se all components excluding print head: 3 million lines 4000 power-... On when the printer is on its printer selection men". ON LINE (green) On when the printer is available. -1 Lights 0 ON LINE C O N - LX - 810 DOT - If your program does not list any LX printers, contact the software... Cut sheet feeder (optional) Pull tractor (optional) Roll paper holder (optional) Cartridge ribbon, available in update is on line .d ready to "se .I program with a Pressure...
...0' (with cut sheet feeder) Because the family of the following list: Lx FX EX RX MX Epson printer Standard printer Draft printer To "se all components excluding print head: 3 million lines 4000 power-... On when the printer is on its printer selection men". ON LINE (green) On when the printer is available. -1 Lights 0 ON LINE C O N - LX - 810 DOT - If your program does not list any LX printers, contact the software... Cut sheet feeder (optional) Pull tractor (optional) Roll paper holder (optional) Cartridge ribbon, available in update is on line .d ready to "se .I program with a Pressure...

User Manual
Page 8
Chapter 1 Setting Up the Printer Unpacking the Printer 1-2 Checking the parts 1-2 Choosing a Place for the Printer 1-4 Assembling the Printer 1-7 Installing the platen knob 1-7 Installing the ribbon cartridge 1-8 Attaching the paper guide 1-13 Testing the Printer 1-15 Plugging in the printer 1-15 Running the self test 1-17 Printing problems and solutions 1-24 Connecting the Printer to Your Computer 1-26 The parallel interface 1-26 Setting Up Your Application Software 1-29 Choosing from a menu 1-29 Setting Up the Printer 1-1
Chapter 1 Setting Up the Printer Unpacking the Printer 1-2 Checking the parts 1-2 Choosing a Place for the Printer 1-4 Assembling the Printer 1-7 Installing the platen knob 1-7 Installing the ribbon cartridge 1-8 Attaching the paper guide 1-13 Testing the Printer 1-15 Plugging in the printer 1-15 Running the self test 1-17 Printing problems and solutions 1-24 Connecting the Printer to Your Computer 1-26 The parallel interface 1-26 Setting Up Your Application Software 1-29 Choosing from a menu 1-29 Setting Up the Printer 1-1

User Manual
Page 9
Unpacking the Printer Checking the parts When you unpack the printer, make sure that you have all the parts shown below and that none have been damaged. Printer Paper guide sa Platen knob Ribbon cartridge Power cable In some locations, the power cable may be attached to the printer. 1-2 Setting Up the Printer
Unpacking the Printer Checking the parts When you unpack the printer, make sure that you have all the parts shown below and that none have been damaged. Printer Paper guide sa Platen knob Ribbon cartridge Power cable In some locations, the power cable may be attached to the printer. 1-2 Setting Up the Printer

User Manual
Page 15
Installing the ribbon cartridge Your printer's ribbon cartridge is not plugged in an electrical outlet. 1-8 Setting Up the Printer Before installing the ribbon cartridge, make sure that the printer is designed to adjust the position of the paper as this interferes with the automatic paper loading system and may cause a paper jam. Push firmly on the platen knob until it fits against the printer case. a ICAUTION: Do not use the platen knob to allow easy installation and removal. Assembling the Printer 2.
Installing the ribbon cartridge Your printer's ribbon cartridge is not plugged in an electrical outlet. 1-8 Setting Up the Printer Before installing the ribbon cartridge, make sure that the printer is designed to adjust the position of the paper as this interferes with the automatic paper loading system and may cause a paper jam. Push firmly on the platen knob until it fits against the printer case. a ICAUTION: Do not use the platen knob to allow easy installation and removal. Assembling the Printer 2.

User Manual
Page 16
Remove the printer cover. Slide the print head to the middle of the printer. Setting Up the Printer 1-9 Install the ribbon cartridge as follows. 1. Assembling the Printer 2.
Remove the printer cover. Slide the print head to the middle of the printer. Setting Up the Printer 1-9 Install the ribbon cartridge as follows. 1. Assembling the Printer 2.

User Manual
Page 18
Assembling the Printer 5. Setting Up the Printer 1-11 Use a pointed object, such as a pencil, to guide the ribbon between the print head and ribbon guide while you turn the ribbon-tightening knob to make sure the plastic hooks are properly seated. 6. Note: Press lightly on both ends of the cartridge to help feed the ribbon into position, making sure the plastic hooks fit in the slots. Hold the ribbon cartridge by its handle and push it firmly down into place.
Assembling the Printer 5. Setting Up the Printer 1-11 Use a pointed object, such as a pencil, to guide the ribbon between the print head and ribbon guide while you turn the ribbon-tightening knob to make sure the plastic hooks are properly seated. 6. Note: Press lightly on both ends of the cartridge to help feed the ribbon into position, making sure the plastic hooks fit in the slots. Hold the ribbon cartridge by its handle and push it firmly down into place.

User Manual
Page 31
... load a new sheet. Turn off the printer, reinstall the ribbon cartridge and take up any slack in the ribbon. See page 1-17. Turn off the printer. Make sure the cartridge hooks are turning on the printer. Turn off the printer and repeat the self test. The ribbon ...ribbon may not be properly installed. ABCD The ribbon cartridge may not be installed properly. If the paper is jammed, turn off the printer and disconnect the cable from inside the printer. Replace the ribbon cartridge. Problem Solution The printer does not print. Also see Chapter 7 for ...
... load a new sheet. Turn off the printer, reinstall the ribbon cartridge and take up any slack in the ribbon. See page 1-17. Turn off the printer. Make sure the cartridge hooks are turning on the printer. Turn off the printer and repeat the self test. The ribbon ...ribbon may not be properly installed. ABCD The ribbon cartridge may not be installed properly. If the paper is jammed, turn off the printer and disconnect the cable from inside the printer. Replace the ribbon cartridge. Problem Solution The printer does not print. Also see Chapter 7 for ...

User Manual
Page 32
...replaced. Stop printing and contact your Epson dealer or Epson authorized service center. ABCD There is faint. Setting Up the Printer 1-25 See page 6-4. See page 1-8. If the printer still does not print the self test correctly, contact your Epson dealer or Epson authorized service center to match the... thickness of dots is damaged. Testing the Printer Solution The ribbon may not be set correctly for the paper you are using. Install a new ribbon cartridge as soon as possible. See page...
...replaced. Stop printing and contact your Epson dealer or Epson authorized service center. ABCD There is faint. Setting Up the Printer 1-25 See page 6-4. See page 1-8. If the printer still does not print the self test correctly, contact your Epson dealer or Epson authorized service center to match the... thickness of dots is damaged. Testing the Printer Solution The ribbon may not be set correctly for the paper you are using. Install a new ribbon cartridge as soon as possible. See page...

User Manual
Page 163
Do not attempt to touch contacts on the circuit board of the printer because many of the components can be destroyed by the static electricity that may build up in your body. 3. Unplug the power cable from the electrical outlet. WARNING: High voltages are present inside the L!!k printer when the power is unplugged. Also, try not to remove the upper case unless the printer is turned off and the power cord is or.. Remove the paper tension unit cover, ribbon cartridge, and platen knob. ~ Using the Printer Options 5-39 Interface Boards 2.
Do not attempt to touch contacts on the circuit board of the printer because many of the components can be destroyed by the static electricity that may build up in your body. 3. Unplug the power cable from the electrical outlet. WARNING: High voltages are present inside the L!!k printer when the power is unplugged. Also, try not to remove the upper case unless the printer is turned off and the power cord is or.. Remove the paper tension unit cover, ribbon cartridge, and platen knob. ~ Using the Printer Options 5-39 Interface Boards 2.

User Manual
Page 175
Reattach the push feed tractor. Interface Boards 6. Two interface cables must not be sure to disconnect the printer cable from the printer's built-in parallel interface. Using the Printer Options 5-51 Reattach the printer cover and paper guide. Reattach the ribbon cartridge, paper CAUTION: When an optional interface board is installed, be connected at the same time. 7. 5.
Reattach the push feed tractor. Interface Boards 6. Two interface cables must not be sure to disconnect the printer cable from the printer's built-in parallel interface. Using the Printer Options 5-51 Reattach the printer cover and paper guide. Reattach the ribbon cartridge, paper CAUTION: When an optional interface board is installed, be connected at the same time. 7. 5.

User Manual
Page 180
Open the paper tension unit cover. 6-4 Maintenance Replacing the Ribbon Replace the ribbon when the printout becomes too faint to read. Use only the #8750 standard ribbon cartridge for your printer. 1. Make sure that the printer is turned off, then remove the printer cover. 2.
Open the paper tension unit cover. 6-4 Maintenance Replacing the Ribbon Replace the ribbon when the printout becomes too faint to read. Use only the #8750 standard ribbon cartridge for your printer. 1. Make sure that the printer is turned off, then remove the printer cover. 2.

User Manual
Page 181
Maintenance 6-5 To remove the ribbon cartridge, grip it cool before attempting to the middle of the printer. 4. Slide the print head to replace the ribbon. 3. Let it by the black plastic tab and lift the cartridge straight up and out of the printer. Replacing the Ribbon WARNING: If the printer has just been used, the print head may be hot.
Maintenance 6-5 To remove the ribbon cartridge, grip it cool before attempting to the middle of the printer. 4. Slide the print head to replace the ribbon. 3. Let it by the black plastic tab and lift the cartridge straight up and out of the printer. Replacing the Ribbon WARNING: If the printer has just been used, the print head may be hot.

User Manual
Page 182
Push the new ribbon cartridge firmly into position, making sure the plastic hooks fit into the slots, as shown below. Note: Press lightly on both sides of the arrow. 6. Replacing the Ribbon 5. To remove excess slack in the new ribbon, turn the ribbontightening knob in the direction of the cartridge to make sure the hooks are properly inserted. 6-6 Maintenance
Push the new ribbon cartridge firmly into position, making sure the plastic hooks fit into the slots, as shown below. Note: Press lightly on both sides of the arrow. 6. Replacing the Ribbon 5. To remove excess slack in the new ribbon, turn the ribbontightening knob in the direction of the cartridge to make sure the hooks are properly inserted. 6-6 Maintenance

User Manual
Page 186
Then, replace the packing materials and put the printer in its box. 6-10 Maintenance Transporting the Printer 3. Remove the ribbon cartridge and platen knob. 4. Reattach the printer cover.
Then, replace the packing materials and put the printer in its box. 6-10 Maintenance Transporting the Printer 3. Remove the ribbon cartridge and platen knob. 4. Reattach the printer cover.

User Manual
Page 191
... faint or uneven. Printing Problem The printer sounds like it . Replace the ribbon cartridge. Refer to 2-22. Refer to 6-4. Refer to 1-8. The printer makes a strange noise, the buzzer sounds several times, and the printer stops abruptly. Refer to 6-4. Refer to match the thickness of your Epson dealer. Turn off the printer, check for the paper you...
... faint or uneven. Printing Problem The printer sounds like it . Replace the ribbon cartridge. Refer to 2-22. Refer to 6-4. Refer to 1-8. The printer makes a strange noise, the buzzer sounds several times, and the printer stops abruptly. Refer to 6-4. Refer to match the thickness of your Epson dealer. Turn off the printer, check for the paper you...

User Manual
Page 192
... off the printer, and reinstall the ribbon cartridge. Printed characters are missing in the printed characters or graphics. ABCD There is either too much slack in the printout. The typestyle or characters that are set by the software cannot be correctly installed for your Epson dealer to ...have the print head replaced. A line of dots is damaged. Printing Problem Dots are missing in random positions. ABCD Dots are not what you expected. Refer to check the printer settings, and reset as needed. 7-6 ...
... off the printer, and reinstall the ribbon cartridge. Printed characters are missing in the printed characters or graphics. ABCD There is either too much slack in the printout. The typestyle or characters that are set by the software cannot be correctly installed for your Epson dealer to ...have the print head replaced. A line of dots is damaged. Printing Problem Dots are missing in random positions. ABCD Dots are not what you expected. Refer to check the printer settings, and reset as needed. 7-6 ...

User Manual
Page 224
Printer Specifications Mechanical Paper feeding methods: Ribbon: MCBF: MTBF: Print head life: Dimensions and weight: Friction Push tractor Cut sheet feeder (optional) Pull tractor (optional) Roll paper holder (optional) Cartridge ribbon, available in black: #8750 Life expectancy at 14 dots/character: 3 million characters For all components excluding print head: 3 million lines 4000 power...
Printer Specifications Mechanical Paper feeding methods: Ribbon: MCBF: MTBF: Print head life: Dimensions and weight: Friction Push tractor Cut sheet feeder (optional) Pull tractor (optional) Roll paper holder (optional) Cartridge ribbon, available in black: #8750 Life expectancy at 14 dots/character: 3 million characters For all components excluding print head: 3 million lines 4000 power...

User Manual - PC
Page 13
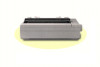
Introduction Names of the Parts paper tension unit cover ribbon cartridge AC inlet Note: In some locations, the power cord is attached to the printer. 4 Introduction
Introduction Names of the Parts paper tension unit cover ribbon cartridge AC inlet Note: In some locations, the power cord is attached to the printer. 4 Introduction

