
Product Information Guide
Page 8
Epson LX-300+II 9. Open the printer cover, then tear off the printed document using the Micro Adjust feature. Turn on page 14. 13. See "Changing Default Settings" on the printer. 12. this may damage the printer or cause it to lose the top-of -form position" on page 10. Press the Tear Off (Font) ... to the standby position, where you press the Load/Eject button. Switching between continuous paper and single sheets If you print. Epson LX-300+II 7/06 When the printer receives data, it . 11. Follow the instructions on the tractor and remove the paper. Press the LF/FF button to ...
Epson LX-300+II 9. Open the printer cover, then tear off the printed document using the Micro Adjust feature. Turn on page 14. 13. See "Changing Default Settings" on the printer. 12. this may damage the printer or cause it to lose the top-of -form position" on page 10. Press the Tear Off (Font) ... to the standby position, where you press the Load/Eject button. Switching between continuous paper and single sheets If you print. Epson LX-300+II 7/06 When the printer receives data, it . 11. Follow the instructions on the tractor and remove the paper. Press the LF/FF button to ...

Product Information Guide
Page 10
...position. You can use the Micro Adjust feature to adjust the top-of -form position, the printer beeps and stops moving the paper. Never use the default position as the printer enters Micro Adjust mode. 4. Epson LX-300+II 7/06 Open the sprocket covers. Fit the first holes of -form position lower on the page...or too low on the page, or press the Load/Eject U button to adjust the top-ofform position; Replace the printer cover but do not lock it in the Default Setting mode to exit the Micro Adjust mode. 10 - this may jam. (See page 14 for about three seconds. Slide...
...position. You can use the Micro Adjust feature to adjust the top-of -form position, the printer beeps and stops moving the paper. Never use the default position as the printer enters Micro Adjust mode. 4. Epson LX-300+II 7/06 Open the sprocket covers. Fit the first holes of -form position lower on the page...or too low on the page, or press the Load/Eject U button to adjust the top-ofform position; Replace the printer cover but do not lock it in the Default Setting mode to exit the Micro Adjust mode. 10 - this may jam. (See page 14 for about three seconds. Slide...

Product Information Guide
Page 11
...receives a full page of data or a form feed command followed by turning on page 14 for continuous paper in Default Setting mode. When you resume printing, the printer automatically feeds the paper back to adjust the tear-off position beyond these steps to the tear-off position. 2....appropriate page length for instructions. When you resume printing, the printer automatically feeds the paper back to the tear-off edge. The printer advances the paper to the top-of-form position; Epson LX-300+II Your top-of-form position setting remains in effect until you change it , even if ...
...receives a full page of data or a form feed command followed by turning on page 14 for continuous paper in Default Setting mode. When you resume printing, the printer automatically feeds the paper back to adjust the tear-off position beyond these steps to the tear-off position. 2....appropriate page length for instructions. When you resume printing, the printer automatically feeds the paper back to the tear-off edge. The printer advances the paper to the top-of-form position; Epson LX-300+II Your top-of-form position setting remains in effect until you change it , even if ...

Product Information Guide
Page 14
... one you 'll need to change them again or reset the printer's defaults. The printer enters Default Setting mode and prints instructions for changing the settings. 7. Press the LF/FF button to scroll through your application software or printer driver, you turn off . 2. Epson LX-300+II 7/06 If the settings are on. (For English, only the Pause light is on.) 3. Then...
... one you 'll need to change them again or reset the printer's defaults. The printer enters Default Setting mode and prints instructions for changing the settings. 7. Press the LF/FF button to scroll through your application software or printer driver, you turn off . 2. Epson LX-300+II 7/06 If the settings are on. (For English, only the Pause light is on.) 3. Then...

Reference Guide
Page 4
... from the CD-ROM 57 Canceling Printing 58 Uninstalling the Printer Software 59 Uninstalling the printer driver and EPSON Status Monitor 3 59 Chapter 3 Using the Control Panel Control Panel Buttons and Lights 63 Selecting a built-in font 65 Changing the Default Settings 67 Using Default Setting mode 72 Restoring the printer's default settings 73 Chapter 4 Maintenance and Troubleshooting Cleaning the...
... from the CD-ROM 57 Canceling Printing 58 Uninstalling the Printer Software 59 Uninstalling the printer driver and EPSON Status Monitor 3 59 Chapter 3 Using the Control Panel Control Panel Buttons and Lights 63 Selecting a built-in font 65 Changing the Default Settings 67 Using Default Setting mode 72 Restoring the printer's default settings 73 Chapter 4 Maintenance and Troubleshooting Cleaning the...
Reference Guide
Page 6
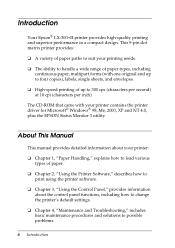
About This Manual This manual provides detailed information about the control panel functions, including how to change the printer's default settings. ❏ Chapter 4, "Maintenance and Troubleshooting," includes basic maintenance procedures and solutions to handle a wide ...the printer software. ❏ Chapter 3, "Using the Control Panel," provides information about your printer: ❏ Chapter 1, "Paper Handling," explains how to load various types of up to 300 cps (characters per second) at 10 cpi (characters per inch). Introduction Your Epson® LX-300+II printer provides...
About This Manual This manual provides detailed information about the control panel functions, including how to change the printer's default settings. ❏ Chapter 4, "Maintenance and Troubleshooting," includes basic maintenance procedures and solutions to handle a wide ...the printer software. ❏ Chapter 3, "Using the Control Panel," provides information about your printer: ❏ Chapter 1, "Paper Handling," explains how to load various types of up to 300 cps (characters per second) at 10 cpi (characters per inch). Introduction Your Epson® LX-300+II printer provides...
Reference Guide
Page 14
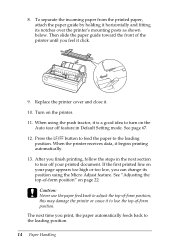
... front of -form position" on your printed document. After you feel it . 10. See "Adjusting the top-of the printer until you finish printing, follow the steps in Default Setting mode. Press the LF/FF button to feed the paper to tear off feature in the next section to the loading... and fitting its position using the push tractor, it is a good idea to the loading position. 14 Paper Handling Replace the printer cover and close it click. 9. When the printer receives data, it to adjust the top-of -form position. When using the Micro Adjust feature. this may damage the...
... front of -form position" on your printed document. After you feel it . 10. See "Adjusting the top-of the printer until you finish printing, follow the steps in Default Setting mode. Press the LF/FF button to feed the paper to tear off feature in the next section to the loading... and fitting its position using the push tractor, it is a good idea to the loading position. 14 Paper Handling Replace the printer cover and close it click. 9. When the printer receives data, it to adjust the top-of -form position. When using the Micro Adjust feature. this may damage the...

Reference Guide
Page 21
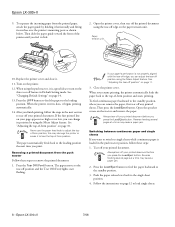
... print head. 13. otherwise, the paper may jam. (See page 67 for more information.) When the printer receives data, it open. 14. Hold it click. 12. To eject the paper, tear off feature in the Default Setting mode to feed the paper forward. Paper Handling 21 If you feel it horizontally and fit... its notches over the printer's mounting posts. 11. Turn on the page, press the LF/FF button to advance the...
... print head. 13. otherwise, the paper may jam. (See page 67 for more information.) When the printer receives data, it open. 14. Hold it click. 12. To eject the paper, tear off feature in the Default Setting mode to feed the paper forward. Paper Handling 21 If you feel it horizontally and fit... its notches over the printer's mounting posts. 11. Turn on the page, press the LF/FF button to advance the...
Reference Guide
Page 24
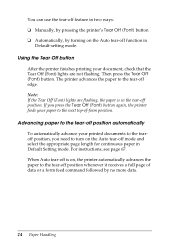
...position, you press the Tear Off (Font) button again, the printer feeds your document, check that the Tear Off (Font) lights are flashing, the paper is on, the printer automatically advances the paper to the tear-off function in Default-setting mode. Note: If the Tear Off (Font) lights are ...not flashing. Using the Tear Off button After the printer finishes printing your paper to turn on the Auto tear...
...position, you press the Tear Off (Font) button again, the printer feeds your document, check that the Tear Off (Font) lights are flashing, the paper is on, the printer automatically advances the paper to the tear-off function in Default-setting mode. Note: If the Tear Off (Font) lights are ...not flashing. Using the Tear Off button After the printer finishes printing your paper to turn on the Auto tear...
Reference Guide
Page 38
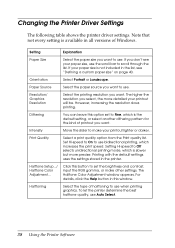
... of halftoning to use bidirectional printing, which increases the print speed. To let the printer determine the best halftone quality, use when printing graphics. Changing the Printer Driver Settings The following table shows the printer driver settings. Printing with the default settings uses the settings stored in all versions of printout you don't see "Defining a custom paper size...
... of halftoning to use bidirectional printing, which increases the print speed. To let the printer determine the best halftone quality, use when printing graphics. Changing the Printer Driver Settings The following table shows the printer driver settings. Printing with the default settings uses the settings stored in all versions of printout you don't see "Defining a custom paper size...
Reference Guide
Page 43
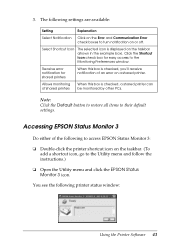
... to restore all items to the Monitoring Preferences window. The following settings are available: Setting Explanation Select Notification Click on a shared printer. Receive error notification for easy access to their default settings. Accessing EPSON Status Monitor 3 Do either of an error on the Error and Communication Error check boxes to the Utility menu and follow the...
... to restore all items to the Monitoring Preferences window. The following settings are available: Setting Explanation Select Notification Click on a shared printer. Receive error notification for easy access to their default settings. Accessing EPSON Status Monitor 3 Do either of an error on the Error and Communication Error check boxes to the Utility menu and follow the...
Reference Guide
Page 63
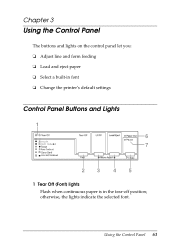
Using the Control Panel 63 Chapter 3 Using the Control Panel The buttons and lights on the control panel let you: ❏ Adjust line and form feeding ❏ Load and eject paper ❏ Select a built-in font ❏ Change the printer's default settings Control Panel Buttons and Lights 1 6 7 23 45 1 Tear Off (Font) lights Flash when continuous paper is in the tear-off position; otherwise, the lights indicate the selected font.
Using the Control Panel 63 Chapter 3 Using the Control Panel The buttons and lights on the control panel let you: ❏ Adjust line and form feeding ❏ Load and eject paper ❏ Select a built-in font ❏ Change the printer's default settings Control Panel Buttons and Lights 1 6 7 23 45 1 Tear Off (Font) lights Flash when continuous paper is in the tear-off position; otherwise, the lights indicate the selected font.
Reference Guide
Page 67
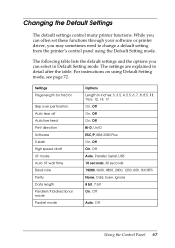
..., 1200, 600, 300 BPS None, Odd, Even, Ignore 8 bit, 7 bit On, Off Auto, Off Using the Control Panel 67 For instructions on using the Default Setting mode. The following table lists the default settings and the options you may sometimes need to change a default setting from the printer's control panel using Default Setting mode, see page 72. Settings Page length for...
..., 1200, 600, 300 BPS None, Odd, Even, Ignore 8 bit, 7 bit On, Off Auto, Off Using the Control Panel 67 For instructions on using the Default Setting mode. The following table lists the default settings and the options you may sometimes need to change a default setting from the printer's control panel using Default Setting mode, see page 72. Settings Page length for...

Reference Guide
Page 72
...emulation mode. When you do not want the printer to 90H are used for more information on , each time the printer ejects a printed sheet. 1. When you need to the beginning of the character tables are used for the control codes. Using Default Setting mode Follow the steps below to 90H of ...the next line. Make sure paper is loaded and the printer is accompanied by a carriage return code. This moves the print position to insert a new...
...emulation mode. When you do not want the printer to 90H are used for more information on , each time the printer ejects a printed sheet. 1. When you need to the beginning of the character tables are used for the control codes. Using Default Setting mode Follow the steps below to 90H of ...the next line. Make sure paper is loaded and the printer is accompanied by a carriage return code. This moves the print position to insert a new...
Reference Guide
Page 73
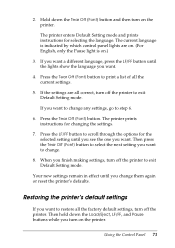
.... Press the LF/FF button to restore all the current settings. 5. Using the Control Panel 73 The printer enters Default Setting mode and prints instructions for changing the settings. 7. If the settings are on the printer. The printer prints instructions for selecting the language. Hold down the Load... the options for the selected setting until you want . Restoring the printer's default settings If you change . 8. Your new settings remain in effect until you see the one you turn off the printer to print a list of all the factory default settings, turn on . (For English...
.... Press the LF/FF button to restore all the current settings. 5. Using the Control Panel 73 The printer enters Default Setting mode and prints instructions for changing the settings. 7. If the settings are on the printer. The printer prints instructions for selecting the language. Hold down the Load... the options for the selected setting until you want . Restoring the printer's default settings If you change . 8. Your new settings remain in effect until you see the one you turn off the printer to print a list of all the factory default settings, turn on . (For English...

Reference Guide
Page 84
...sheets do Continuous paper may be set. The printer's page length setting may be left or right. 84 Maintenance and Troubleshooting Insert a new sheet. See page 68. See page 67. Set the paper release lever to the left or right for tractor setting in Default Setting mode. Cause One-inch skip-...continuous paper you are using. What to do Set skip-over-perforation to do not feed properly Paper does not feed. Remove the continuous paper. Cause What to Off in Default Setting mode. Check the Page length for the printer to the left in the printout. Move the...
...sheets do Continuous paper may be set. The printer's page length setting may be left or right. 84 Maintenance and Troubleshooting Insert a new sheet. See page 68. See page 67. Set the paper release lever to the left or right for tractor setting in Default Setting mode. Cause One-inch skip-...continuous paper you are using. What to do Set skip-over-perforation to do not feed properly Paper does not feed. Remove the continuous paper. Cause What to Off in Default Setting mode. Check the Page length for the printer to the left in the printout. Move the...
Reference Guide
Page 126
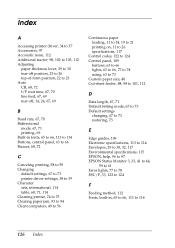
...Buttons, control panel, 63 to 66 Buzzer, 68, 72 C Canceling printing, 58 to 59 Changing default settings, 67 to 73 printer driver settings, 38 to 39 Character sets, international, 114 table, 68, 71, 114 Cleaning printer, 74 to 75 Clearing paper jam, 93 to 94 Client computers, 49 to 56 Continuous paper loading,..., 67 to 73 Default settings changing, 67 to 73 restoring, 73 E Edge guides, 109 Electronic specifications, 113 to 114 Envelopes, 29 to 30, 32, 117 Environmental specifications, 115 EPSON, help, 96 to 97 EPSON Status Monitor 3, 33, 41 to 44, 59 to 61 Error lights, 77 to 78 ESC/P, 33, 122 ...
...Buttons, control panel, 63 to 66 Buzzer, 68, 72 C Canceling printing, 58 to 59 Changing default settings, 67 to 73 printer driver settings, 38 to 39 Character sets, international, 114 table, 68, 71, 114 Cleaning printer, 74 to 75 Clearing paper jam, 93 to 94 Client computers, 49 to 56 Continuous paper loading,..., 67 to 73 Default settings changing, 67 to 73 restoring, 73 E Edge guides, 109 Electronic specifications, 113 to 114 Envelopes, 29 to 30, 32, 117 Environmental specifications, 115 EPSON, help, 96 to 97 EPSON Status Monitor 3, 33, 41 to 44, 59 to 61 Error lights, 77 to 78 ESC/P, 33, 122 ...
Reference Guide
Page 128
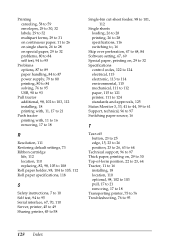
... to 103, 112 installing, 18 printing with, 11, 17 to 21 Push tractor printing with, 11 to 16 removing, 17 to 18 R Resolution, 111 Restoring default settings, 73 Ribbon cartridge life, 112 location, 110 replacing, 82, 98, 105 to 108 Roll paper holder, 98, 104 to 105, 112 Roll paper specifications, 118... S Safety instructions, 7 to 10 Self test, 94 to 95 Serial interface, 67, 70, 110 Server, printer, 45 to 49 Sharing printer, 45 to 58 Single-bin cut-sheet feeder, 98 to 101, 112 Single sheets loading, 26 to 28 printing, 26 to 28 specifications...
... to 103, 112 installing, 18 printing with, 11, 17 to 21 Push tractor printing with, 11 to 16 removing, 17 to 18 R Resolution, 111 Restoring default settings, 73 Ribbon cartridge life, 112 location, 110 replacing, 82, 98, 105 to 108 Roll paper holder, 98, 104 to 105, 112 Roll paper specifications, 118... S Safety instructions, 7 to 10 Self test, 94 to 95 Serial interface, 67, 70, 110 Server, printer, 45 to 49 Sharing printer, 45 to 58 Single-bin cut-sheet feeder, 98 to 101, 112 Single sheets loading, 26 to 28 printing, 26 to 28 specifications...
User's Guide
Page 4
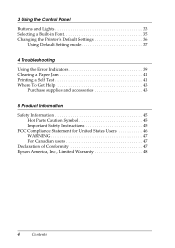
3 Using the Control Panel Buttons and Lights 33 Selecting a Built-in Font 35 Changing the Printer's Default Settings 36 Using Default Setting mode 37 4 Troubleshooting Using the Error Indicators 39 Clearing a Paper Jam 41 Printing a Self Test 41 Where To Get Help 43 Purchase supplies and accessories 43 5 Product Information Safety Information 45 Hot Parts Caution Symbol 45 Important Safety Instructions 45 FCC Compliance Statement for United States Users 46 WARNING 47 For Canadian users 47 Declaration of Conformity 47 Epson America, Inc., Limited Warranty 48 4 Contents
3 Using the Control Panel Buttons and Lights 33 Selecting a Built-in Font 35 Changing the Printer's Default Settings 36 Using Default Setting mode 37 4 Troubleshooting Using the Error Indicators 39 Clearing a Paper Jam 41 Printing a Self Test 41 Where To Get Help 43 Purchase supplies and accessories 43 5 Product Information Safety Information 45 Hot Parts Caution Symbol 45 Important Safety Instructions 45 FCC Compliance Statement for United States Users 46 WARNING 47 For Canadian users 47 Declaration of Conformity 47 Epson America, Inc., Limited Warranty 48 4 Contents

User's Guide
Page 17
.... 8. When using the push tractor, it is a good idea to remove any slack in the paper and lock it in Default Setting mode. Paper Handling 17 See "Changing the Printer's Default Settings" on the printer. 12. Press the LF/FF button to feed the paper to the loading position. To separate the incoming paper from the...
.... 8. When using the push tractor, it is a good idea to remove any slack in the paper and lock it in Default Setting mode. Paper Handling 17 See "Changing the Printer's Default Settings" on the printer. 12. Press the LF/FF button to feed the paper to the loading position. To separate the incoming paper from the...


