Technical Brief (Impact Printers)
Page 2
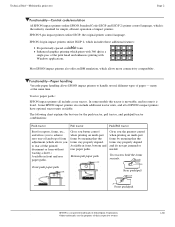
..., forms, etc., and allows you to tear off and top of EPSON's impact printers have optional tractor units available. many at the same time. Most EPSON impact printers also offer an IBM emulation, which prints with Windows applications. LL Functionality-Paper handling Versatile paper handling allows EPSON impact printers to achieve zero tear-off the printed document or form without...
..., forms, etc., and allows you to tear off and top of EPSON's impact printers have optional tractor units available. many at the same time. Most EPSON impact printers also offer an IBM emulation, which prints with Windows applications. LL Functionality-Paper handling Versatile paper handling allows EPSON impact printers to achieve zero tear-off the printed document or form without...
Technical Brief (Impact Printers)
Page 4
... right out of their respective owners. L For optional connectivity, most EPSON impact printers offer EPSON Type B interface slots that are printed unidirectionally for accuracy L Windows applications will overide all EPSON impact printers Proportionally-spaced scalable fonts-selectable in fonts. EPSON impact printers offers these types of the Windows fonts resident on a printer. Barcode fonts are available on your computer. Paper parking Supports loading...
... right out of their respective owners. L For optional connectivity, most EPSON impact printers offer EPSON Type B interface slots that are printed unidirectionally for accuracy L Windows applications will overide all EPSON impact printers Proportionally-spaced scalable fonts-selectable in fonts. EPSON impact printers offers these types of the Windows fonts resident on a printer. Barcode fonts are available on your computer. Paper parking Supports loading...

Technical Brief (Impact Printers)
Page 5
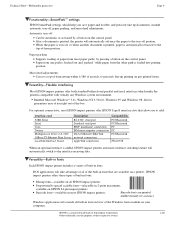
...software utility, and download the settings to the Printer Status Monitor. Start UP Utility Ver. 1.22 Copyright (C) SEIKO EPSON CORP. 1992 Printer: FX-2180 Mode: ESC/P Port: LPT1 Font : Roman Pitch : 10CPI Print Quality : LQ Character Table : PC 437 Continuous Rear : ...8.5mm Manual Rear : 14 inch Manual Rear : 8.5mm Help: Select printer Font. EPSON Sales Training EPSON is the DOS-based printer setup utility that allows you to easily change the printer's default settings. Utility EPSON Remote! L Windows 3.51 and NT 4.0 users can add an optional Ethernet card to have ...
...software utility, and download the settings to the Printer Status Monitor. Start UP Utility Ver. 1.22 Copyright (C) SEIKO EPSON CORP. 1992 Printer: FX-2180 Mode: ESC/P Port: LPT1 Font : Roman Pitch : 10CPI Print Quality : LQ Character Table : PC 437 Continuous Rear : ...8.5mm Manual Rear : 14 inch Manual Rear : 8.5mm Help: Select printer Font. EPSON Sales Training EPSON is the DOS-based printer setup utility that allows you to easily change the printer's default settings. Utility EPSON Remote! L Windows 3.51 and NT 4.0 users can add an optional Ethernet card to have ...
User Manual - Remote Configuration Manager
Page 1
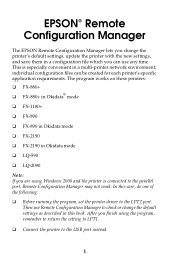
...Windows 2000 and the printer is especially convenient in a multi-printer network environment; In this book. individual configuration files can use Remote Configuration Manager to check or change the printer's default settings, update the printer with the new settings, and save them in a configuration file which you can be created for each printer's specific application requirements. EPSON...2190 in Okidata mode ❏ LQ-590 ❏ LQ-2090 Note: If you are using the program, remember to return the setting to LPT1. ❏ Connect the printer to the parallel port, Remote Configuration...
...Windows 2000 and the printer is especially convenient in a multi-printer network environment; In this book. individual configuration files can use Remote Configuration Manager to check or change the printer's default settings, update the printer with the new settings, and save them in a configuration file which you can be created for each printer's specific application requirements. EPSON...2190 in Okidata mode ❏ LQ-590 ❏ LQ-2090 Note: If you are using the program, remember to return the setting to LPT1. ❏ Connect the printer to the parallel port, Remote Configuration...

User Manual - Remote Configuration Manager
Page 2
Select Create New Configuration and click OK. (If you want to make changes to a configuration file that was created earlier, see "Using an Existing Configuration File" on page 9.) You see this window: 2. From the Start menu, select Programs (or All Programs), Epson Remote Configuration Mgr, and then click Epson Remote Configuration Manager. You see the printer model window: 2 Starting the Program 1.
Select Create New Configuration and click OK. (If you want to make changes to a configuration file that was created earlier, see "Using an Existing Configuration File" on page 9.) You see this window: 2. From the Start menu, select Programs (or All Programs), Epson Remote Configuration Mgr, and then click Epson Remote Configuration Manager. You see the printer model window: 2 Starting the Program 1.
User Manual - Remote Configuration Manager
Page 5
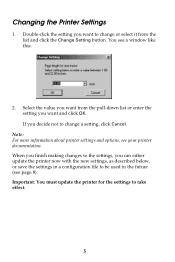
..., you want and click OK. Double-click the setting you can either update the printer now with the new settings, as described below, or save the settings in the future (see your printer documentation. If you want to be used in a configuration file to change a setting..., click Cancel. Note: For more information about printer settings and options, see page 8). Changing the Printer Settings 1. You see a window like this: 2. Important: You must update the printer for the settings to change or select it from the pull-down list or enter ...
..., you want and click OK. Double-click the setting you can either update the printer now with the new settings, as described below, or save the settings in the future (see your printer documentation. If you want to be used in a configuration file to change a setting..., click Cancel. Note: For more information about printer settings and options, see page 8). Changing the Printer Settings 1. You see a window like this: 2. Important: You must update the printer for the settings to change or select it from the pull-down list or enter ...
User Manual - Remote Configuration Manager
Page 6
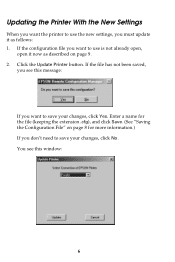
If the file has not been saved, you see this message: If you must update it now as follows: 1. Click the Update Printer button. Enter a name for the file (keeping the extension .cfg), and click Save. (See "Saving the Configuration File" on page 9. 2. If the configuration file you ...don't need to save your changes, click No. Updating the Printer With the New Settings When you want the printer to use the new settings, you want to use is not already open, open it as described on page 8 for more...
If the file has not been saved, you see this message: If you must update it now as follows: 1. Click the Update Printer button. Enter a name for the file (keeping the extension .cfg), and click Save. (See "Saving the Configuration File" on page 9. 2. If the configuration file you ...don't need to save your changes, click No. Updating the Printer With the New Settings When you want the printer to use the new settings, you want to use is not already open, open it as described on page 8 for more...
User Manual - Remote Configuration Manager
Page 7
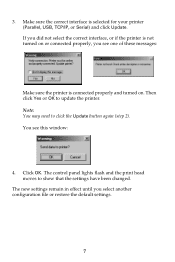
Note: You may need to show that the settings have been changed. If you did not select the correct interface, or if the printer is not turned on . The control panel lights flash and the print head moves to click the Update button again (step 2). Make sure the ...another configuration file or restore the default settings. 7 Click OK. The new settings remain in effect until you see this window: 4. 3. Then click Yes or OK to update the printer. You see one of these messages: Make sure the printer is selected for your printer (Parallel, USB, TCP/IP, or Serial) and click Update.
Note: You may need to show that the settings have been changed. If you did not select the correct interface, or if the printer is not turned on . The control panel lights flash and the print head moves to click the Update button again (step 2). Make sure the ...another configuration file or restore the default settings. 7 Click OK. The new settings remain in effect until you see this window: 4. 3. Then click Yes or OK to update the printer. You see one of these messages: Make sure the printer is selected for your printer (Parallel, USB, TCP/IP, or Serial) and click Update.

User Manual - Remote Configuration Manager
Page 9
Start the Remote Configuration Manager. 2. Using an Existing Configuration File If you already created a configuration file, you see a window like this: 9 You see the first screen (shown below), click the Open Existing Configuration button and click OK. When you need to open it to: ❏ Check its settings ❏ Change one or more settings ❏ Update the printer with the configuration file settings Follow these steps: 1.
Start the Remote Configuration Manager. 2. Using an Existing Configuration File If you already created a configuration file, you see a window like this: 9 You see the first screen (shown below), click the Open Existing Configuration button and click OK. When you need to open it to: ❏ Check its settings ❏ Change one or more settings ❏ Update the printer with the configuration file settings Follow these steps: 1.

User Manual - Remote Configuration Manager
Page 11
...part of this publication may be trademarks of this window: Make sure Binary Files is not responsible for any use with these EPSON printers. Creating a Binary File If you need to be able to other printers. EPSON is selected as applied to change the printer's settings from a DOS system, you want saved ...in any form or by any and all rights in those marks. © 2003 by Epson America, Inc. 12/03 11 General Notice: Other...
...part of this publication may be trademarks of this window: Make sure Binary Files is not responsible for any use with these EPSON printers. Creating a Binary File If you need to be able to other printers. EPSON is selected as applied to change the printer's settings from a DOS system, you want saved ...in any form or by any and all rights in those marks. © 2003 by Epson America, Inc. 12/03 11 General Notice: Other...
Product Brochure
Page 2
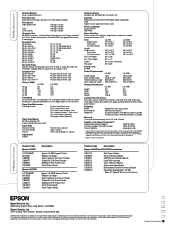
..., allowing the Epson LQ-590/2090 to change without notice. Epson and Epson ESC/P2 are trademarks and/or registered trademarks of Seiko Epson Corporation. skip over time. Test conducted by Seiko Epson Corporation. ** Additional tractor unit required Product Code Epson LQ-590 C11C558001 S015337 C806381 C806371 C800201 C814002 Epson LQ-2090 C11C559001 S015335 C806401 C806391 C800211 C814012 C814031 Description Epson LQ-590 Impact Printer Ribbon Cartridge...
..., allowing the Epson LQ-590/2090 to change without notice. Epson and Epson ESC/P2 are trademarks and/or registered trademarks of Seiko Epson Corporation. skip over time. Test conducted by Seiko Epson Corporation. ** Additional tractor unit required Product Code Epson LQ-590 C11C558001 S015337 C806381 C806371 C800201 C814002 Epson LQ-2090 C11C559001 S015335 C806401 C806391 C800211 C814012 C814031 Description Epson LQ-590 Impact Printer Ribbon Cartridge...
User Manual
Page 12
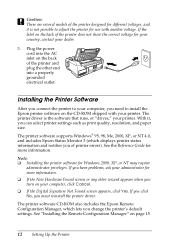
..., you have problems, ask your administrator for Windows 2000, XP, or NT may require administrator privileges. The printer software supports Windows® 95, 98, Me, 2000, XP, or NT 4.0, and includes Epson Status Monitor 3 (which lets you of the printer designed for use with your printer. Note: ❏ Installing the printer software for more information. See "Installing...
..., you have problems, ask your administrator for Windows 2000, XP, or NT may require administrator privileges. The printer software supports Windows® 95, 98, Me, 2000, XP, or NT 4.0, and includes Epson Status Monitor 3 (which lets you of the printer designed for use with your printer. Note: ❏ Installing the printer software for more information. See "Installing...

User Manual
Page 13
Read the agreement and click Accept. The installation starts and you see the software license agreement. 5. Follow these steps to install the printer software: 1. Insert the printer software CD-ROM into the CD-ROM or DVD drive. After a moment the Installation screen appears: If it does not, double-click Setup.exe on the CD-ROM. 3. Select your printer model and click . You see this window: 4. Select Install Printer Software and click . Make sure Windows is running and the printer is turned off. 2. You see this window: Setting Up the Printer 13
Read the agreement and click Accept. The installation starts and you see the software license agreement. 5. Follow these steps to install the printer software: 1. Insert the printer software CD-ROM into the CD-ROM or DVD drive. After a moment the Installation screen appears: If it does not, double-click Setup.exe on the CD-ROM. 3. Select your printer model and click . You see this window: 4. Select Install Printer Software and click . Make sure Windows is running and the printer is turned off. 2. You see this window: Setting Up the Printer 13

User Manual
Page 14
..."System Error" message appears, click Cancel. ❏ If you are using Windows 98, the Printer Utility Setup may take a few minutes.) If you are prompted to insert the Windows CD-ROM, go to specify a path. ❏ If you are using Windows NT, you see a message that the drive is complete, see the Installation...close the screen to select the correct path. Click Browse and select the path for the Windows CD-ROM, insert the disk in the folder and click OK. 10. When prompted, insert the printer software CD-ROM and click Browse to continue with the driver installation. If it does, follow...
..."System Error" message appears, click Cancel. ❏ If you are using Windows 98, the Printer Utility Setup may take a few minutes.) If you are prompted to insert the Windows CD-ROM, go to specify a path. ❏ If you are using Windows NT, you see a message that the drive is complete, see the Installation...close the screen to select the correct path. Click Browse and select the path for the Windows CD-ROM, insert the disk in the folder and click OK. 10. When prompted, insert the printer software CD-ROM and click Browse to continue with the driver installation. If it does, follow...
User Manual
Page 15
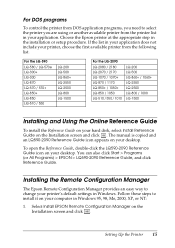
...) > EPSON > LQ590-2090 Reference Guide, and click Reference Guide. Setting Up the Printer 15 For the LQ-590 LQ-580 / LQ-570e LQ-300+ LQ-300 LQ-870 LQ-570 / 570+ LQ-850+ LQ-850 LQ-510 / 550 LQ-200 LQ-500 LQ-860+ LQ-2550 LQ-2500 LQ-800 LQ-1500 For the LQ-2090 LQ-2080 / 2180 LQ-2070 / 2170 LQ-1070 / 1070+ LQ-870 / 1170 LQ-850+ / 1050+ LQ-850 / 1050 LQ-510 / 550 / 1010 LQ...
...) > EPSON > LQ590-2090 Reference Guide, and click Reference Guide. Setting Up the Printer 15 For the LQ-590 LQ-580 / LQ-570e LQ-300+ LQ-300 LQ-870 LQ-570 / 570+ LQ-850+ LQ-850 LQ-510 / 550 LQ-200 LQ-500 LQ-860+ LQ-2550 LQ-2500 LQ-800 LQ-1500 For the LQ-2090 LQ-2080 / 2180 LQ-2070 / 2170 LQ-1070 / 1070+ LQ-870 / 1170 LQ-850+ / 1050+ LQ-850 / 1050 LQ-510 / 550 / 1010 LQ...
User Manual
Page 16
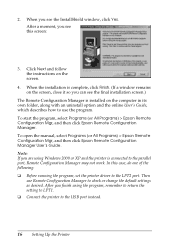
... then click Epson Remote Configuration Manager. Then use the program. In this screen: 3. After you can see the final installation screen.) The Remote Configuration Manager is connected to the USB port instead. 16 Setting Up the Printer When the installation is complete, click Finish. (If a window remains on ...the screen, close it so you finish using Windows 2000 or XP and the printer is installed on the screen. 4. Note: If you see the...
... then click Epson Remote Configuration Manager. Then use the program. In this screen: 3. After you can see the final installation screen.) The Remote Configuration Manager is connected to the USB port instead. 16 Setting Up the Printer When the installation is complete, click Finish. (If a window remains on ...the screen, close it so you finish using Windows 2000 or XP and the printer is installed on the screen. 4. Note: If you see the...


