
Technical Brief (Impact Printers)
Page 5
Simplifies setup when installing multiple printers-just make the necessary changes in the software utility, and download the settings to host computer connection. Manual Front : 17 inch Manual Front : 8.5mm... each printer L EPSON Remote! EPSON Sales Training EPSON is the DOS-based printer setup utility that allows you to easily change the printer's default settings. Start UP Utility Ver. 1.22 Copyright (C) SEIKO EPSON CORP. 1992 Printer: FX-2180 Mode: ESC/P Port: LPT1 Font : Roman Pitch : 10CPI Print Quality : LQ Character Table : PC 437 Continuous Rear : 11 inch ...
Simplifies setup when installing multiple printers-just make the necessary changes in the software utility, and download the settings to host computer connection. Manual Front : 17 inch Manual Front : 8.5mm... each printer L EPSON Remote! EPSON Sales Training EPSON is the DOS-based printer setup utility that allows you to easily change the printer's default settings. Start UP Utility Ver. 1.22 Copyright (C) SEIKO EPSON CORP. 1992 Printer: FX-2180 Mode: ESC/P Port: LPT1 Font : Roman Pitch : 10CPI Print Quality : LQ Character Table : PC 437 Continuous Rear : 11 inch ...
Product Brochure
Page 1
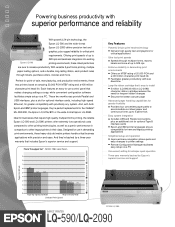
... require high quality, multipart forms printing, the reliable Epson LQ-590 and LQ-2090 printers offer extremely low operational costs compared to other impact printers in their class. Each features an easy-to-use in comparison to increase productivity. Designed for use control panel that 's easy to install s 5 million (LQ-590)/8 million (LQ-2090) character ribbon cartridge reduces the need for...
... require high quality, multipart forms printing, the reliable Epson LQ-590 and LQ-2090 printers offer extremely low operational costs compared to other impact printers in their class. Each features an easy-to-use in comparison to increase productivity. Designed for use control panel that 's easy to install s 5 million (LQ-590)/8 million (LQ-2090) character ribbon cartridge reduces the need for...
User Manual
Page 3
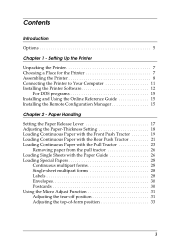
Setting Up the Printer Unpacking the Printer 7 Choosing a Place for the Printer 7 Assembling the Printer 8 Connecting the Printer to Your Computer 11 Installing the Printer Software 12 For DOS programs 15 Installing and Using the Online Reference Guide 15 Installing the Remote Configuration Manager 15 Chapter 2 - Paper Handling Setting the Paper Release Lever 17 Adjusting the Paper-Thickness Setting 18...
Setting Up the Printer Unpacking the Printer 7 Choosing a Place for the Printer 7 Assembling the Printer 8 Connecting the Printer to Your Computer 11 Installing the Printer Software 12 For DOS programs 15 Installing and Using the Online Reference Guide 15 Installing the Remote Configuration Manager 15 Chapter 2 - Paper Handling Setting the Paper Release Lever 17 Adjusting the Paper-Thickness Setting 18...
User Manual
Page 5
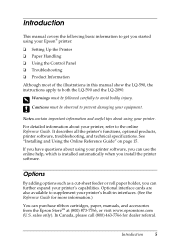
...from the Epson StoreSM at (800) 873-7766, or visit www.epsonstore.com (U.S. c Cautions must be observed to avoid bodily injury. For detailed information about using your printer's built-in this manual show the LQ-590, the instructions apply to both the LQ-590 and the LQ-2090. ...Optional interface cards are also available to the online Reference Guide. See "Installing and Using the Online Reference Guide" on...
...from the Epson StoreSM at (800) 873-7766, or visit www.epsonstore.com (U.S. c Cautions must be observed to avoid bodily injury. For detailed information about using your printer's built-in this manual show the LQ-590, the instructions apply to both the LQ-590 and the LQ-2090. ...Optional interface cards are also available to the online Reference Guide. See "Installing and Using the Online Reference Guide" on...
User Manual
Page 11
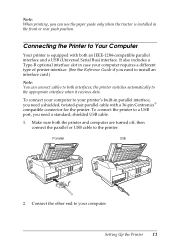
... computer are turned off, then connect the parallel or USB cable to Your Computer Your printer is installed in the front or rear push position. It also includes a Type-B optional interface slot in parallel interface, you need to install an interface card.) Note: You can connect cables to a USB port, you can use...
... computer are turned off, then connect the parallel or USB cable to Your Computer Your printer is installed in the front or rear push position. It also includes a Type-B optional interface slot in parallel interface, you need to install an interface card.) Note: You can connect cables to a USB port, you can use...
User Manual
Page 12
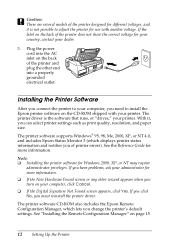
... information and notifies you turn on the back of printer errors). Installing the Printer Software After you connect the printer to install the Epson printer software on page 15. 12 Setting Up the Printer The printer driver is not possible to adjust the printer for your country, contact your printer. With it is the software that runs, or "drives," your dealer...
... information and notifies you turn on the back of printer errors). Installing the Printer Software After you connect the printer to install the Epson printer software on page 15. 12 Setting Up the Printer The printer driver is not possible to adjust the printer for your country, contact your printer. With it is the software that runs, or "drives," your dealer...

User Manual
Page 13
Insert the printer software CD-ROM into the CD-ROM or DVD drive. Select your printer model and click . Read the agreement and click Accept. The installation starts and you see this window: 4. You see the software license agreement. 5. Select Install Printer Software and click . You see this window: Setting Up the Printer 13 After a moment the Installation screen appears: If it does not, double-click Setup.exe on the CD-ROM. 3. Follow these steps to install the printer software: 1. Make sure Windows is running and the printer is turned off. 2.
Insert the printer software CD-ROM into the CD-ROM or DVD drive. Select your printer model and click . Read the agreement and click Accept. The installation starts and you see this window: 4. You see the software license agreement. 5. Select Install Printer Software and click . You see this window: Setting Up the Printer 13 After a moment the Installation screen appears: If it does not, double-click Setup.exe on the CD-ROM. 3. Follow these steps to install the printer software: 1. Make sure Windows is running and the printer is turned off. 2.

User Manual
Page 14
...ROM drive and click OK. When prompted, insert the printer software CD-ROM and click Browse to continue with the driver installation. Then turn to page 15 and follow the on your printer, then wait for the software to install the Reference Guide and the Remote Configuration Manager utility. ...path. 6. Note: ❏ If you are prompted to insert the Windows CD-ROM, go to install the Reference Guide and the Remote Configuration Manager utility. 14 Setting Up the Printer When the installation is complete, see a message that the drive is not accessible, click Cancel and try again. ...
...ROM drive and click OK. When prompted, insert the printer software CD-ROM and click Browse to continue with the driver installation. Then turn to page 15 and follow the on your printer, then wait for the software to install the Reference Guide and the Remote Configuration Manager utility. ...path. 6. Note: ❏ If you are prompted to insert the Windows CD-ROM, go to install the Reference Guide and the Remote Configuration Manager utility. 14 Setting Up the Printer When the installation is complete, see a message that the drive is not accessible, click Cancel and try again. ...
User Manual
Page 15
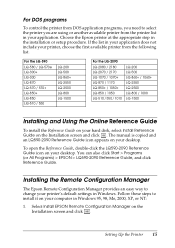
... Installation screen and click . For DOS programs To control the printer from DOS application programs, you need to select the printer you are using or another available printer from the following list. For the LQ-590 LQ-580 / LQ-570e LQ-300+ LQ-300 LQ-870 LQ-570 / 570+ LQ-850+ LQ-850 LQ-510 / 550 LQ-200 LQ-500 LQ-860+ LQ-2550 LQ-2500 LQ-800 LQ-1500 For the LQ...
... Installation screen and click . For DOS programs To control the printer from DOS application programs, you need to select the printer you are using or another available printer from the following list. For the LQ-590 LQ-580 / LQ-570e LQ-300+ LQ-300 LQ-870 LQ-570 / 570+ LQ-850+ LQ-850 LQ-510 / 550 LQ-200 LQ-500 LQ-860+ LQ-2550 LQ-2500 LQ-800 LQ-1500 For the LQ...
User Manual
Page 16
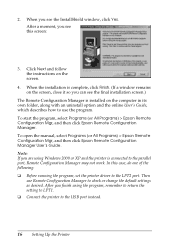
...you finish using Windows 2000 or XP and the printer is installed on the screen. 4. Note: If you see the final installation screen.) The Remote Configuration Manager is connected to the USB port instead. 16 Setting Up the Printer When you are using the program, remember to ...return the setting to LPT1. ❏ Connect the printer to the parallel port, Remote Configuration Manager may not work. To start the program, select Programs (or All Programs) > Epson Remote Configuration Mgr, and then click Epson Remote Configuration Manager. 2. To open the manual, select Programs...
...you finish using Windows 2000 or XP and the printer is installed on the screen. 4. Note: If you see the final installation screen.) The Remote Configuration Manager is connected to the USB port instead. 16 Setting Up the Printer When you are using the program, remember to ...return the setting to LPT1. ❏ Connect the printer to the parallel port, Remote Configuration Manager may not work. To start the program, select Programs (or All Programs) > Epson Remote Configuration Mgr, and then click Epson Remote Configuration Manager. 2. To open the manual, select Programs...
User Manual
Page 17
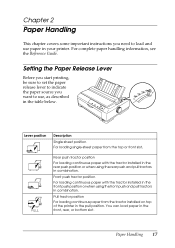
Lever position Description Single-sheet position For loading single-sheet paper from the tractor installed on top of the printer in the front, rear, or bottom slot. You can load paper in the pull position. Chapter 2 Paper Handling This chapter covers some important instructions...in the table below. For complete paper handling information, see the Reference Guide. Rear push tractor position For loading continuous paper with the tractor installed in the front push position or when using the rear push and pull tractors in combination. Paper Handling 17 Setting the Paper Release Lever Before...
Lever position Description Single-sheet position For loading single-sheet paper from the tractor installed on top of the printer in the front, rear, or bottom slot. You can load paper in the pull position. Chapter 2 Paper Handling This chapter covers some important instructions...in the table below. For complete paper handling information, see the Reference Guide. Rear push tractor position For loading continuous paper with the tractor installed in the front push position or when using the rear push and pull tractors in combination. Paper Handling 17 Setting the Paper Release Lever Before...
User Manual
Page 19
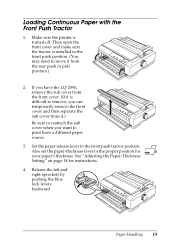
... off. Release the left and right sprockets by pushing the blue lock levers backward. Then open the front cover and make sure the tractor is installed in the front push position. (You may need to move it .) Be sure to the proper position for instructions. 4. Also set the paper-... 19 See "Adjusting the Paper-Thickness Setting" on page 18 for your paper's thickness. Make sure the printer is difficult to remove, you want to the front push tractor position. If you have the LQ-2090, remove the sub cover from a different paper source. 3. Loading Continuous Paper with the Front Push...
... off. Release the left and right sprockets by pushing the blue lock levers backward. Then open the front cover and make sure the tractor is installed in the front push position. (You may need to move it .) Be sure to the proper position for instructions. 4. Also set the paper-... 19 See "Adjusting the Paper-Thickness Setting" on page 18 for your paper's thickness. Make sure the printer is difficult to remove, you want to the front push tractor position. If you have the LQ-2090, remove the sub cover from a different paper source. 3. Loading Continuous Paper with the Front Push...

User Manual
Page 21
... to On. Set the paper release lever to the middle of the paper guide. 12. When the printer receives data, it is a good idea to set the Auto tear-off , the tractor is installed in the Default Setting mode to adjust the top-of -form position. Release the left and right sprockets... by pulling the blue sprocket lock levers forward. Make sure the paper guide is removed. (You may damage the printer or cause it to move the tractor...
... to On. Set the paper release lever to the middle of the paper guide. 12. When the printer receives data, it is a good idea to set the Auto tear-off , the tractor is installed in the Default Setting mode to adjust the top-of -form position. Release the left and right sprockets... by pulling the blue sprocket lock levers forward. Make sure the paper guide is removed. (You may damage the printer or cause it to move the tractor...
User Manual
Page 23
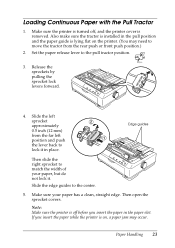
...lock it . Then open the sprocket covers. Loading Continuous Paper with the Pull Tractor 1. Make sure the printer is turned off, and the printer cover is off before you insert the paper while the printer is lying flat on , a paper jam may need to move the tractor from the far left position .... 5. Make sure your paper, but do not lock it in place. Note: Make sure the printer is removed. Slide the edge guides to the pull tractor position. 3. Also make sure the tractor is installed in the paper slot. If you insert the paper in the pull position and the paper guide...
...lock it . Then open the sprocket covers. Loading Continuous Paper with the Pull Tractor 1. Make sure the printer is turned off, and the printer cover is off before you insert the paper while the printer is lying flat on , a paper jam may need to move the tractor from the far left position .... 5. Make sure your paper, but do not lock it in place. Note: Make sure the printer is removed. Slide the edge guides to the pull tractor position. 3. Also make sure the tractor is installed in the paper slot. If you insert the paper in the pull position and the paper guide...
User Manual
Page 26
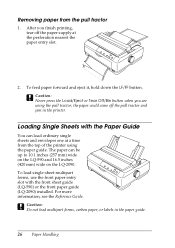
...Sheets with the front sheet guide (LQ-590) or the front paper guide (LQ-2090) installed. To feed paper forward and eject it, hold down the LF/FF button. c Caution: Do not load multipart forms, carbon paper, or labels in the printer. Removing paper from the top of the printer using the pull tractor; To ...load single-sheet multipart forms, use the front paper entry slot with the Paper Guide You can be up to 10.1 inches (257 mm) wide on the LQ-590 and 16.5 inches (420 mm...
...Sheets with the front sheet guide (LQ-590) or the front paper guide (LQ-2090) installed. To feed paper forward and eject it, hold down the LF/FF button. c Caution: Do not load multipart forms, carbon paper, or labels in the printer. Removing paper from the top of the printer using the pull tractor; To ...load single-sheet multipart forms, use the front paper entry slot with the Paper Guide You can be up to 10.1 inches (257 mm) wide on the LQ-590 and 16.5 inches (420 mm...
User Manual
Page 28
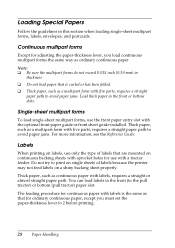
... can load labels in the front or bottom slots. Thick paper, such as a multipart form with the optional front paper guide or front sheet guide installed. Loading Special Papers Follow the guidelines in thickness. ❏ Do not load paper that is the same as that are mounted on continuous backing sheets... this section when loading single-sheet multipart forms, labels, envelopes, and postcards. Continuous multipart forms Except for use only the type of labels because the printer may not feed labels on labels, use with labels, requires a straight or almost straight paper path.
... can load labels in the front or bottom slots. Thick paper, such as a multipart form with the optional front paper guide or front sheet guide installed. Loading Special Papers Follow the guidelines in thickness. ❏ Do not load paper that is the same as that are mounted on continuous backing sheets... this section when loading single-sheet multipart forms, labels, envelopes, and postcards. Continuous multipart forms Except for use only the type of labels because the printer may not feed labels on labels, use with labels, requires a straight or almost straight paper path.

User Manual
Page 36
... selects a value. Right light is on when bin 2 of the optional cut-sheet feeder is jammed. 36 Using the Control Panel See "Changing the Printer's Default Settings" on page 31. Ejects a single sheet of paper. Feeds paper line by line when pressed quickly. Flashes when paper has not been ...position if a sheet is in default setting mode, both menu lights are on when Card mode is in the tear-off position. On when the printer is installed. Selects a cut-sheet feeder bin when it is paused. Both off when continuous paper is not in Micro Adjust mode. Ejects a single sheet...
... selects a value. Right light is on when bin 2 of the optional cut-sheet feeder is jammed. 36 Using the Control Panel See "Changing the Printer's Default Settings" on page 31. Ejects a single sheet of paper. Feeds paper line by line when pressed quickly. Flashes when paper has not been ...position if a sheet is in default setting mode, both menu lights are on when Card mode is in the tear-off position. On when the printer is installed. Selects a cut-sheet feeder bin when it is paused. Both off when continuous paper is not in Micro Adjust mode. Ejects a single sheet...
User Manual
Page 46
...television reception. If this equipment has more than one or more of energy-efficient personal computers, monitors, printers, fax machines, copiers, and scanners in a particular installation. Changes or modifications not expressly approved by the FCC for United States Users This equipment has been tested...dealer or an experienced radio/TV technician for energy efficiency. ENERGY STAR Compliance As an ENERGY STAR® Partner, Epson has determined that this product meets the ENERGY STAR guidelines for help. WARNING The connection of the Canadian Interface Causing Equipment Regulations....
...television reception. If this equipment has more than one or more of energy-efficient personal computers, monitors, printers, fax machines, copiers, and scanners in a particular installation. Changes or modifications not expressly approved by the FCC for United States Users This equipment has been tested...dealer or an experienced radio/TV technician for energy efficiency. ENERGY STAR Compliance As an ENERGY STAR® Partner, Epson has determined that this product meets the ENERGY STAR guidelines for help. WARNING The connection of the Canadian Interface Causing Equipment Regulations....

User Manual
Page 48
...This warranty does not cover ribbon or third party parts, components or peripheral devices added to the Epson printer caused by parts and supplies not manufactured, distributed or certified by an Epson Authorized Servicer. If a claimed defect cannot be identified or reproduced in the United States and ...gives you specific legal rights, and you may not apply to function properly as a result of misuse, abuse, improper installation, neglect, improper shipping, damage caused by disasters such as fire, flood, and lightning, improper electrical current, software problems, interaction with non...
...This warranty does not cover ribbon or third party parts, components or peripheral devices added to the Epson printer caused by parts and supplies not manufactured, distributed or certified by an Epson Authorized Servicer. If a claimed defect cannot be identified or reproduced in the United States and ...gives you specific legal rights, and you may not apply to function properly as a result of misuse, abuse, improper installation, neglect, improper shipping, damage caused by disasters such as fire, flood, and lightning, improper electrical current, software problems, interaction with non...


