
Technical Brief (Impact Printers)
Page 1
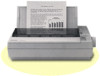
... their reliability with LQ FX-980-Nine-pin narrow carriage Wide carriage printers have 4 number in their names EPSON Sales Training EPSON is a 9- Impact printers are capable of printing. These printers have 3 numbers in their names Narrow carriage printers have the sturdiest printhead pins which: Hit the paper hard to make impressions through the thickest multi-part forms Offer...
... their reliability with LQ FX-980-Nine-pin narrow carriage Wide carriage printers have 4 number in their names EPSON Sales Training EPSON is a 9- Impact printers are capable of printing. These printers have 3 numbers in their names Narrow carriage printers have the sturdiest printhead pins which: Hit the paper hard to make impressions through the thickest multi-part forms Offer...
Technical Brief (Impact Printers)
Page 2
.... Bottom pull paper path Gives you the greatest control when printing on multi-part forms by ensuring that the forms stay properly aligned. EPSON 9-pin impact printers utilize ESC/P, the original printer control language. Gives you better control when printing on multi-part forms by ensuring that the forms stay properly aligned and do not get...
.... Bottom pull paper path Gives you the greatest control when printing on multi-part forms by ensuring that the forms stay properly aligned. EPSON 9-pin impact printers utilize ESC/P, the original printer control language. Gives you better control when printing on multi-part forms by ensuring that the forms stay properly aligned and do not get...

Technical Brief (Impact Printers)
Page 3
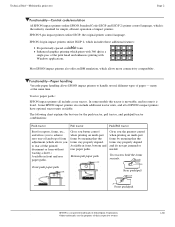
... Guide Type of paper Single sheets, single sheet labels, top- Technical Brief-Multimedia projectors Page 3 Single sheet paper paths: EPSON impact printers all can handle single sheet paper and single sheet multi-part forms, many EPSON impact printers have an Automatic Platten Gap Adjustment which helps eliminate paper jams and minimizes misfeeds, especially when printing on top...
... Guide Type of paper Single sheets, single sheet labels, top- Technical Brief-Multimedia projectors Page 3 Single sheet paper paths: EPSON impact printers all can handle single sheet paper and single sheet multi-part forms, many EPSON impact printers have an Automatic Platten Gap Adjustment which helps eliminate paper jams and minimizes misfeeds, especially when printing on top...

Product Information Guide
Page 2
LQ - 510 DOT- Paper weight: Single Sheet Continuous Multi-part forms Envelope 14 lb to 24 lb 14 lb to 22 lb 12 lb to 242 mm) width paper is used. 0.98 inches (25 mm) ... number sheets = 3 12 lb to 55 Hz Less than 15° (without cut sheet feeder) 0° (with your LQ-510 printer. Friction Push tractor Cut sheet feeder (optional) Pull tractor (optional) Ribbon: Life expectancy of Epson interfaces that are compatible with cut sheet feeder) Interface Timing The figure below shows the timing for one...
LQ - 510 DOT- Paper weight: Single Sheet Continuous Multi-part forms Envelope 14 lb to 24 lb 14 lb to 22 lb 12 lb to 242 mm) width paper is used. 0.98 inches (25 mm) ... number sheets = 3 12 lb to 55 Hz Less than 15° (without cut sheet feeder) 0° (with your LQ-510 printer. Friction Push tractor Cut sheet feeder (optional) Pull tractor (optional) Ribbon: Life expectancy of Epson interfaces that are compatible with cut sheet feeder) Interface Timing The figure below shows the timing for one...

Product Information Guide
Page 4
... test by holding down the LINE FEED button or the FORM FEED button while turning on and the printer can only be adjusted while the MULTI-PART light is off line status. Micro-adjustment: By pressing the FORM FEED button immediately after loading paper or when using the short tear-off line...-inch Line Feed. 9-16 75 4B Select Single-density Graphics Mode 9-38 76 4C Select Double-density Graphics Mode 9-38 77 4 D Select 12 CPI 9-24 LQ-510-4 5/1/89 24 - LOAD/EJECT This button is used to feed paper to the loading position or to eject paper that is set to locate the...
... test by holding down the LINE FEED button or the FORM FEED button while turning on and the printer can only be adjusted while the MULTI-PART light is off line status. Micro-adjustment: By pressing the FORM FEED button immediately after loading paper or when using the short tear-off line...-inch Line Feed. 9-16 75 4B Select Single-density Graphics Mode 9-38 76 4C Select Double-density Graphics Mode 9-38 77 4 D Select 12 CPI 9-24 LQ-510-4 5/1/89 24 - LOAD/EJECT This button is used to feed paper to the loading position or to eject paper that is set to locate the...
Product Information Guide
Page 7
Related Documentation M-TM-LQ510 M-PL-LQ510 Y56799102000 LQ - 510 Technical Manual LQ-510 Parts List LQ-510 User's Manual Technical Information Bulletins None. 24 - Pin Printers 5/1/89 LQ-510-7 Product Support Bulletins None. MATRIX PRINTER Information Reference List Engineering Change Notices None. LQ- 510 DOT-
Related Documentation M-TM-LQ510 M-PL-LQ510 Y56799102000 LQ - 510 Technical Manual LQ-510 Parts List LQ-510 User's Manual Technical Information Bulletins None. 24 - Pin Printers 5/1/89 LQ-510-7 Product Support Bulletins None. MATRIX PRINTER Information Reference List Engineering Change Notices None. LQ- 510 DOT-

User Manual
Page 3
...Epson America, Inc. Torrance, California ii WARNING The connection of a non-shielded equipment interface cable to this equipment will invalidate the FCC Certification of this device and may find the following measures: • Reorient the receiving antenna • Relocate the printer with the specifications in Subpart J of Part...the equipment off and on different branch circuits. No part of this publication may cause interference to the receiver • Plug the printer into a different outlet so that the printer and receiver are designed to provide reasonable protection against ...
...Epson America, Inc. Torrance, California ii WARNING The connection of a non-shielded equipment interface cable to this equipment will invalidate the FCC Certification of this device and may find the following measures: • Reorient the receiving antenna • Relocate the printer with the specifications in Subpart J of Part...the equipment off and on different branch circuits. No part of this publication may cause interference to the receiver • Plug the printer into a different outlet so that the printer and receiver are designed to provide reasonable protection against ...

User Manual
Page 10
Introduction l Pull Tractor Unit (C800062) This option improves the performance of fonts available in the Letter Quality mode. Introduction 3 l Film Ribbon Cartridge (#7768) The optional film ribbon cartridge provides you with continuous multi-part forms, l Multi-Font Module (#7407) The optional Multi-Font module adds to the number of continuous paper handling. It is especially useful with even higher quality printing than the standard fabric ribbon.
Introduction l Pull Tractor Unit (C800062) This option improves the performance of fonts available in the Letter Quality mode. Introduction 3 l Film Ribbon Cartridge (#7768) The optional film ribbon cartridge provides you with continuous multi-part forms, l Multi-Font Module (#7407) The optional Multi-Font module adds to the number of continuous paper handling. It is especially useful with even higher quality printing than the standard fabric ribbon.

User Manual
Page 11
...setting up and operating your Epson LQ-510 printer. Inside the back flap of this manual are illustrations of the printer in which all of your way around l Chapter 1 contains information on setting up , testing, and connecting the printer. This important information is ... parallel interface. Finding your printer. 4 Introduction Introduction l Interface Boards Optional interface boards are available to read and follow these instructions first. Guidelines for the dayto-day operation of the major parts are identified. Be sure to supplement the printer's built-in Chapter 5....
...setting up and operating your Epson LQ-510 printer. Inside the back flap of this manual are illustrations of the printer in which all of your way around l Chapter 1 contains information on setting up , testing, and connecting the printer. This important information is ... parallel interface. Finding your printer. 4 Introduction Introduction l Interface Boards Optional interface boards are available to read and follow these instructions first. Guidelines for the dayto-day operation of the major parts are identified. Be sure to supplement the printer's built-in Chapter 5....

User Manual
Page 14
Chapter 1 Setting Up the Printer Unpacking the Printer 1-2 Checking the Parts 1-2 Choosing a Place for the Printer 1-4 Assembling the Printer 1-6 Installing the Platen Knob 1-6 Installing the Ribbon Cartridge 1-7 Attaching the Paper Guide 1-10 Testing the Printer 1-13 Plugging in the Printer 1-13 Running the Self Test 1-14 Checking the Operation 1-21 Connecting the Printer to Your Computer 1-22 The Parallel Interface 1-22 Setting Up Your Application Software 1-25 Choosing From a Menu 1-25 Setting Up the Printer 1-1
Chapter 1 Setting Up the Printer Unpacking the Printer 1-2 Checking the Parts 1-2 Choosing a Place for the Printer 1-4 Assembling the Printer 1-6 Installing the Platen Knob 1-6 Installing the Ribbon Cartridge 1-7 Attaching the Paper Guide 1-10 Testing the Printer 1-13 Plugging in the Printer 1-13 Running the Self Test 1-14 Checking the Operation 1-21 Connecting the Printer to Your Computer 1-22 The Parallel Interface 1-22 Setting Up Your Application Software 1-25 Choosing From a Menu 1-25 Setting Up the Printer 1-1

User Manual
Page 15
Unpacking the Printer Checking the Parts When you unpack the printer, make sure that you have all the parts shown below and that none have been damaged. 1-2 Setting Up the Printer
Unpacking the Printer Checking the Parts When you unpack the printer, make sure that you have all the parts shown below and that none have been damaged. 1-2 Setting Up the Printer

User Manual
Page 16
Setting Up the Printer 1-3 Unpacking the Printer After removing the parts, save the packaging materials in case you ever need to lift the printer cover and remove the pieces of white packing material. Note: Be sure to transport your printer.
Setting Up the Printer 1-3 Unpacking the Printer After removing the parts, save the packaging materials in case you ever need to lift the printer cover and remove the pieces of white packing material. Note: Be sure to transport your printer.

User Manual
Page 32
For details, see the Cut Sheet Feeder section in draft mode. Testing the Printer Here is slightly different. Setting Up the Printer 1-19 Draft mode Note: When using the optional cut sheet feeder, the first page of the self test printout is part of a typical self test printed in Chapter 5.
For details, see the Cut Sheet Feeder section in draft mode. Testing the Printer Here is slightly different. Setting Up the Printer 1-19 Draft mode Note: When using the optional cut sheet feeder, the first page of the self test printout is part of a typical self test printed in Chapter 5.

User Manual
Page 33
Letter Quality mode 1-20 Setting Up the Printer Testing the Printer Here is part of a typical self test printed in Letter Quality mode.
Letter Quality mode 1-20 Setting Up the Printer Testing the Printer Here is part of a typical self test printed in Letter Quality mode.

User Manual
Page 40
Chapter 2 Paper Handling Using Single Sheets 2-2 Loading Paper 2-2 Reloading During Printing 2-5 Using Continuous Paper 2-6 Positioning Your Continuous Paper Supply 2-6 Loading Continuous Paper 2-7 Switching Between Continuous and Single Sheets 2-13 Switching to Single Sheets 2-13 Switching Back to Continuous Paper 2-17 Printing on Special Paper 2-20 The Paper Thickness Lever 2-20 Multi-part Forms 2-23 Labels 2-24 Envelopes 2-26 Paper Handling 2-1
Chapter 2 Paper Handling Using Single Sheets 2-2 Loading Paper 2-2 Reloading During Printing 2-5 Using Continuous Paper 2-6 Positioning Your Continuous Paper Supply 2-6 Loading Continuous Paper 2-7 Switching Between Continuous and Single Sheets 2-13 Switching to Single Sheets 2-13 Switching Back to Continuous Paper 2-17 Printing on Special Paper 2-20 The Paper Thickness Lever 2-20 Multi-part Forms 2-23 Labels 2-24 Envelopes 2-26 Paper Handling 2-1

User Manual
Page 59
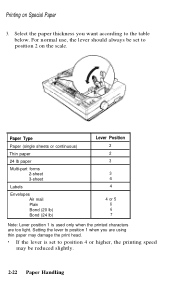
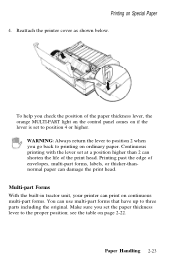
...scale on the printer next to change the paper thickness setting. Before printing on special types of paper, you should not print any closer than one-half inch from either side of paper types, including multi-part forms, labels, and envelopes. WARNING: When printing on multi-part forms, labels,... For multi-part forms and labels you need to the lever. 2-20 Paper Handling For information on the printable area for envelopes, see page 2-26. The Paper Thickness Lever To accommodate various thicknesses of paper, the LQ-510 is equipped with a paper thickness lever that your printer can be ...
...scale on the printer next to change the paper thickness setting. Before printing on special types of paper, you should not print any closer than one-half inch from either side of paper types, including multi-part forms, labels, and envelopes. WARNING: When printing on multi-part forms, labels,... For multi-part forms and labels you need to the lever. 2-20 Paper Handling For information on the printable area for envelopes, see page 2-26. The Paper Thickness Lever To accommodate various thicknesses of paper, the LQ-510 is equipped with a paper thickness lever that your printer can be ...
User Manual
Page 61
Paper Type Paper (single sheets or continuous) Thin paper 24 lb paper Multi-part forms 2-sheet 3-sheet Labels Envelopes Air mail Plain Bond (20 lb) Bond (24 lb) Lever Position 2 2 3 3 4 4 4 or 5 6 6 7 Note: Lever position 1 is set to position 4 or ...
Paper Type Paper (single sheets or continuous) Thin paper 24 lb paper Multi-part forms 2-sheet 3-sheet Labels Envelopes Air mail Plain Bond (20 lb) Bond (24 lb) Lever Position 2 2 3 3 4 4 4 or 5 6 6 7 Note: Lever position 1 is set to position 4 or ...
User Manual
Page 62
... of the paper thickness lever, the orange MULTI-PART light on the control panel comes on if the lever is set to printing on continuous multi-part forms. You can damage the print head. Printing on page 2-22. Reattach the printer cover as shown below. Continuous printing with the... lever set the paper thickness lever to three parts including the original. see the table on Special Paper...
... of the paper thickness lever, the orange MULTI-PART light on the control panel comes on if the lever is set to printing on continuous multi-part forms. You can damage the print head. Printing on page 2-22. Reattach the printer cover as shown below. Continuous printing with the... lever set the paper thickness lever to three parts including the original. see the table on Special Paper...

User Manual
Page 63
... a continuous backing sheet with sprocket holes for the paper thickness lever setting, you need to print labels as continuous paper. Labels If you load multi-part paper the same way as single sheets because labels on a shiny backing sheet almost always slip a little. 2-24 Paper Handling Printing on Special Paper Except...
... a continuous backing sheet with sprocket holes for the paper thickness lever setting, you need to print labels as continuous paper. Labels If you load multi-part paper the same way as single sheets because labels on a shiny backing sheet almost always slip a little. 2-24 Paper Handling Printing on Special Paper Except...

User Manual
Page 68
POWER (green) On when the POWER switch is supplied. Lights MULTI-PART (orange) On when the paper thickness lever is in the standby position. PAPER OUT (red) On when the printer is out of paper or when continuous paper is set to position 4 or higher. When this light is ready to accept data.... 3-2 Using the Printer ON LINE (green) On when the printer is on and power is on line and ready to accept input data. Operating the Control Panel The indicator lights give you...
POWER (green) On when the POWER switch is supplied. Lights MULTI-PART (orange) On when the paper thickness lever is in the standby position. PAPER OUT (red) On when the printer is out of paper or when continuous paper is set to position 4 or higher. When this light is ready to accept data.... 3-2 Using the Printer ON LINE (green) On when the printer is on and power is on line and ready to accept input data. Operating the Control Panel The indicator lights give you...
