
Technical Brief (Impact Printers)
Page 5
...95/98 users with automatic error messaging for direct printer to the user. Start UP Utility Ver. 1.22 Copyright (C) SEIKO EPSON CORP. 1992 Printer: FX-2180 Mode: ESC/P Port: LPT1 Font : Roman Pitch : 10CPI Print Quality : LQ Character Table : PC 437 Continuous Rear : 11...when installing multiple printers-just make the necessary changes in the software utility, and download the settings to the Printer Status Monitor. EPSON Sales Training EPSON is the DOS-based printer setup utility that allows you to easily change the printer's default settings. Utility EPSON Remote! L ...
...95/98 users with automatic error messaging for direct printer to the user. Start UP Utility Ver. 1.22 Copyright (C) SEIKO EPSON CORP. 1992 Printer: FX-2180 Mode: ESC/P Port: LPT1 Font : Roman Pitch : 10CPI Print Quality : LQ Character Table : PC 437 Continuous Rear : 11...when installing multiple printers-just make the necessary changes in the software utility, and download the settings to the Printer Status Monitor. EPSON Sales Training EPSON is the DOS-based printer setup utility that allows you to easily change the printer's default settings. Utility EPSON Remote! L ...
Product Information Guide
Page 1
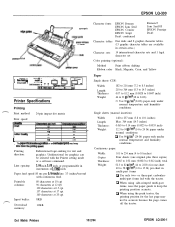
... (15 graphic character tables are available in increments of l/360 inch. Dot Matrix Printers 10/2/94 EPSON LQ-300-1 or three-part carbonless multi-part forms fed with the Printer setting mode or a software command. a When using side-crimped multi-part forms, raise the paper guide to ...52.3 to 82 g/m2 (14 to 22 lb) for text and graphics. EPSON LQ-300 n----7 paper supports sw/ itch amsuifo 0 Couriers 0 Printer Specifications Printing Print method: Print speed: 24-pin impact dot matrix I 12 I 240 J is 300 Le4terQuatity 10 67 12 60 1 I 15 I 100 I l The paper-...
... (15 graphic character tables are available in increments of l/360 inch. Dot Matrix Printers 10/2/94 EPSON LQ-300-1 or three-part carbonless multi-part forms fed with the Printer setting mode or a software command. a When using side-crimped multi-part forms, raise the paper guide to ...52.3 to 82 g/m2 (14 to 22 lb) for text and graphics. EPSON LQ-300 n----7 paper supports sw/ itch amsuifo 0 Couriers 0 Printer Specifications Printing Print method: Print speed: 24-pin impact dot matrix I 12 I 240 J is 300 Le4terQuatity 10 67 12 60 1 I 15 I 100 I l The paper-...

Product Information Guide
Page 4
... continuous paper backward to show the current. selection. EPSON Roman EPSON Sans Setif EPSON Courier EPSON PrWige EPSON Sctipt EPSON Dmlt DfaBoimdmmd Font LigW 0 0 0 l 0 0 is 0 is 0 0 is on when the printer stops printing. EPSON LQ-300-4 10/2/94 Dot Matrix Printers Each time you can also use this button briefly to make with your software will cancel your current selection. Font 1 and...
... continuous paper backward to show the current. selection. EPSON Roman EPSON Sans Setif EPSON Courier EPSON PrWige EPSON Sctipt EPSON Dmlt DfaBoimdmmd Font LigW 0 0 0 l 0 0 is 0 is 0 0 is on when the printer stops printing. EPSON LQ-300-4 10/2/94 Dot Matrix Printers Each time you can also use this button briefly to make with your software will cancel your current selection. Font 1 and...
Product Information Guide
Page 5
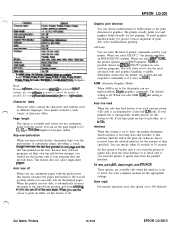
...CR) code is unexpectedly double-spaced, set to that the printer can choose unidirectional or bidirectional as the print direction for the appropriate settings. Dot Matrix Printers 10/2/94 EPSON LQ-300-5 Skip-over-perforation When you want the printer to 8.5, 11,12, or 70/6(the length of continuous... Bulgaria Note: Because @ware settings always ommide the printer0 dejblt settings, use your software programs. This will allow you to use the most software programs set to Auto, the printer determines which interface is set their own top and bottom margins, you use continuous ...
...CR) code is unexpectedly double-spaced, set to that the printer can choose unidirectional or bidirectional as the print direction for the appropriate settings. Dot Matrix Printers 10/2/94 EPSON LQ-300-5 Skip-over-perforation When you want the printer to 8.5, 11,12, or 70/6(the length of continuous... Bulgaria Note: Because @ware settings always ommide the printer0 dejblt settings, use your software programs. This will allow you to use the most software programs set to Auto, the printer determines which interface is set their own top and bottom margins, you use continuous ...

Product Information Guide
Page 6
... you how the control panel lights appear for that guides you press the Font button while in a submenu table. EPSON LQ-300 Changing the printer settings If you cannot use your software program to change the printer's settings, you press the button while in Table B. Turn off , t5=lhshing To choose a language, press the Font button.... At this step by pressing LF/FF instend #the Font buttan. 6. the Pause button once. lO.ReFt steps 6 through the se&ngs in Table A below. EPSON LQ-300-6 10/2/94 Dot Matrix Printers
... you how the control panel lights appear for that guides you press the Font button while in a submenu table. EPSON LQ-300 Changing the printer settings If you cannot use your software program to change the printer's settings, you press the button while in Table B. Turn off , t5=lhshing To choose a language, press the Font button.... At this step by pressing LF/FF instend #the Font buttan. 6. the Pause button once. lO.ReFt steps 6 through the se&ngs in Table A below. EPSON LQ-300-6 10/2/94 Dot Matrix Printers
Product Information Guide
Page 8
... sure the printer is installed on the printer. sheet automatically. Your software probably provides an mstallation or setup section that you reach the section about choosing a printer. 1. Press LF/FF to install the right driver for Windows, and CorelDRAW? EPSON LQ-300-8 10/2/94 Dot Matrix Printers In the Main window, double click the Control Panel icon. 2. EPSON LQ-300 1. Release...
... sure the printer is installed on the printer. sheet automatically. Your software probably provides an mstallation or setup section that you reach the section about choosing a printer. 1. Press LF/FF to install the right driver for Windows, and CorelDRAW? EPSON LQ-300-8 10/2/94 Dot Matrix Printers In the Main window, double click the Control Panel icon. 2. EPSON LQ-300 1. Release...
Product Information Guide
Page 9
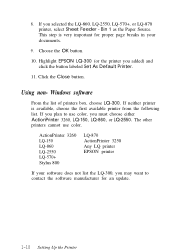
.... If it is not available, choose the first available printer from your software does not list the LQ-300, you can handle continuous paper with the tractor installed in the continuous paper position. ActionPrinter 3260 LQ-150 LQ-860 LQ-2550 LQ-570+ Stylus 800 LQ-870 ActionPrinter 3250 Any LQ printer EPSON printer If your computer. Bin 1 as a pull tractor. Choose the...
.... If it is not available, choose the first available printer from your software does not list the LQ-300, you can handle continuous paper with the tractor installed in the continuous paper position. ActionPrinter 3260 LQ-150 LQ-860 LQ-2550 LQ-570+ Stylus 800 LQ-870 ActionPrinter 3250 Any LQ printer EPSON printer If your computer. Bin 1 as a pull tractor. Choose the...

User Manual
Page 7
...an adverse environment or in the plug marked with other than those designated as a result of the product on site. Use of options Epson (UK) Limited shall not be liable against any damages or problems arising from the use of any options or consumable products other equipment or... program software. Product guarantee may not correspond with the coloured markings identifying the terminals in any combination with the letter N or coloured black. Safety ...
...an adverse environment or in the plug marked with other than those designated as a result of the product on site. Use of options Epson (UK) Limited shall not be liable against any damages or problems arising from the use of any options or consumable products other equipment or... program software. Product guarantee may not correspond with the coloured markings identifying the terminals in any combination with the letter N or coloured black. Safety ...

User Manual
Page 9
...Installing the ribbon cartridge 1-6 Plugging in the printer 1-9 Running the Self Test 1-10 Connecting the Printer to Your Computer 1-13 Connecting to the parallel interface 1-14 Connecting to the serial interface 1-15 Setting Up Your Software 1-16 Microsoft Windows 3.1 and all Windows ...programs 1-17 Using non-Windows software 1-18 Chapter 2 Using the Printer Using the Control Panel 2-2 Lights and buttons 2-2 Selecting fonts 2-4 Printing on ...
...Installing the ribbon cartridge 1-6 Plugging in the printer 1-9 Running the Self Test 1-10 Connecting the Printer to Your Computer 1-13 Connecting to the parallel interface 1-14 Connecting to the serial interface 1-15 Setting Up Your Software 1-16 Microsoft Windows 3.1 and all Windows ...programs 1-17 Using non-Windows software 1-18 Chapter 2 Using the Printer Using the Control Panel 2-2 Lights and buttons 2-2 Selecting fonts 2-4 Printing on ...
User Manual
Page 17
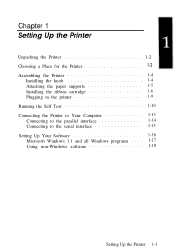
Chapter 1 Setting Up the Printer Unpacking the Printer 1-2 Choosing a Place for the Printer 1-3 Assembling the Printer 1-4 Installing the knob 1-4 Attaching the paper supports 1-5 Installing the ribbon cartridge 1-6 Plugging in the printer 1-9 Running the Self Test 1-10 Connecting the Printer to Your Computer 1-13 Connecting to the parallel interface 1-14 Connecting to the serial interface 1-15 Setting Up Your Software 1-16 Microsoft Windows 3.1 and all Windows programs . . . . 1-17 Using non-Windows software 1-18 Setting Up the Printer 1-1
Chapter 1 Setting Up the Printer Unpacking the Printer 1-2 Choosing a Place for the Printer 1-3 Assembling the Printer 1-4 Installing the knob 1-4 Attaching the paper supports 1-5 Installing the ribbon cartridge 1-6 Plugging in the printer 1-9 Running the Self Test 1-10 Connecting the Printer to Your Computer 1-13 Connecting to the parallel interface 1-14 Connecting to the serial interface 1-15 Setting Up Your Software 1-16 Microsoft Windows 3.1 and all Windows programs . . . . 1-17 Using non-Windows software 1-18 Setting Up the Printer 1-1
User Manual
Page 32
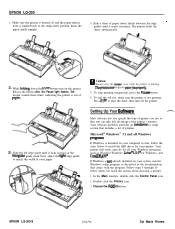
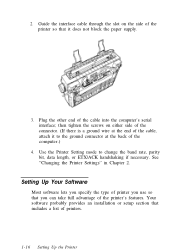
... can take full advantage of the cable into the computer's serial interface; Your software probably provides an installation or setup section that you use so that includes a list of printers. 1-16 Setting Up the Printer Use the Printer Setting mode to the ground connector at the end of the cable, attach it does...supply. 3. 2. Guide the interface cable through the slot on either side of the connector. (If there is a ground wire at the back of the printer so that it to change the baud rate, parity bit, data length, or ETX/ACK handshaking if necessary. Plug the other end of the...
... can take full advantage of the cable into the computer's serial interface; Your software probably provides an installation or setup section that you use so that includes a list of printers. 1-16 Setting Up the Printer Use the Printer Setting mode to the ground connector at the end of the cable, attach it does...supply. 3. 2. Guide the interface cable through the slot on either side of the connector. (If there is a ground wire at the back of the printer so that it to change the baud rate, parity bit, data length, or ETX/ACK handshaking if necessary. Plug the other end of the...
User Manual
Page 34
...) and click the button labeled Set As Default Printer. 11. Windows software From the list of printers box, choose LQ-300. Highlight EPSON LQ-300 (or the printer you selected the LQ-860, LQ-2550, LQ-570+, or LQ-870 printer, select Sheet Feeder - ActionPrinter 3260 LQ-150 LQ-860 LQ-2550 LQ-570+ Stylus 800 LQ-870 ActionPrinter 3250 Any LQ printer EPSON printer If your documents. 9. If you plan to contact...
...) and click the button labeled Set As Default Printer. 11. Windows software From the list of printers box, choose LQ-300. Highlight EPSON LQ-300 (or the printer you selected the LQ-860, LQ-2550, LQ-570+, or LQ-870 printer, select Sheet Feeder - ActionPrinter 3260 LQ-150 LQ-860 LQ-2550 LQ-570+ Stylus 800 LQ-870 ActionPrinter 3250 Any LQ printer EPSON printer If your documents. 9. If you plan to contact...

User Manual
Page 38
... or turn off (•), or flash (0) to cycle through all of the seven internal fonts listed on , • = off, = flashing 2-4 Using the Printer The table below shows how the Font lights appear for each selection. Selecting fonts To choose one of the available selections; stop when you make... with your software will cancel your control panel selection. However, any font choices you reach the desired font. The two font lights come on (0), go off...
... or turn off (•), or flash (0) to cycle through all of the seven internal fonts listed on , • = off, = flashing 2-4 Using the Printer The table below shows how the Font lights appear for each selection. Selecting fonts To choose one of the available selections; stop when you make... with your software will cancel your control panel selection. However, any font choices you reach the desired font. The two font lights come on (0), go off...
User Manual
Page 40
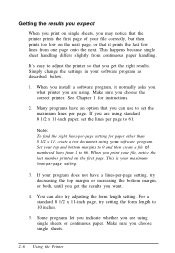
...margin, or both, until you get the right results. You can use to 61. Some programs let you indicate whether you choose the correct printer. If your software program. It's easy to 10 inches. 5. Note: To find the right lines-per -page setting. 3. When you choose single sheets. 2-6 Using... paper handling. Set your file correctly, but then prints too low on the next page, or that it normally asks you what printer you are using standard 8 1/2 x 11-inch paper, set the maximum lines per page. Make sure you print your software program as described below. 1.
...margin, or both, until you get the right results. You can use to 61. Some programs let you indicate whether you choose the correct printer. If your software program. It's easy to 10 inches. 5. Note: To find the right lines-per -page setting. 3. When you choose single sheets. 2-6 Using... paper handling. Set your file correctly, but then prints too low on the next page, or that it normally asks you what printer you are using standard 8 1/2 x 11-inch paper, set the maximum lines per page. Make sure you print your software program as described below. 1.
User Manual
Page 51
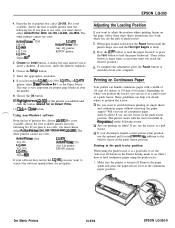
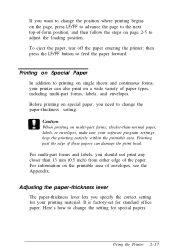
...For multi-part forms and labels, you should not print any closer than -normal paper, labels, or envelopes, make sure your software program settings keep the printing entirely within the printable area. Adjusting the paper-thickness lever The paper-thickness lever lets you specify the ...correct setting for standard office paper. Before printing on special paper, you need to change the setting for special papers: Using the Printer 2-17 Here's how to change the paper-thickness setting. Printing past the edge of envelopes, see the Appendix. For information on the printable ...
...For multi-part forms and labels, you should not print any closer than -normal paper, labels, or envelopes, make sure your software program settings keep the printing entirely within the printable area. Adjusting the paper-thickness lever The paper-thickness lever lets you specify the ...correct setting for standard office paper. Before printing on special paper, you need to change the setting for special papers: Using the Printer 2-17 Here's how to change the paper-thickness setting. Printing past the edge of envelopes, see the Appendix. For information on the printable ...

User Manual
Page 53
... on carbonless multi-part forms of wrinkles and waves. If you print on page 2-7. Using the Printer 2-19 Use only multi-part forms that are free of up to adjust the loading position, use your software program or change the loading position as shown. Never load multi-part forms joined by metal...
... on carbonless multi-part forms of wrinkles and waves. If you print on page 2-7. Using the Printer 2-19 Use only multi-part forms that are free of up to adjust the loading position, use your software program or change the loading position as shown. Never load multi-part forms joined by metal...
User Manual
Page 56
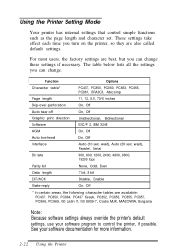
...300, 600, 1200, 2400, 4800, 9600, 19200 bps Parity bit Data length EXT/ACK State reply None, Odd, Even 7 bit, 8 bit Disable, Enable On, Off * In certain areas, the following character tables are also called default settings. See your software program to control the printer..., PC869, IS0 Latin IT, IS0 8859-7, Code MJK, MAZOWIA, Bulgaria Note: Because software settings always override the printer's default settings, use your software documentation for more information. 2-22 Using the Printer These settings take effect each time you can change . I Function Character table* Page ...
...300, 600, 1200, 2400, 4800, 9600, 19200 bps Parity bit Data length EXT/ACK State reply None, Odd, Even 7 bit, 8 bit Disable, Enable On, Off * In certain areas, the following character tables are also called default settings. See your software program to control the printer..., PC869, IS0 Latin IT, IS0 8859-7, Code MJK, MAZOWIA, Bulgaria Note: Because software settings always override the printer's default settings, use your software documentation for more information. 2-22 Using the Printer These settings take effect each time you can change . I Function Character table* Page ...

User Manual
Page 57
... use the tractor to print on labels, set this feature advances the paper perforation to the tear-off the printed pages. When the printer receives data, it automatically reverses the paper to the top-of-form position and starts printing, so you use continuous paper with the tractor.... Because most software programs set the page length to Off. This feature does not affect single-sheet paper. See the Appendix for specific characters. Character table ...
... use the tractor to print on labels, set this feature advances the paper perforation to the tear-off the printed pages. When the printer receives data, it automatically reverses the paper to the top-of-form position and starts printing, so you use continuous paper with the tractor.... Because most software programs set the page length to Off. This feature does not affect single-sheet paper. See the Appendix for specific characters. Character table ...

User Manual
Page 58
... lines print on , each other, set this setting is available. If your printer. The default setting is set to Off. If possible, choose an EPSON ESC/ P 2 printer in your software programs. This will allow you select ESC/P 2TM, the printer emulates an EPSON ESC / P 2 printer. To print graphics faster, select bidirectional printing. Auto line feed When the...
... lines print on , each other, set this setting is available. If your printer. The default setting is set to Off. If possible, choose an EPSON ESC/ P 2 printer in your software programs. This will allow you select ESC/P 2TM, the printer emulates an EPSON ESC / P 2 printer. To print graphics faster, select bidirectional printing. Auto line feed When the...
User Manual
Page 59
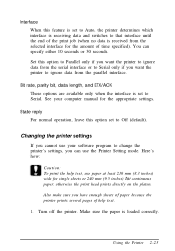
... reply For normal operation, leave this option set to Serial only if you can specify either 10 seconds or 30 seconds. Changing the printer settings If you cannot use your computer manual for the appropriate settings. otherwise the print head prints directly on the platen. Using the... sheets or 240 mm (9.5 inches) for the amount of help text, use the Printer Setting mode. Here's how: Caution: To print the help text. 1. See your software program to change the printer's settings, you want the printer to ignore data from the serial interface or to Off (default). Also make sure ...
... reply For normal operation, leave this option set to Serial only if you can specify either 10 seconds or 30 seconds. Changing the printer settings If you cannot use your computer manual for the appropriate settings. otherwise the print head prints directly on the platen. Using the... sheets or 240 mm (9.5 inches) for the amount of help text, use the Printer Setting mode. Here's how: Caution: To print the help text. 1. See your software program to change the printer's settings, you want the printer to ignore data from the serial interface or to Off (default). Also make sure ...
