
Technical Brief (Impact Printers)
Page 1
...Impact printers are renowned for their respective owners. or a 24-pin printer, and whether it is a registered trademark of Seiko Epson Corporation. 1/00 Other trademarks are the property of their reliability with LQ FX-980-Nine-pin narrow carriage Wide carriage printers... to all EPSON impact printers: Functionality M Printing technology M Control code/emulation M Paper handling M SmartPark™ settings Versatility M Flexible interfacing M Built-in fonts M Computer-based set-up to Near Letter Quality Twenty-four-pin impact printers - EPSON impact printers are either ...
...Impact printers are renowned for their respective owners. or a 24-pin printer, and whether it is a registered trademark of Seiko Epson Corporation. 1/00 Other trademarks are the property of their reliability with LQ FX-980-Nine-pin narrow carriage Wide carriage printers... to all EPSON impact printers: Functionality M Printing technology M Control code/emulation M Paper handling M SmartPark™ settings Versatility M Flexible interfacing M Built-in fonts M Computer-based set-up to Near Letter Quality Twenty-four-pin impact printers - EPSON impact printers are either ...

Technical Brief (Impact Printers)
Page 3
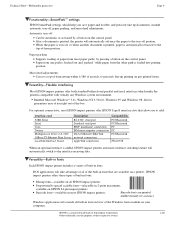
... paper path, which automatically adjusts the platten to the thickness of the paper. Set the lever to accommodate various thicknesses of paper Single sheets, envelopes, or postcards. L Paper thickness adjustment: Most EPSON impact printers have a Paper Thickness Lever that allows the printer to this position when using the front push and pull tractors in the...
... paper path, which automatically adjusts the platten to the thickness of the paper. Set the lever to accommodate various thicknesses of paper Single sheets, envelopes, or postcards. L Paper thickness adjustment: Most EPSON impact printers have a Paper Thickness Lever that allows the printer to this position when using the front push and pull tractors in the...
Technical Brief (Impact Printers)
Page 4
...EPSON impact printers Proportionally-spaced scalable fonts-selectable in 2-point increments, available on EPSON 24-pin impact printers Barcode fonts-available on most EPSON impact printers. DOS applications will take advantage of all built-in fonts in favor of the built-in fonts. Technical Brief-Multimedia projectors Page 4 L LL Functionality-SmartPark™ settings EPSON SmartPark settings...Macintosh PC PC PC/Macintosh Macintosh When an optional interface is added, EPSON impact printers automatic interface switching feature will automatically advance the paper to precisely line...
...EPSON impact printers Proportionally-spaced scalable fonts-selectable in 2-point increments, available on EPSON 24-pin impact printers Barcode fonts-available on most EPSON impact printers. DOS applications will take advantage of all built-in fonts in favor of the built-in fonts. Technical Brief-Multimedia projectors Page 4 L LL Functionality-SmartPark™ settings EPSON SmartPark settings...Macintosh PC PC PC/Macintosh Macintosh When an optional interface is added, EPSON impact printers automatic interface switching feature will automatically advance the paper to precisely line...

Technical Brief (Impact Printers)
Page 5
...in the software utility, and download the settings to host computer connection. Start UP Utility Ver. 1.22 Copyright (C) SEIKO EPSON CORP. 1992 Printer: FX-2180 Mode: ESC/P Port: LPT1 Font : Roman Pitch : 10CPI Print Quality : LQ Character Table : PC 437 Continuous Rear... 2 : 8.5mm Manual Rear : 14 inch Manual Rear : 8.5mm Help: Select printer Font. EPSON Sales Training EPSON is the DOS-based printer setup utility that allows you to easily change the printer's default settings. Manual Front : 17 inch Manual Front : 8.5mm Print Direction : Bi-d Skip over...
...in the software utility, and download the settings to host computer connection. Start UP Utility Ver. 1.22 Copyright (C) SEIKO EPSON CORP. 1992 Printer: FX-2180 Mode: ESC/P Port: LPT1 Font : Roman Pitch : 10CPI Print Quality : LQ Character Table : PC 437 Continuous Rear... 2 : 8.5mm Manual Rear : 14 inch Manual Rear : 8.5mm Help: Select printer Font. EPSON Sales Training EPSON is the DOS-based printer setup utility that allows you to easily change the printer's default settings. Manual Front : 17 inch Manual Front : 8.5mm Print Direction : Bi-d Skip over...

Product Support Bulletin(s)
Page 1
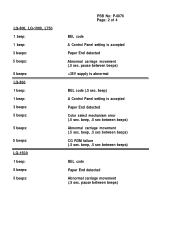
... description "3 Beeps x 2" means two sets of 4 PSB No: P-0076 Originator JV Epson printers issue beep tones when certain error conditions exist. NOTE: Most of the beeps issued by the printers are listed by product name. Carriage will stop until the printhead cools down. LQ-500, LQ-510, LQ-1010, LQ-850, LQ-950, LQ-1050, L1000, AP-4000, AP-4500...
... description "3 Beeps x 2" means two sets of 4 PSB No: P-0076 Originator JV Epson printers issue beep tones when certain error conditions exist. NOTE: Most of the beeps issued by the printers are listed by product name. Carriage will stop until the printhead cools down. LQ-500, LQ-510, LQ-1010, LQ-850, LQ-950, LQ-1050, L1000, AP-4000, AP-4500...
Product Support Bulletin(s)
Page 2
pause between beeps) CG ROM failure (.5 sec. LQ-800, LQ-1000, L750 1 beep: 1 beep: 3 beeps: 5 beeps: 5 beeps: LQ-860 1 beep: 1 beep: 3 beeps: 5 beeps: 5 beeps: 5 beeps: LQ-1500 1 beep: 5 beeps: 5 beeps: PSB No: P-0076 Page: 2 of 4 BEL code A Control Panel setting is accepted Paper End detected Color select mechanism error (.5 sec. beep, .5 sec between beeps) beep) A Control Panel...
pause between beeps) CG ROM failure (.5 sec. LQ-800, LQ-1000, L750 1 beep: 1 beep: 3 beeps: 5 beeps: 5 beeps: LQ-860 1 beep: 1 beep: 3 beeps: 5 beeps: 5 beeps: 5 beeps: LQ-1500 1 beep: 5 beeps: 5 beeps: PSB No: P-0076 Page: 2 of 4 BEL code A Control Panel setting is accepted Paper End detected Color select mechanism error (.5 sec. beep, .5 sec between beeps) beep) A Control Panel...
Product Support Bulletin(s)
Page 3
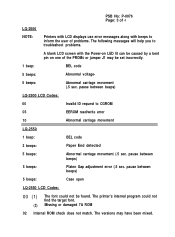
... been mixed. The versions may be found. The printer's internal program could not be set incorrectly. 1 beep: BEL code 5 beeps: Abnormal voltage- 5 beeps: Abnormal carriage movement (.5 sec. pause between beeps) 5 beeps: Platen Gap adjustment error (.5 sec. PSB No: P-0076 Page: 3 of 4 LQ-2500 NOTE: Printers with LCD displays use error messages along with beeps...
... been mixed. The versions may be found. The printer's internal program could not be set incorrectly. 1 beep: BEL code 5 beeps: Abnormal voltage- 5 beeps: Abnormal carriage movement (.5 sec. pause between beeps) 5 beeps: Platen Gap adjustment error (.5 sec. PSB No: P-0076 Page: 3 of 4 LQ-2500 NOTE: Printers with LCD displays use error messages along with beeps...
Product Support Bulletin(s)
Page 4
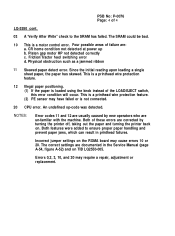
... these errors are un-familiar with the machine. Incorrect jumper settings on the ROMA board may require a repair, adjustment or replacement. The correct settings are : a. Physical obstruction such as a jammed ribbon 11...are usually caused by new operators who are corrected by turning the printer off, taking out the paper and turning the printer back on. Platen gap motor HP not detected correctly c. Four ... 3, 10, and 20 may cause errors 10 or 20. PSB No: P-0076 Page: 4 of 4 LQ-2550 cont. 03 A 'Verify After Write" check to ensure proper paper handling and prevent paper jams, which...
... these errors are un-familiar with the machine. Incorrect jumper settings on the ROMA board may require a repair, adjustment or replacement. The correct settings are : a. Physical obstruction such as a jammed ribbon 11...are usually caused by new operators who are corrected by turning the printer off, taking out the paper and turning the printer back on. Platen gap motor HP not detected correctly c. Four ... 3, 10, and 20 may cause errors 10 or 20. PSB No: P-0076 Page: 4 of 4 LQ-2550 cont. 03 A 'Verify After Write" check to ensure proper paper handling and prevent paper jams, which...
User Manual
Page 4
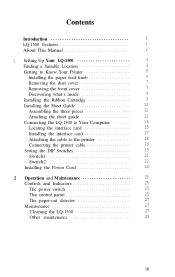
... 12 Assembling the three pieces 12 Attaching the sheet guide 12 Connecting the LQ-1500 to Your Computer 15 Locating the interface card 15 Installing the interface card 17 Attaching the cable to the printer 18 Connecting the printer cable 18 Setting the DIP Switches 19 Switch1 21 Switch2 22 Installing the Power Cord 24...
... 12 Assembling the three pieces 12 Attaching the sheet guide 12 Connecting the LQ-1500 to Your Computer 15 Locating the interface card 15 Installing the interface card 17 Attaching the cable to the printer 18 Connecting the printer cable 18 Setting the DIP Switches 19 Switch1 21 Switch2 22 Installing the Power Cord 24...
User Manual
Page 5
... 41 Removing the tractor unit 41 The LQ-1500 Self-Test 42 4 Control codes 45 Computer-to-Printer-Communications 45 How Many Names Can One Code Have 46 Appendixes 49 A LQ-1500 Command Summary 49 Vertical Spacing Commands 50 Horizontal Spacing Commands 54 Print Style Commands 56 Character Set Commands 61 Graphics Commands 62 Miscellaneous Commands...
... 41 Removing the tractor unit 41 The LQ-1500 Self-Test 42 4 Control codes 45 Computer-to-Printer-Communications 45 How Many Names Can One Code Have 46 Appendixes 49 A LQ-1500 Command Summary 49 Vertical Spacing Commands 50 Horizontal Spacing Commands 54 Print Style Commands 56 Character Set Commands 61 Graphics Commands 62 Miscellaneous Commands...

User Manual
Page 6
C The LQ-1500 Character Set 75 Regular Characters 75 International Character sets 78 D Widths of the Proportional Characters 79 E ASCII Code Conversion Chart 87 F Specifications of the LQ-1500 91 v
C The LQ-1500 Character Set 75 Regular Characters 75 International Character sets 78 D Widths of the Proportional Characters 79 E ASCII Code Conversion Chart 87 F Specifications of the LQ-1500 91 v

User Manual
Page 7
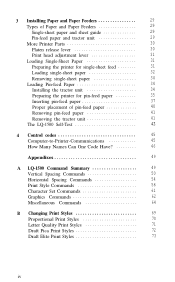
... 1-1 Unpacking the LQ-1500 1-2 Paperplacement 1-3 The LQ-1500 printer 1-4 Paper feed knob 1-5 Removing the front cover 1-6 Printer parts 1-7 Ribbon ...settings 21 2-1 Controls and indicators 26 2-2 Maintenance 28 3-1 Adjustment levers 30 3-2 Sheetload 33 3-3 Protective cover removed 35 3-4 Tractor unit installation 36 3-5 Printer parts used with pin-feed paper 37 3-6 Paper inserted 38 3-7 Aligning pin frames 39 3-8 Pin-feeder covers 40 3-9 Paper path 41 3-10 Removing the tractor unit 42 3-11 The LQ-1500...
... 1-1 Unpacking the LQ-1500 1-2 Paperplacement 1-3 The LQ-1500 printer 1-4 Paper feed knob 1-5 Removing the front cover 1-6 Printer parts 1-7 Ribbon ...settings 21 2-1 Controls and indicators 26 2-2 Maintenance 28 3-1 Adjustment levers 30 3-2 Sheetload 33 3-3 Protective cover removed 35 3-4 Tractor unit installation 36 3-5 Printer parts used with pin-feed paper 37 3-6 Paper inserted 38 3-7 Aligning pin frames 39 3-8 Pin-feeder covers 40 3-9 Paper path 41 3-10 Removing the tractor unit 42 3-11 The LQ-1500...

User Manual
Page 8
Tables 1-1 Settings for switch 1 22 1-2 Settings for switch 2 23 1-3 International character switch settings 23 ix
Tables 1-1 Settings for switch 1 22 1-2 Settings for switch 2 23 1-3 International character switch settings 23 ix
User Manual
Page 9
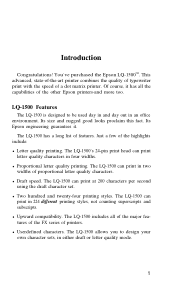
... using the draft character set. The LQ-1500 allows you to be used day in and day out in two widths of printers. This advanced, state-of-the-art printer combines the quality of typewriter print with the speed of the other Epson printers-and more too. Of...hundred and twenty-four printing styles. Introduction Congratulations! You've purchased the Epson LQ-1500TM. The LQ-1500 includes all the capabilities of a dot matrix printer. The LQ-1500 can print in an office environment. The LQ-1500 can print letter quality characters in 224 different printing styles, not counting ...
... using the draft character set. The LQ-1500 allows you to be used day in and day out in two widths of printers. This advanced, state-of-the-art printer combines the quality of typewriter print with the speed of the other Epson printers-and more too. Of...hundred and twenty-four printing styles. Introduction Congratulations! You've purchased the Epson LQ-1500TM. The LQ-1500 includes all the capabilities of a dot matrix printer. The LQ-1500 can print in an office environment. The LQ-1500 can print letter quality characters in 224 different printing styles, not counting ...
User Manual
Page 10
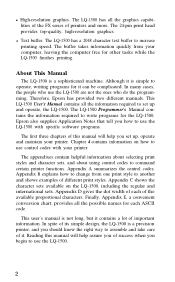
... of each ASCII code. Therefore, Epson has provided two different manuals. Reading this manual will help you should know the right way to use the LQ-1500 are not the ones who use the LQ-1500. 2 About This Manual The LQ-1500 is a precision printer, and you set up , operate and maintain your printer. This LQ-1500 User's Manual contains all the...
... of each ASCII code. Therefore, Epson has provided two different manuals. Reading this manual will help you should know the right way to use the LQ-1500 are not the ones who use the LQ-1500. 2 About This Manual The LQ-1500 is a precision printer, and you set up , operate and maintain your printer. This LQ-1500 User's Manual contains all the...
User Manual
Page 11
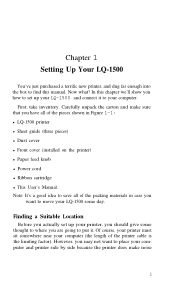
... of the packing materials in Figure 1-1: l LQ-1500 printer l Sheet guide (three pieces) l Dust cover l Front cover (installed on the printer) l Paper feed knob l Power cord l Ribbon cartridge l This User's Manual. Carefully unpack the carton and make noise 3 Chapter 1 Setting Up Your LQ-1500 You've just purchased a terrific new printer, and dug far enough into the box...
... of the packing materials in Figure 1-1: l LQ-1500 printer l Sheet guide (three pieces) l Dust cover l Front cover (installed on the printer) l Paper feed knob l Power cord l Ribbon cartridge l This User's Manual. Carefully unpack the carton and make noise 3 Chapter 1 Setting Up Your LQ-1500 You've just purchased a terrific new printer, and dug far enough into the box...
User Manual
Page 15
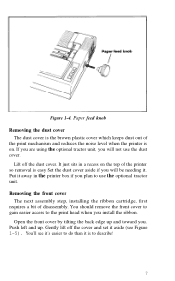
... dust out of disassembly. If you are using the optional tractor unit, you will be needing it is on the top of the printer so removal is easy Set the dust cover aside if you install the ribbon. Removing the front cover The next assembly step, installing the ribbon cartridge, first requires... to gain easier access to use the dust cover. Figure 1-4. You'll see Figure 1-5). Lift off the cover and set it aside (see it's easier to describe! 7 It just sits in the printer box if you plan to the print head when you will not use the optional tractor unit. Put it...
... dust out of disassembly. If you are using the optional tractor unit, you will be needing it is on the top of the printer so removal is easy Set the dust cover aside if you install the ribbon. Removing the front cover The next assembly step, installing the ribbon cartridge, first requires... to gain easier access to use the dust cover. Figure 1-4. You'll see Figure 1-5). Lift off the cover and set it aside (see it's easier to describe! 7 It just sits in the printer box if you plan to the print head when you will not use the optional tractor unit. Put it...
User Manual
Page 27
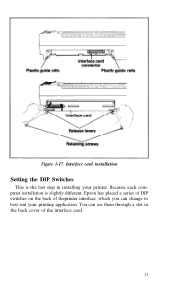
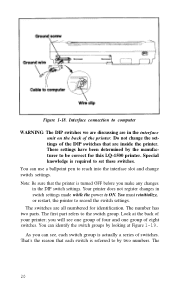
You can change to best suit your printer. Figure 1-17. Interface card installation Setting the DIP Switches This is slightly different, Epson has placed a series of DIP switches on the back of the interface card. 19 Because each computer installation is the last step in the back cover of theprinter interface, which you can see them through a slot in installing your printing application.
You can change to best suit your printer. Figure 1-17. Interface card installation Setting the DIP Switches This is slightly different, Epson has placed a series of DIP switches on the back of the interface card. 19 Because each computer installation is the last step in the back cover of theprinter interface, which you can see them through a slot in installing your printing application.
User Manual
Page 28
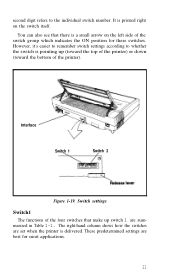
... numbers. That's the reason that are all numbered for this LQ-1500 printer. Special knowledge is referred to set these switches. Look at Figure 1-19. Figure 1-18. These settings have been determined by looking at the back of switches. Your printer does not register changes in switch settings made while the power is actually a series of your...
... numbers. That's the reason that are all numbered for this LQ-1500 printer. Special knowledge is referred to set these switches. Look at Figure 1-19. Figure 1-18. These settings have been determined by looking at the back of switches. Your printer does not register changes in switch settings made while the power is actually a series of your...
User Manual
Page 29
... to whether the switch is pointing up switch 1 are summarized in Table 1-1. Interface Switch 1 Switch 2 Figure 1-19. These predetermined settings are set when the printer is a small arrow on the switch itself. Switch settings Switch1 The functions of the switch group which indicates the ON position for most applications. 21 It is printed right...
... to whether the switch is pointing up switch 1 are summarized in Table 1-1. Interface Switch 1 Switch 2 Figure 1-19. These predetermined settings are set when the printer is a small arrow on the switch itself. Switch settings Switch1 The functions of the switch group which indicates the ON position for most applications. 21 It is printed right...


