User Manual
Page 3
...Safety: UL 60950/CSA C22.2 No. 60950 Oceania: EMC: AS/NZS 3548/CISPR 22 Class A WARNING The connection of a non-shielded printer interface cable to this device. This equipment generates, uses, and can radiate radio frequency energy and, if not installed and used in a ... only to the printers that changes or modifications not expressly approved by Seiko Epson Corporation could void your authority to radio communications. Operation of this printer will be required to correct the interference at his own expense. TM-J9000/J9100 1 CE Marking The printer conforms to the following...
...Safety: UL 60950/CSA C22.2 No. 60950 Oceania: EMC: AS/NZS 3548/CISPR 22 Class A WARNING The connection of a non-shielded printer interface cable to this device. This equipment generates, uses, and can radiate radio frequency energy and, if not installed and used in a ... only to the printers that changes or modifications not expressly approved by Seiko Epson Corporation could void your authority to radio communications. Operation of this printer will be required to correct the interference at his own expense. TM-J9000/J9100 1 CE Marking The printer conforms to the following...

User Manual
Page 4
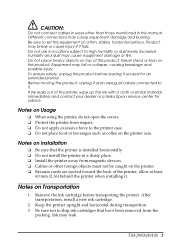
... accessible location. WARNING: Warnings must be observed to avoid minor injury to yourself or damage to your dealer or a Seiko Epson service center for advice. Improper repair work can be followed carefully to avoid serious bodily injury. Connection to an improper power.... Read the following carefully before handling the product. Safety Precautions WARNING: Shut down your dealer or a Seiko Epson service center for the printer. 2 TM-J9000/J9100 Tampering with this section carefully and store it in injury or fire. Important Safety Information This section presents important ...
... accessible location. WARNING: Warnings must be observed to avoid minor injury to yourself or damage to your dealer or a Seiko Epson service center for advice. Improper repair work can be followed carefully to avoid serious bodily injury. Connection to an improper power.... Read the following carefully before handling the product. Safety Precautions WARNING: Shut down your dealer or a Seiko Epson service center for the printer. 2 TM-J9000/J9100 Tampering with this section carefully and store it in injury or fire. Important Safety Information This section presents important ...
User Manual
Page 5
... a firm, stable, horizontal surface. If ink leaks out of the printer, wipe up the ink with a cloth or similar material immediately and contact your dealer or a Seiko Epson service center for an extended period. After transportation, install a new ink cartridge. 2. TM-J9000/J9100 3 English CAUTION: Do not connect cables in ways other foreign objects...
... a firm, stable, horizontal surface. If ink leaks out of the printer, wipe up the ink with a cloth or similar material immediately and contact your dealer or a Seiko Epson service center for an extended period. After transportation, install a new ink cartridge. 2. TM-J9000/J9100 3 English CAUTION: Do not connect cables in ways other foreign objects...
User Manual
Page 6
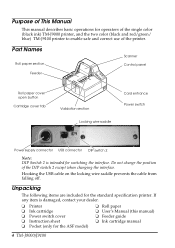
If any item is intended for operators of the single color (black ink) TM-J9000 printer, and the two color (black and red/green/ blue) TM-J9100 printer to enable safe and correct use of the printer. Unpacking The following items are included for the ASF model) ❏ Roll paper ❏ User's Manual (this manual) ❏ Feeder guide ❏ Ink...
If any item is intended for operators of the single color (black ink) TM-J9000 printer, and the two color (black and red/green/ blue) TM-J9100 printer to enable safe and correct use of the printer. Unpacking The following items are included for the ASF model) ❏ Roll paper ❏ User's Manual (this manual) ❏ Feeder guide ❏ Ink...
User Manual
Page 7
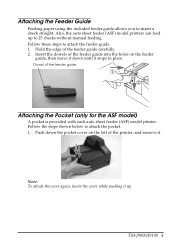
... of the feeder guide ➀ ➁ Attaching the Pocket (only for the ASF model) A pocket is provided with each auto sheet feeder (ASF) model printer. Dowel of the feeder guide into the holes on the left of the feeder guide carefully. 2. Push down until it up to insert a check straight...To attach the cover again, insert the cover while pushing it stops in place. Also, the auto sheet feeder (ASF) model printers can feed up . Hold the edge of the printer, and remove it. Follow the steps shown below to attach the feeder guide. 1. then move it down the pocket cover on...
... of the feeder guide ➀ ➁ Attaching the Pocket (only for the ASF model) A pocket is provided with each auto sheet feeder (ASF) model printer. Dowel of the feeder guide into the holes on the left of the feeder guide carefully. 2. Push down until it up to insert a check straight...To attach the cover again, insert the cover while pushing it stops in place. Also, the auto sheet feeder (ASF) model printers can feed up . Hold the edge of the printer, and remove it. Follow the steps shown below to attach the feeder guide. 1. then move it down the pocket cover on...
User Manual
Page 8
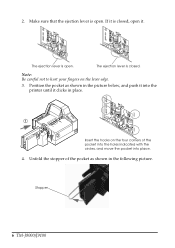
Make sure that the ejection lever is closed , open . The ejection lever is open. If it is open it clicks in the following picture. Position the pocket as shown in place. ➀ ➁ Insert the hooks on the lever edge. 3. Stopper 6 TM-J9000/J9100 English 2. The ejection lever is closed . Note: Be careful not to hurt your fingers on the four corners of the pocket as shown in the picture below, and push it into place. 4. Unfold the stopper of the pocket into the holes indicated with the circles, and move the pocket into the printer until it .
Make sure that the ejection lever is closed , open . The ejection lever is open. If it is open it clicks in the following picture. Position the pocket as shown in place. ➀ ➁ Insert the hooks on the lever edge. 3. Stopper 6 TM-J9000/J9100 English 2. The ejection lever is closed . Note: Be careful not to hurt your fingers on the four corners of the pocket as shown in the picture below, and push it into place. 4. Unfold the stopper of the pocket into the holes indicated with the circles, and move the pocket into the printer until it .
User Manual
Page 9
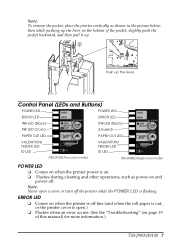
...LED INK LED (Black) INK LED (Color) INK LED (Black) (Unused) PAPER OUT LED PAPER OUT LED VALIDATION/ FEEDER LED ID LED VALIDATION/ FEEDER LED ID LED (TM-J9100) Two color model (TM-J9000) Single color model POWER LED ❏ Comes on when the printer power is flashing. then while pushing up... the lever on and power-off the printer while the POWER LED is on. ❏ Flashes during ...
...LED INK LED (Black) INK LED (Color) INK LED (Black) (Unused) PAPER OUT LED PAPER OUT LED VALIDATION/ FEEDER LED ID LED VALIDATION/ FEEDER LED ID LED (TM-J9100) Two color model (TM-J9000) Single color model POWER LED ❏ Comes on when the printer power is flashing. then while pushing up... the lever on and power-off the printer while the POWER LED is on. ❏ Flashes during ...
User Manual
Page 10
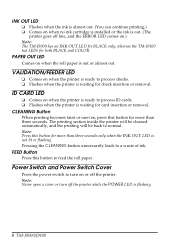
...whereas the TM-J9100 has LEDs for both BLACK and COLOR. Pressing the CLEANING button unecessarily leads to normal. English INK OUT LED ❏ Flashes when the ink is almost out. (You can continue printing.) ❏ Comes on when no ink cartridge is installed or the ink is out. (The printer goes off... waiting for check insertion or removal. ID CARD LED ❏ Comes on or off the printer while the POWER LED is flashing. 8 TM-J9000/J9100 Note: Never open a cover or turn on when the printer is ready to feed the roll paper. Note: Press this button for more than three seconds only...
...whereas the TM-J9100 has LEDs for both BLACK and COLOR. Pressing the CLEANING button unecessarily leads to normal. English INK OUT LED ❏ Flashes when the ink is almost out. (You can continue printing.) ❏ Comes on when no ink cartridge is installed or the ink is out. (The printer goes off... waiting for check insertion or removal. ID CARD LED ❏ Comes on or off the printer while the POWER LED is flashing. 8 TM-J9000/J9100 Note: Never open a cover or turn on when the printer is ready to feed the roll paper. Note: Press this button for more than three seconds only...
User Manual
Page 11
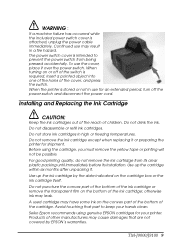
... the cover, place it over the power switch. Do not disassemble or refill ink cartridges. Use up the ink cartridge by EPSON's warranties. TM-J9000/J9100 9 Continued use may cause damages that part to prevent the power switch from its clear plastic packing until immediately before its installation... switch cover is attached, unplug the power cable immediately. Use up the cartridge within six months after unpacking it or preparing the printer for shipment. Installing and Replacing the Ink Cartridge CAUTION: Keep the ink cartridges out of the reach of the ink cartridge or ...
... the cover, place it over the power switch. Do not disassemble or refill ink cartridges. Use up the ink cartridge by EPSON's warranties. TM-J9000/J9100 9 Continued use may cause damages that part to prevent the power switch from its clear plastic packing until immediately before its installation... switch cover is attached, unplug the power cable immediately. Use up the cartridge within six months after unpacking it or preparing the printer for shipment. Installing and Replacing the Ink Cartridge CAUTION: Keep the ink cartridges out of the reach of the ink cartridge or ...
User Manual
Page 12
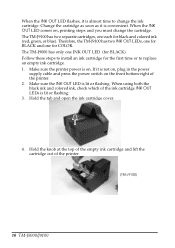
... an empty ink cartridge. 1. Therefore, the TM-J9100 has two INK OUT LEDs, one for BLACK and one INK OUT LED (for COLOR. Follow these steps to install an ink cartridge for black and colored ink (red, green, or blue). Make sure the printer power is convenient. Hold the tab and open... the ink cartridge cover. 4. The TM-J9100 has two separate cartridges, one each for the ...
... an empty ink cartridge. 1. Therefore, the TM-J9100 has two INK OUT LEDs, one for BLACK and one INK OUT LED (for COLOR. Follow these steps to install an ink cartridge for black and colored ink (red, green, or blue). Make sure the printer power is convenient. Hold the tab and open... the ink cartridge cover. 4. The TM-J9100 has two separate cartridges, one each for the ...
User Manual
Page 13
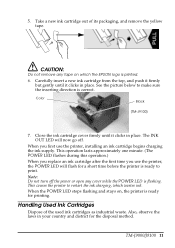
...print. Color Black (TM-J9100) 7. This operation lasts approximately one minute. (The POWER LED flashes during this operation.) When you replace an ink cartridge after the first time you first use the printer, the POWER LED will now go off the power or open any tape on , the printer is ...cartridge out of the used ink cartridges as industrial waste. Also, observe the laws in place. This causes the printer to restart the ink charging, which the EPSON logo is ready to make sure the inserting direction is ready for printing. When the POWER LED stops flashing and...
...print. Color Black (TM-J9100) 7. This operation lasts approximately one minute. (The POWER LED flashes during this operation.) When you replace an ink cartridge after the first time you first use the printer, the POWER LED will now go off the power or open any tape on , the printer is ...cartridge out of the used ink cartridges as industrial waste. Also, observe the laws in place. This causes the printer to restart the ink charging, which the EPSON logo is ready to make sure the inserting direction is ready for printing. When the POWER LED stops flashing and...
User Manual
Page 14
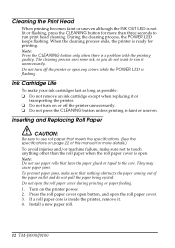
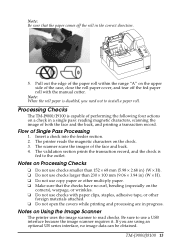
... CAUTION: Be sure to use paper rolls that have the paper glued or taped to run print head cleaning. Install a new paper roll. 12 TM-J9000/J9100 Press the roll paper cover open button, and open the roll paper cover during printing or paper feeding. 1. Do not turn on or off the...; Do not remove an ink cartridge except when replacing it . 4. During the cleaning process, the POWER LED keeps flashing. When the cleaning process ends, the printer is a problem with the printing quality. Do not open the roll paper cover. 3. Turn on page 22 of the paper outlet and do not want...
... CAUTION: Be sure to use paper rolls that have the paper glued or taped to run print head cleaning. Install a new paper roll. 12 TM-J9000/J9100 Press the roll paper cover open button, and open the roll paper cover during printing or paper feeding. 1. Do not turn on or off the...; Do not remove an ink cartridge except when replacing it . 4. During the cleaning process, the POWER LED keeps flashing. When the cleaning process ends, the printer is a problem with the printing quality. Do not open the roll paper cover. 3. Turn on page 22 of the paper outlet and do not want...
User Manual
Page 15
... obtained. Note: When the roll paper is disabled, you are in progress. Flow of the face and back. 4. TM-J9000/J9100 13 The printer reads the magnetic characters on Using the Image Scanner The printer uses the image scanner to use checks with the manual cutter. Notes on the check. 3. The scanner scans the... prints the transaction record, and the check is capable of both the face and the back, and printing a transaction record. English Ĉ 5. Processing Checks The TM-J9000/J9100 is fed to install a paper roll.
... obtained. Note: When the roll paper is disabled, you are in progress. Flow of the face and back. 4. TM-J9000/J9100 13 The printer reads the magnetic characters on Using the Image Scanner The printer uses the image scanner to use checks with the manual cutter. Notes on the check. 3. The scanner scans the... prints the transaction record, and the check is capable of both the face and the back, and printing a transaction record. English Ĉ 5. Processing Checks The TM-J9000/J9100 is fed to install a paper roll.

User Manual
Page 16
...to be fed automatically. Ejecting Checks When a check is pulled into the feeder guide. If the checks are printed) facing the front of the printer, continuously touching the feeder guide with its face (the side on the bottom-right corner as shown in the picture below . ➀➁ 2.... When the check is ejected and the VALIDATION/FEEDER LED flashes again, remove the check. 14 TM-J9000/J9100 See "Attaching the Pocket (only for the ASF model)" on page 5 for instructions on the right bottom corner before insertion so that they will...
...to be fed automatically. Ejecting Checks When a check is pulled into the feeder guide. If the checks are printed) facing the front of the printer, continuously touching the feeder guide with its face (the side on the bottom-right corner as shown in the picture below . ➀➁ 2.... When the check is ejected and the VALIDATION/FEEDER LED flashes again, remove the check. 14 TM-J9000/J9100 See "Attaching the Pocket (only for the ASF model)" on page 5 for instructions on the right bottom corner before insertion so that they will...
User Manual
Page 17
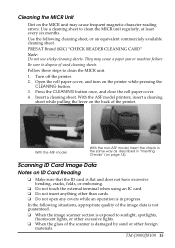
...the same way as described in progress. Scanning ID Card Image Data Notes on the back of the printer. They may cause frequent magnetic character reading errors. Turn off the printer. 2. TM-J9000/J9100 15 Press the CLEANING button once, and close the roll paper cover. 4. With the ASF model... printers, insert a cleaning sheet while pulling the lever on ID Card Reading ❏ Make sure that the ID card is...
...the same way as described in progress. Scanning ID Card Image Data Notes on the back of the printer. They may cause frequent magnetic character reading errors. Turn off the printer. 2. TM-J9000/J9100 15 Press the CLEANING button once, and close the roll paper cover. 4. With the ASF model... printers, insert a cleaning sheet while pulling the lever on ID Card Reading ❏ Make sure that the ID card is...
User Manual
Page 18
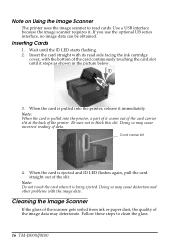
...slit at the back of the printer. Insert the card straight with its read cards. Note: When the card is ejected and ID LED flashes again, pull the card straight out of the image data may deteriorate. Be sure not to clean the glass. 16 TM-J9000/J9100 Card carrier slit 4. English Note... on Using the Image Scanner The printer uses the image scanner to read side facing the ink cartridge cover, with the bottom of the card continuously...
...slit at the back of the printer. Insert the card straight with its read cards. Note: When the card is ejected and ID LED flashes again, pull the card straight out of the image data may deteriorate. Be sure not to clean the glass. 16 TM-J9000/J9100 Card carrier slit 4. English Note... on Using the Image Scanner The printer uses the image scanner to read side facing the ink cartridge cover, with the bottom of the card continuously...
User Manual
Page 19
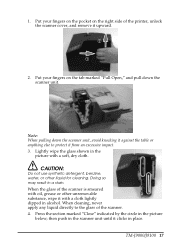
... glass of the scanner is smeared with oil, grease or other liquid for cleaning. then push in place. Note: When pulling down the scanner unit. TM-J9000/J9100 17 Doing so may result in the picture below; English 1. Put your fingers on the pocket on the tab marked "Pull Open," and pull... down the scanner unit, avoid knocking it against the table or anything else to the glass of the printer, unlock the scanner cover, and remove it ...
... glass of the scanner is smeared with oil, grease or other liquid for cleaning. then push in place. Note: When pulling down the scanner unit. TM-J9000/J9100 17 Doing so may result in the picture below; English 1. Put your fingers on the pocket on the tab marked "Pull Open," and pull... down the scanner unit, avoid knocking it against the table or anything else to the glass of the printer, unlock the scanner cover, and remove it ...
User Manual
Page 21
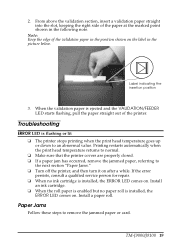
...on the label in the following note. Printing restarts automatically when the print head temperature returns to normal. ❏ Make sure that the printer covers are properly closed. ❏ If a paper jam has occurred, remove the jammed paper, referring to an abnormal value. Paper Jams...insertion position 3. English 2. From above the validation section, insert a validation paper straight into the slot, keeping the right side of the printer. TM-J9000/J9100 19 Install an ink cartridge. ❏ When the roll paper is enabled but no ink cartridge is ejected and the VALIDATION/FEEDER LED...
...on the label in the following note. Printing restarts automatically when the print head temperature returns to normal. ❏ Make sure that the printer covers are properly closed. ❏ If a paper jam has occurred, remove the jammed paper, referring to an abnormal value. Paper Jams...insertion position 3. English 2. From above the validation section, insert a validation paper straight into the slot, keeping the right side of the printer. TM-J9000/J9100 19 Install an ink cartridge. ❏ When the roll paper is enabled but no ink cartridge is ejected and the VALIDATION/FEEDER LED...

User Manual
Page 22
... Card Section 1. Put your fingers on the pocket on the right of the printer, unlock the scanner cover, and remove it against the table or any other object to its original position. Put your fingers on . 20 TM-J9000/J9100 Note: If the scanner unit is not pushed in properly, a cover open error...
... Card Section 1. Put your fingers on the pocket on the right of the printer, unlock the scanner cover, and remove it against the table or any other object to its original position. Put your fingers on . 20 TM-J9000/J9100 Note: If the scanner unit is not pushed in properly, a cover open error...

User Manual
Page 23
... jammed paper cannot be downloaded from the following link (http://www.epson.co.jp/e/) for detailed information on TM-J9000/J9100 development can also be removed easily, open the roll paper cover. 2. English Roll Paper Section 1. Remove the jammed paper. 3. Obtaining the Printer Driver and Technical Reference Guide Download the driver from this web...
... jammed paper cannot be downloaded from the following link (http://www.epson.co.jp/e/) for detailed information on TM-J9000/J9100 development can also be removed easily, open the roll paper cover. 2. English Roll Paper Section 1. Remove the jammed paper. 3. Obtaining the Printer Driver and Technical Reference Guide Download the driver from this web...

