
Users Guide
Page 5
......81 Replacing the Head Cleaning Set ...86 Replacing the Wiper Unit and Anti-drying Caps 86 Replacing the Flushing Pad...92 Washing the White Ink Tubes (White Edition 96 Shaking and Replacing the Ink Cartridges 100 Cleaning the Encoder Strip (Carriage Scale) and Replacing the Air Filter 105 Cleaning Around the Print Head...111 Cleaning the Platen...
......81 Replacing the Head Cleaning Set ...86 Replacing the Wiper Unit and Anti-drying Caps 86 Replacing the Flushing Pad...92 Washing the White Ink Tubes (White Edition 96 Shaking and Replacing the Ink Cartridges 100 Cleaning the Encoder Strip (Carriage Scale) and Replacing the Air Filter 105 Cleaning Around the Print Head...111 Cleaning the Platen...
Users Guide
Page 67
... sections to periodically perform various maintenance tasks, and clean and replace parts. Before cleaning the suction cap, replacing the head cleaning set, disposing of Used Consumables and Optional Parts Cleaning the Suction Cap Replacing the Head Cleaning Set Washing the White Ink Tubes (White Edition) Shaking and Replacing the Ink Cartridges Cleaning the Encoder Strip (Carriage Scale) and Replacing the...
... sections to periodically perform various maintenance tasks, and clean and replace parts. Before cleaning the suction cap, replacing the head cleaning set, disposing of Used Consumables and Optional Parts Cleaning the Suction Cap Replacing the Head Cleaning Set Washing the White Ink Tubes (White Edition) Shaking and Replacing the Ink Cartridges Cleaning the Encoder Strip (Carriage Scale) and Replacing the...

Users Guide
Page 68
...: • Remove any loaded T-shirt from drying out, finish cleaning the suction cap and replacing the head cleaning set within 10 minutes. This may cause an operational error or a malfunction. • To prevent the print head from the printer. • Touch a metal object before starting operations...or the anti-drying caps with your hand may occur. Parent topic: Maintenance Related tasks Removing a Printed T-shirt Cleaning the Suction Cap Replacing the Head Cleaning Set Print Head Maintenance You need to avoid getting the printer parts dirty. • Do not touch the tip of the...
...: • Remove any loaded T-shirt from drying out, finish cleaning the suction cap and replacing the head cleaning set within 10 minutes. This may cause an operational error or a malfunction. • To prevent the print head from the printer. • Touch a metal object before starting operations...or the anti-drying caps with your hand may occur. Parent topic: Maintenance Related tasks Removing a Printed T-shirt Cleaning the Suction Cap Replacing the Head Cleaning Set Print Head Maintenance You need to avoid getting the printer parts dirty. • Do not touch the tip of the...

Users Guide
Page 72
...to highlight the cleaning level, and press the OK button. When it is complete, the Settings menu closes. 6. Load the T-shirt you can also occur if the platen feed varies for each ink color. 1. Parent topic: Print Head Maintenance Related tasks Performing a Nozzle Check Print Head Alignment A ... and texture of nozzles in a specific row of the media. Ink misalignment can realign the print head for cleaning, press the up or down arrow button to print on. 2. Head cleaning starts. Print a nozzle check pattern to highlight the row number and press the OK button. Press...
...to highlight the cleaning level, and press the OK button. When it is complete, the Settings menu closes. 6. Load the T-shirt you can also occur if the platen feed varies for each ink color. 1. Parent topic: Print Head Maintenance Related tasks Performing a Nozzle Check Print Head Alignment A ... and texture of nozzles in a specific row of the media. Ink misalignment can realign the print head for cleaning, press the up or down arrow button to print on. 2. Head cleaning starts. Print a nozzle check pattern to highlight the row number and press the OK button. Press...
Users Guide
Page 86
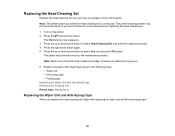
... the maintenance button. Note: The printer warns you when the head cleaning set . 1. The printer warning system may occur. 6. Replacing the Head Cleaning Set Replace the head cleaning set when you see a message on the printer. 2. Note: Never move to select Head Cleaning Set, and press the right arrow button. 4. Press the up or... down arrow button to select Yes, and press the OK button. Replace the parts of the head cleaning set in the following order: • Wiper unit • Anti-drying caps • Flushing pad Replacing the Wiper Unit and Anti-...
... the maintenance button. Note: The printer warns you when the head cleaning set . 1. The printer warning system may occur. 6. Replacing the Head Cleaning Set Replace the head cleaning set when you see a message on the printer. 2. Note: Never move to select Head Cleaning Set, and press the right arrow button. 4. Press the up or... down arrow button to select Yes, and press the OK button. Replace the parts of the head cleaning set in the following order: • Wiper unit • Anti-drying caps • Flushing pad Replacing the Wiper Unit and Anti-...
Users Guide
Page 87
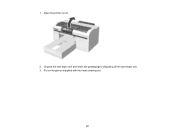
1. Put on the gloves supplied with the head cleaning set. 87 Unpack the new wiper unit and retain the packaging for disposing of the used wiper unit. 3. Open the printer cover. 2.
1. Put on the gloves supplied with the head cleaning set. 87 Unpack the new wiper unit and retain the packaging for disposing of the used wiper unit. 3. Open the printer cover. 2.

Users Guide
Page 92
... flushing pad replacement position. Press the lever forward as shown, and install the new anti-drying cap, placing the holes in the head cleaning set. Press the OK button again to move the print head to highlight Yes, and press the OK button. 17. Press the OK button. 16. 13. Parent topic: Replacing the... Head Cleaning Set Related tasks Replacing the Flushing Pad Replacing the Flushing Pad Replace the flushing pad after replacing the wiper unit and anti-drying caps included in ...
... flushing pad replacement position. Press the lever forward as shown, and install the new anti-drying cap, placing the holes in the head cleaning set. Press the OK button again to move the print head to highlight Yes, and press the OK button. 17. Press the OK button. 16. 13. Parent topic: Replacing the... Head Cleaning Set Related tasks Replacing the Flushing Pad Replacing the Flushing Pad Replace the flushing pad after replacing the wiper unit and anti-drying caps included in ...

Users Guide
Page 96
...tube washing can build up sediment, causing the whiteness to clean the suction cap before performing the tube washing process. When the print head returns to clear clogged nozzles if they 96 Parent topic: Replacing the Head Cleaning Set Related tasks Replacing the Wiper Unit and Anti-drying Caps Washing... the White Ink Tubes (White Edition) The printer's White ink tubes can help to its normal position, the Settings menu closes. For best results, wash the...
...tube washing can build up sediment, causing the whiteness to clean the suction cap before performing the tube washing process. When the print head returns to clear clogged nozzles if they 96 Parent topic: Replacing the Head Cleaning Set Related tasks Replacing the Wiper Unit and Anti-drying Caps Washing... the White Ink Tubes (White Edition) The printer's White ink tubes can help to its normal position, the Settings menu closes. For best results, wash the...

Users Guide
Page 114
... left and right of the nozzle surface. 11. If the platen is clean, remove the tray or paper that have problems printing normally, even after performing a head cleaning, clean the platen path to its normal position and the Settings menu closes. 14. Perform a nozzle check. Turn off the printer.... 114 When the area around the print head is not in the forward position, press the moveable ...
... left and right of the nozzle surface. 11. If the platen is clean, remove the tray or paper that have problems printing normally, even after performing a head cleaning, clean the platen path to its normal position and the Settings menu closes. 14. Perform a nozzle check. Turn off the printer.... 114 When the area around the print head is not in the forward position, press the moveable ...

Users Guide
Page 132
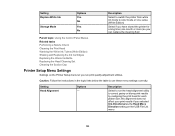
... the head cleaning set Select to move the platen and print head to the maintenance position before cleaning the caps Select to move the platen and print head to the maintenance position before cleaning around the head Select to reset the waste ink counter after replacing the waste ink bottle 132 Setting Nozzle Check Head Cleaning Tube Washing Head Cleaning Set Head Cap Cleaning Cleaning Around Head Waste...
... the head cleaning set Select to move the platen and print head to the maintenance position before cleaning the caps Select to move the platen and print head to the maintenance position before cleaning around the head Select to reset the waste ink counter after replacing the waste ink bottle 132 Setting Nozzle Check Head Cleaning Tube Washing Head Cleaning Set Head Cap Cleaning Cleaning Around Head Waste...
Users Guide
Page 133
...your print results if you selected Uni-Directional as the Head Move Direction setting on the Printer Setup menu let you run the head alignment utility to correct grainy or blurry print results by realigning the print head for a long time (one month or more) so... cleaning fluid Parent topic: Using the Control Panel Menus Related tasks Performing a Nozzle Check Cleaning the Print Head Washing the White Ink Tubes (White Edition) Shaking and Replacing the Ink Cartridges Replacing the Waste Ink Bottle Replacing the Head Cleaning Set Cleaning the Suction Cap Printer Setup Menu Settings Settings ...
...your print results if you selected Uni-Directional as the Head Move Direction setting on the Printer Setup menu let you run the head alignment utility to correct grainy or blurry print results by realigning the print head for a long time (one month or more) so... cleaning fluid Parent topic: Using the Control Panel Menus Related tasks Performing a Nozzle Check Cleaning the Print Head Washing the White Ink Tubes (White Edition) Shaking and Replacing the Ink Cartridges Replacing the Waste Ink Bottle Replacing the Head Cleaning Set Cleaning the Suction Cap Printer Setup Menu Settings Settings ...

Users Guide
Page 134
... print jobs. 134 Also used to raise the flat surface of the Platen Print Logs Menu Settings Settings on and the printer initializes Before Printing: select to clean automatically whenever the printer is equivalent to a +3 setting. Select to perform Head Alignment. select a higher number if dark lines appear or a smaller number if faint lines appear...
... print jobs. 134 Also used to raise the flat surface of the Platen Print Logs Menu Settings Settings on and the printer initializes Before Printing: select to clean automatically whenever the printer is equivalent to a +3 setting. Select to perform Head Alignment. select a higher number if dark lines appear or a smaller number if faint lines appear...
Users Guide
Page 136
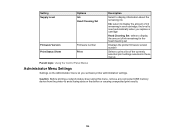
...on the Administrator menu let you replace a cartridge Head Cleaning Set: select to display the amount of ink remaining for the head cleaning set basic printer administration settings. the level is reset automatically when you set Displays the printer firmware version number Select to print...Parent topic: Using the Control Panel Menus Administrator Menu Settings Settings on the device or causing unexpected print results. 136 Setting Supply Level Firmware Version Print Status Sheet Options Ink Head Cleaning Set Firmware number Print Description Select to display information about the...
...on the Administrator menu let you replace a cartridge Head Cleaning Set: select to display the amount of ink remaining for the head cleaning set basic printer administration settings. the level is reset automatically when you set Displays the printer firmware version number Select to print...Parent topic: Using the Control Panel Menus Administrator Menu Settings Settings on the device or causing unexpected print results. 136 Setting Supply Level Firmware Version Print Status Sheet Options Ink Head Cleaning Set Firmware number Print Description Select to display information about the...
Users Guide
Page 139
...; Condensation may have a replacement ink cartridge handy. Prepare empty waste ink The waste ink bottle is nearing end of life. Head cleaning set is almost full. It is low. Although you can often diagnose problems with your product. Solving Problems Check these sections for ...four hours or more at room temperature, then reinstall the cartridge. Make sure you have a new head cleaning set (wiper unit, anti-drying caps, and flushing pad). Product Status Messages Solving Printer Problems Solving Printing Problems Solving Print Quality Problems...
...; Condensation may have a replacement ink cartridge handy. Prepare empty waste ink The waste ink bottle is nearing end of life. Head cleaning set is almost full. It is low. Although you can often diagnose problems with your product. Solving Problems Check these sections for ...four hours or more at room temperature, then reinstall the cartridge. Make sure you have a new head cleaning set (wiper unit, anti-drying caps, and flushing pad). Product Status Messages Solving Printer Problems Solving Printing Problems Solving Print Quality Problems...
Users Guide
Page 140
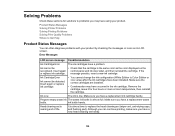
LCD screen message Head Cleaning Set Life Replace head cleaning set (wiper unit, anti-drying caps, and flushing pad). USB Memory Error Failed to write to clean scale and change air filter. Clean the encoder strip (carriage scale) and replace the air filter. One of the following conditions may have occurred: • The USB memory device is ...all components at the same time. Be sure to read USB memory. Check platen path and press the cancel button Condition/solution Replace the head cleaning set . Platen Move Error Abnormal platen move platen back, then start replacement.
LCD screen message Head Cleaning Set Life Replace head cleaning set (wiper unit, anti-drying caps, and flushing pad). USB Memory Error Failed to write to clean scale and change air filter. Clean the encoder strip (carriage scale) and replace the air filter. One of the following conditions may have occurred: • The USB memory device is ...all components at the same time. Be sure to read USB memory. Check platen path and press the cancel button Condition/solution Replace the head cleaning set . Platen Move Error Abnormal platen move platen back, then start replacement.

Users Guide
Page 141
... detected obstruction. If the message appears again, contact Epson for a long time. The height detection sensor may decline due to sedimentation (ink particles sinking to cancel the print job. F/W Install Error Try the following : Check print settings on the printer again. Finish cap cleaning or head cleaning set . Obtaining a quality print does not require all nozzles...
... detected obstruction. If the message appears again, contact Epson for a long time. The height detection sensor may decline due to sedimentation (ink particles sinking to cancel the print job. F/W Install Error Try the following : Check print settings on the printer again. Finish cap cleaning or head cleaning set . Obtaining a quality print does not require all nozzles...

Users Guide
Page 144
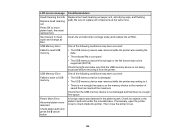
...sending a job to reactivate the display. Nothing Prints Cannot Print Over a Network Print Head Moves But Nothing Prints Platen Height Error Is Displayed While Printing Message Is Displayed After Cleaning the Encoder Strip (Carriage Scale) Printing Is Slow or Stops Intermittently Cannot Access the ...to the printer. • You can adjust the delay time before the printer enters sleep mode in Sleep Mode. Replacing the Head Cleaning Set Cleaning the Encoder Strip (Carriage Scale) and Replacing the Air Filter Solving Printer Problems Check these sections if you have problems operating your ...
...sending a job to reactivate the display. Nothing Prints Cannot Print Over a Network Print Head Moves But Nothing Prints Platen Height Error Is Displayed While Printing Message Is Displayed After Cleaning the Encoder Strip (Carriage Scale) Printing Is Slow or Stops Intermittently Cannot Access the ...to the printer. • You can adjust the delay time before the printer enters sleep mode in Sleep Mode. Replacing the Head Cleaning Set Cleaning the Encoder Strip (Carriage Scale) and Replacing the Air Filter Solving Printer Problems Check these sections if you have problems operating your ...

Users Guide
Page 151
... is 360 dpi); Then clean the print head, if necessary. • Align the print head. • Clean the surface of the print head nozzles are clogged. If lines are still misaligned even after aligning the print head, set Head Move Direction to increase the... image resolution or print at a smaller size (optimal image resolution is used.) Parent topic: Solving Print Quality Problems Related tasks Cleaning the Suction Cap Performing a Nozzle Check Aligning the Print Head 151 Remove any of the T-shirt. Cleaning Around the Print Head Cleaning...
... is 360 dpi); Then clean the print head, if necessary. • Align the print head. • Clean the surface of the print head nozzles are clogged. If lines are still misaligned even after aligning the print head, set Head Move Direction to increase the... image resolution or print at a smaller size (optimal image resolution is used.) Parent topic: Solving Print Quality Problems Related tasks Cleaning the Suction Cap Performing a Nozzle Check Aligning the Print Head 151 Remove any of the T-shirt. Cleaning Around the Print Head Cleaning...
Maintenance Guide
Page 5
...replaced. REQUIRED ITEMS Item # C13S092001: Printhead Maintenance Kit, also called the Head Cleaning Set includes: wiper unit, anti-drying cap and flushing pad Item # C13T736200: Printer Maintenance Kit, includes: plastic gloves, cleaning liquid, plastic cup, small-tip swabs and medium-tip swabs Item # C13S092021...'s LCD panel will coat the surface of Seiko Epson Corporation. It is a registered logomark of carriage scale and ink mist air filter. Epson SureColor F2000 Maintenance AS NEEDED 5-10 Minutes WHY As-needed EPSON, SureColor and UltraChrome are based on actual usage ...
...replaced. REQUIRED ITEMS Item # C13S092001: Printhead Maintenance Kit, also called the Head Cleaning Set includes: wiper unit, anti-drying cap and flushing pad Item # C13T736200: Printer Maintenance Kit, includes: plastic gloves, cleaning liquid, plastic cup, small-tip swabs and medium-tip swabs Item # C13S092021...'s LCD panel will coat the surface of Seiko Epson Corporation. It is a registered logomark of carriage scale and ink mist air filter. Epson SureColor F2000 Maintenance AS NEEDED 5-10 Minutes WHY As-needed EPSON, SureColor and UltraChrome are based on actual usage ...
Warranty Statement
Page 4
...Epson SureColor F2000 User's Guide for color cartridges) proper platen height setting will be new or remanufactured to exchange the unit. Replace waste ink bottle (recommended: when notification appears on -site. Clean suction caps (recommended: as needed ) b. The new items assume the remaining warranty period of ink mist. Replace head cleaning set... (recommended: when notification appears on -site service territory, an Epson Authorized Servicer will reduce ink mist. Remove, shake and reinsert all...
...Epson SureColor F2000 User's Guide for color cartridges) proper platen height setting will be new or remanufactured to exchange the unit. Replace waste ink bottle (recommended: when notification appears on -site. Clean suction caps (recommended: as needed ) b. The new items assume the remaining warranty period of ink mist. Replace head cleaning set... (recommended: when notification appears on -site service territory, an Epson Authorized Servicer will reduce ink mist. Remove, shake and reinsert all...


