Installation Guide
Page 11
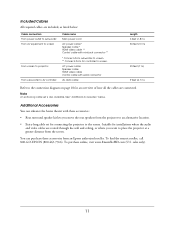
Additional Accessories You can purchase these accessories: • Rear surround speaker kit lets you want to screen. To find the nearest reseller, call 800-GO-EPSON (800-463-7766). sales only). 11 To purchase online, visit www.EnsembleHD.com (U.S. AC power cable Speaker cable HDMI ...video cable Control cable with serial connector AV data cable Length 6 feet (1.8 m) 33 feet (10 m) 23 feet (7 m) 9 feet (2.7 m) Refer to the screen. Note An extra...
Additional Accessories You can purchase these accessories: • Rear surround speaker kit lets you want to screen. To find the nearest reseller, call 800-GO-EPSON (800-463-7766). sales only). 11 To purchase online, visit www.EnsembleHD.com (U.S. AC power cable Speaker cable HDMI ...video cable Control cable with serial connector AV data cable Length 6 feet (1.8 m) 33 feet (10 m) 23 feet (7 m) 9 feet (2.7 m) Refer to the screen. Note An extra...
Installation Guide
Page 15
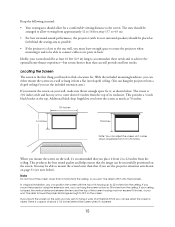
... a sloped ceiling if you use the projector extension arm shown on your wall, make sure there's enough space for . Additional black drop length lets you lower the screen as much as shown below ). If you mount the projector using the extension arm, you can see note below . Note Do not mount... to 16 feet away (3.7 to 4.9 m). • For best surround-sound performance, the projector (with the top of its enclosure. There is a space of the screen housing must leave enough space to rotate the projector when mounting it and to be able to lower the projected image enough to 22 inches...
... a sloped ceiling if you use the projector extension arm shown on your wall, make sure there's enough space for . Additional black drop length lets you lower the screen as much as shown below ). If you mount the projector using the extension arm, you can see note below . Note Do not mount... to 16 feet away (3.7 to 4.9 m). • For best surround-sound performance, the projector (with the top of its enclosure. There is a space of the screen housing must leave enough space to rotate the projector when mounting it and to be able to lower the projected image enough to 22 inches...
Installation Guide
Page 16
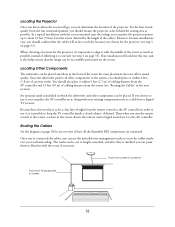
... the AV controller and 33 feet (10 m) of cabling distance from the screen (see step 1 on the screen. Track from screen to projector Track from AV equipment to length as possible. Locating the Projector Once you know where the screen will go, you can place the projector mount up to about 19 feet...needed, and after they're installed you should also place it , along with the room, if necessary. Since the subwoofer powers all the Ensemble HD components are connected. Because there does not have to be a clear line-of-sight from the rear surround speakers, you should confirm that ...
... the AV controller and 33 feet (10 m) of cabling distance from the screen (see step 1 on the screen. Track from screen to projector Track from AV equipment to length as possible. Locating the Projector Once you know where the screen will go, you can place the projector mount up to about 19 feet...needed, and after they're installed you should also place it , along with the room, if necessary. Since the subwoofer powers all the Ensemble HD components are connected. Because there does not have to be a clear line-of-sight from the rear surround speakers, you should confirm that ...

Installation Guide
Page 21
...ceiling, add 3 inches to this line. Note These steps describe how to attach the screen to a wall with this length and draw a line across . If you have a solid concrete wall, you can... also attach it between 2 and 22 inches from the ceiling (see "Attach the Mounting Assembly to the Ceiling (Option 2)"on the distance the screen... hang it 's flat and even going across the wall at an angle. A slight tilt may cause screen failure over time. 21 Attach the Mounting Assembly to the Wall (Option 1) Follow these steps if you...
...ceiling, add 3 inches to this line. Note These steps describe how to attach the screen to a wall with this length and draw a line across . If you have a solid concrete wall, you can... also attach it between 2 and 22 inches from the ceiling (see "Attach the Mounting Assembly to the Ceiling (Option 2)"on the distance the screen... hang it 's flat and even going across the wall at an angle. A slight tilt may cause screen failure over time. 21 Attach the Mounting Assembly to the Wall (Option 1) Follow these steps if you...
Installation Guide
Page 26
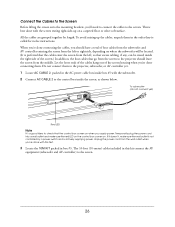
...packed in box #3. When you're done connecting the cables, you should have a total of four cables from the subwoofer and AV controller entering the screen from the left or right side, depending on where the subwoofer will be located. (It is actively supplying power. To subwoofer (do not connect yet... doesn't, make sure the red LED on the control box comes on. This is not controlled by length. Unplug the power cord from the middle. Connect the Cables to the Screen Before lifting the screen onto the mounting brackets, you'll need to connect the cables to check that the control box comes...
...packed in box #3. When you're done connecting the cables, you should have a total of four cables from the subwoofer and AV controller entering the screen from the left or right side, depending on where the subwoofer will be located. (It is actively supplying power. To subwoofer (do not connect yet... doesn't, make sure the red LED on the control box comes on. This is not controlled by length. Unplug the power cord from the middle. Connect the Cables to the Screen Before lifting the screen onto the mounting brackets, you'll need to connect the cables to check that the control box comes...

Installation Guide
Page 44
... the tracks meet . You may have your AV equipment on the right side of the screen, you may be necessary to insert screws at the pre-drilled locations. Tip When using a hacksaw, cut the tracks to desired lengths. Corner connector Seam cover Wall-to-ceiling transition 2 Attach the tracks and connector pieces... wire management system, referring to the illustration below is for a typical installation, but yours may vary. For example, if you plan to have to rotate a length of the tracks to assist with this. Note Depending on the ends of track end-for-end to the ceiling.
... the tracks meet . You may have your AV equipment on the right side of the screen, you may be necessary to insert screws at the pre-drilled locations. Tip When using a hacksaw, cut the tracks to desired lengths. Corner connector Seam cover Wall-to-ceiling transition 2 Attach the tracks and connector pieces... wire management system, referring to the illustration below is for a typical installation, but yours may vary. For example, if you plan to have to rotate a length of the tracks to assist with this. Note Depending on the ends of track end-for-end to the ceiling.

Installation Guide
Page 45
4 Starting from the covers to the color inside the track are sized differently. Be sure to desired lengths. Control cable Video cable AC cable Speaker cable 5 Press the covers in place on each track. If necessary, use a hacksaw to cut the plastic slowly ... the smaller cables in the channels. You may need a second person's help to hold the cables while pressing them . Remove the adhesive backing from the screen, press the cables into place. Note The individual channels inside the track. Tip When using a hacksaw, cut the covers to place the correct cable in...
4 Starting from the covers to the color inside the track are sized differently. Be sure to desired lengths. Control cable Video cable AC cable Speaker cable 5 Press the covers in place on each track. If necessary, use a hacksaw to cut the plastic slowly ... the smaller cables in the channels. You may need a second person's help to hold the cables while pressing them . Remove the adhesive backing from the screen, press the cables into place. Note The individual channels inside the track. Tip When using a hacksaw, cut the covers to place the correct cable in...

Installation Guide
Page 53
...Verify that it , press S-SET to set the screen position. 6 Press S-UP to raise the screen fully. Position the Image 1 Press the Pattern button on the screen. This displays an adjustment pattern to help you want it comes down as far as the maximum length preset by the factory, or 64 inches. •... S-STP to stop the screen 5 Once the screen is positioned where you align the image. 2 Rotate the focus ring to lower it fits on the projector's...
...Verify that it , press S-SET to set the screen position. 6 Press S-UP to raise the screen fully. Position the Image 1 Press the Pattern button on the screen. This displays an adjustment pattern to help you want it comes down as far as the maximum length preset by the factory, or 64 inches. •... S-STP to stop the screen 5 Once the screen is positioned where you align the image. 2 Rotate the focus ring to lower it fits on the projector's...
Schematic
Page 3
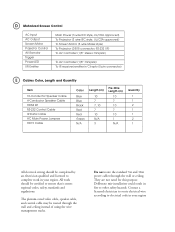
...AV Remote Trigger Power LED I/R Emitter Main Power (3 wire IEC style, UL/CSA approved) To Projector (3 wire IEC style, UL/CSA approved) To Screen Motor (3 wire Molex style) To Projector (DB15 connector, RS-232 I/F) To AV Controller (1/8" stereo minijack) To AV Controller (1/8" minijack) To IR ...receiver/emitter in Ctr spkr (5 pin connector) E Cables Color, Length and Quantity Item 10-Conductor Speaker Cable 4-Conductor Speaker Cable HDMI Kit RS-232 Control Cable IR Data Cable AC Main Power Jumpers HD15 Cable...
...AV Remote Trigger Power LED I/R Emitter Main Power (3 wire IEC style, UL/CSA approved) To Projector (3 wire IEC style, UL/CSA approved) To Screen Motor (3 wire Molex style) To Projector (DB15 connector, RS-232 I/F) To AV Controller (1/8" stereo minijack) To AV Controller (1/8" minijack) To IR ...receiver/emitter in Ctr spkr (5 pin connector) E Cables Color, Length and Quantity Item 10-Conductor Speaker Cable 4-Conductor Speaker Cable HDMI Kit RS-232 Control Cable IR Data Cable AC Main Power Jumpers HD15 Cable...
User's Guide - PowerLite Home Cinema 8100 / 8500 UB
Page 47
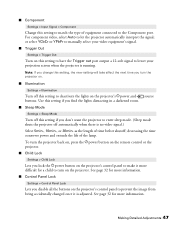
...Input Signal > Component Change this setting to match the type of time before shutoff; or select YCbCr or YPbPr to manually select your projection screen when the projector is running. See page 32 for more difficult for more information. ■ Control Panel Lock Settings > Control Panel Lock.... For component video, select Auto to enter sleep mode. (Sleep mode shuts the projector off automatically when there is adjusted. as the length of equipment connected to prevent the image from being accidentally changed once it more information. See page 32 for a child to turn the ...
...Input Signal > Component Change this setting to match the type of time before shutoff; or select YCbCr or YPbPr to manually select your projection screen when the projector is running. See page 32 for more difficult for more information. ■ Control Panel Lock Settings > Control Panel Lock.... For component video, select Auto to enter sleep mode. (Sleep mode shuts the projector off automatically when there is adjusted. as the length of equipment connected to prevent the image from being accidentally changed once it more information. See page 32 for a child to turn the ...
User's Guide
Page 6
... Controls 50 Restoring Factory Defaults 51 Cleaning and Maintenance Cleaning 53 Cleaning the Screen 53 Cleaning the Projector Lens 53 Cleaning System Components 54 Adjusting the Screen Length 54 Manual Screen Adjustment 55 Adjusting the Image Position and Focus 56 Repositioning the Image 56 ...Support 69 Speak to a Support Representative 69 Purchase Supplies and Accessories 69 Using Advanced Remote Control Features Adjusting the LCD Screen 71 Adjusting the Contrast 72 Learning Commands from Another Remote Control 72 Cloning Your Remote Control 74 Advanced Remote Control Setup...
... Controls 50 Restoring Factory Defaults 51 Cleaning and Maintenance Cleaning 53 Cleaning the Screen 53 Cleaning the Projector Lens 53 Cleaning System Components 54 Adjusting the Screen Length 54 Manual Screen Adjustment 55 Adjusting the Image Position and Focus 56 Repositioning the Image 56 ...Support 69 Speak to a Support Representative 69 Purchase Supplies and Accessories 69 Using Advanced Remote Control Features Adjusting the LCD Screen 71 Adjusting the Contrast 72 Learning Commands from Another Remote Control 72 Cloning Your Remote Control 74 Advanced Remote Control Setup...
User's Guide
Page 15
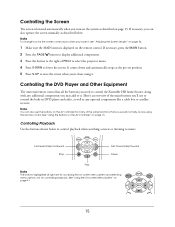
... down and automatically stops at right are for accessing the on page 41. 15 It comes down when you lower it, see "Adjusting the Screen Length" on page 54. 1 Make sure the MAIN menu is lowered automatically when you turn on the system as described on page 16. Note You can... Fast-rewind/skip backward Stop Fast-forward/skip forward Pause Play Note The buttons highlighted at the pre-set position. 5 Press S-UP to control the Ensemble HD home theater, along with any optional components like a cable box or satellite receiver. Controlling Playback Use the buttons shown below .
... down and automatically stops at right are for accessing the on page 41. 15 It comes down when you lower it, see "Adjusting the Screen Length" on page 54. 1 Make sure the MAIN menu is lowered automatically when you turn on the system as described on page 16. Note You can... Fast-rewind/skip backward Stop Fast-forward/skip forward Pause Play Note The buttons highlighted at the pre-set position. 5 Press S-UP to control the Ensemble HD home theater, along with any optional components like a cable box or satellite receiver. Controlling Playback Use the buttons shown below .
User's Guide
Page 53
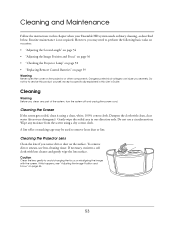
... Follow the instructions in this chapter when your Ensemble HD system needs ordinary cleaning, as specifically explained in one direction only. Gently wipe the soiled area in this User's Guide. Do not try to perform the following basic tasks on occasion: • "Adjusting the Screen Length" on page 54 • "Adjusting the Image Position...
... Follow the instructions in this chapter when your Ensemble HD system needs ordinary cleaning, as specifically explained in one direction only. Gently wipe the soiled area in this User's Guide. Do not try to perform the following basic tasks on occasion: • "Adjusting the Screen Length" on page 54 • "Adjusting the Image Position...
User's Guide
Page 54
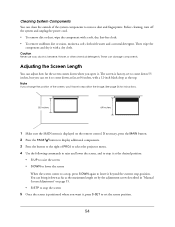
Adjusting the Screen Length You can adjust how far the screen comes down as far as the maximum length set it with a dry cloth. Before cleaning, turn off the system and unplug the power cord. • To remove dirt or dust, wipe the component .... Note If you change the position of PROJ to select the projector menu. 4 Use the following commands to raise and lower the screen, and to stop the screen 5 Once the screen is displayed on page 55. • S-STP to remove dust and fingerprints. Caution Never use wax, alcohol, benzene, thinner, or other chemical...
Adjusting the Screen Length You can adjust how far the screen comes down as far as the maximum length set it with a dry cloth. Before cleaning, turn off the system and unplug the power cord. • To remove dirt or dust, wipe the component .... Note If you change the position of PROJ to select the projector menu. 4 Use the following commands to raise and lower the screen, and to stop the screen 5 Once the screen is displayed on page 55. • S-STP to remove dust and fingerprints. Caution Never use wax, alcohol, benzene, thinner, or other chemical...
User's Guide
Page 55
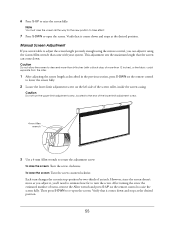
...Locate the lower-limit adjustment screw on the remote control to turn changes the screen's stop-position by two-thirds of more than 12 inches), or the fabric could separate from the roller. 1 After adjusting the screen length as you adjust it, you can adjust it using the remote control, you... and stops at the desired position. To lower the screen: Turn the screw counterclockwise. Note You must raise the screen all the way for the new position to adjust the screen length precisely enough using the 4-mm Allen wrench that the screen can come down and stops at the desired position. ...
...Locate the lower-limit adjustment screw on the remote control to turn changes the screen's stop-position by two-thirds of more than 12 inches), or the fabric could separate from the roller. 1 After adjusting the screen length as you adjust it, you can adjust it using the remote control, you... and stops at the desired position. To lower the screen: Turn the screw counterclockwise. Note You must raise the screen all the way for the new position to adjust the screen length precisely enough using the 4-mm Allen wrench that the screen can come down and stops at the desired position. ...
User's Guide
Page 63
...contrast. After setting the Color Mode, you 've selected the best Color Mode for your viewing environment. See "Restoring Factory Defaults" on the screen. The image isn't positioned correctly on page 51. 63 That's because high-definition TVs and home entertainment systems use the slightly narrower 16:9...bottom if you may get banding in one direction, or stretched out. See "Adjusting the Color Mode" on page 54. See "Adjusting the Screen Length" on page 42. See "Adjusting the Color Mode" on page 56. After setting the Color Mode, you want to see "Adjusting the ...
...contrast. After setting the Color Mode, you 've selected the best Color Mode for your viewing environment. See "Restoring Factory Defaults" on the screen. The image isn't positioned correctly on page 51. 63 That's because high-definition TVs and home entertainment systems use the slightly narrower 16:9...bottom if you may get banding in one direction, or stretched out. See "Adjusting the Color Mode" on page 54. See "Adjusting the Screen Length" on page 42. See "Adjusting the Color Mode" on page 56. After setting the Color Mode, you want to see "Adjusting the ...

User's Guide
Page 65
... . Select the PROJ (Projector) option on page 15 to lower the screen. See "Adjusting the Screen Length" on the back of the screen flashes when you repeatedly raised and lowered the screen. Solution Check for 5 to raise the screen. Then try operating the screen again. The screen motor may have accidentally changed , see page 66). Let the motor...
... . Select the PROJ (Projector) option on page 15 to lower the screen. See "Adjusting the Screen Length" on the back of the screen flashes when you repeatedly raised and lowered the screen. Solution Check for 5 to raise the screen. Then try operating the screen again. The screen motor may have accidentally changed , see page 66). Let the motor...

User's Guide
Page 120
...-sight via infrared) IR Frequency RF Range (radio frequency) RF Frequency Weight Size (L×W×H) Batteries LCD backlit display; Screen Specifications General Screen Size Aspect Ratio Image Area (W×H) Black Drop Length Screen Material Motor Installation Screen Casing Dimensions (W×H×D) Weight 100" (254 cm), nominal diagonal 16:9 (HDTV widescreen format) 87" × 49" (221...
...-sight via infrared) IR Frequency RF Range (radio frequency) RF Frequency Weight Size (L×W×H) Batteries LCD backlit display; Screen Specifications General Screen Size Aspect Ratio Image Area (W×H) Black Drop Length Screen Material Motor Installation Screen Casing Dimensions (W×H×D) Weight 100" (254 cm), nominal diagonal 16:9 (HDTV widescreen format) 87" × 49" (221...
User's Guide
Page 129
... 82 controlling components, 15 to 16, 39 to 40 defaults, resetting, 83 editing commands, 75 to 77 erasing commands, 79 to 80 LCD screen, see LCD screen, remote control learning commands, 72 to 74 lighting, 12, 59 macros, 77 to 80 pages, adding/hiding, 78 to 79 problems, 66 projector... specifications, 120 volume, controlling, 17 Reset menu, 51 RF base station, using optional, 81 to 82 S Safety instructions, 3 to 4 Screen adjusting position, 54 to 55 black drop length, 54 cleaning, 53 controlling, 15 lowering, 13 to 15 problems, 65 raising, 13 to 15 sensor, remote control, 65 specifications, 120 ...
... 82 controlling components, 15 to 16, 39 to 40 defaults, resetting, 83 editing commands, 75 to 77 erasing commands, 79 to 80 LCD screen, see LCD screen, remote control learning commands, 72 to 74 lighting, 12, 59 macros, 77 to 80 pages, adding/hiding, 78 to 79 problems, 66 projector... specifications, 120 volume, controlling, 17 Reset menu, 51 RF base station, using optional, 81 to 82 S Safety instructions, 3 to 4 Screen adjusting position, 54 to 55 black drop length, 54 cleaning, 53 controlling, 15 lowering, 13 to 15 problems, 65 raising, 13 to 15 sensor, remote control, 65 specifications, 120 ...


