Installation Guide
Page 6
... apparatus near any ventilation openings. Keep these instructions. 2. Do not install near water. 6. The wide blade or the third prong is intended to alert the user to persons. Protect the power cord from being walked on ...user serviceable parts inside. Do not block any heat sources such as radiators, heat registers, stoves, or other . CAUTION: These servicing instructions are qualified to qualified personnel. Heed all instructions. 5. Clean only with one wider than that may be of sufficient magnitude to constitute a risk of electrical shock to the presence of time...
... apparatus near any ventilation openings. Keep these instructions. 2. Do not install near water. 6. The wide blade or the third prong is intended to alert the user to persons. Protect the power cord from being walked on ...user serviceable parts inside. Do not block any heat sources such as radiators, heat registers, stoves, or other . CAUTION: These servicing instructions are qualified to qualified personnel. Heed all instructions. 5. Clean only with one wider than that may be of sufficient magnitude to constitute a risk of electrical shock to the presence of time...
Installation Guide
Page 8
... an antenna discharge unit, size of grounding conductors, location of power supplied in direct sunlight. • Make sure nothing blocks the ventilation openings on the marking label. • If an outside antenna or cable system is connected to the product, be operated only from dropping or mishandling it. • Make sure the screen is used as the disconnect device, the...
... an antenna discharge unit, size of grounding conductors, location of power supplied in direct sunlight. • Make sure nothing blocks the ventilation openings on the marking label. • If an outside antenna or cable system is connected to the product, be operated only from dropping or mishandling it. • Make sure the screen is used as the disconnect device, the...
Installation Guide
Page 9
... eyes. Health & Safety Code § 25249.5 and following.) 9 Never spill liquid of any way. WARNING: Handling the cord on the product. • Except as specifically explained in these instructions, do not attempt to projector damage. • The lamp(s) in this product contain ...cords, or integral convenience receptacles as this can result in a risk of fire or electric shock. • Keep the system components free from your skin could damage it. • Never look into the projector lens when the lamp is turned on . • Don't use the projector outside of the required temperature...
... eyes. Health & Safety Code § 25249.5 and following.) 9 Never spill liquid of any way. WARNING: Handling the cord on the product. • Except as specifically explained in these instructions, do not attempt to projector damage. • The lamp(s) in this product contain ...cords, or integral convenience receptacles as this can result in a risk of fire or electric shock. • Keep the system components free from your skin could damage it. • Never look into the projector lens when the lamp is turned on . • Don't use the projector outside of the required temperature...
Installation Guide
Page 12
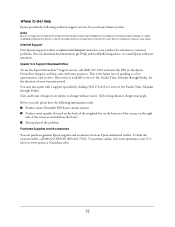
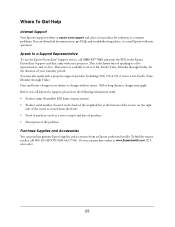
... Get Help Epson provides the following information ready: ■ Product name (Ensemble HD home cinema system) ■ Product serial number (located on the back of the weighted bar on the bottom of the screen, on the Epson PrivateLine Support card that the home theater system be installed by dialing (562) 276-4394, 6 AM to a Support Representative To use the Epson PrivateLine® Support service, call 800-GO-EPSON (800...
... Get Help Epson provides the following information ready: ■ Product name (Ensemble HD home cinema system) ■ Product serial number (located on the back of the weighted bar on the bottom of the screen, on the Epson PrivateLine Support card that the home theater system be installed by dialing (562) 276-4394, 6 AM to a Support Representative To use the Epson PrivateLine® Support service, call 800-GO-EPSON (800...
Installation Guide
Page 51
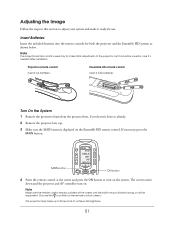
... flash on the remote control screen.) The projector lamp takes up to 30 seconds to adjust your system and make initial adjustments to turn on. Insert Batteries Insert the included batteries into the remote controls for use. If necessary, press the MAIN button. Note The projector remote control is displayed on the system. Projector remote control Insert 2 AA batteries: Ensemble HD remote control Insert 4 AAA batteries: Turn On the System 1 Remove the protective foam from the projector lens...
... flash on the remote control screen.) The projector lamp takes up to 30 seconds to adjust your system and make initial adjustments to turn on. Insert Batteries Insert the included batteries into the remote controls for use. If necessary, press the MAIN button. Note The projector remote control is displayed on the system. Projector remote control Insert 2 AA batteries: Ensemble HD remote control Insert 4 AAA batteries: Turn On the System 1 Remove the protective foam from the projector lens...

Installation Guide
Page 66
.... 2 Turn on the projection screen when you want is currently selected on another unused input, change the label on the port to which you have entered the correct code when the component turns off. 66 Note See the User's Guide for additional ways to customize the remote control. 1 Locate the code table for different video inputs. 8 When you only need to the HDMI1 port and the cable box supports HDMI audio...
.... 2 Turn on the projection screen when you want is currently selected on another unused input, change the label on the port to which you have entered the correct code when the component turns off. 66 Note See the User's Guide for additional ways to customize the remote control. 1 Locate the code table for different video inputs. 8 When you only need to the HDMI1 port and the cable box supports HDMI audio...
Schematic
Page 8
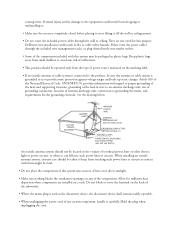
... block or cover the heatsink on or lifting it off the wall or ceiling mount. • Do not route the included power cables through the included wire management tracks, or plug them might be located in fire or other electric light or power circuits, or where it carefully. See the drawing below GROUND CLAMP ELECTRIC SERVICE EQUIPMENT ANTENNA...
... block or cover the heatsink on or lifting it off the wall or ceiling mount. • Do not route the included power cables through the included wire management tracks, or plug them might be located in fire or other electric light or power circuits, or where it carefully. See the drawing below GROUND CLAMP ELECTRIC SERVICE EQUIPMENT ANTENNA...

Schematic
Page 9
... Code § 25249.5 and following.) Never spill liquid of the screen with Proposition 65 in your home, consult your hands. Refer all servicing to projector damage. • The lamp(s) in these instructions, do not attempt to cool for one hour before replacing it . • Never look into the projector lens when the lamp is on. • Don't use the projector outside of the required temperature...
... Code § 25249.5 and following.) Never spill liquid of the screen with Proposition 65 in your home, consult your hands. Refer all servicing to projector damage. • The lamp(s) in these instructions, do not attempt to cool for one hour before replacing it . • Never look into the projector lens when the lamp is on. • Don't use the projector outside of the required temperature...
User's Guide - PowerLite Home Cinema 8100 / 8500 UB
Page 36
... Normal or High Speed to indicate how quickly you 've connected it to the projector using an HDMI cable, set the level of the projector to match that of the correct setting. ■ EPSON Super White Signal > Advanced > EPSON Super White Note: This setting can be used when the Color Mode is set to the brightness of the image. To save power and extend the life of the image. Check your video equipment has an HDMI port and...
... Normal or High Speed to indicate how quickly you 've connected it to the projector using an HDMI cable, set the level of the projector to match that of the correct setting. ■ EPSON Super White Signal > Advanced > EPSON Super White Note: This setting can be used when the Color Mode is set to the brightness of the image. To save power and extend the life of the image. Check your video equipment has an HDMI port and...

User's Guide - PowerLite Home Cinema 8100 / 8500 UB
Page 57
... source icon is warming up. Power icon and icon are on source Projection is turned off the power switch in and turn on the projector. If this doesn't solve the problem, check the status lights on . Turn off the power switch in back to turn off the projector, or press the P power button to appear. Power button flashes; Wait for the picture to turn it back on. no other lights are off The projector is in standby mode. Status lights Warning lights Lights indicating normal operation Light...
... source icon is warming up. Power icon and icon are on source Projection is turned off the power switch in and turn on the projector. If this doesn't solve the problem, check the status lights on . Turn off the power switch in back to turn off the projector, or press the P power button to appear. Power button flashes; Wait for the picture to turn it back on. no other lights are off The projector is in standby mode. Status lights Warning lights Lights indicating normal operation Light...
User's Guide - PowerLite Home Cinema 8100 / 8500 UB
Page 80
... Sleep mode, 47 Source buttons, 9, 10 Source, selecting image, 24 Specifications compatible video formats, 68 to 69 dimensions, 66 electrical, 66 environmental, 67 general, 65 lamp, 66 remote control, 66 Startup screen, selecting, 46 Static, 61 Storing projector, 56 Super-resolution, 41 Support, 12, 63 S-Video connection, 19 Sync (Synchronization) setting, 41 T Technical support, 12, 63 Test pattern, 25 THX setting, 29 Tint, 39 Tracking, 41 Transporting projector, 56 Trigger out port...
... Sleep mode, 47 Source buttons, 9, 10 Source, selecting image, 24 Specifications compatible video formats, 68 to 69 dimensions, 66 electrical, 66 environmental, 67 general, 65 lamp, 66 remote control, 66 Startup screen, selecting, 46 Static, 61 Storing projector, 56 Super-resolution, 41 Support, 12, 63 S-Video connection, 19 Sync (Synchronization) setting, 41 T Technical support, 12, 63 Test pattern, 25 THX setting, 29 Tint, 39 Tracking, 41 Transporting projector, 56 Trigger out port...
User's Guide
Page 4
... case. • Do not touch the white part of the screen with any kind through openings in the system components as the disconnect device, the disconnect device shall remain readily operable. • When unplugging the power cord of power source indicated on the back of the subwoofer. • Where the mains plug is used replacement parts specified by the manufacturer or have the...
... case. • Do not touch the white part of the screen with any kind through openings in the system components as the disconnect device, the disconnect device shall remain readily operable. • When unplugging the power cord of power source indicated on the back of the subwoofer. • Where the mains plug is used replacement parts specified by the manufacturer or have the...
User's Guide
Page 6
... Cleaning 53 Cleaning the Screen 53 Cleaning the Projector Lens 53 Cleaning System Components 54 Adjusting the Screen Length 54 Manual Screen Adjustment 55 Adjusting the Image Position and Focus 56 Repositioning the Image 56 Focusing and Resizing the Image 57 Checking the Projector Lamp 58 Checking the Info Menu 58 Checking the Warning Light 58 Replacing Remote Control Batteries 59 Solving Problems Basic Operation Problems 61 Picture Problems 62 Sound Problems 64 Problems Using the Screen 65 Problems Using the Remote Control 66 Problems Using the DVD Player 67 Problems Using...
... Cleaning 53 Cleaning the Screen 53 Cleaning the Projector Lens 53 Cleaning System Components 54 Adjusting the Screen Length 54 Manual Screen Adjustment 55 Adjusting the Image Position and Focus 56 Repositioning the Image 56 Focusing and Resizing the Image 57 Checking the Projector Lamp 58 Checking the Info Menu 58 Checking the Warning Light 58 Replacing Remote Control Batteries 59 Solving Problems Basic Operation Problems 61 Picture Problems 62 Sound Problems 64 Problems Using the Screen 65 Problems Using the Remote Control 66 Problems Using the DVD Player 67 Problems Using...
User's Guide
Page 58
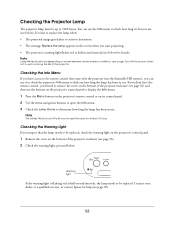
... to the remote control that the lamp needs to be replaced, check the warning light on the projector's control panel. 1 Remove the cover on its control panel. 2 Use the menu navigation buttons to open the Info menu. 3 Check the Lamp Hours to find out how long the lamp has been in use . Contact your dealer or a qualified servicer, or contact Epson for help (see below . Turn off this product when not in use to 3000 hours. Warning light If the warning light is flashing red at...
... to the remote control that the lamp needs to be replaced, check the warning light on the projector's control panel. 1 Remove the cover on its control panel. 2 Use the menu navigation buttons to open the Info menu. 3 Check the Lamp Hours to find out how long the lamp has been in use . Contact your dealer or a qualified servicer, or contact Epson for help (see below . Turn off this product when not in use to 3000 hours. Warning light If the warning light is flashing red at...
User's Guide
Page 61
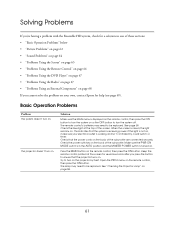
... "Checking the Projector Lamp" on the remote control, then press the ON button. The projector doesn't turn the system off. This indicates that the power cords on the back of the subwoofer are connected securely. Keep the remote control pointed at the top of the screen. Solving Problems If you're having a problem with the Ensemble HD system, check for a solution in the AUTO position and the MASTER POWER switch is turned on the remote control, then...
... "Checking the Projector Lamp" on the remote control, then press the ON button. The projector doesn't turn the system off. This indicates that the power cords on the back of the subwoofer are connected securely. Keep the remote control pointed at the top of the screen. Solving Problems If you're having a problem with the Ensemble HD system, check for a solution in the AUTO position and the MASTER POWER switch is turned on the remote control, then...
User's Guide
Page 62
... The projector's display is not receiving power. Or you 've connected an external component, check the Source Assign screen. Make sure the control cable is connected to turn on . You see a picture. Make sure the AV controller is on the AV controller using abrasives, solvents, or other cleansers. If you 're sourcing video from electronics retailers. page 53). Press the ON/STANDBY button to the HDMI OUT port on . The light around...
... The projector's display is not receiving power. Or you 've connected an external component, check the Source Assign screen. Make sure the control cable is connected to turn on . You see a picture. Make sure the AV controller is on the AV controller using abrasives, solvents, or other cleansers. If you 're sourcing video from electronics retailers. page 53). Press the ON/STANDBY button to the HDMI OUT port on . The light around...
User's Guide
Page 69
... information ready: • Product name (Ensemble HD home cinema system) • Product serial number (located on the Epson PrivateLine Support card that came with your warranty period. Days and hours of speaking to change without notice. To find the nearest reseller, call (800) 637-7661 and enter the PIN on the back of your projector. This service is the fastest way of...
... information ready: • Product name (Ensemble HD home cinema system) • Product serial number (located on the Epson PrivateLine Support card that came with your warranty period. Days and hours of speaking to change without notice. To find the nearest reseller, call (800) 637-7661 and enter the PIN on the back of your projector. This service is the fastest way of...
User's Guide
Page 124
... you use an address in Canada for installation and removal. 124 Epson's liability for the defective unit, Epson will be shipped to provide the service technician with the product model and the product serial number (located on the back of the screen weight bar), along with Part 15 of the FCC rules. Declaration of Conformity We: Located at Epson's option, the replacement may be another model of...
... you use an address in Canada for installation and removal. 124 Epson's liability for the defective unit, Epson will be shipped to provide the service technician with the product model and the product serial number (located on the back of the screen weight bar), along with Part 15 of the FCC rules. Declaration of Conformity We: Located at Epson's option, the replacement may be another model of...
User's Guide
Page 127
... image, 45 LCD screen, adjusting, 72 Copyright notice, 123 CVBS (composite video), 32 to 33 D Defaults, resetting AV controller, 51 remote control, 83 Device names, editing, 75 to 77 Disc inserting, 19 specifications, 119 Distance, speakers, 46 DVD player controlling, 15 to 17 inserting disc, 19 language, selecting, 22, 49 playing movie, 20 to 22 problems, 67 subtitles, selecting, 22 E Enclosure, projector, 56 to 57 Ensemble HD...
... image, 45 LCD screen, adjusting, 72 Copyright notice, 123 CVBS (composite video), 32 to 33 D Defaults, resetting AV controller, 51 remote control, 83 Device names, editing, 75 to 77 Disc inserting, 19 specifications, 119 Distance, speakers, 46 DVD player controlling, 15 to 17 inserting disc, 19 language, selecting, 22, 49 playing movie, 20 to 22 problems, 67 subtitles, selecting, 22 E Enclosure, projector, 56 to 57 Ensemble HD...
User's Guide
Page 129
... Reset menu, 51 RF base station, using optional, 81 to 82 S Safety instructions, 3 to 4 Screen adjusting position, 54 to 55 black drop length, 54 cleaning, 53 controlling, 15 lowering, 13 to 15 problems, 65 raising, 13 to 15 sensor, remote control, 65 specifications, 120 Sensor, remote control, 65 Service, 69 Sharpness, 45 Shift dial, projector lens, 57 Sound, see Audio equipment or Speakers Source Assign menu, 34, 45 Speakers distance, 46 problems, 64 specifications...
... Reset menu, 51 RF base station, using optional, 81 to 82 S Safety instructions, 3 to 4 Screen adjusting position, 54 to 55 black drop length, 54 cleaning, 53 controlling, 15 lowering, 13 to 15 problems, 65 raising, 13 to 15 sensor, remote control, 65 specifications, 120 Sensor, remote control, 65 Service, 69 Sharpness, 45 Shift dial, projector lens, 57 Sound, see Audio equipment or Speakers Source Assign menu, 34, 45 Speakers distance, 46 problems, 64 specifications...


