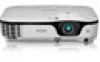
User Manual
Page 3
Front/Top ...14 Projector Parts - Rear ...15 Projector Parts - Remote Control 20 Setting Up the Projector ...22 Projector Placement...22 Projector Setup and Installation Options 22 Projection Distance...24 Projector Connections...25 Connecting to Computer ...
Front/Top ...14 Projector Parts - Rear ...15 Projector Parts - Remote Control 20 Setting Up the Projector ...22 Projector Placement...22 Projector Setup and Installation Options 22 Projection Distance...24 Projector Connections...25 Connecting to Computer ...
User Manual
Page 4
... Connected USB Source 35 Disconnecting a USB Device or Camera From the Projector 35 Connecting to a Document Camera 35 Installing Batteries in the Remote Control 36 Opening the Lens Cover ...37 Using Basic Projector Features ...38 Turning On the Projector ...38 Turning Off the Projector ...40 ... Shape With Quick Corner 46 Resizing the Image...48 Focusing the Image Using the Focus Ring 49 Remote Control Operation ...49 Using the Remote Control as a Wireless Mouse 50 Using the Remote Control as a Presentation Pointer 51 Selecting an Image Source ...52 Projection Modes ...54 Changing the ...
... Connected USB Source 35 Disconnecting a USB Device or Camera From the Projector 35 Connecting to a Document Camera 35 Installing Batteries in the Remote Control 36 Opening the Lens Cover ...37 Using Basic Projector Features ...38 Turning On the Projector ...38 Turning Off the Projector ...40 ... Shape With Quick Corner 46 Resizing the Image...48 Focusing the Image Using the Focus Ring 49 Remote Control Operation ...49 Using the Remote Control as a Wireless Mouse 50 Using the Remote Control as a Presentation Pointer 51 Selecting an Image Source ...52 Projection Modes ...54 Changing the ...
User Manual
Page 6
Replacing the Air Filter...90 Projector Lamp Maintenance...92 Replacing the Lamp ...93 Resetting the Lamp Timer...98 Replacing the Remote Control Batteries 99 Transporting the Projector...101 Solving Problems ...102 Projection Problem Tips ...102 Projector Light Status ...102 Using the Projector... Solutions When There is No Sound or Low Volume 112 Solving Projector or Remote Control Operation Problems 112 Solutions to Projector Power or Shut-Off Problems 113 Solutions to Problems With the Remote Control 113 Solutions to Password Problems 114 Where to Get Help...114 Technical Specifications...
Replacing the Air Filter...90 Projector Lamp Maintenance...92 Replacing the Lamp ...93 Resetting the Lamp Timer...98 Replacing the Remote Control Batteries 99 Transporting the Projector...101 Solving Problems ...102 Projection Problem Tips ...102 Projector Light Status ...102 Using the Projector... Solutions When There is No Sound or Low Volume 112 Solving Projector or Remote Control Operation Problems 112 Solutions to Projector Power or Shut-Off Problems 113 Solutions to Problems With the Remote Control 113 Solutions to Password Problems 114 Where to Get Help...114 Technical Specifications...

User Manual
Page 11
... Or you can purchase screens, other optional accessories, and replacement parts from Epson or an authorized Epson reseller. • To receive an HDMI signal, you need a compatible HDMI cable (EX5210/EX7210). 2 Remote control 3 Remote control batteries (two AA alkaline) 4 Power cord 5 USB cable 6 VGA...signal, you need a D-sub, 15-pin, component-to obtain the following optional accessories and replacement parts for your device. Epson offers the following additional components: • To receive an S-Video signal, you need an S-Video cable compatible with your projector: ...
... Or you can purchase screens, other optional accessories, and replacement parts from Epson or an authorized Epson reseller. • To receive an HDMI signal, you need a compatible HDMI cable (EX5210/EX7210). 2 Remote control 3 Remote control batteries (two AA alkaline) 4 Power cord 5 USB cable 6 VGA...signal, you need a D-sub, 15-pin, component-to obtain the following optional accessories and replacement parts for your device. Epson offers the following additional components: • To receive an S-Video signal, you need an S-Video cable compatible with your projector: ...
User Manual
Page 13
... your projector during a presentation? Parent topic: Projector Features Notations Used in the Documentation Follow the guidelines in help fast. In addition, Epson offers free Extra Care Road Service. Register your product online using your documentation: • Warnings must be followed carefully to get help ...brochure for help: • Built-in these notations as you won't have to wait for Additional Information Need quick help on the remote control or projector to avoid bodily injury. • Cautions must be repaired. Here's where to Get Help 13 Warranty and Registration ...
... your projector during a presentation? Parent topic: Projector Features Notations Used in the Documentation Follow the guidelines in help fast. In addition, Epson offers free Extra Care Road Service. Register your product online using your documentation: • Warnings must be followed carefully to get help ...brochure for help: • Built-in these notations as you won't have to wait for Additional Information Need quick help on the remote control or projector to avoid bodily injury. • Cautions must be repaired. Here's where to Get Help 13 Warranty and Registration ...
User Manual
Page 14
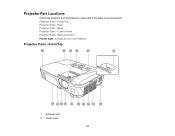
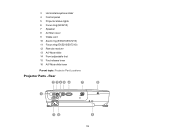
Projector Parts - Rear Projector Parts - Front/Top 1 Exhaust vent 2 Lamp cover 14 Front/Top Projector Parts - Base Projector Parts - Projector Part Locations Check the projector part illustrations to Your Projector Projector Parts - Remote Control Parent topic: Introduction to learn about the parts on your projector. Control Panel Projector Parts -
Projector Parts - Rear Projector Parts - Front/Top 1 Exhaust vent 2 Lamp cover 14 Front/Top Projector Parts - Base Projector Parts - Projector Part Locations Check the projector part illustrations to Your Projector Projector Parts - Remote Control Parent topic: Introduction to learn about the parts on your projector. Control Panel Projector Parts -
User Manual
Page 15
Rear 15 3 Horizontal keystone slider 4 Control panel 5 Projector status lights 6 Focus ring (EX3210) 7 Speaker 8 Air filter cover 9 Intake vent 10 Zoom ring (EX5210/EX7210) 11 Focus ring (EX5210/EX7210) 12 Remote receiver 13 A/V Mute slide 14 Front adjustable foot 15 Foot release lever 16 A/V Mute slide lever Parent topic: Projector Part Locations Projector Parts -
Rear 15 3 Horizontal keystone slider 4 Control panel 5 Projector status lights 6 Focus ring (EX3210) 7 Speaker 8 Air filter cover 9 Intake vent 10 Zoom ring (EX5210/EX7210) 11 Focus ring (EX5210/EX7210) 12 Remote receiver 13 A/V Mute slide 14 Front adjustable foot 15 Foot release lever 16 A/V Mute slide lever Parent topic: Projector Part Locations Projector Parts -
User Manual
Page 22
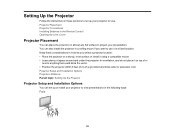
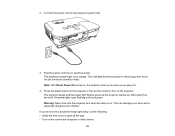
... any flat surface to project your projector for ventilation, and do not place it in a fixed location. Projector Placement Projector Connections Installing Batteries in the Remote Control Opening the Lens Cover Projector Placement You can also install the projector in the following ways: Front 22
... any flat surface to project your projector for ventilation, and do not place it in a fixed location. Projector Placement Projector Connections Installing Batteries in the Remote Control Opening the Lens Cover Projector Placement You can also install the projector in the following ways: Front 22
User Manual
Page 29
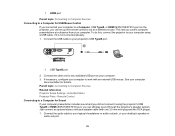
...the other end to a Computer, USB TypeB, or HDMI (EX5210/EX7210) port on your projector's USB TypeB port. 1 USB TypeB port 2. Remote Control Connecting to a Computer for USB Mouse Control If you connected your computer to any available USB port on the projector, you control computer presentations...See your computer using a USB cable, if it using the projector's USB TypeB or HDMI (EX5210/EX7210) port, you can set up the remote control to your computer documentation for details. Parent topic: Connecting to work with one 3.5 mm mini-plug and two RCA plugs). 1. Extended Menu ...
...the other end to a Computer, USB TypeB, or HDMI (EX5210/EX7210) port on your projector's USB TypeB port. 1 USB TypeB port 2. Remote Control Connecting to a Computer for USB Mouse Control If you connected your computer to any available USB port on the projector, you control computer presentations...See your computer using a USB cable, if it using the projector's USB TypeB or HDMI (EX5210/EX7210) port, you can set up the remote control to your computer documentation for details. Parent topic: Connecting to work with one 3.5 mm mini-plug and two RCA plugs). 1. Extended Menu ...
User Manual
Page 35
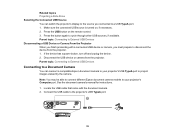
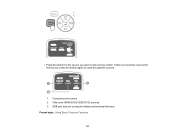
... projector's display to the source you must prepare to disconnect the device from the projector. Note: You may be able to connect different Epson document camera models to cycle through other USB sources, if available. If the device has a power button, turn off and unplug the device... projector's USB TypeA port. 35 See the document camera's manual for instructions. 1. Make sure the connected USB source is turned on the remote control. 3. Disconnect the USB device or camera from the projector. 1. Related topics Projecting a Slide Show Selecting the Connected USB Source You can ...
... projector's display to the source you must prepare to disconnect the device from the projector. Note: You may be able to connect different Epson document camera models to cycle through other USB sources, if available. If the device has a power button, turn off and unplug the device... projector's USB TypeA port. 35 See the document camera's manual for instructions. 1. Make sure the connected USB source is turned on the remote control. 3. Disconnect the USB device or camera from the projector. 1. Related topics Projecting a Slide Show Selecting the Connected USB Source You can ...
User Manual
Page 36
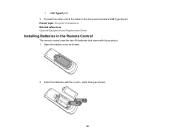
1 USB TypeA port 3. ends facing as shown. 2. Insert the batteries with the projector. 1. Parent topic: Projector Connections Related references Optional Equipment and Replacement Parts Installing Batteries in the Remote Control The remote control uses the two AA batteries that came with the + and - Open the battery cover as shown. 36 Connect the other end of the cable to the document camera's USB Type B port.
1 USB TypeA port 3. ends facing as shown. 2. Insert the batteries with the projector. 1. Parent topic: Projector Connections Related references Optional Equipment and Replacement Parts Installing Batteries in the Remote Control The remote control uses the two AA batteries that came with the + and - Open the battery cover as shown. 36 Connect the other end of the cable to the document camera's USB Type B port.
User Manual
Page 38
... the Projector Selecting the Language for the Projector Menus Adjusting the Image Height Image Shape Resizing the Image Focusing the Image Using the Focus Ring Remote Control Operation Selecting an Image Source Projection Modes Image Aspect Ratio Color Mode Controlling the Volume With the Volume Buttons Projecting a Slide Show Turning On...
... the Projector Selecting the Language for the Projector Menus Adjusting the Image Height Image Shape Resizing the Image Focusing the Image Using the Focus Ring Remote Control Operation Selecting an Image Source Projection Modes Image Aspect Ratio Color Mode Controlling the Volume With the Volume Buttons Projecting a Slide Show Turning On...
User Manual
Page 39
... to turn on the connected computer or video device. 39 2. This indicates that the projector is receiving power, but is on the projector or the remote control to the projector's power inlet. 3. Warning: Never look into an electrical outlet. Note: With Direct Power On turned on, the projector turns on (standby...
... to turn on the connected computer or video device. 39 2. This indicates that the projector is receiving power, but is on the projector or the remote control to the projector's power inlet. 3. Warning: Never look into an electrical outlet. Note: With Direct Power On turned on, the projector turns on (standby...
User Manual
Page 40
...not in use to detect the video source. Press the power button on , press any computer connected to it on the projector or the remote control. Press the power button again. (To leave it so you can see the computer display during shutdown. Parent topic: Using Basic ... away. 40 The projector displays a shutdown confirmation screen. 2. Lamp life will vary depending upon mode selected, environmental conditions, and usage. Note: With Epson's Instant Off technology, there is no cool-down any other video media, and press the play button (if necessary). • Press the Source Search...
...not in use to detect the video source. Press the power button on , press any computer connected to it on the projector or the remote control. Press the power button again. (To leave it so you can see the computer display during shutdown. Parent topic: Using Basic ... away. 40 The projector displays a shutdown confirmation screen. 2. Lamp life will vary depending upon mode selected, environmental conditions, and usage. Note: With Epson's Instant Off technology, there is no cool-down any other video media, and press the play button (if necessary). • Press the Source Search...
User Manual
Page 48
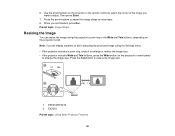
...enlarge or reduce the image size. • If the projector includes Wide and Tele buttons, press the Wide button on the projector or the remote control to enlarge the image size. Use the arrow buttons on the projector's control panel to select the corner of the image you are ... press Enter. 7. Press the Tele button to adjust the image shape as necessary. 8. Press the arrow buttons to reduce the image size. 1 EX5210/EX7210 2 EX3210 Parent topic: Using Basic Projector Features 48 Parent topic: Image Shape Resizing the Image You can display a pattern to aid in adjusting the projected image...
...enlarge or reduce the image size. • If the projector includes Wide and Tele buttons, press the Wide button on the projector or the remote control to enlarge the image size. Use the arrow buttons on the projector's control panel to select the corner of the image you are ... press Enter. 7. Press the Tele button to adjust the image shape as necessary. 8. Press the arrow buttons to reduce the image size. 1 EX5210/EX7210 2 EX3210 Parent topic: Using Basic Projector Features 48 Parent topic: Image Shape Resizing the Image You can display a pattern to aid in adjusting the projected image...
User Manual
Page 49
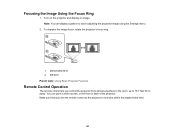
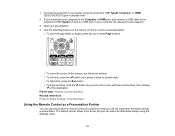
Focusing the Image Using the Focus Ring 1. To sharpen the image focus, rotate the projector's focus ring. 1 EX5210/EX7210 2 EX3210 Parent topic: Using Basic Projector Features Remote Control Operation The remote control lets you aim the remote control at the screen, or the front or back of the projector. You can display a pattern to 19...
Focusing the Image Using the Focus Ring 1. To sharpen the image focus, rotate the projector's focus ring. 1 EX5210/EX7210 2 EX3210 Parent topic: Using Basic Projector Features Remote Control Operation The remote control lets you aim the remote control at the screen, or the front or back of the projector. You can display a pattern to 19...

User Manual
Page 50
...3 ± 15º Note: Avoid using the remote control in conditions with bright fluorescent lights or in direct sunlight, or the projector may not respond to commands. Using the Remote Control as a Wireless Mouse Using the Remote Control as a Presentation Pointer Parent topic: Using Basic Projector... Features Related tasks Replacing the Remote Control Batteries Using the Remote Control as a Wireless Mouse You can control your...
...3 ± 15º Note: Avoid using the remote control in conditions with bright fluorescent lights or in direct sunlight, or the projector may not respond to commands. Using the Remote Control as a Wireless Mouse Using the Remote Control as a Presentation Pointer Parent topic: Using Basic Projector... Features Related tasks Replacing the Remote Control Batteries Using the Remote Control as a Wireless Mouse You can control your...
User Manual
Page 51
...projector to a computer using the Settings menu. 51 Use the following buttons on the screen, use the projector's remote control as you move the cursor on the remote control to help you call out important information during a presentation. The default pointer shape is an arrow, but...and-drop, hold the button as a pointer to control your computer (for wireless mouse support). 3. Start your presentation. 4. Extended Menu Using the Remote Control as a Presentation Pointer You can select an alternative shape using the projector's USB TypeB, Computer, or HDMI (EX5210/EX7210) port to a...
...projector to a computer using the Settings menu. 51 Use the following buttons on the screen, use the projector's remote control as you move the cursor on the remote control to help you call out important information during a presentation. The default pointer shape is an arrow, but...and-drop, hold the button as a pointer to control your computer (for wireless mouse support). 3. Start your presentation. 4. Extended Menu Using the Remote Control as a Presentation Pointer You can select an alternative shape using the projector's USB TypeB, Computer, or HDMI (EX5210/EX7210) port to a...

User Manual
Page 52
... - Press the Pointer button on . 2. Make sure the connected image source you want to use is turned on the remote control. 2. Press Esc to move the pointer on the projector or remote control until you see the image from the source you may want . 52 Do one image source to switch from... as a computer and DVD player, you want to the other video media and press its play button (if necessary). 3. Use the arrow buttons on the remote control to clear the pointer from one of the following: • Press the Source Search button on the screen. 3.
... - Press the Pointer button on . 2. Make sure the connected image source you want to use is turned on the remote control. 2. Press Esc to move the pointer on the projector or remote control until you see the image from the source you may want . 52 Do one image source to switch from... as a computer and DVD player, you want to the other video media and press its play button (if necessary). 3. Use the arrow buttons on the remote control to clear the pointer from one of the following: • Press the Source Search button on the screen. 3.
User Manual
Page 53
If there is more than one port for the source you want on the remote control. • Press the button for that source, press the button again to cycle through the sources. 1 Computer port sources 2 Video and HDMI (EX5210/EX7210) sources 3 USB port sources (computer display and external devices) Parent topic: Using Basic Projector Features 53
If there is more than one port for the source you want on the remote control. • Press the button for that source, press the button again to cycle through the sources. 1 Computer port sources 2 Video and HDMI (EX5210/EX7210) sources 3 USB port sources (computer display and external devices) Parent topic: Using Basic Projector Features 53


