
User Manual
Page 2
...of Microsoft Corporation. Centronics is a registered trademark of Seiko Epson Corporation. ESC/P is a trademark of Centronics Data Computer Corporation. Reorient the receiving antenna - WARNING The connection of a non-shielded printer interface cable to correct the interference by turning the equipment off...against such interference in a residential installation, However, there is encouraged to try to this printer will not occur in Subpart J of part 15 of Seiko Epson Corporation. If this equipment. All rights reserved. Graphics created with the specifications in a particular...
...of Microsoft Corporation. Centronics is a registered trademark of Seiko Epson Corporation. ESC/P is a trademark of Centronics Data Computer Corporation. Reorient the receiving antenna - WARNING The connection of a non-shielded printer interface cable to correct the interference by turning the equipment off...against such interference in a residential installation, However, there is encouraged to try to this printer will not occur in Subpart J of part 15 of Seiko Epson Corporation. If this equipment. All rights reserved. Graphics created with the specifications in a particular...

User Manual
Page 5
... the Self Test 1-12 Connecting the Printer to Your Computer 1-13 Setting the DIP Switches Chapter 2 Choosing and Loading Paper 2-1 Choosing Paper 2-1 Loading Single Sheets 2-2 Loading Continuous-feed Paper 2-7 Loading Labels 2-8 The Paper Thickness Lever Using Your Printer Chapter 3 Using the EX with Application Programs 3-1 Printer Selection Menus 3-2 Computer-Printer Communication 3-3 Word Processors 3-4 Spreadsheets 3-6 Graphics...
... the Self Test 1-12 Connecting the Printer to Your Computer 1-13 Setting the DIP Switches Chapter 2 Choosing and Loading Paper 2-1 Choosing Paper 2-1 Loading Single Sheets 2-2 Loading Continuous-feed Paper 2-7 Loading Labels 2-8 The Paper Thickness Lever Using Your Printer Chapter 3 Using the EX with Application Programs 3-1 Printer Selection Menus 3-2 Computer-Printer Communication 3-3 Word Processors 3-4 Spreadsheets 3-6 Graphics...
User Manual
Page 6
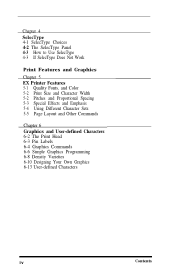
Chapter 4 SelecType 4-1 SelecType Choices 4-2 The SelecType Panel 4-3 How to Use SelecType 4-3 If SelecType Does Not Work Print Features and Graphics Chapter 5 EX Printer Features 5-1 Quality Fonts, and Color 5-2 Print Size and Character Width 5-2 Pitches and Proportional Spacing 5-3 Special Effects and Emphasis 5-4 Using Different Character Sets 5-5 Page Layout and ...
Chapter 4 SelecType 4-1 SelecType Choices 4-2 The SelecType Panel 4-3 How to Use SelecType 4-3 If SelecType Does Not Work Print Features and Graphics Chapter 5 EX Printer Features 5-1 Quality Fonts, and Color 5-2 Print Size and Character Width 5-2 Pitches and Proportional Spacing 5-3 Special Effects and Emphasis 5-4 Using Different Character Sets 5-5 Page Layout and ...
User Manual
Page 9
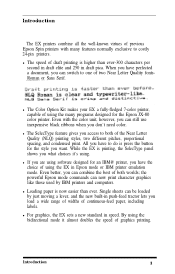
..., the SelecType panel shows you have perfected a document, you don't need color. Introduction 1 Introduction The EX printers combine all the well-known virtues of previous Epson Spin printers with the color unit, however, you can still use inexpensive black ribbons when you can now print character graphics... printing is press the button for the Epson JX-80 color printer. l The SelecType feature gives you can be loaded by IBM printers and computers. By using . Even better, you access to costly 24-pin printers. l For graphics, the EX sets a new standard in speed. When...
..., the SelecType panel shows you have perfected a document, you don't need color. Introduction 1 Introduction The EX printers combine all the well-known virtues of previous Epson Spin printers with the color unit, however, you can still use inexpensive black ribbons when you can now print character graphics... printing is press the button for the Epson JX-80 color printer. l The SelecType feature gives you can be loaded by IBM printers and computers. By using . Even better, you access to costly 24-pin printers. l For graphics, the EX sets a new standard in speed. When...

User Manual
Page 10
... use any of the printer's commands, and some advice on solving problems. Finally, there is a glossary and a comprehensive index, and inside the back of the manual is printed on the inside of the back flap, summarizes the first chapter's setting up your new EX-800 or EX-1000, this Manual To make... it easier to using the manual. About this manual includes a 10-step guide. In addition to Setting Up Your printer, there are another aid to set up instructions. They make it easy...
... use any of the printer's commands, and some advice on solving problems. Finally, there is a glossary and a comprehensive index, and inside the back of the manual is printed on the inside of the back flap, summarizes the first chapter's setting up your new EX-800 or EX-1000, this Manual To make... it easier to using the manual. About this manual includes a 10-step guide. In addition to Setting Up Your printer, there are another aid to set up instructions. They make it easy...

User Manual
Page 12
... Simply follow the steps in this manual covers both the EX-800 and the EX-1000, the illustrations show only one printer (the EX-800) because the only difference between the two is that the EX-1000 can use wider paper. 1 Unpacking the Printer As you unpack the printer, see that all the parts in Figure l-l are there and...
... Simply follow the steps in this manual covers both the EX-800 and the EX-1000, the illustrations show only one printer (the EX-800) because the only difference between the two is that the EX-1000 can use wider paper. 1 Unpacking the Printer As you unpack the printer, see that all the parts in Figure l-l are there and...
User Manual
Page 13
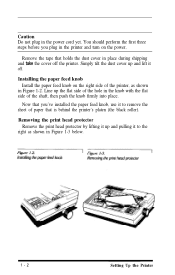
... it up and pulling it to the right as shown in Figure 1-2. Caution Do not plug in the printer and turn on the right side of the shaft, then push the knob firmly into place. Simply tilt ...the dust cover up the flat side of the hole in the knob with the flat side of the printer, as shown in place during shipping and take the cover off . You should perform the first three steps ...of paper that holds the dust cover in Figure 1-3 below. 1-2 Setting Up the Printer Installing the paper feed knob Install the paper feed knob on the power, Remove the tape that is behind the...
... it up and pulling it to the right as shown in Figure 1-2. Caution Do not plug in the printer and turn on the right side of the shaft, then push the knob firmly into place. Simply tilt ...the dust cover up the flat side of the hole in the knob with the flat side of the printer, as shown in place during shipping and take the cover off . You should perform the first three steps ...of paper that holds the dust cover in Figure 1-3 below. 1-2 Setting Up the Printer Installing the paper feed knob Install the paper feed knob on the power, Remove the tape that is behind the...

User Manual
Page 14
...potential sources of interference such as the base units of ribbon in case you need to reach. l Avoid sockets on transporting the printer are finished unpacking, put the packaging materials and the head protector in the box and keep the following tips in , see that... is turned off. If the printer is plugged in mind: l Place the printer on a flat, stable surface-never on the printer. You install both types of cordless telephones. 3 Installing the Ribbon The EX uses a simple cartridge ribbon designed for convenient and trouble-free installation...
...potential sources of interference such as the base units of ribbon in case you need to reach. l Avoid sockets on transporting the printer are finished unpacking, put the packaging materials and the head protector in the box and keep the following tips in , see that... is turned off. If the printer is plugged in mind: l Place the printer on a flat, stable surface-never on the printer. You install both types of cordless telephones. 3 Installing the Ribbon The EX uses a simple cartridge ribbon designed for convenient and trouble-free installation...
User Manual
Page 15
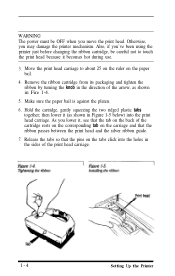
...holes in the sides of the arrow, as shown in Fire 1-4. 5. As you 've been using the printer just before changing the ribbon cartridge, be OFF when you may damage the printer mechanism. Remove the ribbon cartridge from its packaging and tighten the ribbon by turning the knob in the direction... of the print head carriage. 1-4 Setting Up the Printer Release the tabs so that the ribbon passes between the print head and the silver ribbon guide. 7. WARNING The power must be careful not ...
...holes in the sides of the arrow, as shown in Fire 1-4. 5. As you 've been using the printer just before changing the ribbon cartridge, be OFF when you may damage the printer mechanism. Remove the ribbon cartridge from its packaging and tighten the ribbon by turning the knob in the direction... of the print head carriage. 1-4 Setting Up the Printer Release the tabs so that the ribbon passes between the print head and the silver ribbon guide. 7. WARNING The power must be careful not ...

User Manual
Page 16
...old ribbon, simply grip the cartridge by the two plastic tabs and lift it up the Printer 1-5 then plug the power cord into a properly grounded socket. Figure 1-6. Always use ribbons for Epson EX printers. Before plugging in the power cord, see that the ribbon moves freely Replacing the ribbon .... . . It is turned off; Turning on the left side of the printer (see that the power switch on the printer Setting up and out of printer, and you have...
...old ribbon, simply grip the cartridge by the two plastic tabs and lift it up the Printer 1-5 then plug the power cord into a properly grounded socket. Figure 1-6. Always use ribbons for Epson EX printers. Before plugging in the power cord, see that the ribbon moves freely Replacing the ribbon .... . . It is turned off; Turning on the left side of the printer (see that the power switch on the printer Setting up and out of printer, and you have...
User Manual
Page 17
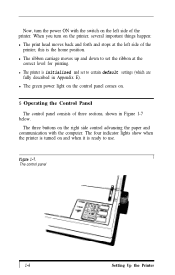
...control panel consists of three sections, shown in Appendix E). The four indicator lights show when the printer is turned on and when it is the home position. Now, turn on the printer, several important things happen: l The print head moves back and forth and stops at the correct... is ready to certain default settings (which are fully described in Figure 1-7 below. l The printer is initialized and set the ribbon at the left side of the printer. The control panel 1-6 Setting Up the Printer l The ribbon carriage moves up and down to set to use. Figure 1-7. l The green...
...control panel consists of three sections, shown in Appendix E). The four indicator lights show when the printer is turned on and when it is the home position. Now, turn on the printer, several important things happen: l The print head moves back and forth and stops at the correct... is ready to certain default settings (which are fully described in Figure 1-7 below. l The printer is initialized and set the ribbon at the left side of the printer. The control panel 1-6 Setting Up the Printer l The ribbon carriage moves up and down to set to use. Figure 1-7. l The green...

User Manual
Page 18
...off line or from the computer. Remember not to use the paper feed knob while the printer is turned on . POWER This comes on . When the light is off line when ...is out of paper or advances continuous paper to on when the printer is fully described in the printer. The buttons There are three buttons on when the printer is able to print. Pressing the ON LINE button then has... no effect until you hold it or continuously if you load paper. The printer automatically goes off , the printer is turned on to show that let you try to the power and is off line...
...off line or from the computer. Remember not to use the paper feed knob while the printer is turned on . POWER This comes on . When the light is off line when ...is out of paper or advances continuous paper to on when the printer is fully described in the printer. The buttons There are three buttons on when the printer is able to print. Pressing the ON LINE button then has... no effect until you hold it or continuously if you load paper. The printer automatically goes off , the printer is turned on to show that let you try to the power and is off line...
User Manual
Page 19
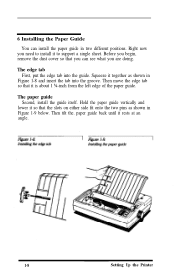
... shown in two different positions. 6 Installing the Paper Guide You can see what you are doing. Squeeze it rests at an angle. 1-8 Setting Up the Printer Right now you need to install it to support a single sheet.
... shown in two different positions. 6 Installing the Paper Guide You can see what you are doing. Squeeze it rests at an angle. 1-8 Setting Up the Printer Right now you need to install it to support a single sheet.

User Manual
Page 20
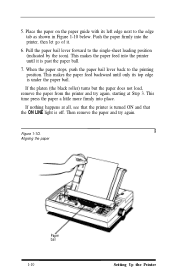
...) remind you whether to the single-sheet loading (forward) position in step 5. 4. Setting Up the Printer 1-9 7 Loading Paper Even if you normally use 14-inch-wide paper so that the paper bail lever...on the platen. Turn the printer ON first. Note that none of paper: 1. Make sure the ON LINE light is OFF If it on the EX have an EX-1000, be in the printer before you have icons (small... pictures) beside them. If you turn it is simpler to test the printer using a single sheet of paper....
...) remind you whether to the single-sheet loading (forward) position in step 5. 4. Setting Up the Printer 1-9 7 Loading Paper Even if you normally use 14-inch-wide paper so that the paper bail lever...on the platen. Turn the printer ON first. Note that none of paper: 1. Make sure the ON LINE light is OFF If it on the EX have an EX-1000, be in the printer before you have icons (small... pictures) beside them. If you turn it is simpler to test the printer using a single sheet of paper....
User Manual
Page 21
... let go of it is past the paper ball. 7. This makes the paper feed into the printer until only its left edge next to the edge tab as shown in Figure 1-10 below. When the paper stops, push the paper bail lever ... until it . 6. If the platen (the black roller) turns but the paper does not load, remove the paper from the printer and try again. Then remove the paper and try again, starting at all, see that the printer is turned ON and that the ON LINE light is under the paper bail.
... let go of it is past the paper ball. 7. This makes the paper feed into the printer until only its left edge next to the edge tab as shown in Figure 1-10 below. When the paper stops, push the paper bail lever ... until it . 6. If the platen (the black roller) turns but the paper does not load, remove the paper from the printer and try again. Then remove the paper and try again, starting at all, see that the printer is turned ON and that the ON LINE light is under the paper bail.

User Manual
Page 22
...hold down the FORM FEED button while you turn the printer off. 8 Running the Self Test The EX has a built-in self test that prints out the ...characters in its memory The test continues until you turn the printer on. This part of ... 0123456789: ;?@ABCDEFGHIJKLMNOP * o * + , - . /0123456789: ;?BABCDEFGHIJKLMNOPQ o * + , - . /0123456789: ;?@ABCDEFGHIJKLMNOPQR Setting Up the Printer 1-11 Then it prints the characters from its memory so that you can see that the power is shown below. Auto LF Interface OFF 0 ...
...hold down the FORM FEED button while you turn the printer off. 8 Running the Self Test The EX has a built-in self test that prints out the ...characters in its memory The test continues until you turn the printer on. This part of ... 0123456789: ;?@ABCDEFGHIJKLMNOP * o * + , - . /0123456789: ;?BABCDEFGHIJKLMNOPQ o * + , - . /0123456789: ;?@ABCDEFGHIJKLMNOPQR Setting Up the Printer 1-11 Then it prints the characters from its memory so that you can see that the power is shown below. Auto LF Interface OFF 0 ...

User Manual
Page 23
The EX cannot print a draft self test, however, if the NLQ DIP switch is on the printer to protect data from interference. Therefore, you must be sure to use. The two interfaces are explained in Fire 1-11. The parallel interface More connecting a ... ground screw on . Then plug the other interfaces can usually use the one . If you have a ground wire. Connect this wire to Your Computer Your EX printer has two separate interface connections. Some parallel cables have a suitable cable, you can connect most computers immediately The few computers that require other end of...
The EX cannot print a draft self test, however, if the NLQ DIP switch is on the printer to protect data from interference. Therefore, you must be sure to use. The two interfaces are explained in Fire 1-11. The parallel interface More connecting a ... ground screw on . Then plug the other interfaces can usually use the one . If you have a ground wire. Connect this wire to Your Computer Your EX printer has two separate interface connections. Some parallel cables have a suitable cable, you can connect most computers immediately The few computers that require other end of...

User Manual
Page 24
...DB-25 socket, including the Apple IIe with serial interface. (Although you can use an Epson serial interface cable. See the section on how to set them. 10 Setting the DIP Switches The EX has sixteen switches that allow you should use the serial interface with an IBM or compatible ... compatibles, and #8293 for information on serial interfaces in the back of the printer See Figure 1-12 below. Setting Up the Printer 1-13 The serial interface For the serial interface, you to change many of the printer's settings to the parallel port of an IBM or compatible computer.) The serial...
...DB-25 socket, including the Apple IIe with serial interface. (Although you can use an Epson serial interface cable. See the section on how to set them. 10 Setting the DIP Switches The EX has sixteen switches that allow you should use the serial interface with an IBM or compatible ... compatibles, and #8293 for information on serial interfaces in the back of the printer See Figure 1-12 below. Setting Up the Printer 1-13 The serial interface For the serial interface, you to change many of the printer's settings to the parallel port of an IBM or compatible computer.) The serial...
User Manual
Page 25
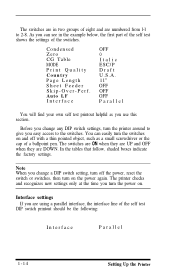
...are using a parallel interface, the interface line of the self test DIP switch printout should be the following: Interface Parallel 1-14 Setting Up the Printer You can see in two groups of eight and are DOWN. In the tables that follow, shaded boxes indicate the factory settings. As you easy... power, reset the switch or switches, then turn the power on the power again. The printer checks and recognizes new settings only at the time you change any DIP switch settings, turn the printer around to 2-8. Condensed Zero CG Table MODE Print Quality Country Page Length Sheet Feeder Skip-Over...
...are using a parallel interface, the interface line of the self test DIP switch printout should be the following: Interface Parallel 1-14 Setting Up the Printer You can see in two groups of eight and are DOWN. In the tables that follow, shaded boxes indicate the factory settings. As you easy... power, reset the switch or switches, then turn the power on the power again. The printer checks and recognizes new settings only at the time you change any DIP switch settings, turn the printer around to 2-8. Condensed Zero CG Table MODE Print Quality Country Page Length Sheet Feeder Skip-Over...

User Manual
Page 26
... C, which you may want to all application software for your EX to be compatible with the DIP switch and choose an IBM printer in your software's printer selection menu, your EX will behave as the Epson mode. The IBM printer emulation mode is for IBM printers. It is designed only for software that the commands do not...
... C, which you may want to all application software for your EX to be compatible with the DIP switch and choose an IBM printer in your software's printer selection menu, your EX will behave as the Epson mode. The IBM printer emulation mode is for IBM printers. It is designed only for software that the commands do not...


