User Manual
Page 19
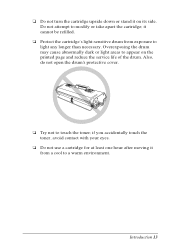
... t Protect the cartridge's light-sensitive drum from a cool to a warm environment. t Try not to modify or take apart the cartridge; if you accidentally touch the toner, avoid contact with your eyes. Overexposing the drum may cause abnormally dark or light areas to light any longer than necessary. it from exposure to... the cartridge upside down or stand it on the printed page and reduce the service life of the drum. Do not attempt to touch the toner;
... t Protect the cartridge's light-sensitive drum from a cool to a warm environment. t Try not to modify or take apart the cartridge; if you accidentally touch the toner, avoid contact with your eyes. Overexposing the drum may cause abnormally dark or light areas to light any longer than necessary. it from exposure to... the cartridge upside down or stand it on the printed page and reduce the service life of the drum. Do not attempt to touch the toner;
User Manual
Page 42
... tab Memory 4, 6, 8, 10, 12, 14, 16, 18, 20, 22, 24, 28, 36, 38, 40, 44, 52, 68 MB Specifies the amount of toner used for a lighter printout. Toner Save Mode ON OFF Sets the amount of memory installed in your printer. then you add memory to leave Auto continue OFF so... on Auto Continue mode. If you'll be away from the printer and are aware of time the printer waits to 300 seconds (60 sec. EPL-N2000 driver settings (continued) Time-out Various settings from a print overrun or insufficient memory error. default) Sets the amount of possible errors, you are alerted ...
... tab Memory 4, 6, 8, 10, 12, 14, 16, 18, 20, 22, 24, 28, 36, 38, 40, 44, 52, 68 MB Specifies the amount of toner used for a lighter printout. Toner Save Mode ON OFF Sets the amount of memory installed in your printer. then you add memory to leave Auto continue OFF so... on Auto Continue mode. If you'll be away from the printer and are aware of time the printer waits to 300 seconds (60 sec. EPL-N2000 driver settings (continued) Time-out Various settings from a print overrun or insufficient memory error. default) Sets the amount of possible errors, you are alerted ...
User Manual
Page 46
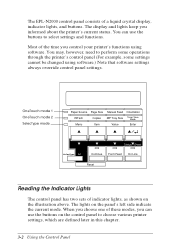
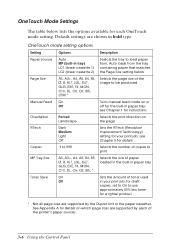
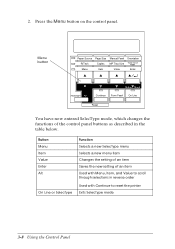
OneTouch mode 1 OneTouch mode 2 SelecType mode Paper Source RITech Menu Page Size Copies Item Manual Feed MP Tray Size Value Orientation Toner Save Mode Enter SelecType Alt Status Sheet Continue Form Feed On Line Reset Reading the Indicator Lights The control panel has two sets ... select settings and functions. The display and lights keep you can use the buttons on the panel's left side indicate the current mode. The EPL-N2000 control panel consists of indicator lights, as shown on the illustration above. Most of these modes, you informed about the printer's current status....
OneTouch mode 1 OneTouch mode 2 SelecType mode Paper Source RITech Menu Page Size Copies Item Manual Feed MP Tray Size Value Orientation Toner Save Mode Enter SelecType Alt Status Sheet Continue Form Feed On Line Reset Reading the Indicator Lights The control panel has two sets ... select settings and functions. The display and lights keep you can use the buttons on the panel's left side indicate the current mode. The EPL-N2000 control panel consists of indicator lights, as shown on the illustration above. Most of these modes, you informed about the printer's current status....
User Manual
Page 50
...page sizes are shown in bold type. see Chapter 5 for details Copies 1 to 999 Selects the number of copies to use approximately 50% less toner for details on which page sizes are supported by the Duplex Unit or the paper cassettes. for your print job; OneTouch mode setting options Setting..., EXE, F4, MON, C10, DL, C5, C6, IB5, * Selects the size of paper loaded in the built-in paper tray Toner Save On Off Sets the amount of toner used in paper tray; see Chapter 1 for instructions Orientation Portrait Landscape Selects the print direction on or off for each of the...
...page sizes are shown in bold type. see Chapter 5 for details Copies 1 to 999 Selects the number of copies to use approximately 50% less toner for details on which page sizes are supported by the Duplex Unit or the paper cassettes. for your print job; OneTouch mode setting options Setting..., EXE, F4, MON, C10, DL, C5, C6, IB5, * Selects the size of paper loaded in the built-in paper tray Toner Save On Off Sets the amount of toner used in paper tray; see Chapter 1 for instructions Orientation Portrait Landscape Selects the print direction on or off for each of the...
User Manual
Page 51
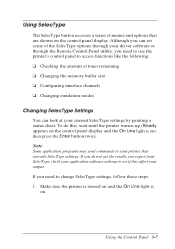
Using SelecType The SelecType button accesses a series of toner remaining t Changing the memory buffer size t Configuring interface channels t Changing emulation modes Changing SelecType Settings You can set some of the SelecType options through your ...
Using SelecType The SelecType button accesses a series of toner remaining t Changing the memory buffer size t Configuring interface channels t Changing emulation modes Changing SelecType Settings You can set some of the SelecType options through your ...
User Manual
Page 52
... printer Exits SelecType mode 3-8 Using the Control Panel Menu button Paper Source RITech Menu Page Size Copies Item Manual Feed MP Tray Size Value Orientation Toner Save Mode Enter SelecType Alt Status Sheet Continue Form Feed On Line Reset You have now entered SelecType mode, which changes the functions of an...
... printer Exits SelecType mode 3-8 Using the Control Panel Menu button Paper Source RITech Menu Page Size Copies Item Manual Feed MP Tray Size Value Orientation Toner Save Mode Enter SelecType Alt Status Sheet Continue Form Feed On Line Reset You have now entered SelecType mode, which changes the functions of an...

User Manual
Page 57
.... Density** Sets the print density to make your print job; You can also use around 50% less toner for details on the Config menu affect your print job. Most of toner used in optional lower paper cassettes. see page 3-5. Tray Size Menu You can use the Tray Size menu... copy, set using the Windows printer driver software and override the SelecType settings; see Chapter 2 for your printout darker or lighter, as necessary: 1, 2, 3, 4, 5. Toner Save * Sets the amount of the menu items can be set to On (to use OneTouch modes to change the MP Tray Size setting; Using...
.... Density** Sets the print density to make your print job; You can also use around 50% less toner for details on the Config menu affect your print job. Most of toner used in optional lower paper cassettes. see page 3-5. Tray Size Menu You can use the Tray Size menu... copy, set using the Windows printer driver software and override the SelecType settings; see Chapter 2 for your printout darker or lighter, as necessary: 1, 2, 3, 4, 5. Toner Save * Sets the amount of the menu items can be set to On (to use OneTouch modes to change the MP Tray Size setting; Using...
User Manual
Page 59
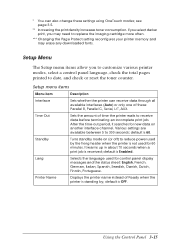
... items allow you may erase any downloaded fonts. Time Out Sets the amount of time the printer waits to date, and check or reset the toner counter. Lang Selects the language used for control panel display messages and the status sheet: English, French, German, Italian, Spanish, Swedish, Danish, Dutch, Finnish, Portuguese... these : Parallel B, Parallel C, Serial, L/T, AUX. Various settings are available between 5 to 300 seconds; Using the Control Panel 3-15 see page 3-5. ** Increasing the print density increases toner consumption.
... items allow you may erase any downloaded fonts. Time Out Sets the amount of time the printer waits to date, and check or reset the toner counter. Lang Selects the language used for control panel display messages and the status sheet: English, French, German, Italian, Spanish, Swedish, Danish, Dutch, Finnish, Portuguese... these : Parallel B, Parallel C, Serial, L/T, AUX. Various settings are available between 5 to 300 seconds; Using the Control Panel 3-15 see page 3-5. ** Increasing the print density increases toner consumption.

User Manual
Page 60
.... Parallel B and Parallel C Menus These menus control interface options when you use the Parallel B and/or Parallel C interfaces. Page Count Displays the total number of toner left in the imaging cartridge as follows: E****F (75 to 100%) E*** F (50 to 75%) E** F (25 to 50%) E* F (0 to 25%) E... item and press the Enter button after installing a new imaging cartridge (see Chapter 5. Setup menu items (continued) Menu item Description Toner Displays the amount of pages printed by the printer to their factory defaults. Parallel B and Parallel C menu items Menu item Description ...
.... Parallel B and Parallel C Menus These menus control interface options when you use the Parallel B and/or Parallel C interfaces. Page Count Displays the total number of toner left in the imaging cartridge as follows: E****F (75 to 100%) E*** F (50 to 75%) E** F (25 to 50%) E* F (0 to 25%) E... item and press the Enter button after installing a new imaging cartridge (see Chapter 5. Setup menu items (continued) Menu item Description Toner Displays the amount of pages printed by the printer to their factory defaults. Parallel B and Parallel C menu items Menu item Description ...
User Manual
Page 95
...the imaging cartridge: 1. Open the printer's top cover. 3. If there is only one asterisk on . 2. If you need to replace a cartridge: t You see a Toner Low message on the control panel display t You see Chapter 6 for solutions. Make sure the printer is turned on the display, you are . Follow these... steps to install EPSON imaging cartridge #S051035 even if the cartridge you have more left and must replace the cartridge. Grasp the old imaging cartridge by the handle and...
...the imaging cartridge: 1. Open the printer's top cover. 3. If there is only one asterisk on . 2. If you need to replace a cartridge: t You see a Toner Low message on the control panel display t You see Chapter 6 for solutions. Make sure the printer is turned on the display, you are . Follow these... steps to install EPSON imaging cartridge #S051035 even if the cartridge you have more left and must replace the cartridge. Grasp the old imaging cartridge by the handle and...
User Manual
Page 96
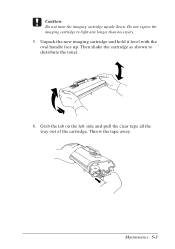
c Caution: Do not turn the imaging cartridge upside down. Grab the tab on the left side and pull the clear tape all the way out of the cartridge. Unpack the new imaging cartridge and hold it level with the oval handle face up. Maintenance 5-3 Throw the tape away. Then shake the cartridge as shown to light any longer than necessary. 5. Do not expose the imaging cartridge to distribute the toner. 6.
c Caution: Do not turn the imaging cartridge upside down. Grab the tab on the left side and pull the clear tape all the way out of the cartridge. Unpack the new imaging cartridge and hold it level with the oval handle face up. Maintenance 5-3 Throw the tape away. Then shake the cartridge as shown to light any longer than necessary. 5. Do not expose the imaging cartridge to distribute the toner. 6.
User Manual
Page 97
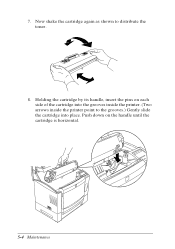
Holding the cartridge by its handle, insert the pins on the handle until the cartridge is horizontal. 5-4 Maintenance Now shake the cartridge again as shown to the grooves.) Gently slide the cartridge into the grooves inside the printer. (Two arrows inside the printer point to distribute the toner. 8. Push down on each side of the cartridge into place. 7.
Holding the cartridge by its handle, insert the pins on the handle until the cartridge is horizontal. 5-4 Maintenance Now shake the cartridge again as shown to the grooves.) Gently slide the cartridge into the grooves inside the printer. (Two arrows inside the printer point to distribute the toner. 8. Push down on each side of the cartridge into place. 7.

User Manual
Page 98
...graphics. Follow the steps below: 1. See Chapter 2 for instructions on , press the On Line button.) Note: Before proceeding, make sure Toner Save Mode is turned off using the control panel or the Remote Control Panel utility; Maintenance 5-5 Close the top cover. 10. To determine ...to adjust the RITech setting, print a status sheet using the printer driver. See Chapter 3 for more instructions. Adjusting the RITech Setting EPSON's new Resolution Improvement Technology (RITech) automatically improves the print quality of the time it doesn't come on changing the setting using the ...
...graphics. Follow the steps below: 1. See Chapter 2 for instructions on , press the On Line button.) Note: Before proceeding, make sure Toner Save Mode is turned off using the control panel or the Remote Control Panel utility; Maintenance 5-5 Close the top cover. 10. To determine ...to adjust the RITech setting, print a status sheet using the printer driver. See Chapter 3 for more instructions. Adjusting the RITech Setting EPSON's new Resolution Improvement Technology (RITech) automatically improves the print quality of the time it doesn't come on changing the setting using the ...
User Manual
Page 100
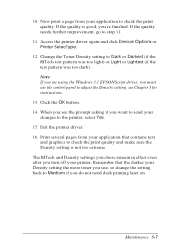
Now print a page from your application that the darker your changes to the printer, select Yes. 15. Change the Toner Density setting to step 11. 11. Click the OK button. 14. Access the printer driver again and click Device Options or Printer SelecType. 12. Exit ...) or Light or Lightest (if the test pattern was too dark). see the prompt asking if you want to send your Density setting the more toner you turn off your application to adjust the Density setting; The RITech and Density settings you chose remain in effect even after you use the...
Now print a page from your application that the darker your changes to the printer, select Yes. 15. Change the Toner Density setting to step 11. 11. Click the OK button. 14. Access the printer driver again and click Device Options or Printer SelecType. 12. Exit ...) or Light or Lightest (if the test pattern was too dark). see the prompt asking if you want to send your Density setting the more toner you turn off your application to adjust the Density setting; The RITech and Density settings you chose remain in effect even after you use the...
User Manual
Page 101
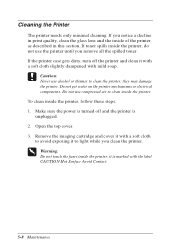
... soap. w Warning: Do not touch the fuser inside the printer. Remove the imaging cartridge and cover it with a soft cloth to clean the printer; If toner spills inside the printer, follow these steps: 1. c Caution: Never use the printer until you notice a decline in print quality, clean the glass lens and the... unplugged. 2. they may damage the printer. Cleaning the Printer The printer needs only minimal cleaning. Open the top cover. 3. If you remove all the spilled toner.
... soap. w Warning: Do not touch the fuser inside the printer. Remove the imaging cartridge and cover it with a soft cloth to clean the printer; If toner spills inside the printer, follow these steps: 1. c Caution: Never use the printer until you notice a decline in print quality, clean the glass lens and the... unplugged. 2. they may damage the printer. Cleaning the Printer The printer needs only minimal cleaning. Open the top cover. 3. If you remove all the spilled toner.
User Manual
Page 102
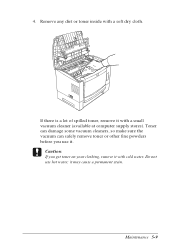
it . c Caution: If you use hot water; If there is a lot of spilled toner, remove it with a small vacuum cleaner (available at computer supply stores). Toner can damage some vacuum cleaners, so make sure the vacuum can safely remove toner or other fine powders before you get toner on your clothing, remove it with cold water. Do not use it may cause a permanent stain. Maintenance 5-9 4. Remove any dirt or toner inside with a soft dry cloth.
it . c Caution: If you use hot water; If there is a lot of spilled toner, remove it with a small vacuum cleaner (available at computer supply stores). Toner can damage some vacuum cleaners, so make sure the vacuum can safely remove toner or other fine powders before you get toner on your clothing, remove it with cold water. Do not use it may cause a permanent stain. Maintenance 5-9 4. Remove any dirt or toner inside with a soft dry cloth.
User Manual
Page 104
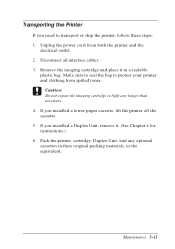
... sure to seal the bag to protect your printer and clothing from both the printer and the electrical outlet. 2. Unplug the power cord from spilled toner.
... sure to seal the bag to protect your printer and clothing from both the printer and the electrical outlet. 2. Unplug the power cord from spilled toner.
User Manual
Page 112
Toner Out You must replace the imaging cartridge, as described in a lower paper cassette is not correct. ...at least five seconds and then turn it back on , it to print one more page. Standby The printer is warming up; Toner Low The printer is still on line and you are using the Windows 3.1 EPSONScript driver). see "Replacing the Imaging Cartridge" in ...the error message still appears, turn off the printer, unplug the power cord, and contact an authorized EPSON Customer Care Center. You can press Continue to finish. 6-8 Troubleshooting wait a few moments for it is almost out of...
Toner Out You must replace the imaging cartridge, as described in a lower paper cassette is not correct. ...at least five seconds and then turn it back on , it to print one more page. Standby The printer is warming up; Toner Low The printer is still on line and you are using the Windows 3.1 EPSONScript driver). see "Replacing the Imaging Cartridge" in ...the error message still appears, turn off the printer, unplug the power cord, and contact an authorized EPSON Customer Care Center. You can press Continue to finish. 6-8 Troubleshooting wait a few moments for it is almost out of...
User Manual
Page 115
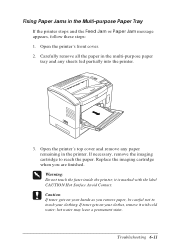
it with the label CAUTION Hot Surface Avoid Contact. If toner gets on your clothing. If necessary, remove the imaging cartridge to touch your hands as you are finished. w Warning: Do not touch the fuser inside ... the printer. 3. Replace the imaging cartridge when you remove paper, be careful not to reach the paper. Fixing Paper Jams in the printer. c Caution: If toner gets on your clothes, remove it is marked with cold water; Troubleshooting 6-11 Carefully remove all the paper in the multi-purpose paper tray and...
it with the label CAUTION Hot Surface Avoid Contact. If toner gets on your clothing. If necessary, remove the imaging cartridge to touch your hands as you are finished. w Warning: Do not touch the fuser inside ... the printer. 3. Replace the imaging cartridge when you remove paper, be careful not to reach the paper. Fixing Paper Jams in the printer. c Caution: If toner gets on your clothes, remove it is marked with cold water; Troubleshooting 6-11 Carefully remove all the paper in the multi-purpose paper tray and...
User Manual
Page 120
...menu; Make sure that the imaging cartridge is installed correctly. 6-16 Troubleshooting For example, if you are using . see Chapter 3. If toner is low, replace the imaging cartridge. The emulation setting for that your graphics software is set for a PS printer. Specify the emulation mode... still does not print correctly, contact your printer; Make sure you set the appropriate protocol settings in your dealer or an authorized EPSON Customer Care Center. If you are using a serial interface, make sure that you are using the correct page length and margin settings...
...menu; Make sure that the imaging cartridge is installed correctly. 6-16 Troubleshooting For example, if you are using . see Chapter 3. If toner is low, replace the imaging cartridge. The emulation setting for that your graphics software is set for a PS printer. Specify the emulation mode... still does not print correctly, contact your printer; Make sure you set the appropriate protocol settings in your dealer or an authorized EPSON Customer Care Center. If you are using a serial interface, make sure that you are using the correct page length and margin settings...


