Product Information Guide
Page 1
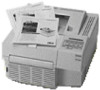
... Note: Since the quality of any type of paper. Always test samples of printing. EPSON EPL-N1200 top cover latch optional LocalTalk/Serial interface access cover optional interface card slot cover AC inlet parallel C interface parallel B interface imaging cartridge guides control panel fuser paper stopper power switch front cover Printer Specifications Printing Printing method...
... Note: Since the quality of any type of paper. Always test samples of printing. EPSON EPL-N1200 top cover latch optional LocalTalk/Serial interface access cover optional interface card slot cover AC inlet parallel C interface parallel B interface imaging cartridge guides control panel fuser paper stopper power switch front cover Printer Specifications Printing Printing method...

Product Information Guide
Page 2
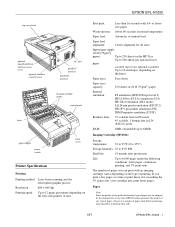
... inches (411 mm) Depth: Weight: Durability: Electrical 19.0 inches (484 mm) 33.1 lb (15 kg) including the imaging cartridge 5 years or 300,000 sheets, whichever comes first Specification Voltage Rated frequency Rated current Power consumption Power consumption in Standby mode with your... steps: 1. Optional Serial Interface The printer's optional serial interface can be set for either RS-232C or current loop operation. EPSON EPL-N1200 Paper types: Plain paper, recycled paper, labels, envelopes, transparencies, colored paper, card stock, letterhead Note: Use recycled paper under...
... inches (411 mm) Depth: Weight: Durability: Electrical 19.0 inches (484 mm) 33.1 lb (15 kg) including the imaging cartridge 5 years or 300,000 sheets, whichever comes first Specification Voltage Rated frequency Rated current Power consumption Power consumption in Standby mode with your... steps: 1. Optional Serial Interface The printer's optional serial interface can be set for either RS-232C or current loop operation. EPSON EPL-N1200 Paper types: Plain paper, recycled paper, labels, envelopes, transparencies, colored paper, card stock, letterhead Note: Use recycled paper under...

Product Information Guide
Page 9
... are removing has another reason your printing is turned on the left , there may be another part number. Unpack the imaging cartridge and hold it straight out of the cartridge. 1/97 EPSON EPL-N1200 - 9 Make sure the printer is faint. 6. To check the toner capacity using SelecType, access the Setup menu and select Toner. Follow...
... are removing has another reason your printing is turned on the left , there may be another part number. Unpack the imaging cartridge and hold it straight out of the cartridge. 1/97 EPSON EPL-N1200 - 9 Make sure the printer is faint. 6. To check the toner capacity using SelecType, access the Setup menu and select Toner. Follow...

Product Information Guide
Page 10
... Lightest (if the test pattern was too dark). 10 - When you 're finished. EPSON EPL-N1200 1/97 You can also turn it doesn't come on the printer and let it warm up the cartridge pins with the green guides inside the square is turned off using the printer's control panel... print a page from your changes to adjust the RITech setting, print a status sheet using the control panel or the Remote Control Panel utility. 2. EPSON EPL-N1200 7. Turn on , press the On Line button.) Note: Before proceeding, make sure Toner Save Mode is lighter than the background, select Light. 7....
... Lightest (if the test pattern was too dark). 10 - When you 're finished. EPSON EPL-N1200 1/97 You can also turn it doesn't come on the printer and let it warm up the cartridge pins with the green guides inside the square is turned off using the printer's control panel... print a page from your changes to adjust the RITech setting, print a status sheet using the control panel or the Remote Control Panel utility. 2. EPSON EPL-N1200 7. Turn on , press the On Line button.) Note: Before proceeding, make sure Toner Save Mode is lighter than the background, select Light. 7....

Product Information Guide
Page 11
... on . Most packages of paper indicate the printable surface with the label CAUTION HOT SURFACE. Open the printer's top cover and remove the imaging cartridge. hold down the Form Feed button while you turn on hex dump mode and send a print job using it into the printer. 3. t...then tap the edges to align them : t Use a higher-quality paper, one that is a special feature that side is automatically reprinted. 1/97 EPSON EPL-N1200 - 11 Paper Feeding Problems If you have selected to turn on the printer; Then remove any sheets fed partially into the built-in paper tray...
... on . Most packages of paper indicate the printable surface with the label CAUTION HOT SURFACE. Open the printer's top cover and remove the imaging cartridge. hold down the Form Feed button while you turn on hex dump mode and send a print job using it into the printer. 3. t...then tap the edges to align them : t Use a higher-quality paper, one that is a special feature that side is automatically reprinted. 1/97 EPSON EPL-N1200 - 11 Paper Feeding Problems If you have selected to turn on the printer; Then remove any sheets fed partially into the built-in paper tray...

User Manual
Page 3
Printer Parts top cover latch optional LocalTalk/ Serial interface access cover optional interface card slot cover fuser paper stopper power switch AC inlet parallel C interface parallel B interface imaging cartridge guides control panel front cover
Printer Parts top cover latch optional LocalTalk/ Serial interface access cover optional interface card slot cover fuser paper stopper power switch AC inlet parallel C interface parallel B interface imaging cartridge guides control panel front cover

User Manual
Page 6
Chapter 5 Maintenance Replacing the Imaging Cartridge 5-2 Adjusting the RITech Setting 5-5 Cleaning the Printer 5-8 Transporting the Printer 5-10 Chapter 6 Troubleshooting Diagnosing Problems 6-2 Reading Control Panel Display Messages 6-2 Using Hex Dump Mode 6-7 Paper ... Paper Printer General Environmental Mechanical Electrical Interfaces Parallel B Interface Parallel C Interface Using ECP Mode in Windows 95 Serial Interface 500 Sheet Lower Paper Cassette Imaging Cartridge (S051016 A-2 A-3 A-3 A-4 A-4 A-4 A-5 A-5 A-6 A-6 A-7 A-10 A-10 Index v
Chapter 5 Maintenance Replacing the Imaging Cartridge 5-2 Adjusting the RITech Setting 5-5 Cleaning the Printer 5-8 Transporting the Printer 5-10 Chapter 6 Troubleshooting Diagnosing Problems 6-2 Reading Control Panel Display Messages 6-2 Using Hex Dump Mode 6-7 Paper ... Paper Printer General Environmental Mechanical Electrical Interfaces Parallel B Interface Parallel C Interface Using ECP Mode in Windows 95 Serial Interface 500 Sheet Lower Paper Cassette Imaging Cartridge (S051016 A-2 A-3 A-3 A-4 A-4 A-4 A-5 A-5 A-6 A-6 A-7 A-10 A-10 Index v

User Manual
Page 10
... for selecting printer driver settings. Chapter 2, "Printing With the Windows Printer Driver," explains how to install them. Chapter 5, "Maintenance," gives instructions for replacing the imaging cartridge and for other media, load it in the Technical Information manual. How to Use Your Manuals For instructions on setting up your printer, connecting it...
... for selecting printer driver settings. Chapter 2, "Printing With the Windows Printer Driver," explains how to install them. Chapter 5, "Maintenance," gives instructions for replacing the imaging cartridge and for other media, load it in the Technical Information manual. How to Use Your Manuals For instructions on setting up your printer, connecting it...

User Manual
Page 18
... SURFACE. Also, be sure not to scratch the surface of printers, be sure to follow these precautions carefully to modify or take apart the cartridge; Laser precautions This printer uses laser technology. If the printer has been in this User's Guide. u Never force the printer's components into place...of the drum and avoid touching it cannot be very hot. Do not attempt to ensure safe, efficient operation. u When you remove the imaging cartridge from your skin can permanently damage its side. it , since oils from the printer, always set it on a clean, smooth surface. Even ...
... SURFACE. Also, be sure not to scratch the surface of printers, be sure to follow these precautions carefully to modify or take apart the cartridge; Laser precautions This printer uses laser technology. If the printer has been in this User's Guide. u Never force the printer's components into place...of the drum and avoid touching it cannot be very hot. Do not attempt to ensure safe, efficient operation. u When you remove the imaging cartridge from your skin can permanently damage its side. it , since oils from the printer, always set it on a clean, smooth surface. Even ...
User Manual
Page 19
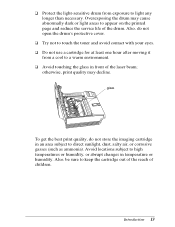
...print quality may cause abnormally dark or light areas to light any longer than necessary. Overexposing the drum may decline. Introduction 13 u Do not use a cartridge for at least one hour after moving it from exposure to appear on the printed page and reduce the service life of the drum. u Try... not to keep the cartridge out of the reach of the laser beam; Avoid locations subject to direct sunlight, dust, salty air, or corrosive gasses (such as ammonia). glass...
...print quality may cause abnormally dark or light areas to light any longer than necessary. Overexposing the drum may decline. Introduction 13 u Do not use a cartridge for at least one hour after moving it from exposure to appear on the printed page and reduce the service life of the drum. u Try... not to keep the cartridge out of the reach of the laser beam; Avoid locations subject to direct sunlight, dust, salty air, or corrosive gasses (such as ammonia). glass...

User Manual
Page 44
... Print Settings tab to include any optional paper cassettes you add memory to use Image Optimum mode so you can print complex, memory-intensive graphics. EPL-N1200 driver settings (continued) Setting Options Printer Options tab Memory 2, 3, 4, 5, 6, 7, 8, 10, 11, 12, 14, 18, 19, 20, 22, 26...reallocates printer memory from use for printing complex, memory-intensive documents. Not available Printing With the Windows Printer Drivers 2-15 Cartridge Description Specifies the amount of memory installed in the printer. It is best to print without memory errors. Sets the ...
... Print Settings tab to include any optional paper cassettes you add memory to use Image Optimum mode so you can print complex, memory-intensive graphics. EPL-N1200 driver settings (continued) Setting Options Printer Options tab Memory 2, 3, 4, 5, 6, 7, 8, 10, 11, 12, 14, 18, 19, 20, 22, 26...reallocates printer memory from use for printing complex, memory-intensive documents. Not available Printing With the Windows Printer Drivers 2-15 Cartridge Description Specifies the amount of memory installed in the printer. It is best to print without memory errors. Sets the ...
User Manual
Page 65
... Chapter 5. select this menu item and press the Enter button after the time-out period, it warms up in the imaging cartridge as follows: E****F 75 to 100 % E*** F 50 to 75% E** F 25 to 50% E* F 0 to 25% E F None For instructions on another interface channel: Various settings available between 5 to ... panel language, check the total pages printed to their factory defaults 3-14 Using the Control Panel it searches for new data on replacing the imaging cartridge, see Chapter 5 for details) Displays the total number of time the printer waits to 300 seconds;
... Chapter 5. select this menu item and press the Enter button after the time-out period, it warms up in the imaging cartridge as follows: E****F 75 to 100 % E*** F 50 to 75% E** F 25 to 50% E* F 0 to 25% E F None For instructions on another interface channel: Various settings available between 5 to ... panel language, check the total pages printed to their factory defaults 3-14 Using the Control Panel it searches for new data on replacing the imaging cartridge, see Chapter 5 for details) Displays the total number of time the printer waits to 300 seconds;

User Manual
Page 73
...other connections for the last number, which varies by country.) 4-2 Installing Options In Canada, call (800) 873-7766 for EPSON products from EPSON Accessories at (800) 873-7766 (U.S. The following optional equipment to your printer: u Optional interface cards and modules to connect... your printer's memory capacity You can purchase optional equipment, imaging cartridges, paper, parts, printed manuals, and accessories for a dealer referral. ...
...other connections for the last number, which varies by country.) 4-2 Installing Options In Canada, call (800) 873-7766 for EPSON products from EPSON Accessories at (800) 873-7766 (U.S. The following optional equipment to your printer: u Optional interface cards and modules to connect... your printer's memory capacity You can purchase optional equipment, imaging cartridges, paper, parts, printed manuals, and accessories for a dealer referral. ...

User Manual
Page 87
Chapter 5 Maintenance Replacing the Imaging Cartridge 5-2 5 Adjusting the RITech Setting 5-5 Cleaning the Printer 5-8 Transporting the Printer 5-10 Maintenance 5-1
Chapter 5 Maintenance Replacing the Imaging Cartridge 5-2 5 Adjusting the RITech Setting 5-5 Cleaning the Printer 5-8 Transporting the Printer 5-10 Maintenance 5-1
User Manual
Page 88
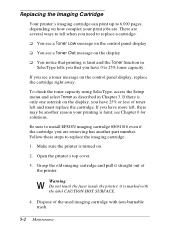
..., access the Setup menu and select Toner as described in SelecType tells you that you have more left and must replace the cartridge. Follow these steps to replace the imaging cartridge: 1. w Warning: Do not touch the fuser inside the printer; If there is only one asterisk on the display u You... notice that printing is faint and the Toner function in Chapter 3. Open the printer's top cover. 3. Be sure to install EPSON imaging cartridge #S051016 even if the cartridge you have 25% or less of toner left , there may be another part number. Grasp the old imaging...
..., access the Setup menu and select Toner as described in SelecType tells you that you have more left and must replace the cartridge. Follow these steps to replace the imaging cartridge: 1. w Warning: Do not touch the fuser inside the printer; If there is only one asterisk on the display u You... notice that printing is faint and the Toner function in Chapter 3. Open the printer's top cover. 3. Be sure to install EPSON imaging cartridge #S051016 even if the cartridge you have 25% or less of toner left , there may be another part number. Grasp the old imaging...
User Manual
Page 89
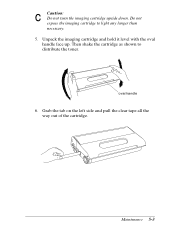
Maintenance 5-3 oval handle 6. Grab the tab on the left side and pull the clear tape all the way out of the cartridge. Do not expose the imaging cartridge to distribute the toner. Then shake the cartridge as shown to light any longer than necessary. 5. c Caution: Do not turn the imaging cartridge upside down. Unpack the imaging cartridge and hold it level with the oval handle face up.
Maintenance 5-3 oval handle 6. Grab the tab on the left side and pull the clear tape all the way out of the cartridge. Do not expose the imaging cartridge to distribute the toner. Then shake the cartridge as shown to light any longer than necessary. 5. c Caution: Do not turn the imaging cartridge upside down. Unpack the imaging cartridge and hold it level with the oval handle face up.

User Manual
Page 90
Line up the cartridge pins with the green guides inside the printer; green guides 9. then slide in the cartridge until it stops. See Chapter 3 for instructions. 5-4 Maintenance Close the top cover. 10. 7. Now shake the cartridge again as shown to reset the toner counter. Select Toner Count Clear on the SelecType Setup menu to distribute the toner. 8.
Line up the cartridge pins with the green guides inside the printer; green guides 9. then slide in the cartridge until it stops. See Chapter 3 for instructions. 5-4 Maintenance Close the top cover. 10. 7. Now shake the cartridge again as shown to reset the toner counter. Select Toner Count Clear on the SelecType Setup menu to distribute the toner. 8.
User Manual
Page 91
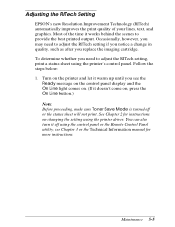
... the RITech Setting EPSON's new Resolution Improvement Technology (RITech) automatically improves the print quality of the time it off or the status sheet will not print. To determine whether you need to adjust the RITech setting if you notice a change in quality, such as after you replace the imaging cartridge. Occasionally, however...
... the RITech Setting EPSON's new Resolution Improvement Technology (RITech) automatically improves the print quality of the time it off or the status sheet will not print. To determine whether you need to adjust the RITech setting if you notice a change in quality, such as after you replace the imaging cartridge. Occasionally, however...
User Manual
Page 94
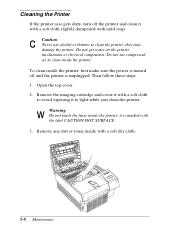
To clean inside the printer. Remove the imaging cartridge and cover it with a soft cloth to avoid exposing it to clean inside the printer, first make sure the power is turned off the printer ...
To clean inside the printer. Remove the imaging cartridge and cover it with a soft cloth to avoid exposing it to clean inside the printer, first make sure the power is turned off the printer ...

User Manual
Page 95
c Caution: If you use hot water; Replace the imaging cartridge. 6. Clean inside the paper feeder with cold water. Reload the paper and close the front cover. If there is a lot of spilled toner, remove it ...
c Caution: If you use hot water; Replace the imaging cartridge. 6. Clean inside the paper feeder with cold water. Reload the paper and close the front cover. If there is a lot of spilled toner, remove it ...

