Product Information Guide
Page 10
...portrait (vertical) or landscape (horizontal) printing orientation. SelecType Level 2 functions TEST PRINT Prints two test patterns to their defaults. [W] TONER LOW The printer is sent during the specified time period, the printer switches from one of all SelecType options. Channel configuration. Specifies... print options without using software commands. See SelecType Options later in this manual for detailed descriptions of the available fonts. EPL-7000 LASER PRINTER [S] STANDBY MODE When both interfaces. press any panel button or send data to 25 more pages. The right...
...portrait (vertical) or landscape (horizontal) printing orientation. SelecType Level 2 functions TEST PRINT Prints two test patterns to their defaults. [W] TONER LOW The printer is sent during the specified time period, the printer switches from one of all SelecType options. Channel configuration. Specifies... print options without using software commands. See SelecType Options later in this manual for detailed descriptions of the available fonts. EPL-7000 LASER PRINTER [S] STANDBY MODE When both interfaces. press any panel button or send data to 25 more pages. The right...
Product Support Bulletin(s)
Page 8
The right column is in the optional lower paper cassette. EPL-7500 [Ej COVER OPEN Cover is open or the imaging cartridge is not installed. [El ...pages. [Ej TONER OUT The imaging cartridge must be replaced. [El TRAY SET AUTO XXX The paper size setting does not match the paper loaded in the standard paper cassette. PSB No: P-0077 Page: 7 of 11 EPL-7000 cont. [WI TONER LOW The ...printer is almost out of toner. When this message first appears on the LCD display, you can print up .
The right column is in the optional lower paper cassette. EPL-7500 [Ej COVER OPEN Cover is open or the imaging cartridge is not installed. [El ...pages. [Ej TONER OUT The imaging cartridge must be replaced. [El TRAY SET AUTO XXX The paper size setting does not match the paper loaded in the standard paper cassette. PSB No: P-0077 Page: 7 of 11 EPL-7000 cont. [WI TONER LOW The ...printer is almost out of toner. When this message first appears on the LCD display, you can print up .
Product Support Bulletin(s)
Page 9
PSB No: P-0077 Page: 8 of data and is flushing a job from the specified paper cassette or has jammed on , and momentarily between print jobs. [El TONER LOW The imaging cartridge must be replaced. [S] WAIT FOR READY The On-tine button was pressed while a print job was in progress. The job can ... current job is completed, then it goes Of-Line. [S] WAITING The printer is in the process of executing a job and has run out of 11 EPL-7500 cont. [El PAPER ENTRY JAM Paper is not feeding from the buffer. [S] READY The printer is ready to provide more data.
PSB No: P-0077 Page: 8 of data and is flushing a job from the specified paper cassette or has jammed on , and momentarily between print jobs. [El TONER LOW The imaging cartridge must be replaced. [S] WAIT FOR READY The On-tine button was pressed while a print job was in progress. The job can ... current job is completed, then it goes Of-Line. [S] WAITING The printer is in the process of executing a job and has run out of 11 EPL-7500 cont. [El PAPER ENTRY JAM Paper is not feeding from the buffer. [S] READY The printer is ready to provide more data.

Product Support Bulletin(s)
Page 11
Exception error. External RAM error. Paper feed error. GQ-3500 cont. Toner empty. Illegal Instruction. Reverse vector interrupt error. CG ROM error. Fusing unit error. Address error. System RAM error. NMI error. Paper empty, paper tray is ...
Exception error. External RAM error. Paper feed error. GQ-3500 cont. Toner empty. Illegal Instruction. Reverse vector interrupt error. CG ROM error. Fusing unit error. Address error. System RAM error. NMI error. Paper empty, paper tray is ...
User Manual
Page 9
Chapter 5 Application Software 5-1 Using Your Printer with Application Software 5-2 Controlling the Printer 5-5 Chapter 6 Maintenance and Transportation 6-1 TONER LOW Message 6-2 Routine Cleaning 6-14 Transporting Your Printer 6-22 Chapter 7 Troubleshooting Status and Error Messages Troubleshooting Directory Paper Jam Problems Power Supply Test Print Printing ...
Chapter 5 Application Software 5-1 Using Your Printer with Application Software 5-2 Controlling the Printer 5-5 Chapter 6 Maintenance and Transportation 6-1 TONER LOW Message 6-2 Routine Cleaning 6-14 Transporting Your Printer 6-22 Chapter 7 Troubleshooting Status and Error Messages Troubleshooting Directory Paper Jam Problems Power Supply Test Print Printing ...

User Manual
Page 12
... maintenance. You can store customized configurations in a wide range of applications software written for easy configuration control. A SelecType control panel for Epson 9-pin and 24-pin printers. 2 Introduction Two Epson ESC/P® emulation modes for compatibility with the touch of paper. Add the optional lower cassette, which holds an additional 250 sheets...-in-one imaging cartridge that holds up tray for you. Replace it to 500 pages continuously. A standard paper cassette that combines the photoconductive, developing, and toner unit in interfaces.
... maintenance. You can store customized configurations in a wide range of applications software written for easy configuration control. A SelecType control panel for Epson 9-pin and 24-pin printers. 2 Introduction Two Epson ESC/P® emulation modes for compatibility with the touch of paper. Add the optional lower cassette, which holds an additional 250 sheets...-in-one imaging cartridge that holds up tray for you. Replace it to 500 pages continuously. A standard paper cassette that combines the photoconductive, developing, and toner unit in interfaces.
User Manual
Page 17
... with a soft cloth or sheet of paper. l Never try to be sturdy, rough handling can permanently damage its surface and may cause toner to scratch the surface of the toner cartridge. Although the printer is a spill, see Chapter 6 for cleaning instructions. Laser Printer Precautions If you remove the imaging cartridge from your...
... with a soft cloth or sheet of paper. l Never try to be sturdy, rough handling can permanently damage its surface and may cause toner to scratch the surface of the toner cartridge. Although the printer is a spill, see Chapter 6 for cleaning instructions. Laser Printer Precautions If you remove the imaging cartridge from your...
User Manual
Page 30
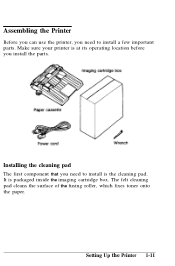
Installing the cleaning pad The first component that you need to install a few important parts. The felt cleaning pad cleans the surface of the fusing roller, which fixes toner onto the paper. It is at its operating location before you install the parts. Setting Up the Printer 1-11 Assembling the Printer Before you can use the printer, you need to install is the cleaning pad. Make sure your printer is packaged inside the imaging cartridge box.
Installing the cleaning pad The first component that you need to install a few important parts. The felt cleaning pad cleans the surface of the fusing roller, which fixes toner onto the paper. It is at its operating location before you install the parts. Setting Up the Printer 1-11 Assembling the Printer Before you can use the printer, you need to install is the cleaning pad. Make sure your printer is packaged inside the imaging cartridge box.
User Manual
Page 35
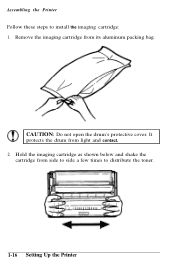
Hold the imaging cartridge as shown below and shake the cartridge from light and contact. 2. It protects the drum from side to side a few times to install the imaging cartridge: 1. CAUTION: Do not open the drum's protective cover. Remove the imaging cartridge from its aluminum packing bag. Assembling the Printer Follow these steps to distribute the toner. 1-16 Setting Up the Printer
Hold the imaging cartridge as shown below and shake the cartridge from light and contact. 2. It protects the drum from side to side a few times to install the imaging cartridge: 1. CAUTION: Do not open the drum's protective cover. Remove the imaging cartridge from its aluminum packing bag. Assembling the Printer Follow these steps to distribute the toner. 1-16 Setting Up the Printer

User Manual
Page 56
Find the yellow density control knob inside the front right corner of the printer, as shown. If you select darker print, you may need to replace the imaging cartridge more often. AA Note: Increasing the print density increases toner consumption. For darker print, turn the knob clockwise as shown below. 3. Testing and Connecting Your Printer 2-15 Testing the Printer 2.
Find the yellow density control knob inside the front right corner of the printer, as shown. If you select darker print, you may need to replace the imaging cartridge more often. AA Note: Increasing the print density increases toner consumption. For darker print, turn the knob clockwise as shown below. 3. Testing and Connecting Your Printer 2-15 Testing the Printer 2.

User Manual
Page 112
...dots fall into indentations on many tiny dots of your printing looks. Do not store paper in your printer directly affects the quality of toner that will be changed by the paper. If the paper is rough, the edges of the letters become ragged because some recommendations for... choices and how to start with the best original possible. The printed image is sensitive to make reproductions. The type of any time, Epson cannot guarantee the use especially smooth paper for greater control. Choosing Paper With this printer you can also use , the better your printed output...
...dots fall into indentations on many tiny dots of your printing looks. Do not store paper in your printer directly affects the quality of toner that will be changed by the paper. If the paper is rough, the edges of the letters become ragged because some recommendations for... choices and how to start with the best original possible. The printed image is sensitive to make reproductions. The type of any time, Epson cannot guarantee the use especially smooth paper for greater control. Choosing Paper With this printer you can also use , the better your printed output...
User Manual
Page 133
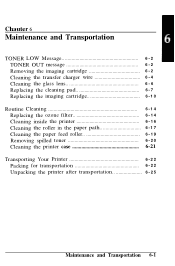
Chauter 6 Maintenance and Transportation TONER LOW Message 6 - 2 TONER OUT message 6 - 2 Removing the imaging cartridge 6 - 2 Cleaning the transfer charger wire 6 - 4 Cleaning the glass lens 6 - 6 Replacing the cleaning pad 6 - 7 Replacing the... cartridge 6 - 1 0 Routine Cleaning Replacing the ozone filter Cleaning inside the printer Cleaning the roller in the paper path Cleaning the paper feed roller Removing spilled toner Cleaning the printer case 6-14 6-14 6-16 6-17 6-19 6-20 6-21 Transporting Your Printer 6 - 2 2 Packing for transportation 6 - 2 2 Unpacking the printer ...
Chauter 6 Maintenance and Transportation TONER LOW Message 6 - 2 TONER OUT message 6 - 2 Removing the imaging cartridge 6 - 2 Cleaning the transfer charger wire 6 - 4 Cleaning the glass lens 6 - 6 Replacing the cleaning pad 6 - 7 Replacing the... cartridge 6 - 1 0 Routine Cleaning Replacing the ozone filter Cleaning inside the printer Cleaning the roller in the paper path Cleaning the paper feed roller Removing spilled toner Cleaning the printer case 6-14 6-14 6-16 6-17 6-19 6-20 6-21 Transporting Your Printer 6 - 2 2 Packing for transportation 6 - 2 2 Unpacking the printer ...
User Manual
Page 134
...cord from the wall outlet. 6-2 Maintenance and Transportation Make sure the printer is almost out of procedures in order whenever you see the TONER LOW message, you must replace the imaging cartridge and cleaning pad before printing any more pages), but print quality may decline. Replace ... next section as soon as described in the following sections. 1. TONER OUT message When the TONER OUT message appears, you can keep printing until the TONER OUT message appears (about 25 more pages. Follow this list of toner. Clean the glass lens 4. Replace the imaging cartridge Removing the ...
...cord from the wall outlet. 6-2 Maintenance and Transportation Make sure the printer is almost out of procedures in order whenever you see the TONER LOW message, you must replace the imaging cartridge and cleaning pad before printing any more pages), but print quality may decline. Replace ... next section as soon as described in the following sections. 1. TONER OUT message When the TONER OUT message appears, you can keep printing until the TONER OUT message appears (about 25 more pages. Follow this list of toner. Clean the glass lens 4. Replace the imaging cartridge Removing the ...

User Manual
Page 135
Maintenance and Transportation 6-3 Lift the latch to remove it. Hold the imaging cartridge as shown below and gently slide it toward you to open the printer case. TONER LOW Message 2. Stop at the lower position, as shown below . 3.
Maintenance and Transportation 6-3 Lift the latch to remove it. Hold the imaging cartridge as shown below and gently slide it toward you to open the printer case. TONER LOW Message 2. Stop at the lower position, as shown below . 3.
User Manual
Page 136
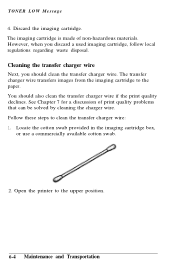
.... 6-4 Maintenance and Transportation Open the printer to the paper. You should clean the transfer charger wire. Follow these steps to clean the transfer charger wire: 1. TONER LOW Message 4. Discard the imaging cartridge.
.... 6-4 Maintenance and Transportation Open the printer to the paper. You should clean the transfer charger wire. Follow these steps to clean the transfer charger wire: 1. TONER LOW Message 4. Discard the imaging cartridge.

User Manual
Page 137
TONER LOW Message 3. the oil on your fingers; CAUTION: When cleaning the transfer charger wire, be sure that you apply too much pressure. The wire is thin and difficult to spot instantly. Maintenance and Transportation 6-5 never touch the wire with your fingers may damage it. Locate the transfer charger wire in the paper path. It is delicate and can break if you do not press too hard. Also;
TONER LOW Message 3. the oil on your fingers; CAUTION: When cleaning the transfer charger wire, be sure that you apply too much pressure. The wire is thin and difficult to spot instantly. Maintenance and Transportation 6-5 never touch the wire with your fingers may damage it. Locate the transfer charger wire in the paper path. It is delicate and can break if you do not press too hard. Also;
User Manual
Page 138
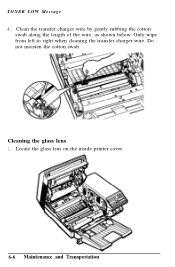
Cleaning the glass lens 1. Locate the glass lens on the inside printer cover. 6-6 Maintenance and Transportation TONER LOW Message 4. Only wipe from left to right when cleaning the transfer charger wire. Do not moisten the cotton swab. Clean the transfer charger wire by gently rubbing the cotton swab along the length of the wire, as shown below.
Cleaning the glass lens 1. Locate the glass lens on the inside printer cover. 6-6 Maintenance and Transportation TONER LOW Message 4. Only wipe from left to right when cleaning the transfer charger wire. Do not moisten the cotton swab. Clean the transfer charger wire by gently rubbing the cotton swab along the length of the wire, as shown below.
User Manual
Page 139
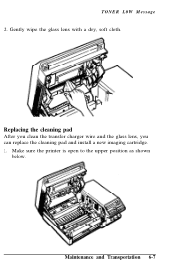
Make sure the printer is open to the upper position as shown below. Gently wipe the glass lens with a dry, soft cloth. Replacing the cleaning pad After you clean the transfer charger wire and the glass lens, you can replace the cleaning pad and install a new imaging cartridge. 1. Maintenance and Transportation 6-7 TONER L0W Message 2.
Make sure the printer is open to the upper position as shown below. Gently wipe the glass lens with a dry, soft cloth. Replacing the cleaning pad After you clean the transfer charger wire and the glass lens, you can replace the cleaning pad and install a new imaging cartridge. 1. Maintenance and Transportation 6-7 TONER L0W Message 2.

User Manual
Page 140
Let it cool before you replace the cleaning pad. 3. Locate the cleaning pad inside the printer. Carefully grasp the yellow felt handle and lift out the used recently, the fuser may be hot. The cleaning pad is the long black pad with the yellow felt handle in a slot on the gray-colored fuser. WARNING: If the printer has been used cleaning pad, as shown below. (Be careful not to let dirt from the pad drop into the printer.) Discard the cleaning pad. 6-8 Maintenance and Transportation TONER LOW Message 2.
Let it cool before you replace the cleaning pad. 3. Locate the cleaning pad inside the printer. Carefully grasp the yellow felt handle and lift out the used recently, the fuser may be hot. The cleaning pad is the long black pad with the yellow felt handle in a slot on the gray-colored fuser. WARNING: If the printer has been used cleaning pad, as shown below. (Be careful not to let dirt from the pad drop into the printer.) Discard the cleaning pad. 6-8 Maintenance and Transportation TONER LOW Message 2.
User Manual
Page 141
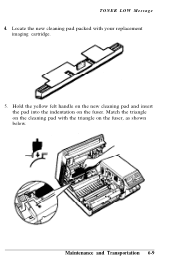
Locate the new cleaning pad packed with the triangle on the fuser. Hold the yellow felt handle on the new cleaning pad and insert the pad into the indentation on the fuser, as shown below. Match the triangle on the cleaning pad with your replacement imaging cartridge. 5. Maintenance and Transportation 6-9 TONER LOW Message 4.
Locate the new cleaning pad packed with the triangle on the fuser. Hold the yellow felt handle on the new cleaning pad and insert the pad into the indentation on the fuser, as shown below. Match the triangle on the cleaning pad with your replacement imaging cartridge. 5. Maintenance and Transportation 6-9 TONER LOW Message 4.


