Product Information Guide
Page 10
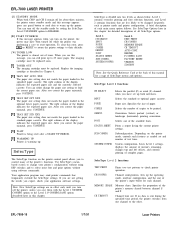
... VERSION STANDBY Note: See the Quick Reference Card at the back of all SelecType options. Subconfiguration. BEEPER P-CONFIG. EPL-7000-10 1/7/91 Laser Printers The imaging cartridge must be replaced soon. [El TONER OUT The imaging cartridge must be printed. You can still print up to warm up the operating mode, interface configuration, and the...
... VERSION STANDBY Note: See the Quick Reference Card at the back of all SelecType options. Subconfiguration. BEEPER P-CONFIG. EPL-7000-10 1/7/91 Laser Printers The imaging cartridge must be replaced soon. [El TONER OUT The imaging cartridge must be printed. You can still print up to warm up the operating mode, interface configuration, and the...
Product Support Bulletin(s)
Page 8
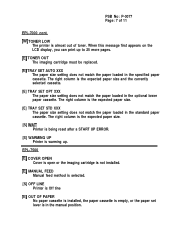
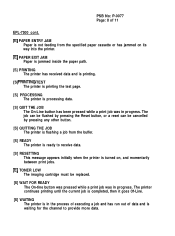
...column is almost out of 11 EPL-7000 cont. [WI TONER LOW The printer is the expected paper size. [E] TRAY SET STD XXX The paper size setting does not match the paper loaded in the standard paper cassette. EPL-7500 [Ej COVER OPEN Cover is open or the imaging cartridge is not installed. [El MANUAL...expected paper size. [S] WAlT Printer is being reset after a START UP ERROR. [S] WARMING UP Printer is warming up to 25 more pages. [Ej TONER OUT The imaging cartridge must be replaced. [El TRAY SET AUTO XXX The paper size setting does not match the paper loaded in the manual position. When this...
...column is almost out of 11 EPL-7000 cont. [WI TONER LOW The printer is the expected paper size. [E] TRAY SET STD XXX The paper size setting does not match the paper loaded in the standard paper cassette. EPL-7500 [Ej COVER OPEN Cover is open or the imaging cartridge is not installed. [El MANUAL...expected paper size. [S] WAlT Printer is being reset after a START UP ERROR. [S] WARMING UP Printer is warming up to 25 more pages. [Ej TONER OUT The imaging cartridge must be replaced. [El TRAY SET AUTO XXX The paper size setting does not match the paper loaded in the manual position. When this...
Product Support Bulletin(s)
Page 9
PSB No: P-0077 Page: 8 of data and is turned on, and momentarily between print jobs. [El TONER LOW The imaging cartridge must be cancelled by pressing any other button. [S] QUITTING THE JOB The printer is flushing a job from the specified paper cassette or has jammed on .... [S] WAIT FOR READY The On-tine button was pressed while a print job was in the process of executing a job and has run out of 11 EPL-7500 cont. [El PAPER ENTRY JAM Paper is not feeding from the buffer. [S] READY The printer is ready to receive data. [S] RESETTING This message appears...
PSB No: P-0077 Page: 8 of data and is turned on, and momentarily between print jobs. [El TONER LOW The imaging cartridge must be cancelled by pressing any other button. [S] QUITTING THE JOB The printer is flushing a job from the specified paper cassette or has jammed on .... [S] WAIT FOR READY The On-tine button was pressed while a print job was in the process of executing a job and has run out of 11 EPL-7500 cont. [El PAPER ENTRY JAM Paper is not feeding from the buffer. [S] READY The printer is ready to receive data. [S] RESETTING This message appears...

User Manual
Page 12
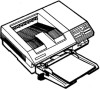
...you. Replace it to generate and download character fonts in -one imaging cartridge that holds up to 250 sheets of a button from the printer's front panel to create the system that's right for Epson 9-pin and 24-pin printers. 2 Introduction Customize your everyday printing needs,...print up to 500 pages continuously. Choose serial, or RS-422 serial. A standard paper cassette that combines the photoconductive, developing, and toner unit in minutes for printing on special media like lables or very heavy paper. Centronics ® parallel, RS-232 Two independent interface ...
...you. Replace it to generate and download character fonts in -one imaging cartridge that holds up to 250 sheets of a button from the printer's front panel to create the system that's right for Epson 9-pin and 24-pin printers. 2 Introduction Customize your everyday printing needs,...print up to 500 pages continuously. Choose serial, or RS-422 serial. A standard paper cassette that combines the photoconductive, developing, and toner unit in minutes for printing on special media like lables or very heavy paper. Centronics ® parallel, RS-232 Two independent interface ...
User Manual
Page 17
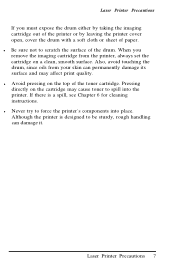
... expose the drum either by taking the imaging cartridge out of the printer or by leaving the printer cover open, cover the drum with a soft cloth or sheet of paper. If there is designed to scratch the surface of the toner cartridge. Laser Printer Precautions If you remove the imaging... cartridge from your skin can damage it. l Be sure not to be sturdy, rough handling can permanently damage its surface ...
... expose the drum either by taking the imaging cartridge out of the printer or by leaving the printer cover open, cover the drum with a soft cloth or sheet of paper. If there is designed to scratch the surface of the toner cartridge. Laser Printer Precautions If you remove the imaging... cartridge from your skin can damage it. l Be sure not to be sturdy, rough handling can permanently damage its surface ...
User Manual
Page 30
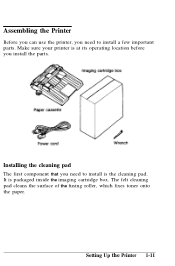
Assembling the Printer Before you can use the printer, you need to install a few important parts. Make sure your printer is at its operating location before you need to install is packaged inside the imaging cartridge box. Setting Up the Printer 1-11 The felt cleaning pad cleans the surface of the fusing roller, which fixes toner onto the paper. It is the cleaning pad. Installing the cleaning pad The first component that you install the parts.
Assembling the Printer Before you can use the printer, you need to install a few important parts. Make sure your printer is at its operating location before you need to install is packaged inside the imaging cartridge box. Setting Up the Printer 1-11 The felt cleaning pad cleans the surface of the fusing roller, which fixes toner onto the paper. It is the cleaning pad. Installing the cleaning pad The first component that you install the parts.
User Manual
Page 35
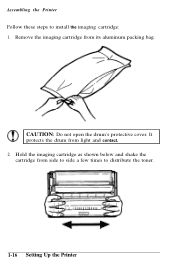
Remove the imaging cartridge from light and contact. 2. Hold the imaging cartridge as shown below and shake the cartridge from side to side a few times to install the imaging cartridge: 1. CAUTION: Do not open the drum's protective cover. It protects the drum from its aluminum packing bag. Assembling the Printer Follow these steps to distribute the toner. 1-16 Setting Up the Printer
Remove the imaging cartridge from light and contact. 2. Hold the imaging cartridge as shown below and shake the cartridge from side to side a few times to install the imaging cartridge: 1. CAUTION: Do not open the drum's protective cover. It protects the drum from its aluminum packing bag. Assembling the Printer Follow these steps to distribute the toner. 1-16 Setting Up the Printer

User Manual
Page 56
For darker print, turn the knob clockwise as shown below. 3. If you select darker print, you may need to replace the imaging cartridge more often. AA Note: Increasing the print density increases toner consumption. Testing and Connecting Your Printer 2-15 Testing the Printer 2. Find the yellow density control knob inside the front right corner of the printer, as shown.
For darker print, turn the knob clockwise as shown below. 3. If you select darker print, you may need to replace the imaging cartridge more often. AA Note: Increasing the print density increases toner consumption. Testing and Connecting Your Printer 2-15 Testing the Printer 2. Find the yellow density control knob inside the front right corner of the printer, as shown.
User Manual
Page 133
... charger wire 6 - 4 Cleaning the glass lens 6 - 6 Replacing the cleaning pad 6 - 7 Replacing the imaging cartridge 6 - 1 0 Routine Cleaning Replacing the ozone filter Cleaning inside the printer Cleaning the roller in the paper path Cleaning the paper feed roller Removing spilled toner Cleaning the printer case 6-14 6-14 6-16 6-17 6-19 6-20 6-21 Transporting Your...
... charger wire 6 - 4 Cleaning the glass lens 6 - 6 Replacing the cleaning pad 6 - 7 Replacing the imaging cartridge 6 - 1 0 Routine Cleaning Replacing the ozone filter Cleaning inside the printer Cleaning the roller in the paper path Cleaning the paper feed roller Removing spilled toner Cleaning the printer case 6-14 6-14 6-16 6-17 6-19 6-20 6-21 Transporting Your...
User Manual
Page 134
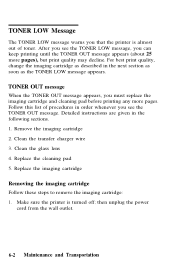
...TONER OUT message. Replace the imaging cartridge Removing the imaging cartridge Follow these steps to remove the imaging cartridge: 1. For best print quality, change the imaging cartridge as the TONER LOW message appears. then unplug the power cord from the wall outlet. 6-2 Maintenance and Transportation TONER OUT message When the TONER... OUT message appears, you must replace the imaging cartridge and cleaning pad before printing any more pages), but print quality may decline...
...TONER OUT message. Replace the imaging cartridge Removing the imaging cartridge Follow these steps to remove the imaging cartridge: 1. For best print quality, change the imaging cartridge as the TONER LOW message appears. then unplug the power cord from the wall outlet. 6-2 Maintenance and Transportation TONER OUT message When the TONER... OUT message appears, you must replace the imaging cartridge and cleaning pad before printing any more pages), but print quality may decline...

User Manual
Page 135
Hold the imaging cartridge as shown below and gently slide it toward you to open the printer case. TONER LOW Message 2. Maintenance and Transportation 6-3 Stop at the lower position, as shown below . 3. Lift the latch to remove it.
Hold the imaging cartridge as shown below and gently slide it toward you to open the printer case. TONER LOW Message 2. Maintenance and Transportation 6-3 Stop at the lower position, as shown below . 3. Lift the latch to remove it.
User Manual
Page 136
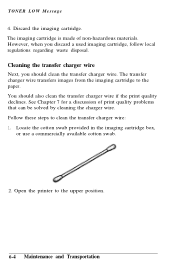
... regulations regarding waste disposal. You should clean the transfer charger wire. See Chapter 7 for a discussion of non-hazardous materials. The imaging cartridge is made of print quality problems that can be solved by cleaning the charger wire. Follow these steps to the upper position. 6-4 Maintenance... and Transportation Locate the cotton swab provided in the imaging cartridge box, or use a commercially available cotton swab. 2. Open the printer to clean the transfer charger wire: 1. Discard the imaging...
... regulations regarding waste disposal. You should clean the transfer charger wire. See Chapter 7 for a discussion of non-hazardous materials. The imaging cartridge is made of print quality problems that can be solved by cleaning the charger wire. Follow these steps to the upper position. 6-4 Maintenance... and Transportation Locate the cotton swab provided in the imaging cartridge box, or use a commercially available cotton swab. 2. Open the printer to clean the transfer charger wire: 1. Discard the imaging...
User Manual
Page 139
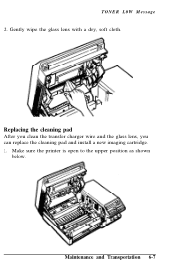
Make sure the printer is open to the upper position as shown below. Replacing the cleaning pad After you clean the transfer charger wire and the glass lens, you can replace the cleaning pad and install a new imaging cartridge. 1. Maintenance and Transportation 6-7 Gently wipe the glass lens with a dry, soft cloth. TONER L0W Message 2.
Make sure the printer is open to the upper position as shown below. Replacing the cleaning pad After you clean the transfer charger wire and the glass lens, you can replace the cleaning pad and install a new imaging cartridge. 1. Maintenance and Transportation 6-7 Gently wipe the glass lens with a dry, soft cloth. TONER L0W Message 2.
User Manual
Page 141
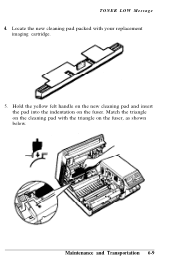
Locate the new cleaning pad packed with the triangle on the fuser. Hold the yellow felt handle on the new cleaning pad and insert the pad into the indentation on the fuser, as shown below. Maintenance and Transportation 6-9 TONER LOW Message 4. Match the triangle on the cleaning pad with your replacement imaging cartridge. 5.
Locate the new cleaning pad packed with the triangle on the fuser. Hold the yellow felt handle on the new cleaning pad and insert the pad into the indentation on the fuser, as shown below. Maintenance and Transportation 6-9 TONER LOW Message 4. Match the triangle on the cleaning pad with your replacement imaging cartridge. 5.
User Manual
Page 142
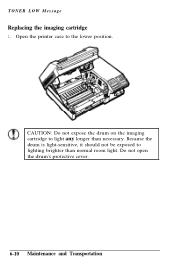
Because the drum is light-sensitive, it should not be exposed to light any longer than normal room light. CAUTION: Do not expose the drum on the imaging cartridge to lighting brighter than necessary. TONER LOW Message Replacing the imaging cartridge 1. Do not open the drum's protective cover. 6-10 Maintenance and Transportation Open the printer case to the lower position.
Because the drum is light-sensitive, it should not be exposed to light any longer than normal room light. CAUTION: Do not expose the drum on the imaging cartridge to lighting brighter than necessary. TONER LOW Message Replacing the imaging cartridge 1. Do not open the drum's protective cover. 6-10 Maintenance and Transportation Open the printer case to the lower position.
User Manual
Page 143
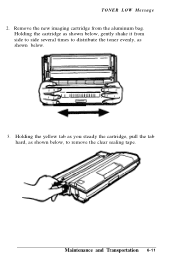
Remove the new imaging cartridge from side to side several times to distribute the toner evenly, as shown below, to remove the clear sealing tape. Holding the yellow tab as you steady the cartridge, pull the tab hard, as shown below , gently shake it from the aluminum bag. Maintenance and Transportation 6-11 TONER LOW Message 2. Holding the cartridge as shown below . 3.
Remove the new imaging cartridge from side to side several times to distribute the toner evenly, as shown below, to remove the clear sealing tape. Holding the yellow tab as you steady the cartridge, pull the tab hard, as shown below , gently shake it from the aluminum bag. Maintenance and Transportation 6-11 TONER LOW Message 2. Holding the cartridge as shown below . 3.
User Manual
Page 144
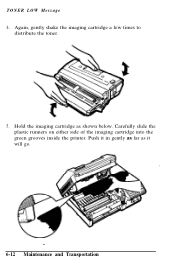
Carefully slide the plastic runners on either side of the imaging cartridge into the green grooves inside the printer. TONER LOW Message 4. Again, gently shake the imaging cartridge a few times to distribute the toner. 5. Push it in gently as far as shown below. Hold the imaging cartridge as it will go. 6-12 Maintenance and Transportation
Carefully slide the plastic runners on either side of the imaging cartridge into the green grooves inside the printer. TONER LOW Message 4. Again, gently shake the imaging cartridge a few times to distribute the toner. 5. Push it in gently as far as shown below. Hold the imaging cartridge as it will go. 6-12 Maintenance and Transportation
User Manual
Page 154
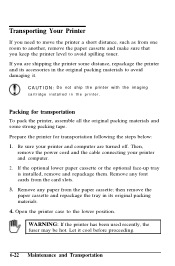
If you keep the printer level to avoid spilling toner. Prepare the printer for transportation To pack the printer, assemble all the original packing materials and some distance, repackage the printer and its original packing ... has been used recently, the fuser may be hot. Remove any paper from the card slots. 3. CAUTION: Do not ship the printer with the imaging cartridge installed in its accessories in the original packing materials to the lower position. Remove any font cards from the paper cassette; Transporting Your Printer If...
If you keep the printer level to avoid spilling toner. Prepare the printer for transportation To pack the printer, assemble all the original packing materials and some distance, repackage the printer and its original packing ... has been used recently, the fuser may be hot. Remove any paper from the card slots. 3. CAUTION: Do not ship the printer with the imaging cartridge installed in its accessories in the original packing materials to the lower position. Remove any font cards from the paper cassette; Transporting Your Printer If...
User Manual
Page 155
... this chapter; then close the printer. Maintenance and Transportation 6-23 Remove the imaging cartridge as shown below. When you remove it is kept level and that the cartridge cannot move around in its original aluminum bag and pack the bag into the two white packaging pieces ...and seal the box with packing tape. Put the imaging cartridge back in the box. 7. Replace the protective plate. Use the wrench provided to prevent toner spills. 6. CAUTION: Hold the imaging cartridge level as you transport the imaging cartridge box, make sure it to secure the two screws. Transporting...
... this chapter; then close the printer. Maintenance and Transportation 6-23 Remove the imaging cartridge as shown below. When you remove it is kept level and that the cartridge cannot move around in its original aluminum bag and pack the bag into the two white packaging pieces ...and seal the box with packing tape. Put the imaging cartridge back in the box. 7. Replace the protective plate. Use the wrench provided to prevent toner spills. 6. CAUTION: Hold the imaging cartridge level as you transport the imaging cartridge box, make sure it to secure the two screws. Transporting...
User Manual
Page 157
Maintenance and Transportation 6-25 Unpack the printer as described in Chapter 1. Place the accessory pack in Chapter 1. Unpacking the printer after transportation 1. Assemble the printer as described in the main carton on top of the printer. 11. Transporting Your Printer 10. When you unpack the imaging cartridge, wipe off any toner that spilled during shipment. 2. Seal the main carton with packing tape.
Maintenance and Transportation 6-25 Unpack the printer as described in Chapter 1. Place the accessory pack in Chapter 1. Unpacking the printer after transportation 1. Assemble the printer as described in the main carton on top of the printer. 11. Transporting Your Printer 10. When you unpack the imaging cartridge, wipe off any toner that spilled during shipment. 2. Seal the main carton with packing tape.


