User Manual
Page 16
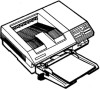
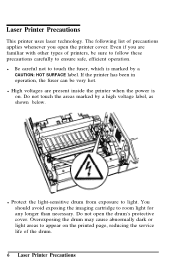
... you open the drum's protective cover. Do not open the printer cover. If the printer has been in operation, the fuser can be sure to follow these precautions carefully to touch the fuser, which is on the printed page, reducing the service life of printers, be very hot. You should avoid exposing...
... you open the drum's protective cover. Do not open the printer cover. If the printer has been in operation, the fuser can be sure to follow these precautions carefully to touch the fuser, which is on the printed page, reducing the service life of printers, be very hot. You should avoid exposing...

User Manual
Page 32
... The drum is in the correct position, match the triangle on the cleaning pad with the triangle on the fuser, as shown below. Assembling the Printer WARNING: Never touch the fuser. Hold the cleaning pad by the yellow handle and place the cleaning pad into the indentation on imaging cartridge life.... See Chapter 6 for information on top of the fuser. Do not expose it to light any longer than normal room light. When the printer is light-sensitive. Installing the imaging cartridge The imaging...
... The drum is in the correct position, match the triangle on the cleaning pad with the triangle on the fuser, as shown below. Assembling the Printer WARNING: Never touch the fuser. Hold the cleaning pad by the yellow handle and place the cleaning pad into the indentation on imaging cartridge life.... See Chapter 6 for information on top of the fuser. Do not expose it to light any longer than normal room light. When the printer is light-sensitive. Installing the imaging cartridge The imaging...
User Manual
Page 113
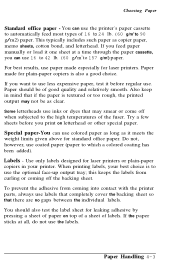
... plain-paper copiers is also a good choice. If the paper sticks at a time through the paper cassette, you print on top of a sheet of the fuser. Use only labels designed for laser printers or plain-paper copiers in mind that there are no gaps between the individual labels. Do not, however...
... plain-paper copiers is also a good choice. If the paper sticks at a time through the paper cassette, you print on top of a sheet of the fuser. Use only labels designed for laser printers or plain-paper copiers in mind that there are no gaps between the individual labels. Do not, however...

User Manual
Page 140
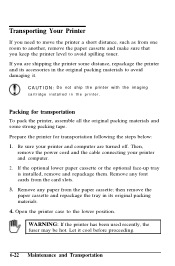
Locate the cleaning pad inside the printer. Carefully grasp the yellow felt handle and lift out the used recently, the fuser may be hot. The cleaning pad is the long black pad with the yellow felt handle in a slot on the gray-colored fuser. WARNING: If the printer has been used cleaning pad, as shown below. (Be careful not to let dirt from the pad drop into the printer.) Discard the cleaning pad. 6-8 Maintenance and Transportation TONER LOW Message 2. Let it cool before you replace the cleaning pad. 3.
Locate the cleaning pad inside the printer. Carefully grasp the yellow felt handle and lift out the used recently, the fuser may be hot. The cleaning pad is the long black pad with the yellow felt handle in a slot on the gray-colored fuser. WARNING: If the printer has been used cleaning pad, as shown below. (Be careful not to let dirt from the pad drop into the printer.) Discard the cleaning pad. 6-8 Maintenance and Transportation TONER LOW Message 2. Let it cool before you replace the cleaning pad. 3.
User Manual
Page 141
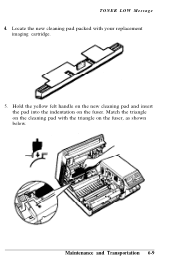
Locate the new cleaning pad packed with the triangle on the fuser. Maintenance and Transportation 6-9 TONER LOW Message 4. Hold the yellow felt handle on the new cleaning pad and insert the pad into the indentation on the fuser, as shown below. Match the triangle on the cleaning pad with your replacement imaging cartridge. 5.
Locate the new cleaning pad packed with the triangle on the fuser. Maintenance and Transportation 6-9 TONER LOW Message 4. Hold the yellow felt handle on the new cleaning pad and insert the pad into the indentation on the fuser, as shown below. Match the triangle on the cleaning pad with your replacement imaging cartridge. 5.

User Manual
Page 149
If the printer has been used recently, the fuser may be careful not to clean the roller as described in the following steps. Let the printer cool before you clean inside 2. be hot; Cleaning the roller in the paper path Use a soft, clean cloth to touch it. Maintenance and Transportation 6-17 Routine Cleaning WARNING: Opening the printer exposes the fuser, which is marked by a caution label. Remove any dirt from the paper path with a soft, clean cloth.
If the printer has been used recently, the fuser may be careful not to clean the roller as described in the following steps. Let the printer cool before you clean inside 2. be hot; Cleaning the roller in the paper path Use a soft, clean cloth to touch it. Maintenance and Transportation 6-17 Routine Cleaning WARNING: Opening the printer exposes the fuser, which is marked by a caution label. Remove any dirt from the paper path with a soft, clean cloth.
User Manual
Page 154
... below: 1. then remove the paper cassette and repackage the tray in its accessories in the printer. WARNING: If the printer has been used recently, the fuser may be hot. Be sure your printer and computer. 2.
... below: 1. then remove the paper cassette and repackage the tray in its accessories in the printer. WARNING: If the printer has been used recently, the fuser may be hot. Be sure your printer and computer. 2.

User Manual
Page 172
... optional lower paper cassette. After a feed jam is cleared, a jammed page is marked by a CAUTION: HOT SURFACE label. If feed errors continue to touch the fuser. WARNING: Opening the printer exposes the fuser, which is automatically reprinted. See Chapter 4 for this printer.
... optional lower paper cassette. After a feed jam is cleared, a jammed page is marked by a CAUTION: HOT SURFACE label. If feed errors continue to touch the fuser. WARNING: Opening the printer exposes the fuser, which is automatically reprinted. See Chapter 4 for this printer.

User Manual
Page 175
... the printer may be slightly smeared with cold water. Do not use the printer until the page is caught under both the roller and the fuser, first pull the paper out from under the roller in the opposite direction until you are removing the paper. When you spill toner on the... it may leave a permanent stain. l If toner spills inside the printer may not have been fixed on your hands while you remove all of the fuser. Paper Jam Problems 3. If the paper is caught at the...
... the printer may be slightly smeared with cold water. Do not use the printer until the page is caught under both the roller and the fuser, first pull the paper out from under the roller in the opposite direction until you are removing the paper. When you spill toner on the... it may leave a permanent stain. l If toner spills inside the printer may not have been fixed on your hands while you remove all of the fuser. Paper Jam Problems 3. If the paper is caught at the...
