Product Information Guide
Page 7
...None. Related Documentation CPD 8045 EPSON PowerLite 5500C/7500C User’s Guide CPD 7218R1 EPSON PowerLite 5500C/7500C Easy Setup Card SM-ELP5500C EPSON PowerLite 5500C Multimedia Projector Service Manual SM-ELP7500C EPSON PowerLite 7500C Multimedia Projector Service Manual Addendum PL-ELP5500C EPSON PowerLite 5500C Multimedia Projector Parts Price List PL-ELP7500C EPSON PowerLite 7500C Multimedia Projector Parts Price List 2/99 PowerLite 5500C/7500C Multimedia Projector - 7 EPSON PowerLite 5500C/7500C Multimedia Projector Information Reference List Engineering Change...
...None. Related Documentation CPD 8045 EPSON PowerLite 5500C/7500C User’s Guide CPD 7218R1 EPSON PowerLite 5500C/7500C Easy Setup Card SM-ELP5500C EPSON PowerLite 5500C Multimedia Projector Service Manual SM-ELP7500C EPSON PowerLite 7500C Multimedia Projector Service Manual Addendum PL-ELP5500C EPSON PowerLite 5500C Multimedia Projector Parts Price List PL-ELP7500C EPSON PowerLite 7500C Multimedia Projector Parts Price List 2/99 PowerLite 5500C/7500C Multimedia Projector - 7 EPSON PowerLite 5500C/7500C Multimedia Projector Information Reference List Engineering Change...
User Manual
Page 5
Contents Introduction 1 Getting the Most Out of Your Projector 3 Remote Control 3 Sleep Mode 3 Control Panel 3 Optional Accessories 4 About This Manual 5 Safety Instructions 6 Where to Get Help 8 Electronic Support Services 8 Automated Telephone Services 9 1 Installation 11 Unpacking the Projector 12 Additional Components 14 Attaching the Hand Strap 15 v
Contents Introduction 1 Getting the Most Out of Your Projector 3 Remote Control 3 Sleep Mode 3 Control Panel 3 Optional Accessories 4 About This Manual 5 Safety Instructions 6 Where to Get Help 8 Electronic Support Services 8 Automated Telephone Services 9 1 Installation 11 Unpacking the Projector 12 Additional Components 14 Attaching the Hand Strap 15 v
User Manual
Page 13
... the EPSON PowerLite 5500C and PowerLite 7500C projectors. Chapter 3, "Using the Projector Menus," describes how to use the optional ELP Link III software to adjust the color and image settings, change the display of the projected image, and modify audio settings such as bass and treble. Chapter 6, "Troubleshooting," describes how to your configuration. About This Manual This manual describes...
... the EPSON PowerLite 5500C and PowerLite 7500C projectors. Chapter 3, "Using the Projector Menus," describes how to use the optional ELP Link III software to adjust the color and image settings, change the display of the projected image, and modify audio settings such as bass and treble. Chapter 6, "Troubleshooting," describes how to your configuration. About This Manual This manual describes...

User Manual
Page 14
Chapter 7, "Technical Specifications," lists the technical specifications for the projector. A Glossary and Index are provided at the end of the manual. 6 Introduction
Chapter 7, "Technical Specifications," lists the technical specifications for the projector. A Glossary and Index are provided at the end of the manual. 6 Introduction

User Manual
Page 30
..., and connect the other end of the ports needed to the projector's Computer In port. b. Connecting to a Computer 21 Computer Out port Computer In port projector video cable monitor cable Note: Computer configurations vary. See your computer manual for the location of the projector video cable to the computer's video port. Disconnect the computer...
..., and connect the other end of the ports needed to the projector's Computer In port. b. Connecting to a Computer 21 Computer Out port Computer In port projector video cable monitor cable Note: Computer configurations vary. See your computer manual for the location of the projector video cable to the computer's video port. Disconnect the computer...

User Manual
Page 33
See your computer manual for the location of the projector video cable to the laptop's video (monitor) port. c. Connecting to a PC Laptop Computer Before beginning, turn off the projector and computer if they are on both connectors. 24 1 • Installation a. Connect the other end of the ports needed to the projector's Computer In port. Connect the projector video cable. Computer In port projector video cable Note: Laptop configurations vary. Connect either end of the projector video cable to connect your projector. b. Tighten the screws on . 1.
See your computer manual for the location of the projector video cable to the laptop's video (monitor) port. c. Connecting to a PC Laptop Computer Before beginning, turn off the projector and computer if they are on both connectors. 24 1 • Installation a. Connect the other end of the ports needed to the projector's Computer In port. Connect the projector video cable. Computer In port projector video cable Note: Laptop configurations vary. Connect either end of the projector video cable to connect your projector. b. Tighten the screws on . 1.

User Manual
Page 36
Connect the projector video cable and monitor cable. Connect either end of the ports needed to the projector's Computer In port. Computer Out port Computer In port Macintosh desktop adapter Macintosh monitor adapter projector video cable Note: Macintosh computer configurations vary. Connecting to a Desktop Macintosh Before beginning, turn off the projector and Macintosh if they are on. 1. a. Connecting to a Computer 27 See your computer manual for the location of the projector video cable to connect your projector.
Connect the projector video cable and monitor cable. Connect either end of the ports needed to the projector's Computer In port. Computer Out port Computer In port Macintosh desktop adapter Macintosh monitor adapter projector video cable Note: Macintosh computer configurations vary. Connecting to a Desktop Macintosh Before beginning, turn off the projector and Macintosh if they are on. 1. a. Connecting to a Computer 27 See your computer manual for the location of the projector video cable to connect your projector.
User Manual
Page 40
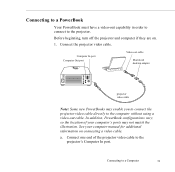
...configurations vary, so the location of the projector video cable to the projector. Before beginning, turn off the projector and computer if they are on connecting a video cable. See your computer's ports may enable you to connect the projector video cable directly to a Computer 31...out cable. Computer In port Computer Out port Video-out cable Macintosh desktop adapter projector video cable Note: Some new PowerBooks may not match the illustration. a. Connect one end of your computer manual for additional information on . 1. Connecting to a PowerBook Your PowerBook must have ...
...configurations vary, so the location of the projector video cable to the projector. Before beginning, turn off the projector and computer if they are on connecting a video cable. See your computer's ports may enable you to connect the projector video cable directly to a Computer 31...out cable. Computer In port Computer Out port Video-out cable Macintosh desktop adapter projector video cable Note: Some new PowerBooks may not match the illustration. a. Connect one end of your computer manual for additional information on . 1. Connecting to a PowerBook Your PowerBook must have ...
User Manual
Page 74
... multi-purpose button on the control panel or the remote to return to clear the confirmation screen without changing any settings. 64 3 • Using the Projector Menus Next, select Yes and then press the Enter button (control panel) or a multi-purpose button (remote) to select a color. Menu item Description .... Increase the color setting for more intense color, or lower the setting for less intense color. Reset Returns all menu items to the current projector settings. When you change your projector settings manually. The projector will enter color adjustment mode.
... multi-purpose button on the control panel or the remote to return to clear the confirmation screen without changing any settings. 64 3 • Using the Projector Menus Next, select Yes and then press the Enter button (control panel) or a multi-purpose button (remote) to select a color. Menu item Description .... Increase the color setting for more intense color, or lower the setting for less intense color. Reset Returns all menu items to the current projector settings. When you change your projector settings manually. The projector will enter color adjustment mode.
User Manual
Page 76
... for details. See Treble for the speakers and audio-out terminal. Increasing the value widens the sound. 66 3 • Using the Projector Menus Press the right arrow button (control panel) or press right on the pointer button (remote) to display the confirmation screen. Bass ...-purpose button (remote) to decrease the treble tone. Normally this signal system setting should be left on the pointer button (remote) to manually specify NTSC, PAL, or SECAM. Select this menu to increase the treble tone; If you make adjustments related to automatically detect the type...
... for details. See Treble for the speakers and audio-out terminal. Increasing the value widens the sound. 66 3 • Using the Projector Menus Press the right arrow button (control panel) or press right on the pointer button (remote) to display the confirmation screen. Bass ...-purpose button (remote) to decrease the treble tone. Normally this signal system setting should be left on the pointer button (remote) to manually specify NTSC, PAL, or SECAM. Select this menu to increase the treble tone; If you make adjustments related to automatically detect the type...

User Manual
Page 91
... by the computer manufacturer. 4. Note: If your laptop uses a serial mouse, perform steps 3 and 4 using the ELP Link III software or to use the ELP Link III software if your laptop's manual or online help for instructions. 9. Note: You may have to set the display to support a serial mouse. 6. Note... your laptop. 7. Connect the other end of the PS/2 mouse cable (not shown in the illustration). 5. Connecting the ELP Link III Cables 81 To configure the projector from your laptop using the serial mouse cable instead of the PS/2 mouse cable to the mouse port on both the laptop...
... by the computer manufacturer. 4. Note: If your laptop uses a serial mouse, perform steps 3 and 4 using the ELP Link III software or to use the ELP Link III software if your laptop's manual or online help for instructions. 9. Note: You may have to set the display to support a serial mouse. 6. Note... your laptop. 7. Connect the other end of the PS/2 mouse cable (not shown in the illustration). 5. Connecting the ELP Link III Cables 81 To configure the projector from your laptop using the serial mouse cable instead of the PS/2 mouse cable to the mouse port on both the laptop...

User Manual
Page 97
... on page 88 for more information about turning off your online manual. You see the ELPLink3 Welcome screen. Read the agreement and click Yes. 9. 6. You see a list of items to your CD-ROM drive. Make sure ELP Link III V2.0 and ELP Link User's Guide are checked. Click Next. 8. Follow the instructions on... a directory or a folder for the Macintosh: 1. If you don't have Adobe® Acrobat® Reader on may cause problems while running the software. Insert the Projector Software CD into your system. 11.
... on page 88 for more information about turning off your online manual. You see the ELPLink3 Welcome screen. Read the agreement and click Yes. 9. 6. You see a list of items to your CD-ROM drive. Make sure ELP Link III V2.0 and ELP Link User's Guide are checked. Click Next. 8. Follow the instructions on... a directory or a folder for the Macintosh: 1. If you don't have Adobe® Acrobat® Reader on may cause problems while running the software. Insert the Projector Software CD into your system. 11.
User Manual
Page 136
...manual for a different resolution. If the computer's output resolution setting is displayed. In the Monitors & Sound screen, select a resolution from the computer, or the signal is not reaching the projector. ◗ Only part of the computer image is higher than 800 × 600 (PowerLite 5500C) or 1024 × 768 (PowerLite 7500C), the projector... and then choose Monitors & Sound. Then check that 124 6 • Troubleshooting You also may need to the projector is selected, the signal is not compatible with this resizing, choose a different display setting on the computer. In ...
...manual for a different resolution. If the computer's output resolution setting is displayed. In the Monitors & Sound screen, select a resolution from the computer, or the signal is not reaching the projector. ◗ Only part of the computer image is higher than 800 × 600 (PowerLite 5500C) or 1024 × 768 (PowerLite 7500C), the projector... and then choose Monitors & Sound. Then check that 124 6 • Troubleshooting You also may need to the projector is selected, the signal is not compatible with this resizing, choose a different display setting on the computer. In ...
User Replaceable Parts List
Page 1
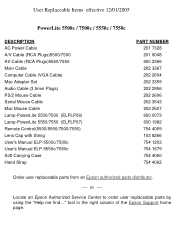
...Audio Cable (3.5mm Plugs) PS/2 Mouse Cable Serial Mouse Cable Mac Mouse Cable Lamp-PowerLite 5500/7500 (ELPLP06) Lamp-PowerLite 5550/7550 (ELPLP07) Remote Control(5500/5550/7500/7550) Lens Cap with String User's Manual ELP-5500c/7500c User's Manual ELP-5550c/7550c Soft Carrying Case Hand Strap PART NUMBER 201 7328 201 6048 600 2366...600 0073 600 1982 754 4059 103 8266 754 1203 754 1679 754 4060 754 4062 Order user replaceable parts from an Epson authorized parts distributor. ---- Locate an Epson Authorized Service Center to order user replaceable parts by using the "Help me find..." or ----
...Audio Cable (3.5mm Plugs) PS/2 Mouse Cable Serial Mouse Cable Mac Mouse Cable Lamp-PowerLite 5500/7500 (ELPLP06) Lamp-PowerLite 5550/7550 (ELPLP07) Remote Control(5500/5550/7500/7550) Lens Cap with String User's Manual ELP-5500c/7500c User's Manual ELP-5550c/7550c Soft Carrying Case Hand Strap PART NUMBER 201 7328 201 6048 600 2366...600 0073 600 1982 754 4059 103 8266 754 1203 754 1679 754 4060 754 4062 Order user replaceable parts from an Epson authorized parts distributor. ---- Locate an Epson Authorized Service Center to order user replaceable parts by using the "Help me find..." or ----
Product Brochure
Page 2
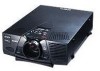
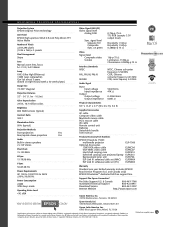
... _P_r_is_m___te_c_h_n__o_lo_g__y LCD Panel Video signal level Analog RGB 0.7Vp-p 75 Ω TTL RGB (accepts 3.3V EPSON high ...aperture SVGA 0.9-inch Poly-Silicon TFT output level) A__c_ti_v_e_M__a_t_ri_x Sync. signal level Separate H.V Bi-polarity 1-5Vp-p TM Number of Pixels Composite Bi-polarity 1-5Vp-p 2,359,296 pixels (_1_0__2_4_x__7_6_8_)__x_3__p_a_n__e_ls ________S_y_n_c_. _o_n__g_r_e_e_n_____0_._2_8_6_V_p__-p__7_5 Video Pixel Arrangement Signal level S__tr_ip__e Lens Manual...EPSON PowerLite 7500C Built-in stereo speakers multimedia projector ELP-7500...
... _P_r_is_m___te_c_h_n__o_lo_g__y LCD Panel Video signal level Analog RGB 0.7Vp-p 75 Ω TTL RGB (accepts 3.3V EPSON high ...aperture SVGA 0.9-inch Poly-Silicon TFT output level) A__c_ti_v_e_M__a_t_ri_x Sync. signal level Separate H.V Bi-polarity 1-5Vp-p TM Number of Pixels Composite Bi-polarity 1-5Vp-p 2,359,296 pixels (_1_0__2_4_x__7_6_8_)__x_3__p_a_n__e_ls ________S_y_n_c_. _o_n__g_r_e_e_n_____0_._2_8_6_V_p__-p__7_5 Video Pixel Arrangement Signal level S__tr_ip__e Lens Manual...EPSON PowerLite 7500C Built-in stereo speakers multimedia projector ELP-7500...

