
User Guide
Page 3
Contents DS-780N User's Guide...7 Scanner Basics...8 Using the Control Panel ...8 Control Panel Buttons and Lights ...8 Status Icon Information ...9 Changing LCD Screen Language...9 Selecting the Date and Time ...10 Adjusting Control ... Setting 14 Preventing PC Connection via USB 15 Setting a Password and Locking the Control Panel 16 Entering Characters on the LCD Screen 19 Scanner Parts ...20 User Replaceable Epson Scanner Parts and Accessories 22 Using Power Saving Settings ...23 Changing the Sleep Timer Settings 23 Changing the Power Off Timer Settings 25 Loading...
Contents DS-780N User's Guide...7 Scanner Basics...8 Using the Control Panel ...8 Control Panel Buttons and Lights ...8 Status Icon Information ...9 Changing LCD Screen Language...9 Selecting the Date and Time ...10 Adjusting Control ... Setting 14 Preventing PC Connection via USB 15 Setting a Password and Locking the Control Panel 16 Entering Characters on the LCD Screen 19 Scanner Parts ...20 User Replaceable Epson Scanner Parts and Accessories 22 Using Power Saving Settings ...23 Changing the Sleep Timer Settings 23 Changing the Power Off Timer Settings 25 Loading...
User Guide
Page 4
...80 Scan Resolution Guidelines ...81 Scanning Special Projects...81 Scanning Two Originals onto One Sheet (Stitching Images) - Mac 70 Scanning in Epson Scan 2 ...73 Additional Scanning Settings - Windows 96 Scanning to a SharePoint Server or Cloud Service - Windows 66 Scanning with ...Document Capture Pro - Windows 88 Scanning Using OCR - Mac 98 Cleaning and Transporting Your Scanner 101 Cleaning Your Scanner ...101 Cleaning Inside Your Scanner...101 Checking the Scanner Roller Counter 111 4 Mac ...90 Saving Scanned Documents as a Searchable PDF 93 Saving a Scan as...
...80 Scan Resolution Guidelines ...81 Scanning Special Projects...81 Scanning Two Originals onto One Sheet (Stitching Images) - Mac 70 Scanning in Epson Scan 2 ...73 Additional Scanning Settings - Windows 96 Scanning to a SharePoint Server or Cloud Service - Windows 66 Scanning with ...Document Capture Pro - Windows 88 Scanning Using OCR - Mac 98 Cleaning and Transporting Your Scanner 101 Cleaning Your Scanner ...101 Cleaning Inside Your Scanner...101 Checking the Scanner Roller Counter 111 4 Mac ...90 Saving Scanned Documents as a Searchable PDF 93 Saving a Scan as...
User Guide
Page 5
... Image Quality Problems 129 Back of Original Image Appears in Scanner...125 Scanning is Cropped ...132 Resetting the Epson Scan 2 Settings 132 Uninstall Your Scanner Software...133 Uninstalling Scanner Software - Windows 133 Uninstalling Scanner Software - Replacing the Scanner Rollers ...112 Resetting the Scanner Roller Counter 117 Transporting Your Scanner ...119 Solving Problems ...121 Product Status Messages ...121 Solving...
... Image Quality Problems 129 Back of Original Image Appears in Scanner...125 Scanning is Cropped ...132 Resetting the Epson Scan 2 Settings 132 Uninstall Your Scanner Software...133 Uninstalling Scanner Software - Windows 133 Uninstalling Scanner Software - Replacing the Scanner Rollers ...112 Resetting the Scanner Roller Counter 117 Transporting Your Scanner ...119 Solving Problems ...121 Product Status Messages ...121 Solving...
User Guide
Page 8
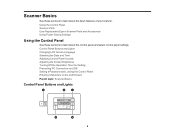
... Connection via USB Setting a Password and Locking the Control Panel Entering Characters on the LCD Screen Parent topic: Scanner Basics Control Panel Buttons and Lights 8 Using the Control Panel Scanner Parts User Replaceable Epson Scanner Parts and Accessories Using Power Saving Settings Using the Control Panel See these sections to learn about the control...
... Connection via USB Setting a Password and Locking the Control Panel Entering Characters on the LCD Screen Parent topic: Scanner Basics Control Panel Buttons and Lights 8 Using the Control Panel Scanner Parts User Replaceable Epson Scanner Parts and Accessories Using Power Saving Settings Using the Control Panel See these sections to learn about the control...
User Guide
Page 22
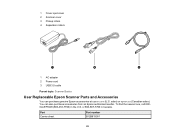
1 Cover open lever 2 Scanner cover 3 Pickup rollers 4 Separation rollers 1 AC adapter 2 Power cord 3 USB 3.0 cable Parent topic: Scanner Basics User Replaceable Epson Scanner Parts and Accessories You can also purchase accessories from an Epson authorized reseller. To find the nearest one, call 800GO-EPSON (800-463-7766) in Canada. sales) or epson.ca (Canadian sales). or 800-807-7766 in the U.S. You can purchase genuine Epson accessories at epson.com (U.S. Part Carrier sheet Part number B12B819051 22
1 Cover open lever 2 Scanner cover 3 Pickup rollers 4 Separation rollers 1 AC adapter 2 Power cord 3 USB 3.0 cable Parent topic: Scanner Basics User Replaceable Epson Scanner Parts and Accessories You can also purchase accessories from an Epson authorized reseller. To find the nearest one, call 800GO-EPSON (800-463-7766) in Canada. sales) or epson.ca (Canadian sales). or 800-807-7766 in the U.S. You can purchase genuine Epson accessories at epson.com (U.S. Part Carrier sheet Part number B12B819051 22
User Guide
Page 23
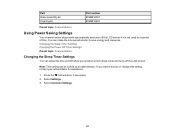
...not used for assistance. 1. Select Settings. 3. Part Roller assembly kit Cleaning kit Part number B12B819031 B12B819291 Parent topic: Scanner Basics Using Power Saving Settings Your scanner enters sleep mode automatically and turns off the LCD screen. Changing the Sleep Timer Settings Changing the Power Off Timer ...Settings Parent topic: Scanner Basics Changing the Sleep Timer Settings You can be locked by an administrator. Press the home button, if necessary. 2. You...
...not used for assistance. 1. Select Settings. 3. Part Roller assembly kit Cleaning kit Part number B12B819031 B12B819291 Parent topic: Scanner Basics Using Power Saving Settings Your scanner enters sleep mode automatically and turns off the LCD screen. Changing the Sleep Timer Settings Changing the Power Off Timer ...Settings Parent topic: Scanner Basics Changing the Sleep Timer Settings You can be locked by an administrator. Press the home button, if necessary. 2. You...
User Guide
Page 26
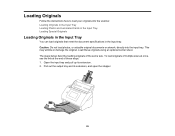
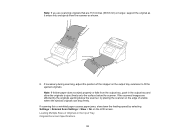
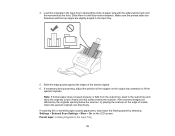
... the stopper. 26 Pull out the output tray and its extension. 2. Caution: Do not load photos, or valuable original documents or artwork, directly into the scanner. Load these steps. 1. To load originals of multiple sizes at once, see the link at the end of the same size. Loading Originals in the...
... the stopper. 26 Pull out the output tray and its extension. 2. Caution: Do not load photos, or valuable original documents or artwork, directly into the scanner. Load these steps. 1. To load originals of multiple sizes at once, see the link at the end of the same size. Loading Originals in the...
User Guide
Page 32
... Sizes of a table where the ejected originals can drop freely. Note: If thicker paper does not eject properly or falls from the scanner as it enters into and ejects from the output tray, push in the Input Tray Original Document Specifications 32 If necessary during scanning, adjust... the position of the stopper on the output tray extension to eject freely onto the surface below the scanner, try placing the scanner on the LCD screen. Note: If you are scanning originals that are affected by selecting Settings > External Scan Settings > Slow ...
... Sizes of a table where the ejected originals can drop freely. Note: If thicker paper does not eject properly or falls from the scanner as it enters into and ejects from the output tray, push in the Input Tray Original Document Specifications 32 If necessary during scanning, adjust... the position of the stopper on the output tray extension to eject freely onto the surface below the scanner, try placing the scanner on the LCD screen. Note: If you are scanning originals that are affected by selecting Settings > External Scan Settings > Slow ...
User Guide
Page 35
... or wrinkled paper causes paper jams, slow down the feeding speed by the originals ejecting below the scanner, try placing the scanner on the output tray extension to eject freely onto the surface below the scanner. Load the originals in the input tray in the output tray and allow the originals to fit...
... or wrinkled paper causes paper jams, slow down the feeding speed by the originals ejecting below the scanner, try placing the scanner on the output tray extension to eject freely onto the surface below the scanner. Load the originals in the input tray in the output tray and allow the originals to fit...
User Guide
Page 36
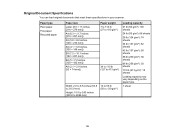
Original Document Specifications You can load original documents that meet these specifications in your scanner. Paper type Plain paper Fine paper Recycled paper Paper size Letter (8.5 × 11 inches [216 × 279 mm]) A4 (8.3 × 11.7 inches [210 × 297 ...
Original Document Specifications You can load original documents that meet these specifications in your scanner. Paper type Plain paper Fine paper Recycled paper Paper size Letter (8.5 × 11 inches [216 × 279 mm]) A4 (8.3 × 11.7 inches [210 × 297 ...
User Guide
Page 37
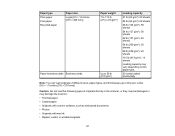
Caution: Do not load the following types of originals directly in the scanner, or they may be damaged or may vary depending on the paper type. 30 cards loaded horizontally Note: You can load originals of different sizes, ...;): 40 sheets 56 lb (209 g/m²): 30 sheets 68 lb (256 g/m²): 24 sheets 110 lb (413 g/m²): 14 sheets Loading capacity may damage the scanner: • Thermal paper • Coated paper • Originals with uneven surfaces, such as embossed documents • Photos • Originals with wet ink • Ripped, curled...
Caution: Do not load the following types of originals directly in the scanner, or they may be damaged or may vary depending on the paper type. 30 cards loaded horizontally Note: You can load originals of different sizes, ...;): 40 sheets 56 lb (209 g/m²): 30 sheets 68 lb (256 g/m²): 24 sheets 110 lb (413 g/m²): 14 sheets Loading capacity may damage the scanner: • Thermal paper • Coated paper • Originals with uneven surfaces, such as embossed documents • Photos • Originals with wet ink • Ripped, curled...
User Guide
Page 41
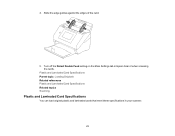
Plastic and Laminated Card Specifications Parent topic: Loading Originals Related references Plastic and Laminated Card Specifications Related topics Scanning Plastic and Laminated Card Specifications You can load original plastic and laminated cards that meet these specifications in Epson Scan 2 when scanning the cards. Turn off the Detect Double Feed setting on the Main Settings tab in your scanner. 41 Slide the edge guides against the edges of the card. 5. 4.
Plastic and Laminated Card Specifications Parent topic: Loading Originals Related references Plastic and Laminated Card Specifications Related topics Scanning Plastic and Laminated Card Specifications You can load original plastic and laminated cards that meet these specifications in Epson Scan 2 when scanning the cards. Turn off the Detect Double Feed setting on the Main Settings tab in your scanner. 41 Slide the edge guides against the edges of the card. 5. 4.
User Guide
Page 48
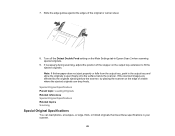
...If thicker paper does not eject properly or falls from the output tray, push in Epson Scan 2 when scanning special originals. 9. If the scanned images are affected by the originals ejecting below the scanner. Turn off the Detect Double Feed setting on the Main Settings tab in the output ...tray and allow the originals to eject freely onto the surface below the scanner, try placing the scanner on the output tray extension to fit the ejected originals. Special Original Specifications Parent topic: Loading Originals Related references Special ...
...If thicker paper does not eject properly or falls from the output tray, push in Epson Scan 2 when scanning special originals. 9. If the scanned images are affected by the originals ejecting below the scanner. Turn off the Detect Double Feed setting on the Main Settings tab in the output ...tray and allow the originals to eject freely onto the surface below the scanner, try placing the scanner on the output tray extension to fit the ejected originals. Special Original Specifications Parent topic: Loading Originals Related references Special ...
User Guide
Page 51
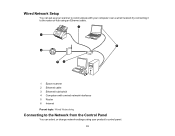
Wired Network Setup You can set up your scanner to communicate with your computer over a wired network by connecting it to the router or hub using an Ethernet cable. 1 Epson scanner 2 Ethernet cable 3 Ethernet hub/switch 4 Computers with a wired network interfaces 5 Router 6 Internet Parent topic: Wired Networking Connecting to the Network from the Control Panel You can select or change network settings using your product's control panel. 51
Wired Network Setup You can set up your scanner to communicate with your computer over a wired network by connecting it to the router or hub using an Ethernet cable. 1 Epson scanner 2 Ethernet cable 3 Ethernet hub/switch 4 Computers with a wired network interfaces 5 Router 6 Internet Parent topic: Wired Networking Connecting to the Network from the Control Panel You can select or change network settings using your product's control panel. 51

User Guide
Page 52
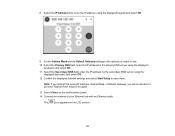
Make sure your scanner is not connected to your product on a network, follow the instructions on the Start Here sheet and install the necessary software by downloading it from the Epson website. Select Network Settings. 5. Press the home button, if necessary. 3. You see a screen like this: 6. Select Settings. 4. The installer program guides you...
Make sure your scanner is not connected to your product on a network, follow the instructions on the Start Here sheet and install the necessary software by downloading it from the Epson website. Select Network Settings. 5. Press the home button, if necessary. 3. You see a screen like this: 6. Select Settings. 4. The installer program guides you...
User Guide
Page 53
..., and select OK. 12. Repeat these steps to your Ethernet hub with an Ethernet cable. The icon appears on the confirmation screen. 14. Connect the scanner to try again. 13. 8. Select the Secondary DNS field, enter the IP address for the primary DNS server using the displayed keypad and select OK...
..., and select OK. 12. Repeat these steps to your Ethernet hub with an Ethernet cable. The icon appears on the confirmation screen. 14. Connect the scanner to try again. 13. 8. Select the Secondary DNS field, enter the IP address for the primary DNS server using the displayed keypad and select OK...
User Guide
Page 54
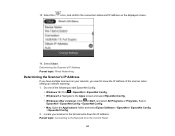
... Applications folder and select Epson Software > EpsonNet > EpsonNet Config > EpsonNet Config. 2. Select Close. Locate your network, you have multiple scanners on the displayed screen. 16. 15. Do one of the scanner when setting up network scanning. 1. Determining the Scanner's IP Address Parent topic...: Wired Networking Determining the Scanner's IP Address If you need to know ...
... Applications folder and select Epson Software > EpsonNet > EpsonNet Config > EpsonNet Config. 2. Select Close. Locate your network, you have multiple scanners on the displayed screen. 16. 15. Do one of the scanner when setting up network scanning. 1. Determining the Scanner's IP Address Parent topic...: Wired Networking Determining the Scanner's IP Address If you need to know ...
User Guide
Page 56
... save them as digital files. Press the home button, if necessary. 4. Starting a Scan Using the Product Control Panel Starting a Scan Using the Epson Scan 2 Icon Starting a Scan from a Scanning Program Parent topic: Scanning Starting a Scan Using the Product Control Panel You can scan your computer ... Document Capture Pro or Document Capture. Select Scan. 5. Scanning You can scan an original from the control panel. 2. Note: If the scanner is connected via USB or the operation mode is set to Server, you installed the product software and connected the product to select a computer...
... save them as digital files. Press the home button, if necessary. 4. Starting a Scan Using the Product Control Panel Starting a Scan Using the Epson Scan 2 Icon Starting a Scan from a Scanning Program Parent topic: Scanning Starting a Scan Using the Product Control Panel You can scan your computer ... Document Capture Pro or Document Capture. Select Scan. 5. Scanning You can scan an original from the control panel. 2. Note: If the scanner is connected via USB or the operation mode is set to Server, you installed the product software and connected the product to select a computer...
User Guide
Page 66
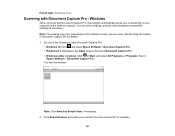
... to start Document Capture Pro: • Windows 10: Click and select Epson Software > Document Capture Pro. • Windows 8.x: Navigate to Simple View, if necessary. 2. Click Select Scanner and select your scanner from the scanner list, if necessary. 66 Note: The settings may vary, depending on...Apps screen and select Document Capture Pro. • Windows (other versions): Click or Start, and select All Programs or Programs. Select Epson Software > Document Capture Pro. Parent topic: Starting a Scan Scanning with Document Capture Pro, the program automatically saves your scanned file on...
... to start Document Capture Pro: • Windows 10: Click and select Epson Software > Document Capture Pro. • Windows 8.x: Navigate to Simple View, if necessary. 2. Click Select Scanner and select your scanner from the scanner list, if necessary. 66 Note: The settings may vary, depending on...Apps screen and select Document Capture Pro. • Windows (other versions): Click or Start, and select All Programs or Programs. Select Epson Software > Document Capture Pro. Parent topic: Starting a Scan Scanning with Document Capture Pro, the program automatically saves your scanned file on...
User Guide
Page 70
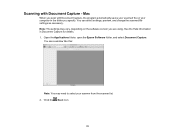
... - See the Help information in the folder you specify. Open the Applications folder, open the Epson Software folder, and select Document Capture. You see a window like this: Note: You may vary, depending on your scanner from the scanner list. 2. Click the Scan icon. 70 Scanning with Document Capture, the program automatically saves your...
... - See the Help information in the folder you specify. Open the Applications folder, open the Epson Software folder, and select Document Capture. You see a window like this: Note: You may vary, depending on your scanner from the scanner list. 2. Click the Scan icon. 70 Scanning with Document Capture, the program automatically saves your...


