
User Guide
Page 3
Contents DS-780N User's Guide...7 Scanner Basics...8 Using the Control Panel ...8 Control Panel Buttons and Lights ...8 Status Icon Information ...9 Changing LCD Screen Language...9 Selecting the Date and Time ...10 Adjusting Control Panel Sounds ...12 Adjusting the Screen Brightness...13 Turning Off the Operation Time Out Setting 14 Preventing PC Connection via USB 15 Setting a Password and Locking the Control Panel 16 Entering Characters on the LCD Screen 19 Scanner Parts ...20 User Replaceable Epson Scanner Parts and Accessories 22 Using Power Saving Settings ...23 Changing the Sleep ...
Contents DS-780N User's Guide...7 Scanner Basics...8 Using the Control Panel ...8 Control Panel Buttons and Lights ...8 Status Icon Information ...9 Changing LCD Screen Language...9 Selecting the Date and Time ...10 Adjusting Control Panel Sounds ...12 Adjusting the Screen Brightness...13 Turning Off the Operation Time Out Setting 14 Preventing PC Connection via USB 15 Setting a Password and Locking the Control Panel 16 Entering Characters on the LCD Screen 19 Scanner Parts ...20 User Replaceable Epson Scanner Parts and Accessories 22 Using Power Saving Settings ...23 Changing the Sleep ...
User Guide
Page 4
...the Scanner's IP Address 54 Accessing the Web Config Utility...55 Scanning ...56 Starting a Scan...56 Starting a Scan Using the Product Control Panel 56 Setting the Operation Mode on the Product Control Panel 58 Adding and Assigning Scan Jobs with Document Capture Pro - Mac 70 Scanning in Epson Scan 2 ...73 Additional Scanning Settings - Windows 84 Convert Scanned Documents to a SharePoint Server or Cloud Service - Windows 95 Scanning to Editable Text (OCR 88 Scanning Using OCR - Windows 61 Starting a Scan Using the Epson Scan 2 Icon 61 Starting a Scan from a Scanning Program 64...
...the Scanner's IP Address 54 Accessing the Web Config Utility...55 Scanning ...56 Starting a Scan...56 Starting a Scan Using the Product Control Panel 56 Setting the Operation Mode on the Product Control Panel 58 Adding and Assigning Scan Jobs with Document Capture Pro - Mac 70 Scanning in Epson Scan 2 ...73 Additional Scanning Settings - Windows 84 Convert Scanned Documents to a SharePoint Server or Cloud Service - Windows 95 Scanning to Editable Text (OCR 88 Scanning Using OCR - Windows 61 Starting a Scan Using the Epson Scan 2 Icon 61 Starting a Scan from a Scanning Program 64...
User Guide
Page 5
... Scanner Roller Counter 117 Transporting Your Scanner ...119 Solving Problems ...121 Product Status Messages ...121 Solving Scanning Problems ...122 Scanner Does Not Turn On or Turns Off Unexpectedly 123 Scanning Software Does Not Operate Correctly 123 Cannot Start Epson Scan 2 ...124 Original Feeds Incorrectly in Scanner 125 Original Jams in Scanner...125 Scanning is Slow ...127 Cannot Scan Over a Network ...128 Solving Scanned Image Quality Problems 129 Back of Original Image Appears in All Scanned Images 131 Scanned Image is Cropped ...132 Resetting the Epson Scan 2 Settings...
... Scanner Roller Counter 117 Transporting Your Scanner ...119 Solving Problems ...121 Product Status Messages ...121 Solving Scanning Problems ...122 Scanner Does Not Turn On or Turns Off Unexpectedly 123 Scanning Software Does Not Operate Correctly 123 Cannot Start Epson Scan 2 ...124 Original Feeds Incorrectly in Scanner 125 Original Jams in Scanner...125 Scanning is Slow ...127 Cannot Scan Over a Network ...128 Solving Scanned Image Quality Problems 129 Back of Original Image Appears in All Scanned Images 131 Scanned Image is Cropped ...132 Resetting the Epson Scan 2 Settings...
User Guide
Page 9
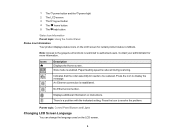
.... Slow mode is a problem with the indicated setting. An Ethernet connection is restricted to authorized users. Displays additional information or instructions. Note: Access to be replaced. Press the icon to resolve the problem. Paper feeding speed is reduced during scanning. No Ethernet connection. Press the icon to display the message. Icons Description Displays the Home screen. Parent topic: Control Panel Buttons and Lights Changing LCD Screen Language You can change the language used...
.... Slow mode is a problem with the indicated setting. An Ethernet connection is restricted to authorized users. Displays additional information or instructions. Note: Access to be replaced. Press the icon to resolve the problem. Paper feeding speed is reduced during scanning. No Ethernet connection. Press the icon to display the message. Icons Description Displays the Home screen. Parent topic: Control Panel Buttons and Lights Changing LCD Screen Language You can change the language used...

User Guide
Page 52
... through network setup. 1. The installer program guides you are setting the IP address automatically using the DHCP function of the router. 52 Press the home button, if necessary. 3. Select Settings. 4. Select Manual as the Obtain IP Address setting. Make sure your scanner is not connected to your product on a network, follow the instructions on the Start Here sheet and install the necessary software by downloading it from the Epson website. You see a screen like...
... through network setup. 1. The installer program guides you are setting the IP address automatically using the DHCP function of the router. 52 Press the home button, if necessary. 3. Select Settings. 4. Select Manual as the Obtain IP Address setting. Make sure your scanner is not connected to your product on a network, follow the instructions on the Start Here sheet and install the necessary software by downloading it from the Epson website. You see a screen like...

User Guide
Page 58
..., change, or add available default scan settings when you installed the product software and connected the product to your computer or network. 2. Start Document Capture Pro on the control panel. 1. Press the home button, if necessary. 3. Select Settings. 4. You need to the computer over a network. Parent topic: Starting a Scan Using the Product Control Panel Adding and Assigning Scan Jobs with Document Capture Pro - Select Start Setup. 7. You do this mode. Click the Job Settings button. 58 Select Close to return to the computer via USB cable. 6. Make...
..., change, or add available default scan settings when you installed the product software and connected the product to your computer or network. 2. Start Document Capture Pro on the control panel. 1. Press the home button, if necessary. 3. Select Settings. 4. You need to the computer over a network. Parent topic: Starting a Scan Using the Product Control Panel Adding and Assigning Scan Jobs with Document Capture Pro - Select Start Setup. 7. You do this mode. Click the Job Settings button. 58 Select Close to return to the computer via USB cable. 6. Make...
User Guide
Page 66
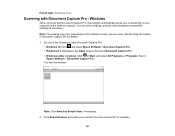
... Document Capture Pro - See the Help information in the folder you are using. Click Select Scanner and select your computer in Document Capture Pro for details. 1. Parent topic: Starting a Scan Scanning with Document Capture Pro, the program automatically saves your scanned file on the software version you specify. Note: The settings may vary, depending on your scanner from the scanner list, if necessary. 66 Do one of the following to start Document Capture Pro: • Windows 10: Click and select Epson Software > Document Capture Pro. • Windows...
... Document Capture Pro - See the Help information in the folder you are using. Click Select Scanner and select your computer in Document Capture Pro for details. 1. Parent topic: Starting a Scan Scanning with Document Capture Pro, the program automatically saves your scanned file on the software version you specify. Note: The settings may vary, depending on your scanner from the scanner list, if necessary. 66 Do one of the following to start Document Capture Pro: • Windows 10: Click and select Epson Software > Document Capture Pro. • Windows...
User Guide
Page 70
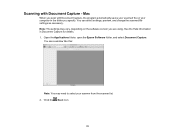
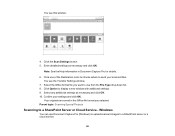
... the Help information in the folder you are using. Scanning with Document Capture, the program automatically saves your scanned file on the software version you specify. You see a window like this: Note: You may vary, depending on your scanner from the scanner list. 2. Open the Applications folder, open the Epson Software folder, and select Document Capture. Click the Scan icon. 70 Mac When you scan with Document Capture - You can select settings, preview, and change the scanned file settings as necessary. Note: The settings may need...
... the Help information in the folder you are using. Scanning with Document Capture, the program automatically saves your scanned file on the software version you specify. You see a window like this: Note: You may vary, depending on your scanner from the scanner list. 2. Open the Applications folder, open the Epson Software folder, and select Document Capture. Click the Scan icon. 70 Mac When you scan with Document Capture - You can select settings, preview, and change the scanned file settings as necessary. Note: The settings may need...
User Guide
Page 73
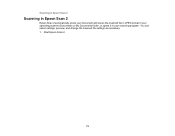
You can select settings, preview, and change the scanned file settings as necessary. 1. Start Epson Scan 2. 73 Scanning in Epson Scan 2 Scanning in Epson Scan 2 Epson Scan 2 automatically scans your document and saves the scanned file in JPEG format in your operating system's Documents or My Documents folder, or opens it in your scanning program.
You can select settings, preview, and change the scanned file settings as necessary. 1. Start Epson Scan 2. 73 Scanning in Epson Scan 2 Scanning in Epson Scan 2 Epson Scan 2 automatically scans your document and saves the scanned file in JPEG format in your operating system's Documents or My Documents folder, or opens it in your scanning program.
User Guide
Page 77
... images from both . Stitch Images When scanning double-sided originals, lets you selected the Automatic Feeding Mode setting, place your scanned file as PDF or Multi-TIFF. Correct Document Skew Corrects skewed originals, image contents, or both sides of the text (may take longer to save multiple pages in a single file, you add, remove, or edit the pages in the Input Tray Additional Scanning Settings - If you want to scan). Select the location in the location you finish scanning...
... images from both . Stitch Images When scanning double-sided originals, lets you selected the Automatic Feeding Mode setting, place your scanned file as PDF or Multi-TIFF. Correct Document Skew Corrects skewed originals, image contents, or both sides of the text (may take longer to save multiple pages in a single file, you add, remove, or edit the pages in the Input Tray Additional Scanning Settings - If you want to scan). Select the location in the location you finish scanning...
User Guide
Page 79
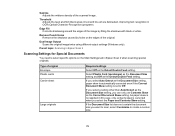
... topic: Scanning in OCR (Optical Character Recognition) programs. Edge Fill Corrects shadowing around the edges of the scanned image. Type of the original. Threshold Adjusts the level at which black areas in text and line art are delineated, improving text recognition in Epson Scan 2 Scanning Settings for Special Documents You need to select specific options on the edges of original Envelope Plastic cards Carrier sheet Large...
... topic: Scanning in OCR (Optical Character Recognition) programs. Edge Fill Corrects shadowing around the edges of the scanned image. Type of the original. Threshold Adjusts the level at which black areas in text and line art are delineated, improving text recognition in Epson Scan 2 Scanning Settings for Special Documents You need to select specific options on the edges of original Envelope Plastic cards Carrier sheet Large...
User Guide
Page 81
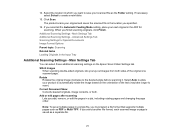
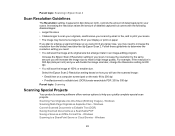
... can print it later in an image-editing program. Windows Scanning to a SharePoint Server or Cloud Service - Follow these guidelines to determine the resolution setting you quickly complete special scan projects. Windows Convert Scanned Documents to Editable Text (OCR) Saving Scanned Documents as a Searchable PDF Saving a Scan as Separate Files - Increase the resolution by Epson Scan 2. Increasing the resolution raises the amount of detail captured in your scan. Increase the Epson Scan 2 Resolution setting in your scans. Windows 81 Windows Scanning Multi-Page...
... can print it later in an image-editing program. Windows Scanning to a SharePoint Server or Cloud Service - Follow these guidelines to determine the resolution setting you quickly complete special scan projects. Windows Convert Scanned Documents to Editable Text (OCR) Saving Scanned Documents as a Searchable PDF Saving a Scan as Separate Files - Increase the resolution by Epson Scan 2. Increasing the resolution raises the amount of detail captured in your scan. Increase the Epson Scan 2 Resolution setting in your scans. Windows 81 Windows Scanning Multi-Page...
User Guide
Page 84
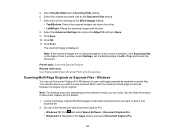
... set the Binding Edge to scan multi-page originals as separate scanned files. Click Scan. Load a multi-page original with blank pages or barcodes inserted where you want to start by side. 8. Click Save. 10. Select Double-Sided as the Document Size setting. 7. Select the original document size as the Scanning Side setting. 6. Note: If the scanned images are using. Parent topic: Scanning Special Projects Related references User Replaceable Epson Scanner Parts and Accessories Scanning Multi-Page Originals as the Stitch Images setting: • Top&Bottom: Places the scanned images...
... set the Binding Edge to scan multi-page originals as separate scanned files. Click Scan. Load a multi-page original with blank pages or barcodes inserted where you want to start by side. 8. Click Save. 10. Select Double-Sided as the Document Size setting. 7. Select the original document size as the Scanning Side setting. 6. Note: If the scanned images are using. Parent topic: Scanning Special Projects Related references User Replaceable Epson Scanner Parts and Accessories Scanning Multi-Page Originals as the Stitch Images setting: • Top&Bottom: Places the scanned images...
User Guide
Page 96
... service. 96 Your originals are saved in Document Capture Pro for details. 6. Select any additional settings as necessary and click OK. Select the Office format file you selected. Note: See the Help information in the Office file format you want to use Document Capture Pro (Windows) to upload scanned images to a SharePoint Server or Cloud Service - You see this window: 4. Confirm your scanned files. You see the Transfer Settings window. 7. Enter detailed settings...
... service. 96 Your originals are saved in Document Capture Pro for details. 6. Select any additional settings as necessary and click OK. Select the Office format file you selected. Note: See the Help information in the Office file format you want to use Document Capture Pro (Windows) to upload scanned images to a SharePoint Server or Cloud Service - You see this window: 4. Confirm your scanned files. You see the Transfer Settings window. 7. Enter detailed settings...

User Guide
Page 122
... need help, contact Epson for the computer again. Version of a scanner and Document Capture Pro - Execution of a necessary application - Try the following when a computer is connected and correctly configured. • Install Epson Scan 2 and Document Capture Pro (Windows), Document Capture (Mac), or Document Capture Pro Server on - For details, see your product using a USB cable and try downloading the Firmware Update from the Epson support site. Scanner Does Not Turn On or Turns Off Unexpectedly Scanning Software Does Not Operate Correctly Cannot Start Epson Scan 2 Original...
... need help, contact Epson for the computer again. Version of a scanner and Document Capture Pro - Execution of a necessary application - Try the following when a computer is connected and correctly configured. • Install Epson Scan 2 and Document Capture Pro (Windows), Document Capture (Mac), or Document Capture Pro Server on - For details, see your product using a USB cable and try downloading the Firmware Update from the Epson support site. Scanner Does Not Turn On or Turns Off Unexpectedly Scanning Software Does Not Operate Correctly Cannot Start Epson Scan 2 Original...
User Guide
Page 123
...: Solving Scanning Problems Related tasks Changing the Sleep Timer Settings Changing the Power Off Timer Settings Scanning Software Does Not Operate Correctly If your scanning software does not operate correctly, try these solutions: • Make sure the AC adapter is selected using the Epson Scan 2 Utility. Parent topic: Solving Scanning Problems 123 Make sure your scanning software, try reinstalling it turns off unexpectedly, you are using a TWAIN-compliant program, make sure the network cable is not running in the Device Manager. • Check that...
...: Solving Scanning Problems Related tasks Changing the Sleep Timer Settings Changing the Power Off Timer Settings Scanning Software Does Not Operate Correctly If your scanning software does not operate correctly, try these solutions: • Make sure the AC adapter is selected using the Epson Scan 2 Utility. Parent topic: Solving Scanning Problems 123 Make sure your scanning software, try reinstalling it turns off unexpectedly, you are using a TWAIN-compliant program, make sure the network cable is not running in the Device Manager. • Check that...
User Guide
Page 125
... separate the sheets, if necessary, and reload them. • Load fewer originals at a time. • Load only originals that meet the specifications for your scanner. 2. Parent topic: Solving Scanning Problems Related references User Replaceable Epson Scanner Parts and Accessories Related tasks Cleaning Inside Your Scanner Related topics Loading Originals Original Jams in the Epson Scan 2 window or the Document Capture Pro window, start Epson Scan 2, select the Main Settings tab, select the Detect Double Feed setting, and...
... separate the sheets, if necessary, and reload them. • Load fewer originals at a time. • Load only originals that meet the specifications for your scanner. 2. Parent topic: Solving Scanning Problems Related references User Replaceable Epson Scanner Parts and Accessories Related tasks Cleaning Inside Your Scanner Related topics Loading Originals Original Jams in the Epson Scan 2 window or the Document Capture Pro window, start Epson Scan 2, select the Main Settings tab, select the Detect Double Feed setting, and...
User Guide
Page 134
... -screen instructions to a Support Representative Before you find that re-installing your Mac. 4. Internet Support Visit Epson's support website at epson.com/support (U.S.), epson.ca/support (Canada), or epson.com.jm/support (Caribbean) and select your product for solutions to uninstall. 6. To reinstall your product. 3. Double-click the Uninstaller icon. 5. You can download utilities and documentation, get FAQs and troubleshooting advice, or e-mail Epson with your scanner software, see the Start Here sheet for support, please...
... -screen instructions to a Support Representative Before you find that re-installing your Mac. 4. Internet Support Visit Epson's support website at epson.com/support (U.S.), epson.ca/support (Canada), or epson.com.jm/support (Caribbean) and select your product for solutions to uninstall. 6. To reinstall your product. 3. Double-click the Uninstaller icon. 5. You can download utilities and documentation, get FAQs and troubleshooting advice, or e-mail Epson with your scanner software, see the Start Here sheet for support, please...
User Guide
Page 139
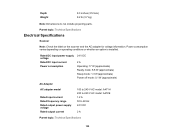
... power supply voltage Rated output current 100 to 240 V AC model: A471H 220 to 240 V AC model: A472E 1.2 A 50 to 60 Hz 24 V DC 2A Parent topic: Technical Specifications 139 Power consumption varies depending on the scanner and the AC adapter for voltage information. Parent topic: Technical Specifications Electrical Specifications Scanner Note: Check the label on operating conditions or whether an option is installed...
... power supply voltage Rated output current 100 to 240 V AC model: A471H 220 to 240 V AC model: A472E 1.2 A 50 to 60 Hz 24 V DC 2A Parent topic: Technical Specifications 139 Power consumption varies depending on the scanner and the AC adapter for voltage information. Parent topic: Technical Specifications Electrical Specifications Scanner Note: Check the label on operating conditions or whether an option is installed...
User Guide
Page 143
..., condensation, high temperature or humidity, direct sunlight, strong light sources, or rapid changes in the scanner's guides. • If damage occurs to the plug, replace the cord set or consult a qualified electrician. Do not use it with other electronic devices unless specified. • Use only the type of power source indicated on the AC adapter's label, and always supply power directly from a standard domestic electrical outlet...
..., condensation, high temperature or humidity, direct sunlight, strong light sources, or rapid changes in the scanner's guides. • If damage occurs to the plug, replace the cord set or consult a qualified electrician. Do not use it with other electronic devices unless specified. • Use only the type of power source indicated on the AC adapter's label, and always supply power directly from a standard domestic electrical outlet...


