ESC/label Command Reference Guide
Page 4
... Label Printing...14 1.4.3 Serialized Printing...15 1.4.4 Saving a File for the Command...10 1.3.3 Command Syntax ...12 1.3.4 About Saving the Graphics and Label Formats in the Field and Printing It 41 3. Fonts ...19 2.1.1 Font type ...20 2.1.2 Special symbols...21 2.2. Print area...24 2.4.1 Leading edge and direction definitions ...25 2.4.2 Reference position definitions ...26 2.4.3 Maximum printable area ...27 2.4.4 Printable area and mount settings...28 2.4.5 Print area and margin settings...29 2.4.6 Print...
... Label Printing...14 1.4.3 Serialized Printing...15 1.4.4 Saving a File for the Command...10 1.3.3 Command Syntax ...12 1.3.4 About Saving the Graphics and Label Formats in the Field and Printing It 41 3. Fonts ...19 2.1.1 Font type ...20 2.1.2 Special symbols...21 2.2. Print area...24 2.4.1 Leading edge and direction definitions ...25 2.4.2 Reference position definitions ...26 2.4.3 Maximum printable area ...27 2.4.4 Printable area and mount settings...28 2.4.5 Print area and margin settings...29 2.4.6 Print...
ESC/label Command Reference Guide
Page 54
... character. [Response] None [Reference] Related commands: ^FW , ^BY ESC/Label Command Reference Guide Rev. E Page 54 The check digit is calculated by modulus 43. An asterisk is added automatically. ^B3 [Name] Code 39 barcode [Format] ^B3 o ,c ,h ,i ,a Parameters Description Range o Code 39 field orientation o = N/R/I/B N: Normal R: 90° rotation (clockwise) I: 180° rotation B: 270° rotation (clockwise) c Set/cancel check digit printing...
... character. [Response] None [Reference] Related commands: ^FW , ^BY ESC/Label Command Reference Guide Rev. E Page 54 The check digit is calculated by modulus 43. An asterisk is added automatically. ^B3 [Name] Code 39 barcode [Format] ^B3 o ,c ,h ,i ,a Parameters Description Range o Code 39 field orientation o = N/R/I/B N: Normal R: 90° rotation (clockwise) I: 180° rotation B: 270° rotation (clockwise) c Set/cancel check digit printing...
ESC/label Command Reference Guide
Page 60
... Code 93 Y: Set barcode N: Cancel c Set/cancel check digit c = Y/N printing for HRI characters. All ASCII code (128 types) can be encoded. If the width of the barcode to be rendered exceeds the label width, only the part that fits in the label width will be specified in the field data using a combination of the alphabet (A to 9), capital letters of shift codes and characters. The check digit is added automatically...
... Code 93 Y: Set barcode N: Cancel c Set/cancel check digit c = Y/N printing for HRI characters. All ASCII code (128 types) can be encoded. If the width of the barcode to be rendered exceeds the label width, only the part that fits in the label width will be specified in the field data using a combination of the alphabet (A to 9), capital letters of shift codes and characters. The check digit is added automatically...

Users Manual
Page 3
...; Cleaning the Auto Cutter (Auto Cutter Model Only 54 ■ Cleaning the Peeler (Peeler Model Only 55 ■ Cleaning the Edge Guides 56 ■ Cleaning the Platen 57 ■ Cleaning the Paper Feed Roller 58 ■ Cleaning the Paper Pressure Roller 59 ■ Cleaning the Print Head 60 Using the Operation Panel 61 Using the Printer Driver 61 Using the WebConfig 61 Troubleshooting 62 ■ Paper is jammed 62 For the Auto Cutter Model 63 For the Peeler Model 65 ■ Problems with Print...
...; Cleaning the Auto Cutter (Auto Cutter Model Only 54 ■ Cleaning the Peeler (Peeler Model Only 55 ■ Cleaning the Edge Guides 56 ■ Cleaning the Platen 57 ■ Cleaning the Paper Feed Roller 58 ■ Cleaning the Paper Pressure Roller 59 ■ Cleaning the Print Head 60 Using the Operation Panel 61 Using the Printer Driver 61 Using the WebConfig 61 Troubleshooting 62 ■ Paper is jammed 62 For the Auto Cutter Model 63 For the Peeler Model 65 ■ Problems with Print...

Users Manual
Page 69
... the computer. Press the Peeler Reset button to perform printing. Check whether or not the printer driver is installed by following the steps below. 1 Display Devices and Printers on the computer. 2 Check that the power cable is Canceled on PC but "Printing" Message on Printer Does Not Disappear If you cancel printing in printer queue on the operation panel, and then select [All label formats]. 69 To cancel the status...
... the computer. Press the Peeler Reset button to perform printing. Check whether or not the printer driver is installed by following the steps below. 1 Display Devices and Printers on the computer. 2 Check that the power cable is Canceled on PC but "Printing" Message on Printer Does Not Disappear If you cancel printing in printer queue on the operation panel, and then select [All label formats]. 69 To cancel the status...
Users Manual
Page 70
... loaded paper is not loaded. Or change the print area to match them with the loaded paper. (U"Printer Driver Settings" on page 39) Load media that matches the [Media Detect] settings. Replace the paper. 70 Or change the media source setting. Troubleshooting A Message is Displayed on page 34) Use paper that matches the print area size. Load the paper or change the [Media Source] and [Media Form] settings to match them with the loaded paper. (U"Printer Driver Settings" on the Operation Panel Message Information Paper feed error...
... loaded paper is not loaded. Or change the print area to match them with the loaded paper. (U"Printer Driver Settings" on page 39) Load media that matches the [Media Detect] settings. Replace the paper. 70 Or change the media source setting. Troubleshooting A Message is Displayed on page 34) Use paper that matches the print area size. Load the paper or change the [Media Source] and [Media Form] settings to match them with the loaded paper. (U"Printer Driver Settings" on the Operation Panel Message Information Paper feed error...

Application Development Guide - CW-C6000/CW-C6500 Series
Page 5
... determine the optimum printing position for International Color Consortium Epson ESC/Label Application Development Guide CW-C6000/CW-C6500 Series Rev. A field whose content does not change within a batch is called a variable field. One sheet of memory is longer than the maximum label length supported by that group of commands. Refers to the distance from the left edge of the paper to the...
... determine the optimum printing position for International Color Consortium Epson ESC/Label Application Development Guide CW-C6000/CW-C6500 Series Rev. A field whose content does not change within a batch is called a variable field. One sheet of memory is longer than the maximum label length supported by that group of commands. Refers to the distance from the left edge of the paper to the...

Application Development Guide - CW-C6000/CW-C6500 Series
Page 23
... 23 n Command(s) used : Ø ^S(CUB,S Epson ESC/Label Application Development Guide CW-C6000/CW-C6500 Series Rev. n Command(s) used : Ø ^S(CMP,M Buzzer setting n Function description: Ø Use this function to sound the buzzer on the printer at the timing after printing that is not sounded after printing. n Usage case: Ø Use to set operations after each user-specified number of labels. Peeler setting n Function description: Ø Use this function to...
... 23 n Command(s) used : Ø ^S(CUB,S Epson ESC/Label Application Development Guide CW-C6000/CW-C6500 Series Rev. n Command(s) used : Ø ^S(CMP,M Buzzer setting n Function description: Ø Use this function to sound the buzzer on the printer at the timing after printing that is not sounded after printing. n Usage case: Ø Use to set operations after each user-specified number of labels. Peeler setting n Function description: Ø Use this function to...

Application Development Guide - CW-C6000/CW-C6500 Series
Page 32
...¥CW-C6000 Series * [Public document] is because the color specified as the spot color may change in the dialog when selecting a spot color list file is also the default location where the EPSON tool saves the file. - Color correction type setting - Choose this when applying spot color adjustment with this printing. - The default folder displayed in ICM. Epson ESC/Label Application Development Guide CW-C6000/CW-C6500...
...¥CW-C6000 Series * [Public document] is because the color specified as the spot color may change in the dialog when selecting a spot color list file is also the default location where the EPSON tool saves the file. - Color correction type setting - Choose this when applying spot color adjustment with this printing. - The default folder displayed in ICM. Epson ESC/Label Application Development Guide CW-C6000/CW-C6500...

Application Development Guide - CW-C6000/CW-C6500 Series
Page 54
... for using the printer control software to printing a label image that exceed the maximum label length are switched to set availability of divisions = ROUNDUP (label image length/maximum label length) Ø Gap between labels: No gap 2. Figure 5.4-1 Banner settings and label design Epson ESC/Label Application Development Guide CW-C6000/CW-C6500 Series Rev. At this time, the following values for the media detection method, a user is longer than the maximum label length supported...
... for using the printer control software to printing a label image that exceed the maximum label length are switched to set availability of divisions = ROUNDUP (label image length/maximum label length) Ø Gap between labels: No gap 2. Figure 5.4-1 Banner settings and label design Epson ESC/Label Application Development Guide CW-C6000/CW-C6500 Series Rev. At this time, the following values for the media detection method, a user is longer than the maximum label length supported...

ESC/label Command List CW-C6000/CW-C6500 Series
Page 17
... Send valid character This command sends the file Text code conversion name of replaced printer None [dpi] b=C: Distance between labels, label length, configuration or label width). Printer setting ~H(CLR,b ~H(C ~H(C ~H(C Send media setting Sends media layout (distance Media LS between labels [dot] None b=L: Label length [dot] None b=P: Label width [dot] None b=H: Media size error (width) detection None b= V: Media size error (length) detection None b=B: Set backfeed procedure b=H: Operation at change media b=M: Manual paper suction strength b=P: Operation at power on , or...
... Send valid character This command sends the file Text code conversion name of replaced printer None [dpi] b=C: Distance between labels, label length, configuration or label width). Printer setting ~H(CLR,b ~H(C ~H(C ~H(C Send media setting Sends media layout (distance Media LS between labels [dot] None b=L: Label length [dot] None b=P: Label width [dot] None b=H: Media size error (width) detection None b= V: Media size error (length) detection None b=B: Set backfeed procedure b=H: Operation at change media b=M: Manual paper suction strength b=P: Operation at power on , or...

ESC/label Command List CW-C6000/CW-C6500 Series
Page 24
... adjustment. ^S(CFE,b,c ^S(CLB,b,c ^S(CLE,b,c Select media type Selects media type (label Media edge detection, media source, configuration media shape, or media coating type). ^S(CLM,b,c ^S(C LM ^S(C Set paper feeding Sets paper feed amount, or Media LP adjustment cut position adjustment. axis] Sets the background image application position on the [X- Miscellaneous ^S(CCA,b,c ^S(C CA ^S(C ^S(C ^S(C Set valid character This command sets the Text code conversion character code conversion FE table table file which relate the character code to specify the image file...
... adjustment. ^S(CFE,b,c ^S(CLB,b,c ^S(CLE,b,c Select media type Selects media type (label Media edge detection, media source, configuration media shape, or media coating type). ^S(CLM,b,c ^S(C LM ^S(C Set paper feeding Sets paper feed amount, or Media LP adjustment cut position adjustment. axis] Sets the background image application position on the [X- Miscellaneous ^S(CCA,b,c ^S(C CA ^S(C ^S(C ^S(C Set valid character This command sets the Text code conversion character code conversion FE table table file which relate the character code to specify the image file...
Technical Reference Guide
Page 13
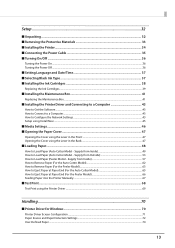
... the Auto Cutter Model 65 How to Load Paper (Auto Cutter Model - Supply from Outside 53 How to Load Paper (Auto Cutter Model - Setup ...32 ■ Unpacking ...32 ■ Removing the Protective Materials 33 ■ Installing the Printer...34 ■ Connecting the Power Cable 35 ■ Turning On/Off ...36 Turning the Power On ...36 Turning the Power Off ...36 ■ Setting Language and Date/Time 37 ■ Selecting Black Ink Type ...37 ■ Installing the Ink Cartridges 38 Replacing the Ink Cartridges...
... the Auto Cutter Model 65 How to Load Paper (Auto Cutter Model - Supply from Outside 53 How to Load Paper (Auto Cutter Model - Setup ...32 ■ Unpacking ...32 ■ Removing the Protective Materials 33 ■ Installing the Printer...34 ■ Connecting the Power Cable 35 ■ Turning On/Off ...36 Turning the Power On ...36 Turning the Power Off ...36 ■ Setting Language and Date/Time 37 ■ Selecting Black Ink Type ...37 ■ Installing the Ink Cartridges 38 Replacing the Ink Cartridges...

Technical Reference Guide
Page 77
... Margin]. If you have set the printer to eliminate both top and bottom margins from the printout. c IMPORTANT When the [Media Saving] function is enabled, printing a barcode using the [Media Saving] function. 7 Media Type Select the paper type. ("Paper Specifications" on the printout. Eliminate Lower Margin: Paper is not advanced after printing to cut paper in the [Settings for continuous label only) Select a media saving setting. Top margin Print data Bottom margin Paper feed direction No Saving: Paper...
... Margin]. If you have set the printer to eliminate both top and bottom margins from the printout. c IMPORTANT When the [Media Saving] function is enabled, printing a barcode using the [Media Saving] function. 7 Media Type Select the paper type. ("Paper Specifications" on the printout. Eliminate Lower Margin: Paper is not advanced after printing to cut paper in the [Settings for continuous label only) Select a media saving setting. Top margin Print data Bottom margin Paper feed direction No Saving: Paper...
Technical Reference Guide
Page 115
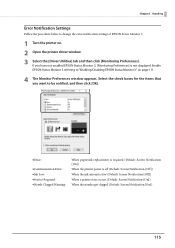
... the printer driver window. 3 Select the [Driver Utilities] tab and then click [Monitoring Preferences]. Chapter3 Handling Error Notification Settings Follow the procedure below to change the error notification settings of EPSON Status Monitor 3. 1 Turn the printer on page 111. 4 The Monitor Preferences window appears. Select the check boxes for the items that you have not enabled EPSON Status Monitor 3, [Monitoring Preferences] is low (Default: Screen Notification [Off]) When a printer error occurs (Default...
... the printer driver window. 3 Select the [Driver Utilities] tab and then click [Monitoring Preferences]. Chapter3 Handling Error Notification Settings Follow the procedure below to change the error notification settings of EPSON Status Monitor 3. 1 Turn the printer on page 111. 4 The Monitor Preferences window appears. Select the check boxes for the items that you have not enabled EPSON Status Monitor 3, [Monitoring Preferences] is low (Default: Screen Notification [Off]) When a printer error occurs (Default...

Technical Reference Guide
Page 135
... to adjust print start position and cut position. Item Media settings* Layout settings* Position adjustment Print results adjustment* Store data in the printer Background image settings* Print head maintenance Detailed settings Printer information Settings save the printer settings and to restore the settings from the character code table. Page 174 * Not displayed if you to make settings for periodic cleaning. Allows you to make paper layout settings. User-defined layout settings that allows you to configure the printer settings. In addition, a character code can...
... to adjust print start position and cut position. Item Media settings* Layout settings* Position adjustment Print results adjustment* Store data in the printer Background image settings* Print head maintenance Detailed settings Printer information Settings save the printer settings and to restore the settings from the character code table. Page 174 * Not displayed if you to make settings for periodic cleaning. Allows you to make paper layout settings. User-defined layout settings that allows you to configure the printer settings. In addition, a character code can...

Technical Reference Guide
Page 204
... position, or adjust the printing position of the printer. 204 Use label paper that has waste parts around each label to correct this error. Media layout settings for borderless printing using the Epson printer driver. Basically, the black mark position needs to be no waste parts around each Media Size Notice setting: Enable the error notice. Gap between labels cannot be detected when using die-cut labels, use die-cut labels that has no...
... position, or adjust the printing position of the printer. 204 Use label paper that has waste parts around each label to correct this error. Media layout settings for borderless printing using the Epson printer driver. Basically, the black mark position needs to be no waste parts around each Media Size Notice setting: Enable the error notice. Gap between labels cannot be detected when using die-cut labels, use die-cut labels that has no...

Technical Reference Guide
Page 208
... in paper size. Detecting Differences in Paper Size Using Label Command This function is equipped with two detectors; Change the settings using the operation panel. [Menu] - [Maintenance] - [Calibration] Simple Media Detect Allows you to adjust the sensitivity of the detectors and the threshold for detecting labels. Perform this adjustment first. Media Detect Allows you to adjust the threshold for detecting labels. If you have labels that...
... in paper size. Detecting Differences in Paper Size Using Label Command This function is equipped with two detectors; Change the settings using the operation panel. [Menu] - [Maintenance] - [Calibration] Simple Media Detect Allows you to adjust the sensitivity of the detectors and the threshold for detecting labels. Perform this adjustment first. Media Detect Allows you to adjust the threshold for detecting labels. If you have labels that...
Technical Reference Guide
Page 233
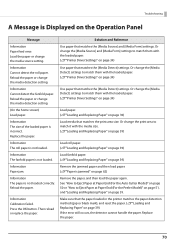
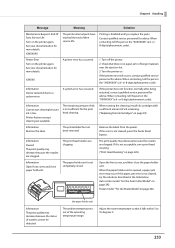
... the "XXXXXXXX" (a 6- Printer Error Turn on page 39) Information Remove the label. or 8-digit alphanumeric code). When running the cleaning, install ink cartridges with a sufficient amount of ink remaining. ("Replacing the Ink Cartridges" on the printer again. Information Paused The print quality may occur. If the paper jam error is not cleared, press the Peeler Reset button. Chapter3 Handling Message Meaning Solution Maintenance Request: End Of Parts Service Life Turn on . See your...
... the "XXXXXXXX" (a 6- Printer Error Turn on page 39) Information Remove the label. or 8-digit alphanumeric code). When running the cleaning, install ink cartridges with a sufficient amount of ink remaining. ("Replacing the Ink Cartridges" on the printer again. Information Paused The print quality may occur. If the paper jam error is not cleared, press the Peeler Reset button. Chapter3 Handling Message Meaning Solution Maintenance Request: End Of Parts Service Life Turn on . See your...

Technical Reference Guide
Page 234
... bottom margins on page 154) If die-cut label (without black marks) thinner than "Stop at Cut Position" or "Stop at Peel-Off Position", and printed labels have not been removed after each label. (The "top and bottom" used and the Media Coating Type setting of the printer driver. ("User-Defined Paper" on page 225) The printed label has been back-fed. Carry out [Bi-directional Printing Adjustment] of PrinterSetting. ("Print Head...
... bottom margins on page 154) If die-cut label (without black marks) thinner than "Stop at Cut Position" or "Stop at Peel-Off Position", and printed labels have not been removed after each label. (The "top and bottom" used and the Media Coating Type setting of the printer driver. ("User-Defined Paper" on page 225) The printed label has been back-fed. Carry out [Bi-directional Printing Adjustment] of PrinterSetting. ("Print Head...
