ESC/label Command Reference Guide
Page 4
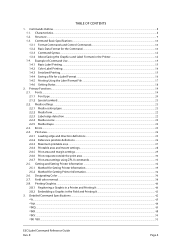
... printable area ...27 2.4.4 Printable area and mount settings...28 2.4.5 Print area and margin settings...29 2.4.6 Print requests outside the print area ...30 2.4.7 Print area settings using ZPL II commands 31 2.5. Detailed Command Specifications ...42 ^A...43 ^A@ ...44 ^B(Q...45 ^B(R ...48 ^B(V ...50 ^B0 ^BO...51 ESC/Label Command Reference Guide Rev. Media settings ...21 2.2.1 Media coating type ...21 2.2.2 Media form...22 2.2.3 Label edge detection ...22 2.2.4 Media source ...22...
... printable area ...27 2.4.4 Printable area and mount settings...28 2.4.5 Print area and margin settings...29 2.4.6 Print requests outside the print area ...30 2.4.7 Print area settings using ZPL II commands 31 2.5. Detailed Command Specifications ...42 ^A...43 ^A@ ...44 ^B(Q...45 ^B(R ...48 ^B(V ...50 ^B0 ^BO...51 ESC/Label Command Reference Guide Rev. Media settings ...21 2.2.1 Media coating type ...21 2.2.2 Media form...22 2.2.3 Label edge detection ...22 2.2.4 Media source ...22...
ESC/label Command Reference Guide
Page 54
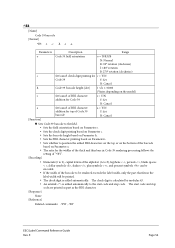
... character. [Response] None [Reference] Related commands: ^FW , ^BY ESC/Label Command Reference Guide Rev. E Page 54 The check digit is calculated by modulus 43. An asterisk is added automatically. ^B3 [Name] Code 39 barcode [Format] ^B3 o ,c ,h ,i ,a Parameters Description Range o Code 39 field orientation o = N/R/I/B N: Normal R: 90° rotation (clockwise) I: 180° rotation B: 270° rotation (clockwise) c Set/cancel check digit printing...
... character. [Response] None [Reference] Related commands: ^FW , ^BY ESC/Label Command Reference Guide Rev. E Page 54 The check digit is calculated by modulus 43. An asterisk is added automatically. ^B3 [Name] Code 39 barcode [Format] ^B3 o ,c ,h ,i ,a Parameters Description Range o Code 39 field orientation o = N/R/I/B N: Normal R: 90° rotation (clockwise) I: 180° rotation B: 270° rotation (clockwise) c Set/cancel check digit printing...
ESC/label Command Reference Guide
Page 60
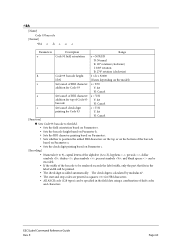
... label width, only the part that fits in the field data using a combination of the barcode to Z), hyphens , periods , dollar symbols , slashes , plus symbols , percent symbols , and blank spaces < > can be printed. The check digit is added automatically. E Page 60 The check digit is calculated by modulus 47. The start and stop codes are printed as squares for Code 93 Y: Set N: Cancel [Function] Sets Code...
... label width, only the part that fits in the field data using a combination of the barcode to Z), hyphens , periods , dollar symbols , slashes , plus symbols , percent symbols , and blank spaces < > can be printed. The check digit is added automatically. E Page 60 The check digit is calculated by modulus 47. The start and stop codes are printed as squares for Code 93 Y: Set N: Cancel [Function] Sets Code...

Users Manual
Page 3
...; Cleaning the Auto Cutter (Auto Cutter Model Only 54 ■ Cleaning the Peeler (Peeler Model Only 55 ■ Cleaning the Edge Guides 56 ■ Cleaning the Platen 57 ■ Cleaning the Paper Feed Roller 58 ■ Cleaning the Paper Pressure Roller 59 ■ Cleaning the Print Head 60 Using the Operation Panel 61 Using the Printer Driver 61 Using the WebConfig 61 Troubleshooting 62 ■ Paper is jammed 62 For the Auto Cutter Model 63 For the Peeler Model 65 ■ Problems with Print...
...; Cleaning the Auto Cutter (Auto Cutter Model Only 54 ■ Cleaning the Peeler (Peeler Model Only 55 ■ Cleaning the Edge Guides 56 ■ Cleaning the Platen 57 ■ Cleaning the Paper Feed Roller 58 ■ Cleaning the Paper Pressure Roller 59 ■ Cleaning the Print Head 60 Using the Operation Panel 61 Using the Printer Driver 61 Using the WebConfig 61 Troubleshooting 62 ■ Paper is jammed 62 For the Auto Cutter Model 63 For the Peeler Model 65 ■ Problems with Print...

Users Manual
Page 69
... Suddenly Impossible Print Data is Sent, But Does Not Print (Peeler Model) Cause The label peeling detector is required. Press the Peeler Reset button to break up and "Printing" may cause the print data to cancel the non-printing state. If not, the printer driver is not installed. 3 Install the printer driver. (U""Downloading the Latest Version" on page 4) The printer does not turn on the operation panel of the printer. Printing from a computer...
... Suddenly Impossible Print Data is Sent, But Does Not Print (Peeler Model) Cause The label peeling detector is required. Press the Peeler Reset button to break up and "Printing" may cause the print data to cancel the non-printing state. If not, the printer driver is not installed. 3 Install the printer driver. (U""Downloading the Latest Version" on page 4) The printer does not turn on the operation panel of the printer. Printing from a computer...
Users Manual
Page 70
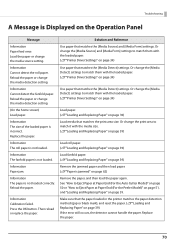
... paper. Information Paper jam. Or change the [Media Source] and [Media Form] settings to match it with the loaded paper. (U"Printer Driver Settings" on page 34) Load paper. (U"Loading and Replacing Paper" on the Operation Panel Message Information Paper feed error. Make sure that the paper loaded in the printer matches the paper detection method (gap or black mark), and reset the paper. (U"Loading and Replacing Paper" on page 34) Use paper that matches the [Media Detect] settings. Information The roll paper is not loaded...
... paper. Information Paper jam. Or change the [Media Source] and [Media Form] settings to match it with the loaded paper. (U"Printer Driver Settings" on page 34) Load paper. (U"Loading and Replacing Paper" on the Operation Panel Message Information Paper feed error. Make sure that the paper loaded in the printer matches the paper detection method (gap or black mark), and reset the paper. (U"Loading and Replacing Paper" on page 34) Use paper that matches the [Media Detect] settings. Information The roll paper is not loaded...

Application Development Guide - CW-C6000/CW-C6500 Series
Page 5
... of multiple labels that the user prints at one time. Refers to determine the optimum printing position for each object that is rendered by that group of commands. Term Printer control software Gap, gap between labels, in order to printing multiple labels at least one field. A label format for International Color Consortium Epson ESC/Label Application Development Guide CW-C6000/CW-C6500 Series Rev. Refers to the left edge...
... of multiple labels that the user prints at one time. Refers to determine the optimum printing position for each object that is rendered by that group of commands. Term Printer control software Gap, gap between labels, in order to printing multiple labels at least one field. A label format for International Color Consortium Epson ESC/Label Application Development Guide CW-C6000/CW-C6500 Series Rev. Refers to the left edge...

Application Development Guide - CW-C6000/CW-C6500 Series
Page 23
...,S Epson ESC/Label Application Development Guide CW-C6000/CW-C6500 Series Rev. E Page 23 Each specified label The buzzer is not sounded after printing. n Command(s) used : Ø ^S(CMP,M Buzzer setting n Function description: Ø Use this function to sound the buzzer on the printer at the timing after printing that is specified by the user. n Implementation recommendations: Ø For auto cutter models, link the timing of post-printing operation settings...
...,S Epson ESC/Label Application Development Guide CW-C6000/CW-C6500 Series Rev. E Page 23 Each specified label The buzzer is not sounded after printing. n Command(s) used : Ø ^S(CMP,M Buzzer setting n Function description: Ø Use this function to sound the buzzer on the printer at the timing after printing that is specified by the user. n Implementation recommendations: Ø For auto cutter models, link the timing of post-printing operation settings...

Application Development Guide - CW-C6000/CW-C6500 Series
Page 32
... can be reproduced correctly. Print quality setting - Black ratio correction value setting - Epson ESC/Label Application Development Guide CW-C6000/CW-C6500 Series Rev. That is because the color specified as follows: - E Page 32 Color correction type setting - Item Don't apply Apply Spot color list file name Table 4.5.6-1 User setting items Description Choose this when not applying spot color adjustment with an appropriate color...
... can be reproduced correctly. Print quality setting - Black ratio correction value setting - Epson ESC/Label Application Development Guide CW-C6000/CW-C6500 Series Rev. That is because the color specified as follows: - E Page 32 Color correction type setting - Item Don't apply Apply Spot color list file name Table 4.5.6-1 User setting items Description Choose this when not applying spot color adjustment with an appropriate color...

Application Development Guide - CW-C6000/CW-C6500 Series
Page 54
... no gap is selected for the media detection method, a user is allowed to set availability of divisions = ROUNDUP (label image length/maximum label length) Ø Gap between labels: No gap 2. At this time, the following values for using the printer control software to the automatic settings. Ø Label length: Label image length/number of divisions Number of banner printing. Figure 5.4-1 Banner settings and label design Epson ESC/Label Application Development Guide CW-C6000/CW-C6500 Series Rev...
... no gap is selected for the media detection method, a user is allowed to set availability of divisions = ROUNDUP (label image length/maximum label length) Ø Gap between labels: No gap 2. At this time, the following values for using the printer control software to the automatic settings. Ø Label length: Label image length/number of divisions Number of banner printing. Figure 5.4-1 Banner settings and label design Epson ESC/Label Application Development Guide CW-C6000/CW-C6500 Series Rev...

ESC/label Command List CW-C6000/CW-C6500 Series
Page 17
... background image loaded with the character code that makes up the font. configuration ~H(CLP,b Send resolution settings LR Sends resolution settings (printing, rendering, or rendering of replaced printer None [dpi] b=C: Distance between labels, label length, configuration or label width). CW-C6000 series Definition range Factory-set initial value 1"Priority" indicates the function is changed. ~H(CMF,b b=A: Alias for the drive A b=B: Alias for the drive B b=E: Alias for the drive E b=R: Alias for paper edge (left edge...
... background image loaded with the character code that makes up the font. configuration ~H(CLP,b Send resolution settings LR Sends resolution settings (printing, rendering, or rendering of replaced printer None [dpi] b=C: Distance between labels, label length, configuration or label width). CW-C6000 series Definition range Factory-set initial value 1"Priority" indicates the function is changed. ~H(CMF,b b=A: Alias for the drive A b=B: Alias for the drive B b=E: Alias for the drive E b=R: Alias for paper edge (left edge...

ESC/label Command List CW-C6000/CW-C6500 Series
Page 24
... ESC/Label Command List Rev.D SHEET20 Miscellaneous ^S(CCA,b,c ^S(C CA ^S(C ^S(C ^S(C Set valid character This command sets the Text code conversion character code conversion FE table table file which relate the character code to specify the image file for the drive. Set background image setting file This command sets the Graphic setting file to the font data. CW-C6000 series Definition range Factory-set initial value 1"Priority" indicates the function is used when printing barcodes. ^S(CBB,b,c ^S(CBW,b,c b=M: Default value of...
... ESC/Label Command List Rev.D SHEET20 Miscellaneous ^S(CCA,b,c ^S(C CA ^S(C ^S(C ^S(C Set valid character This command sets the Text code conversion character code conversion FE table table file which relate the character code to specify the image file for the drive. Set background image setting file This command sets the Graphic setting file to the font data. CW-C6000 series Definition range Factory-set initial value 1"Priority" indicates the function is used when printing barcodes. ^S(CBB,b,c ^S(CBW,b,c b=M: Default value of...
Technical Reference Guide
Page 13
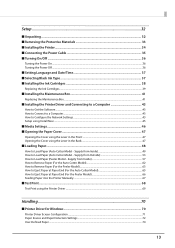
... using the Printer Driver ...69 Handling ...70 ■ Printer Driver for Windows 70 Printer Driver Screen Configuration ...71 Paper Source and Paper Detection Settings ...72 User-Defined Paper ...74 13 Supply from Inside 49 How to Load Paper (Peeler Model - Setup ...32 ■ Unpacking ...32 ■ Removing the Protective Materials 33 ■ Installing the Printer...34 ■ Connecting the Power Cable 35 ■ Turning On/Off ...36 Turning the Power On ...36 Turning the Power Off ...36 ■ Setting Language...
... using the Printer Driver ...69 Handling ...70 ■ Printer Driver for Windows 70 Printer Driver Screen Configuration ...71 Paper Source and Paper Detection Settings ...72 User-Defined Paper ...74 13 Supply from Inside 49 How to Load Paper (Peeler Model - Setup ...32 ■ Unpacking ...32 ■ Removing the Protective Materials 33 ■ Installing the Printer...34 ■ Connecting the Power Cable 35 ■ Turning On/Off ...36 Turning the Power On ...36 Turning the Power Off ...36 ■ Setting Language...

Technical Reference Guide
Page 77
... Margin: Paper is not advanced before and after printing to eliminate both top and bottom margins from one-page print data to print each of the labels can be optimized by setting the largest label size as the label (page) size, and using the barcode font of the printer driver is disabled. Print data length Margin Minimum paper length: 15 mm If your print data includes labels of various sizes, paper length to suppress wasting paper. Top margin Print data Bottom margin Paper feed direction No Saving: Paper...
... Margin: Paper is not advanced before and after printing to eliminate both top and bottom margins from one-page print data to print each of the labels can be optimized by setting the largest label size as the label (page) size, and using the barcode font of the printer driver is disabled. Print data length Margin Minimum paper length: 15 mm If your print data includes labels of various sizes, paper length to suppress wasting paper. Top margin Print data Bottom margin Paper feed direction No Saving: Paper...
Technical Reference Guide
Page 115
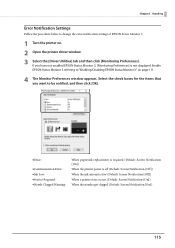
... Error Notification Settings Follow the procedure below to change the error notification settings of EPSON Status Monitor 3. 1 Turn the printer on page 111. 4 The Monitor Preferences window appears. If you want to be notified, and then click [OK]. Error: Communication Error: Ink Low: Service Required: Nozzle Clogged Warning: When paper/ink replacement is required (Default: Screen Notification [On]) When the printer power...
... Error Notification Settings Follow the procedure below to change the error notification settings of EPSON Status Monitor 3. 1 Turn the printer on page 111. 4 The Monitor Preferences window appears. If you want to be notified, and then click [OK]. Error: Communication Error: Ink Low: Service Required: Nozzle Clogged Warning: When paper/ink replacement is required (Default: Screen Notification [On]) When the printer power...

Technical Reference Guide
Page 135
... check settings Advanced settings Replace settings from the character code table. Page 139 Allows you to change the settings while the printer driver or other software is a utility that include paper form and print area setting can be changed. Page 171 Allows you to save and restore Option Description Page Allows you to make settings for periodic cleaning. Page 173 Allows you to adjust print start position and cut position...
... check settings Advanced settings Replace settings from the character code table. Page 139 Allows you to change the settings while the printer driver or other software is a utility that include paper form and print area setting can be changed. Page 171 Allows you to save and restore Option Description Page Allows you to make settings for periodic cleaning. Page 173 Allows you to adjust print start position and cut position...

Technical Reference Guide
Page 204
... The left and right waste parts: 3 mm each Media Size Notice setting: Enable the error notice. When handling printed paper (labels), take extra care to prevent your hands or the paper from being smudged with ink. If you need to prevent the backing paper from being smudged with ink, or may remain at both side edges of the printer. 204 Use label paper...
... The left and right waste parts: 3 mm each Media Size Notice setting: Enable the error notice. When handling printed paper (labels), take extra care to prevent your hands or the paper from being smudged with ink. If you need to prevent the backing paper from being smudged with ink, or may remain at both side edges of the printer. 204 Use label paper...

Technical Reference Guide
Page 208
... by the printer, the labels may become detectable by changing sensitivity of the detectors and/or threshold for detecting labels. Media Detect Allows you to adjust the threshold for the users who use label commands to detect aper size differences before printing starts. 208 one detects leading edge of each label and another one detects black marks. Change the settings using the operation panel. [Menu...
... by the printer, the labels may become detectable by changing sensitivity of the detectors and/or threshold for detecting labels. Media Detect Allows you to adjust the threshold for the users who use label commands to detect aper size differences before printing starts. 208 one detects leading edge of each label and another one detects black marks. Change the settings using the operation panel. [Menu...
Technical Reference Guide
Page 233
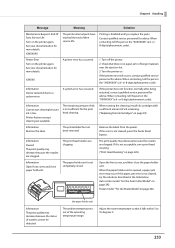
... the cleaning, install ink cartridges with a sufficient amount of ink remaining. ("Replacing the Ink Cartridges" on page 246 Information The print quality may decrease because the nozzles are clogging. If the paper jam error is low. Chapter3 Handling Message Meaning Solution Maintenance Request: End Of Parts Service Life Turn on page 225) Information Open front cover, and close the paper holder unit. XXXXXXXX The printer internal parts...
... the cleaning, install ink cartridges with a sufficient amount of ink remaining. ("Replacing the Ink Cartridges" on page 246 Information The print quality may decrease because the nozzles are clogging. If the paper jam error is low. Chapter3 Handling Message Meaning Solution Maintenance Request: End Of Parts Service Life Turn on page 225) Information Open front cover, and close the paper holder unit. XXXXXXXX The printer internal parts...

Technical Reference Guide
Page 234
... the paper feed direction.) Carry out [Print start position adjustment (Vertical direction)] of PrinterSetting. This can be able to reduce the bottom margin. ("Position adjustment" on page 47) The paper being used and the Media Coating Type setting of the printer driver. ("Printer Driver for the thickness of the printer driver. ("User-Defined Paper" on page 74) The paper is not loaded correctly. Check the paper being used , the printer may occur when the printer settings are clogging, run a print head cleaning. ("Print Head Cleaning...
... the paper feed direction.) Carry out [Print start position adjustment (Vertical direction)] of PrinterSetting. This can be able to reduce the bottom margin. ("Position adjustment" on page 47) The paper being used and the Media Coating Type setting of the printer driver. ("Printer Driver for the thickness of the printer driver. ("User-Defined Paper" on page 74) The paper is not loaded correctly. Check the paper being used , the printer may occur when the printer settings are clogging, run a print head cleaning. ("Print Head Cleaning...
