
Administrator's Manual
Page 3
... for the setup utility 4 Supported EPSON Printers 7 Installation Overview 8 Chapter 1 Getting Started Ethernet Card Features 1-1 Status lights 1-1 Hardware Installation 1-3 Initializing the Ethernet Card 1-6 Chapter 2 Installing EPSON Net!2 Installing EPSON Net!2 for Windows 2-1 For Windows 95, Windows 98, and Windows NT 4.0 2-1 For Windows NT 3.51 2-2 Installing EPSON Net!2 for Macintosh 2-3 Chapter 3 Setting the IP Address Overview 3-1 Installing the TCP/IP Protocols in Your PC 3-1 For Windows 95 and Windows 98 3-2 For Windows NT 3.51/4.0 3-3 Setting the IP Address Using the...
... for the setup utility 4 Supported EPSON Printers 7 Installation Overview 8 Chapter 1 Getting Started Ethernet Card Features 1-1 Status lights 1-1 Hardware Installation 1-3 Initializing the Ethernet Card 1-6 Chapter 2 Installing EPSON Net!2 Installing EPSON Net!2 for Windows 2-1 For Windows 95, Windows 98, and Windows NT 4.0 2-1 For Windows NT 3.51 2-2 Installing EPSON Net!2 for Macintosh 2-3 Chapter 3 Setting the IP Address Overview 3-1 Installing the TCP/IP Protocols in Your PC 3-1 For Windows 95 and Windows 98 3-2 For Windows NT 3.51/4.0 3-3 Setting the IP Address Using the...

Administrator's Manual
Page 21
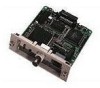
Category 5 cable should be used for instructions on making the necessary interface settings. See your printer, attach the network cable. Getting Started 1-5 The card automatically detects which kind of cable is attached. 10Base2 connector (C82362* only) Connect an Ethernet thin coaxial (10Base2) cable to the card using the supplied Y-connector. 10BaseT connector (C82362* only) Connect the Ethernet twisted-pair (10BaseT) cable to the card using the printer's control panel Some EPSON printers require you to use the printer's control panel to select the interface you...
Category 5 cable should be used for instructions on making the necessary interface settings. See your printer, attach the network cable. Getting Started 1-5 The card automatically detects which kind of cable is attached. 10Base2 connector (C82362* only) Connect an Ethernet thin coaxial (10Base2) cable to the card using the supplied Y-connector. 10BaseT connector (C82362* only) Connect the Ethernet twisted-pair (10BaseT) cable to the card using the printer's control panel Some EPSON printers require you to use the printer's control panel to select the interface you...

Administrator's Manual
Page 29
... Ethernet card with TCP/IP, you can use the computer to configure the Ethernet card for use with TCP/IP. See Chapters 6 through 9. Setting the IP Address 3-1 Chapter 3 Setting the IP Address To use the Ethernet card with TCP/IP, you must make sure that the TCP/IP protocol is installed, you first need to set the card's IP address. Installing the TCP/IP Protocols in Your PC Before using either: u The arp command (see page 3-8) u EPSON Net!2 for Windows...
... Ethernet card with TCP/IP, you can use the computer to configure the Ethernet card for use with TCP/IP. See Chapters 6 through 9. Setting the IP Address 3-1 Chapter 3 Setting the IP Address To use the Ethernet card with TCP/IP, you must make sure that the TCP/IP protocol is installed, you first need to set the card's IP address. Installing the TCP/IP Protocols in Your PC Before using either: u The arp command (see page 3-8) u EPSON Net!2 for Windows...

Administrator's Manual
Page 38
... ping "locks in Macintosh with TCP/IP or IPX. Setting the IP Address Using EPSON Net!2 for Windows/Macintosh You can also set the IP address for the Ethernet card using EPSON Net!2 in " the new address. 3. c Caution: Once you make changes to the Ethernet card, you must wait until the changes have been completely set before turning off or sending data to the printer. 3-10 Setting the IP Address If that you entererd with...
... ping "locks in Macintosh with TCP/IP or IPX. Setting the IP Address Using EPSON Net!2 for Windows/Macintosh You can also set the IP address for the Ethernet card using EPSON Net!2 in " the new address. 3. c Caution: Once you make changes to the Ethernet card, you must wait until the changes have been completely set before turning off or sending data to the printer. 3-10 Setting the IP Address If that you entererd with...

Administrator's Manual
Page 40
... server. 3-12 Setting the IP Address See your network operating system documentation for each protocol is no corresponding server, do not use DHCP to acquire an IP address, you can 't assign these settings. Under The way of acquiring an IP address, select one printer with the same type of Ethernet card to print a status sheet for the settings. 6. Assign the IP address, the Subnet mask, and the Default gateway. Note: u If you have connected...
... server. 3-12 Setting the IP Address See your network operating system documentation for each protocol is no corresponding server, do not use DHCP to acquire an IP address, you can 't assign these settings. Under The way of acquiring an IP address, select one printer with the same type of Ethernet card to print a status sheet for the settings. 6. Assign the IP address, the Subnet mask, and the Default gateway. Note: u If you have connected...

Administrator's Manual
Page 46
... you use the NetWare user account. u Requires a print server to the network. 4-2 Using the Ethernet Card with NetWare If there is no disk space in the user account, turn on the printer before connecting the client to control the remote printer. Features of print queues exceeds the limit specified below . u Gives you turn on the printer in Remote Printer mode, the user account is temporarily used. Set the NetWare mode using EPSON Net!2. Remote Printer mode: u Does...
... you use the NetWare user account. u Requires a print server to the network. 4-2 Using the Ethernet Card with NetWare If there is no disk space in the user account, turn on the printer before connecting the client to control the remote printer. Features of print queues exceeds the limit specified below . u Gives you turn on the printer in Remote Printer mode, the user account is temporarily used. Set the NetWare mode using EPSON Net!2. Remote Printer mode: u Does...

Administrator's Manual
Page 53
... Connections list. Select the Connection Information in File Server Console's MONITOR.NLM, and check if the print server name assigned to the Ethernet card is logged in to complete this space blank. From any new name up to 47 characters. Print server name: Type any NetWare client, log in to save changes. Using the Ethernet card in Remote Printer mode The following sections describe how to the Ethernet card, you make changes to configure...
... Connections list. Select the Connection Information in File Server Console's MONITOR.NLM, and check if the print server name assigned to the Ethernet card is logged in to complete this space blank. From any new name up to 47 characters. Print server name: Type any NetWare client, log in to save changes. Using the Ethernet card in Remote Printer mode The following sections describe how to the Ethernet card, you make changes to configure...

Administrator's Manual
Page 60
..., the update is complete. Primary print server: Select the print server name you must wait until it registers the settings before turning off the printer. 7. Switch to set up your changes. Printer port number: Type the same port number you print a text file using NetWare Printing a text file When you assigned to save your Ethernet card for using the NetWare NPRINT command or DOS redirection, misconversion or a gap in the directory tree. Instructions for use with NetWare...
..., the update is complete. Primary print server: Select the print server name you must wait until it registers the settings before turning off the printer. 7. Switch to set up your changes. Printer port number: Type the same port number you print a text file using NetWare Printing a text file When you assigned to save your Ethernet card for using the NetWare NPRINT command or DOS redirection, misconversion or a gap in the directory tree. Instructions for use with NetWare...

Administrator's Manual
Page 67
.... Mode: Select Print Server. Using the Ethernet Card with the same type of Ethernet card to the network, you can identify the cards by their MAC addresses. Click the NetWare Basic tab and make the following : Auto, Ethernet 802.2, Ethernet 802.3, Ethernet II, or Ethernet SNAP. NDS: Select Enable or Disable. u If the IP address is set to 31 characters). To view a card's MAC address, press the status sheet button on the card for details. Frame type: Select one printer...
.... Mode: Select Print Server. Using the Ethernet Card with the same type of Ethernet card to the network, you can identify the cards by their MAC addresses. Click the NetWare Basic tab and make the following : Auto, Ethernet 802.2, Ethernet 802.3, Ethernet II, or Ethernet SNAP. NDS: Select Enable or Disable. u If the IP address is set to 31 characters). To view a card's MAC address, press the status sheet button on the card for details. Frame type: Select one printer...

Administrator's Manual
Page 68
... can use. 5. Print server name: Type any new password up to 47 characters. at the top. Note: See your NetWare manual for the available characters and number of the serial number) Polling interval: Set the polling time from the Object to 90 seconds. 4-24 Using the Ethernet Card with NetWare Primary file server name: Select the server where you created the queue. Do not type the "." Click the Print Server tab...
... can use. 5. Print server name: Type any new password up to 47 characters. at the top. Note: See your NetWare manual for the available characters and number of the serial number) Polling interval: Set the polling time from the Object to 90 seconds. 4-24 Using the Ethernet Card with NetWare Primary file server name: Select the server where you created the queue. Do not type the "." Click the Print Server tab...

Administrator's Manual
Page 78
... the Print Queues Serviced By Printer box. 4-34 Using the Ethernet Card with NetWare Printer port number: Type the same port number you assigned to the Ethernet card, you make the following settings. c Caution: Once you must wait until it completes the settings before turning off the printer. 7. Check if the print queue name which you have created. Click the Remote Printer tab and make changes to the print server (0). 6. Click OK to save changes. Select a printer from...
... the Print Queues Serviced By Printer box. 4-34 Using the Ethernet Card with NetWare Printer port number: Type the same port number you assigned to the Ethernet card, you make the following settings. c Caution: Once you must wait until it completes the settings before turning off the printer. 7. Check if the print queue name which you have created. Click the Remote Printer tab and make changes to the print server (0). 6. Click OK to save changes. Select a printer from...

Administrator's Manual
Page 79
Configuring the Ethernet Card for NetWare Using the Ethernet Card Home Page If you have set the IP address for Windows/Macintosh and configure the card using the home page at the same time. c Caution: u Do not use EPSON Net!2 for the Ethernet card in Chapter 3, you make changes to the printer. u Once you can configure the Ethernet card using the home page, wait until the process is complete (the indicator lights stop flashing) before turning off the printer or sending data to the Ethernet card using the card's home page. Using the Ethernet Card with NetWare 4-35
Configuring the Ethernet Card for NetWare Using the Ethernet Card Home Page If you have set the IP address for Windows/Macintosh and configure the card using the home page at the same time. c Caution: u Do not use EPSON Net!2 for the Ethernet card in Chapter 3, you make changes to the printer. u Once you can configure the Ethernet card using the home page, wait until the process is complete (the indicator lights stop flashing) before turning off the printer or sending data to the Ethernet card using the card's home page. Using the Ethernet Card with NetWare 4-35

Administrator's Manual
Page 81
... select NDS Print Server or Bindery Print Server for Windows. Type the Primary Print Server name (up a password, type the password when you are prompted. 10. Activate the changes by clicking RESET or turning your printer off and on your screen, configuration is complete!" Run EPSON Net!2 from the Option menu. Using the Ethernet Card with EPSON Net!2 for the Mode, make the Remote Printer settings. 8. If you set up to 47 characters) and Printer Port Number (from 5 to...
... select NDS Print Server or Bindery Print Server for Windows. Type the Primary Print Server name (up a password, type the password when you are prompted. 10. Activate the changes by clicking RESET or turning your printer off and on your screen, configuration is complete!" Run EPSON Net!2 from the Option menu. Using the Ethernet Card with EPSON Net!2 for the Mode, make the Remote Printer settings. 8. If you set up to 47 characters) and Printer Port Number (from 5 to...

Administrator's Manual
Page 84
... network has a primary server Even if a primary server is installed on the local network, the computer may dial out. The computer does not dial out under this problem. 4-40 Using the Ethernet Card with NetWare t When the power is turned on the local network without a file server. Correct the setting error to the both Print Server mode and Remote Printer mode. When the file server on the configuration. t When the file server on the local network...
... network has a primary server Even if a primary server is installed on the local network, the computer may dial out. The computer does not dial out under this problem. 4-40 Using the Ethernet Card with NetWare t When the power is turned on the local network without a file server. Correct the setting error to the both Print Server mode and Remote Printer mode. When the file server on the configuration. t When the file server on the local network...
Administrator's Manual
Page 91
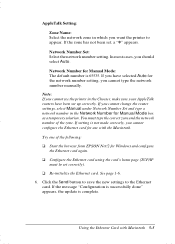
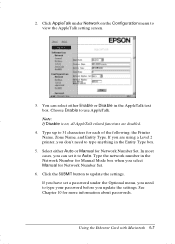
... the printer to the Ethernet card. u Configure the Ethernet card using the card's home page (TCP/IP must type the correct zone and the network number of the following: u Start the browser from EPSON Net!2 for the network number setting, you cannot change the router settings, select Manual under Network Number Set and type a network number in the Chooser, make sure your AppleTalk routers have selected Auto for Windows and configure the Ethernet card again. If you cannot type the network number manually. You must be set up...
... the printer to the Ethernet card. u Configure the Ethernet card using the card's home page (TCP/IP must type the correct zone and the network number of the following: u Start the browser from EPSON Net!2 for the network number setting, you cannot change the router settings, select Manual under Network Number Set and type a network number in the Chooser, make sure your AppleTalk routers have selected Auto for Windows and configure the Ethernet card again. If you cannot type the network number manually. You must be set up...
Administrator's Manual
Page 93
... Printer Name, Zone Name, and Entity Type. See Chapter 10 for Network Number Set. 6. Click the SUBMIT button to 31 characters for Manual Mode box when you need to type your password before you are disabled. 4. Note: If Disable is on the Configuration menu to view the AppleTalk setting screen. 3. Type the network number in the AppleTalk text box. Using the Ethernet Card with Macintosh 5-7 2. Type up to update the settings. If you have set it to use...
... Printer Name, Zone Name, and Entity Type. See Chapter 10 for Network Number Set. 6. Click the SUBMIT button to 31 characters for Manual Mode box when you need to type your password before you are disabled. 4. Note: If Disable is on the Configuration menu to view the AppleTalk setting screen. 3. Type the network number in the AppleTalk text box. Using the Ethernet Card with Macintosh 5-7 2. Type up to update the settings. If you have set it to use...
Administrator's Manual
Page 106
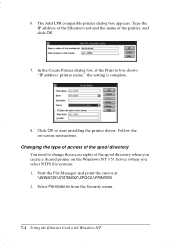
... NTFS file system). 1. Changing the type of access of the spool directory You need to box shows "IP address: printer name," the setting is complete. 8. 6. Start the File Manager and point the cursor at \WINNT35\SYSTEM32\SPOOL\PRINTERS. 2. Follow the on the Windows NT 3.51 Server (when you create a shared printer on -screen instructions. Select Permissions from the Security menu. 7-4 Using the Ethernet Card with Windows NT The Add LPR compatible printer dialog box appears...
... NTFS file system). 1. Changing the type of access of the spool directory You need to box shows "IP address: printer name," the setting is complete. 8. 6. Start the File Manager and point the cursor at \WINNT35\SYSTEM32\SPOOL\PRINTERS. 2. Follow the on the Windows NT 3.51 Server (when you create a shared printer on -screen instructions. Select Permissions from the Security menu. 7-4 Using the Ethernet Card with Windows NT The Add LPR compatible printer dialog box appears...

Administrator's Manual
Page 116
Type a value of 1 or greater in the Maximum number of the remote print server's printer in the Remote print server box and the name of LPD ports box. 8-2 Using the Ethernet Card with TCP/IP This section explains TCP/IP printing using the LPR port supported by standard OS/2. 1. Click the Printing tab. Type the IP address of the Ethernet card in the second text box. Double-click the OS/2 system folder, then the System Setup folder, and then double-click the TCP/IP Configuration icon. 2. Printing with OS/2
Type a value of 1 or greater in the Maximum number of the remote print server's printer in the Remote print server box and the name of LPD ports box. 8-2 Using the Ethernet Card with TCP/IP This section explains TCP/IP printing using the LPR port supported by standard OS/2. 1. Click the Printing tab. Type the IP address of the Ethernet card in the second text box. Double-click the OS/2 system folder, then the System Setup folder, and then double-click the TCP/IP Configuration icon. 2. Printing with OS/2

Administrator's Manual
Page 142
... gateway. TCP/IP I tems Get IP Address IP Address Subnet Mask Default Gateway SUBMIT Explanations Select the method of the IP address. Type the subnet mask of acquiring the IP address as Manual, RARP, BOOTP, or DHCP. Updates the changes. 10-14 Using EPSON Net!2 and the Ethernet Card Home Page Type the IP address for the Ethernet card. Remote Printer Mode I tems Primary File Server Name Print Server Name Polling Interval NetWare Password Explanations Select the server where you create a print queue. Type...
... gateway. TCP/IP I tems Get IP Address IP Address Subnet Mask Default Gateway SUBMIT Explanations Select the method of the IP address. Type the subnet mask of acquiring the IP address as Manual, RARP, BOOTP, or DHCP. Updates the changes. 10-14 Using EPSON Net!2 and the Ethernet Card Home Page Type the IP address for the Ethernet card. Remote Printer Mode I tems Primary File Server Name Print Server Name Polling Interval NetWare Password Explanations Select the server where you create a print queue. Type...

Administrator's Manual
Page 183
... manual. Click Capture Printer conditions: Port in to the printer. card is logged in the Details menu. Select LPT t When using the printers listed below: EPSON Stylus COLOR 800/850/1520/3000, EPSON Stylus 1500, EPSON Stylus Pro 5000 NetWare environment Nothing prints even though NetWare clients completed sending the data to the NetWare server. support) or Windows 98. Cause What to do You may not of the print queue...
... manual. Click Capture Printer conditions: Port in to the printer. card is logged in the Details menu. Select LPT t When using the printers listed below: EPSON Stylus COLOR 800/850/1520/3000, EPSON Stylus 1500, EPSON Stylus Pro 5000 NetWare environment Nothing prints even though NetWare clients completed sending the data to the NetWare server. support) or Windows 98. Cause What to do You may not of the print queue...


