
Technical Reference Guide
Page 15
... to rewind roll paper after printing with black mark and die-cut labels Supports the gap between labels and blackmark position detection TM-C7500 Series: Supports plain labels, matte labels and synthetic labels TM-C7500G Series: Supports the plain labels, matte labels, synthetic labels, and the glossy labels... (Model No.: TU-RC7508). Printing speed varies depending on the data transfer speed. Printing speed varies depending on -demand label printing. Features TM-C7500/TM-C7500G is light. 15
... to rewind roll paper after printing with black mark and die-cut labels Supports the gap between labels and blackmark position detection TM-C7500 Series: Supports plain labels, matte labels and synthetic labels TM-C7500G Series: Supports the plain labels, matte labels, synthetic labels, and the glossy labels... (Model No.: TU-RC7508). Printing speed varies depending on the data transfer speed. Printing speed varies depending on -demand label printing. Features TM-C7500/TM-C7500G is light. 15
Technical Reference Guide
Page 16
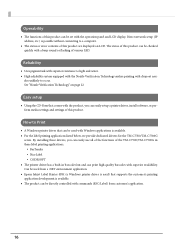
... sound or flashing of various LED. Reliability Uses pigment ink with commands (ESC/Label) from a .NET environment application. Epson Inkjet Label Printer SDK (a Windows printer driver is used with Windows applications is possible without connecting to Print A Windows printer driver that...61623; The product can be used ) that comes with the product, you can easily use all of the functions of the TM-C7500/TM-C7500G in these drivers, you can print high quality barcodes with superior readability. The status of this product. See "Nozzle Verification...
... sound or flashing of various LED. Reliability Uses pigment ink with commands (ESC/Label) from a .NET environment application. Epson Inkjet Label Printer SDK (a Windows printer driver is used with Windows applications is possible without connecting to Print A Windows printer driver that...61623; The product can be used ) that comes with the product, you can easily use all of the functions of the TM-C7500/TM-C7500G in these drivers, you can print high quality barcodes with superior readability. The status of this product. See "Nozzle Verification...

Technical Reference Guide
Page 36
The items included in the package are as follows: A B C D E F G A TM-C7500 Series D USB cable G Cushioning material *2 B Ink cartridge(C, M, Y, K) *1 E Roll paper C CD-ROM F AC cable *1 It can be used for the first time, check the items included in the package. Keep it in a safe place. 36 Checking the Items Included in the Package When using the printer for initial ink charging. *2 This is required when re-shipping the product.
The items included in the package are as follows: A B C D E F G A TM-C7500 Series D USB cable G Cushioning material *2 B Ink cartridge(C, M, Y, K) *1 E Roll paper C CD-ROM F AC cable *1 It can be used for the first time, check the items included in the package. Keep it in a safe place. 36 Checking the Items Included in the Package When using the printer for initial ink charging. *2 This is required when re-shipping the product.

Technical Reference Guide
Page 69
... the newly created media layout. 13Select [Media Coating Type]. If using other than genuine paper, select [Matte1] and adjust as needed. For TM-C7500, glossy paper is not displayed 14Click [OK]. This completes the settings of the paper. When enlarging the print area, put a checkmark in [Borderless Printing...
... the newly created media layout. 13Select [Media Coating Type]. If using other than genuine paper, select [Matte1] and adjust as needed. For TM-C7500, glossy paper is not displayed 14Click [OK]. This completes the settings of the paper. When enlarging the print area, put a checkmark in [Borderless Printing...

Technical Reference Guide
Page 75
...61623; For Windows Server 2003 R2: Click [Printers and Faxes] on [Start] menu. For Windows Vista: Click [Printers] of the [EPSON TM-C7500]. 3 The Properties screen is displayed. Perform a test printing with the following steps. 1 Open the [Devices and Printers]. For Windows 10...Printers]. For Windows 7: Click [View devices and printers] of [Control Panel] on [Start] menu. 2 Right-click [EPSON TM-C7500], and click [Printer properties]. Chapter 2 Setup Test Printing If the printer driver has been installed already, a test printing can be performed.
...61623; For Windows Server 2003 R2: Click [Printers and Faxes] on [Start] menu. For Windows Vista: Click [Printers] of the [EPSON TM-C7500]. 3 The Properties screen is displayed. Perform a test printing with the following steps. 1 Open the [Devices and Printers]. For Windows 10...Printers]. For Windows 7: Click [View devices and printers] of [Control Panel] on [Start] menu. 2 Right-click [EPSON TM-C7500], and click [Printer properties]. Chapter 2 Setup Test Printing If the printer driver has been installed already, a test printing can be performed.

Technical Reference Guide
Page 76
The printer driver screen is displayed. How to display in the case of the [EPSON TM-C7500]. 76 Registered name of [Control Panel] on [Start] menu. For Windows XP Professional: Click [Printers and Faxes] on [Start] menu. For Windows XP ...], and click [Hardware and Sound], then [Devices and Printers]. For Windows 7: Click [View devices and printers] of [Control Panel] on [Start] menu. 2 Right-click [EPSON TM-C7500], and click [Printing References].
The printer driver screen is displayed. How to display in the case of the [EPSON TM-C7500]. 76 Registered name of [Control Panel] on [Start] menu. For Windows XP Professional: Click [Printers and Faxes] on [Start] menu. For Windows XP ...], and click [Hardware and Sound], then [Devices and Printers]. For Windows 7: Click [View devices and printers] of [Control Panel] on [Start] menu. 2 Right-click [EPSON TM-C7500], and click [Printing References].

Technical Reference Guide
Page 85
..., or that support the ZPL II command when printing through the direct command execution from applications that data is disabled when printing with TM-C7500/TM-C7500G Series printer drivers. You can use 3 1 In PrinterSetting, save the [Favorite setting] settings to the product. See "FAVORITE SETTING" on the operation...
..., or that support the ZPL II command when printing through the direct command execution from applications that data is disabled when printing with TM-C7500/TM-C7500G Series printer drivers. You can use 3 1 In PrinterSetting, save the [Favorite setting] settings to the product. See "FAVORITE SETTING" on the operation...

Technical Reference Guide
Page 88
In that case, enter IP address. 88 Select a printer to set and click [OK]. For an Ethernet connection, the product may not be displayed when a search is displayed. Starting the PrinterSetting Start the PrinterSetting with the following methods. 1 Turn on the product. 2 Select [Start] - [All Programs] - [Epson] - [TM-C7500 Series] - [PrinterSetting]. 3 The [Select printer] screen is executed. Select a search target and click [Search]. 4 This product is displayed in the list.
In that case, enter IP address. 88 Select a printer to set and click [OK]. For an Ethernet connection, the product may not be displayed when a search is displayed. Starting the PrinterSetting Start the PrinterSetting with the following methods. 1 Turn on the product. 2 Select [Start] - [All Programs] - [Epson] - [TM-C7500 Series] - [PrinterSetting]. 3 The [Select printer] screen is executed. Select a search target and click [Search]. 4 This product is displayed in the list.

Technical Reference Guide
Page 139
Start the PrinterSetting from the printer driver. Click [Printer Setting Utility]. Chapter 3 Handling 3 3 The "TM-C7500 Series PrinterSetting" screen is displayed. 139 See "How to Display the Printer Driver" on page 76 2 Select [Printer Utility] tab. Start the PrinterSetting from the printer driver with the following steps. 1 Display the printer driver window.
Start the PrinterSetting from the printer driver. Click [Printer Setting Utility]. Chapter 3 Handling 3 3 The "TM-C7500 Series PrinterSetting" screen is displayed. 139 See "How to Display the Printer Driver" on page 76 2 Select [Printer Utility] tab. Start the PrinterSetting from the printer driver with the following steps. 1 Display the printer driver window.

Technical Reference Guide
Page 182
..., use USBInformationSetting to overwrite the USB ID of the printer before replacing and set. 182 Perform the following procedure. 1 From the [Start] menu, select [Epson], then [TM-C7500 Series], and click [USBInformationSetting]. 2 USBInformationSetting starts up. Set the replacement method, then click [Next]. For USB interface Setting the USBInformationSetting If you select [Auto...
..., use USBInformationSetting to overwrite the USB ID of the printer before replacing and set. 182 Perform the following procedure. 1 From the [Start] menu, select [Epson], then [TM-C7500 Series], and click [USBInformationSetting]. 2 USBInformationSetting starts up. Set the replacement method, then click [Next]. For USB interface Setting the USBInformationSetting If you select [Auto...

Technical Reference Guide
Page 186
... on the network. Included in Windows base. Software and Manuals The following functions for the illustra- Software Software TM-C7500 Series PrinterSetting EpsonNet Config Epson Monitoring Tool USB Printer Class Device Replacement Service Color Tone Matching Assistant Description Manual Providing method Utility to support color adjustment for mul- Web or ...
... on the network. Included in Windows base. Software and Manuals The following functions for the illustra- Software Software TM-C7500 Series PrinterSetting EpsonNet Config Epson Monitoring Tool USB Printer Class Device Replacement Service Color Tone Matching Assistant Description Manual Providing method Utility to support color adjustment for mul- Web or ...

Technical Reference Guide
Page 187
... necessary when installing an ink cartridge in the product for system development, design and installation or application development and design using TM-C7500/TMC7500G. Maintenance box with the rewinder TU-RC7508 User's manual Describes cautionary items and the installation procedure Included with the rewinder Maintenance... Box Instruction Sheet Describes cautionary items and the replacement procedure for the rewinder. CD-ROM Web 4 187 rewinder TM-C7500 Series / TM-C7500G Series Technical Reference Guide This document. Ink cartridge with the for the Maintenance box.
... necessary when installing an ink cartridge in the product for system development, design and installation or application development and design using TM-C7500/TMC7500G. Maintenance box with the rewinder TU-RC7508 User's manual Describes cautionary items and the installation procedure Included with the rewinder Maintenance... Box Instruction Sheet Describes cautionary items and the replacement procedure for the rewinder. CD-ROM Web 4 187 rewinder TM-C7500 Series / TM-C7500G Series Technical Reference Guide This document. Ink cartridge with the for the Maintenance box.

Technical Reference Guide
Page 189
... the instructions on the product. 3 Open the [Devices and Printers]. In the printer driver installation screen that is displayed during the procedure, select "Epson" as the manufacturer and "EPSON TM-C7500" as the printer. 4 189 See "How to Display the Printer Driver" on page 76 4 Execute [Add a printer] and add the product following...
... the instructions on the product. 3 Open the [Devices and Printers]. In the printer driver installation screen that is displayed during the procedure, select "Epson" as the manufacturer and "EPSON TM-C7500" as the printer. 4 189 See "How to Display the Printer Driver" on page 76 4 Execute [Add a printer] and add the product following...

Technical Reference Guide
Page 191
... feed Autocutter Graphic resolution Printing speed Cutting method Auto-cut type Paper (See "Paper Specifications" on page 195 for details) Media type Media form TM-C7500 TM-C7500G Media source Ink cartridge (See "Ink Cartridge" on page 219 for details.) Interface Barcode/ two-dimensional code printing Barcode Two-dimensional code printing...
... feed Autocutter Graphic resolution Printing speed Cutting method Auto-cut type Paper (See "Paper Specifications" on page 195 for details) Media type Media form TM-C7500 TM-C7500G Media source Ink cartridge (See "Ink Cartridge" on page 219 for details.) Interface Barcode/ two-dimensional code printing Barcode Two-dimensional code printing...

Technical Reference Guide
Page 195
... paper may be detected incorrectly by the connected line, and rubbed by the print head and become contaminated, or the paper may jam. TM-C7500 Media form Full-page label (Black mark/ No Black Mark) Die-cut label (Gap) Die-cut label (Black mark) Media type Plain label Matte label...
... paper may be detected incorrectly by the connected line, and rubbed by the print head and become contaminated, or the paper may jam. TM-C7500 Media form Full-page label (Black mark/ No Black Mark) Die-cut label (Gap) Die-cut label (Black mark) Media type Plain label Matte label...

Technical Reference Guide
Page 214
... TM-C7500G Autocutter mechanism TM-C7500 TM-C7500G 12 billion shots/nozzle Die-cut label (Plain): 500 km Die-cut label (Matte): 500 km Die-cut label (Synthetic): 500 km Full-...
... TM-C7500G Autocutter mechanism TM-C7500 TM-C7500G 12 billion shots/nozzle Die-cut label (Plain): 500 km Die-cut label (Matte): 500 km Die-cut label (Synthetic): 500 km Full-...

Technical Reference Guide
Page 219
Consumable Product Specifications Appendix Ink Cartridge Model number Type Ink color Ink type Ink life Temperatures TM-C7500 TM-C7510 TM-C7520 TM-C7500G TM-C7510G TM-C7520G Transport Storage Installation SJIC26P(K)/ SJIC26P(C)/ SJIC26P(M)/ SJIC26P(Y) SJIC27P(K)/ SJIC27P(C)/ SJIC27P(M)/ SJIC27P(Y) SJIC28P(K)/ SJIC28P(C)/ SJIC28P(M)/ SJIC28P(Y) ...
Consumable Product Specifications Appendix Ink Cartridge Model number Type Ink color Ink type Ink life Temperatures TM-C7500 TM-C7510 TM-C7520 TM-C7500G TM-C7510G TM-C7520G Transport Storage Installation SJIC26P(K)/ SJIC26P(C)/ SJIC26P(M)/ SJIC26P(Y) SJIC27P(K)/ SJIC27P(C)/ SJIC27P(M)/ SJIC27P(Y) SJIC28P(K)/ SJIC28P(C)/ SJIC28P(M)/ SJIC28P(Y) ...
Technical Reference Guide
Page 225
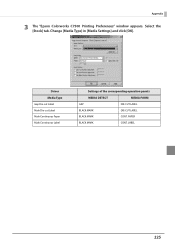
PAPER BLACK MARK CONT. Appendix 3 The "Epson Colorworks C7500 Printing Preferences" window appears. Driver Media Type Gap Die-cut Label Mark Die-cut Label Mark Continuous Paper Mark Continuous Label Settings of the corresponding operation panels MEDIA DETECT MEDIA FORM GAP DIE-CUT LABEL BLACK MARK DIE-CUT LABEL BLACK MARK CONT. LABEL 225 Select the [Stock] tab. Change [Media Type] in [Media Settings] and click [OK].
PAPER BLACK MARK CONT. Appendix 3 The "Epson Colorworks C7500 Printing Preferences" window appears. Driver Media Type Gap Die-cut Label Mark Die-cut Label Mark Continuous Paper Mark Continuous Label Settings of the corresponding operation panels MEDIA DETECT MEDIA FORM GAP DIE-CUT LABEL BLACK MARK DIE-CUT LABEL BLACK MARK CONT. LABEL 225 Select the [Stock] tab. Change [Media Type] in [Media Settings] and click [OK].
Technical Reference Guide
Page 226
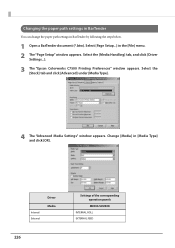
... the [Stock] tab and click [Advanced] under [Media Type]. 4 The "Advanced Media Settings" window appears. Select the [Media Handling] tab, and click [Driver Settings...]. 3 The "Epson Colorworks C7500 Printing Preferences" window appears.
... the [Stock] tab and click [Advanced] under [Media Type]. 4 The "Advanced Media Settings" window appears. Select the [Media Handling] tab, and click [Driver Settings...]. 3 The "Epson Colorworks C7500 Printing Preferences" window appears.

Technical Reference Guide
Page 227
Select "Epson TM-C7500 for NiceLabel" and click [Properties...]. Appendix Changing the media detector settings in NiceLabel Change the media detector settings in the [File] menu. 2 The "Label Setup Wizard" window or the "Label Setup" window appears. If you check the [Do not use the wizard next time] box, the "Label Setup" window appears. 227 Select [Label Setup...] in NiceLabel by following the steps below. 1 Open a NiceLabel label (*.lab).
Select "Epson TM-C7500 for NiceLabel" and click [Properties...]. Appendix Changing the media detector settings in NiceLabel Change the media detector settings in the [File] menu. 2 The "Label Setup Wizard" window or the "Label Setup" window appears. If you check the [Do not use the wizard next time] box, the "Label Setup" window appears. 227 Select [Label Setup...] in NiceLabel by following the steps below. 1 Open a NiceLabel label (*.lab).