
User Manual
Page 6
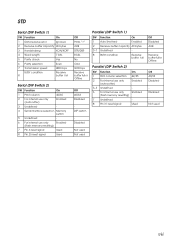
... 1) SW Function 1 Auto line feed On Enabled 2 Receive buffer capacity 3~7 Undefined 40 bytes - 8 BUSY condition Receive buffer full Parallel (DIP Switch 2) SW Function 1 Print column selection 2 For internal use only (autocutter) On 42/35 Enabled 3 Undefined - 4 Pin 31 reset signal Used 5 Undefined - 6 For internal use the "US" tables below. If the last letters are "STD", use only (flash memory rewriting) 7 Undefined 8 Serial interface selection On 42...
... 1) SW Function 1 Auto line feed On Enabled 2 Receive buffer capacity 3~7 Undefined 40 bytes - 8 BUSY condition Receive buffer full Parallel (DIP Switch 2) SW Function 1 Print column selection 2 For internal use only (autocutter) On 42/35 Enabled 3 Undefined - 4 Pin 31 reset signal Used 5 Undefined - 6 For internal use the "US" tables below. If the last letters are "STD", use only (flash memory rewriting) 7 Undefined 8 Serial interface selection On 42...
User Manual
Page 7
... 1 Data receive error Ignored 2 Receive buffer capacity 40 bytes 3 Handshaking XON/XOFF 4 Word length 7 bits 5 Parity check Yes 6 Parity selection 7 Transmission speed Even 4800 bps BUSY condition 8 Receive buffer full Serial (DIP Switch 2) SW Function On 1 Print column 42/35 2 For internal use only (autocutter) Enabled 3 Undefined - 4 Serial interface selection Memory switch 5 Undefined - 6 For internal use only Enabled (flash memory rewriting) 7 Pin 6 reset signal Used 8 Pin...
... 1 Data receive error Ignored 2 Receive buffer capacity 40 bytes 3 Handshaking XON/XOFF 4 Word length 7 bits 5 Parity check Yes 6 Parity selection 7 Transmission speed Even 4800 bps BUSY condition 8 Receive buffer full Serial (DIP Switch 2) SW Function On 1 Print column 42/35 2 For internal use only (autocutter) Enabled 3 Undefined - 4 Serial interface selection Memory switch 5 Undefined - 6 For internal use only Enabled (flash memory rewriting) 7 Pin 6 reset signal Used 8 Pin...
User Manual
Page 8
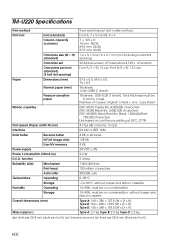
....) Type A: 2.7 kg Type B: 2.5 kg Type D: 2.3 kg dpi: dots per 25.4 mm (dots per second; TM-U220 Specifications Print method 9-pin serial impact dot matrix method Print font Font (standard) Font A: 7 × 9, Font B: 9 × 9 Column capacity (columns) 7 × 9/9 × 9: 76 mm: 40/33 69.5 mm: 36/30 57.5 mm: 30/25 Character size (W × H) 1.2 × 3.1 mm/1.6 × 3.1 mm (not including horizontal (standard) spacing) Character set 95 Alphanumeric, 37 International...
....) Type A: 2.7 kg Type B: 2.5 kg Type D: 2.3 kg dpi: dots per 25.4 mm (dots per second; TM-U220 Specifications Print method 9-pin serial impact dot matrix method Print font Font (standard) Font A: 7 × 9, Font B: 9 × 9 Column capacity (columns) 7 × 9/9 × 9: 76 mm: 40/33 69.5 mm: 36/30 57.5 mm: 30/25 Character size (W × H) 1.2 × 3.1 mm/1.6 × 3.1 mm (not including horizontal (standard) spacing) Character set 95 Alphanumeric, 37 International...
User Manual
Page 9
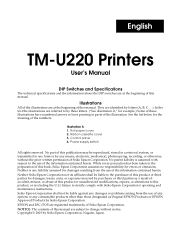
... of these illustrations have numbered arrows or lines pointing to change without the prior written permission of Seiko Epson Corporation. Copyright © 2003 by letters (A, B, C . . .). No part of this publication may be liable against any damages or problems arising from the use of the information contained herein. English TM-U220 Printers User's Manual DIP Switches and Specifications The technical specifications and the information...
... of these illustrations have numbered arrows or lines pointing to change without the prior written permission of Seiko Epson Corporation. Copyright © 2003 by letters (A, B, C . . .). No part of this publication may be liable against any damages or problems arising from the use of the information contained herein. English TM-U220 Printers User's Manual DIP Switches and Specifications The technical specifications and the information...

User Manual
Page 10
... operate the equipment. You are cautioned that are so labeled. (EMC is tested using the EPSON power supplies.) Europe: CE marking Safety: TÜV (EN 60950) North America: EMI: FCC/ICES-003 Class A Safety: UL 60950/CSA C22.2 No. 60950 Japan: EMI: VCCI Class A Oceania: EMC: AS/NZS 3548 Class B WARNING The connection of a non-shielded printer interface cable...
... operate the equipment. You are cautioned that are so labeled. (EMC is tested using the EPSON power supplies.) Europe: CE marking Safety: TÜV (EN 60950) North America: EMI: FCC/ICES-003 Class A Safety: UL 60950/CSA C22.2 No. 60950 Japan: EMI: VCCI Class A Oceania: EMC: AS/NZS 3548 Class B WARNING The connection of a non-shielded printer interface cable...
User Manual
Page 11
... not use the specified power source. Safety Label WARNING: Do not connect a telephone line to high humidity or dust levels. Penetration by foreign objects may lead to fire. Unplug the power cord immediately and contact your equipment immediately if it produces smoke, a strange odor, or unusual noise. CAUTION: During printing or after printing, the print head can be dangerous. Improper repair work...
... not use the specified power source. Safety Label WARNING: Do not connect a telephone line to high humidity or dust levels. Penetration by foreign objects may lead to fire. Unplug the power cord immediately and contact your equipment immediately if it produces smoke, a strange odor, or unusual noise. CAUTION: During printing or after printing, the print head can be dangerous. Improper repair work...
User Manual
Page 12
..., using a Type B or D printer, you can hang it on the case of the printer. Two color printing Autocutter Take up device Paper width (mm) Interface Characters supported Type A Yes Yes Yes 76 Serial or parallel Alphanumeric Type B Yes Yes No 76/69.5/57.5 Serial or parallel Alphanumeric Type D Yes No No 76/69.5/57.5 Serial or parallel Alphanumeric 4 TM-U220 User's Manual Notes on Installation ❏ When using...
..., using a Type B or D printer, you can hang it on the case of the printer. Two color printing Autocutter Take up device Paper width (mm) Interface Characters supported Type A Yes Yes Yes 76 Serial or parallel Alphanumeric Type B Yes Yes No 76/69.5/57.5 Serial or parallel Alphanumeric Type D Yes No No 76/69.5/57.5 Serial or parallel Alphanumeric 4 TM-U220 User's Manual Notes on Installation ❏ When using...

User Manual
Page 13
... roll paper cover is detected. Buttons FEED FEED feeds the roll paper. Note: Paper cannot be fed by using this manual covers three types of the TM-U220, some of the illustrations may be included with the printer.) Control Panel (LEDs and Buttons) See illustration B. TM-U220 User's Manual 5 Flashes when an error occurs. (See the Troubleshooting section.) PAPER OUT Lights when roll paper is off. LEDs POWER Lights when the power is...
... roll paper cover is detected. Buttons FEED FEED feeds the roll paper. Note: Paper cannot be fed by using this manual covers three types of the TM-U220, some of the illustrations may be included with the printer.) Control Panel (LEDs and Buttons) See illustration B. TM-U220 User's Manual 5 Flashes when an error occurs. (See the Troubleshooting section.) PAPER OUT Lights when roll paper is off. LEDs POWER Lights when the power is...

User Manual
Page 14
... replace the ribbon cassette. Note: Use the EPSON ERC-38 ribbon cassette for a long time, turn the ribbon cassette's feed knob in the cover to operate the switch. Press the power supply switch to install it off with the cover attached, you can use the enclosed power supply switch cover to make sure that the power supply switch is installed between the print head and the platen without wrinkles or creases. 6 TM-U220 User's Manual Insert the ribbon...
... replace the ribbon cassette. Note: Use the EPSON ERC-38 ribbon cassette for a long time, turn the ribbon cassette's feed knob in the cover to operate the switch. Press the power supply switch to install it off with the cover attached, you can use the enclosed power supply switch cover to make sure that the power supply switch is installed between the print head and the platen without wrinkles or creases. 6 TM-U220 User's Manual Insert the ribbon...
User Manual
Page 15
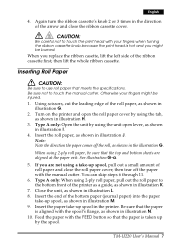
... replace the ribbon casette, lift the left side of the printer as a guide, as shown in illustration I. 4. Feed the paper with the manual cutter. CAUTION: Be careful not to the bottom front of the ribbon cassette first; then lift the whole ribbon cassette. Inserting Roll Paper CAUTION: Be sure to touch the manual cutter. When using the tab, as shown in the illustration G. You can skip steps 6 through 11. 6. Using scissors, cut...
... replace the ribbon casette, lift the left side of the printer as a guide, as shown in illustration I. 4. Feed the paper with the manual cutter. CAUTION: Be careful not to the bottom front of the ribbon cassette first; then lift the whole ribbon cassette. Inserting Roll Paper CAUTION: Be sure to touch the manual cutter. When using the tab, as shown in the illustration G. You can skip steps 6 through 11. 6. Using scissors, cut...
User Manual
Page 16
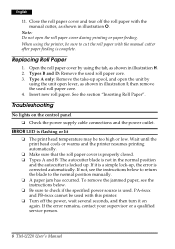
... power supply cable connections and the power outlet. Type A only: Remove the take-up . See the section "Inserting Roll Paper". Troubleshooting No lights on again. If not, see the instructions below to return the blade to check if the specified power source is used with this printer. ❏ Turn off the roll paper with the manual cutter after paper feeding is locked up spool, and open the roll paper cover during printing or paper feeding. then remove...
... power supply cable connections and the power outlet. Type A only: Remove the take-up . See the section "Inserting Roll Paper". Troubleshooting No lights on again. If not, see the instructions below to return the blade to check if the specified power source is used with this printer. ❏ Turn off the roll paper with the manual cutter after paper feeding is locked up spool, and open the roll paper cover during printing or paper feeding. then remove...
User Manual
Page 17
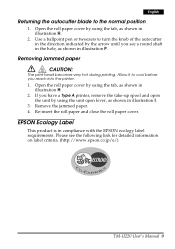
... the roll paper cover by using the tab, as shown in illustration I. 3. English Returning the autocutter blade to turn the knob of the autocutter in the direction indicated by the arrow until you see the following link for detailed information on label criteria. (http://www.epson.co.jp/e/) TM-U220 User's Manual 9 Allow it to cool before you have a Type A printer, remove the...
... the roll paper cover by using the tab, as shown in illustration I. 3. English Returning the autocutter blade to turn the knob of the autocutter in the direction indicated by the arrow until you see the following link for detailed information on label criteria. (http://www.epson.co.jp/e/) TM-U220 User's Manual 9 Allow it to cool before you have a Type A printer, remove the...
