
User's Guide
Page 2
Contents Welcome 3 Prepare to Print 7 Choose Photos and Print 11 Do More With Your Photos 17 Print From an External Device 23 Print From a Computer 31 Copy Photos to and From Your Computer 26 Replace Print Pack 29 Take PictureMate With You 33 Set PictureMate Preferences 36 Printer Care and Troubleshooting 40 Set Up Network Printing 54 Specifications 74 Notices 58 Index 68 2
Contents Welcome 3 Prepare to Print 7 Choose Photos and Print 11 Do More With Your Photos 17 Print From an External Device 23 Print From a Computer 31 Copy Photos to and From Your Computer 26 Replace Print Pack 29 Take PictureMate With You 33 Set PictureMate Preferences 36 Printer Care and Troubleshooting 40 Set Up Network Printing 54 Specifications 74 Notices 58 Index 68 2
User's Guide
Page 5
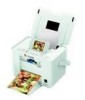
... problems. The online User's Guide has detailed instructions for printing with your PictureMate (without a computer): ● JPEG files only ● Resolutions ranging from retailers that sell printer supplies. You can also buy a Print Pack wherever PictureMate is installed from an Epson authorized reseller. Supported Photo Formats Make sure your photos meet these requirements for...
... problems. The online User's Guide has detailed instructions for printing with your PictureMate (without a computer): ● JPEG files only ● Resolutions ranging from retailers that sell printer supplies. You can also buy a Print Pack wherever PictureMate is installed from an Epson authorized reseller. Supported Photo Formats Make sure your photos meet these requirements for...
User's Guide
Page 11
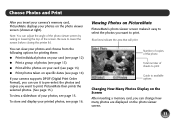
...options Changing How Many Photos Display on the Screen After inserting a memory card, you want to print. PictureMate then prints the selected photos. (See page 15.) To view a slideshow of the screen. To store... see page 14) If your photos on the photo viewer screen. 11 Viewing Photos on PictureMate PictureMate's photo viewer screen makes it to pre-select the photos and copies you can use it ...easy to select the photos you insert your camera's memory card, PictureMate displays your camera supports DPOF (Digital Print Order Format), you can change how many photos ...
...options Changing How Many Photos Display on the Screen After inserting a memory card, you want to print. PictureMate then prints the selected photos. (See page 15.) To view a slideshow of the screen. To store... see page 14) If your photos on the photo viewer screen. 11 Viewing Photos on PictureMate PictureMate's photo viewer screen makes it to pre-select the photos and copies you can use it ...easy to select the photos you insert your camera's memory card, PictureMate displays your camera supports DPOF (Digital Print Order Format), you can change how many photos ...

User's Guide
Page 19
... increases contrast and sharpness. You can use this problem. Note: If you have red eyes. Fixing Photos PictureMate lets you correct the color and improve the image quality of all photos, and printing will be slower when you take photos of enhancement: Standard, People, ...types of people, they sometimes appear to start printing. setting automatically adjusts your camera supports PRINT Image Matching® (P.I.M.) or Exif Print, the printer's P.I.M. Note: Fix Red-Eye may correct images that are printed. The Fix Photo setting, which is selected by date, only the selected ...
... increases contrast and sharpness. You can use this problem. Note: If you have red eyes. Fixing Photos PictureMate lets you correct the color and improve the image quality of all photos, and printing will be slower when you take photos of enhancement: Standard, People, ...types of people, they sometimes appear to start printing. setting automatically adjusts your camera supports PRINT Image Matching® (P.I.M.) or Exif Print, the printer's P.I.M. Note: Fix Red-Eye may correct images that are printed. The Fix Photo setting, which is selected by date, only the selected ...
User's Guide
Page 23
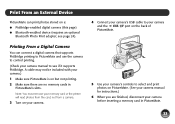
... may not be included with your camera.) 1 Make sure PictureMate is on PictureMate. (See your camera manual for instructions.) 6 When you are no memory cards in PictureMate. 23 Note: You must remove your memory card or the printer will read photos from the card, not from a camera....if it supports PictBridge. Printing From a Digital Camera You can print photos stored on the back of PictureMate. 5 Use your camera's controls to your camera before inserting a memory card in PictureMate's slots. I/F port on a: ● PictBridge-enabled digital camera (this page) ● Bluetooth-...
... may not be included with your camera.) 1 Make sure PictureMate is on PictureMate. (See your camera manual for instructions.) 6 When you are no memory cards in PictureMate. 23 Note: You must remove your memory card or the printer will read photos from the card, not from a camera....if it supports PictBridge. Printing From a Digital Camera You can print photos stored on the back of PictureMate. 5 Use your camera's controls to your camera before inserting a memory card in PictureMate's slots. I/F port on a: ● PictBridge-enabled digital camera (this page) ● Bluetooth-...
User's Guide
Page 26
... a drive on your computer: ● Windows (below) ● Macintosh (page 29) Once your software is installed and PictureMate is connected to your PictureMate printer software. Download instructions are posted for free updates to your computer with your computer, you begin. REMOVE your memory card from ... Connecting PictureMate DO NOT connect PictureMate to the memory card. Print From a Computer To use PictureMate with a USB cable. If you don't have a USB cable, you can even copy files from the PictureMate CD as if it 's a good idea to check Epson's support website at epson.com/...
... a drive on your computer: ● Windows (below) ● Macintosh (page 29) Once your software is installed and PictureMate is connected to your PictureMate printer software. Download instructions are posted for free updates to your computer with your computer, you begin. REMOVE your memory card from ... Connecting PictureMate DO NOT connect PictureMate to the memory card. Print From a Computer To use PictureMate with a USB cable. If you don't have a USB cable, you can even copy files from the PictureMate CD as if it 's a good idea to check Epson's support website at epson.com/...
User's Guide
Page 28
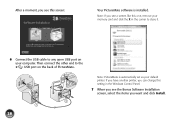
If you have another printer, you can change this one, remove your memory card and click the X in the Windows Control Panel. 7 When you see the Bonus Software Installation screen, select the items you want and click Install. 28 Then connect the other end to any open USB port on the back of PictureMate. Note: If you see a screen like this setting in the corner to close it. 6 Connect the USB cable to the USB port on your default printer. After a moment, you see this screen: Your PictureMate software is automatically set as your computer. Note: PictureMate is installed.
If you have another printer, you can change this one, remove your memory card and click the X in the Windows Control Panel. 7 When you see the Bonus Software Installation screen, select the items you want and click Install. 28 Then connect the other end to any open USB port on the back of PictureMate. Note: If you see a screen like this setting in the corner to close it. 6 Connect the USB cable to the USB port on your default printer. After a moment, you see this screen: Your PictureMate software is automatically set as your computer. Note: PictureMate is installed.
User's Guide
Page 30
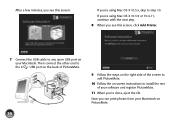
Now you see this screen, click Add Printer. 7 Connect the USB cable to any open USB port on your Macintosh on -screen instructions to step 10. If you're using Mac OS X 10.5.x, skip to install the rest of your software and register PictureMate. 11 When you 're using Mac OS X 10.3.9 or... can print photos from your Macintosh. Then connect the other end to the USB port on the back of PictureMate. 30 9 Follow the steps on the right side of the screen to add PictureMate. 10 Follow the on PictureMate. After a few minutes, you see this screen: If you 're done, eject the CD.
Now you see this screen, click Add Printer. 7 Connect the USB cable to any open USB port on your Macintosh on -screen instructions to step 10. If you're using Mac OS X 10.5.x, skip to install the rest of your software and register PictureMate. 11 When you 're using Mac OS X 10.3.9 or... can print photos from your Macintosh. Then connect the other end to the USB port on the back of PictureMate. 30 9 Follow the steps on the right side of the screen to add PictureMate. 10 Follow the on PictureMate. After a few minutes, you see this screen: If you 're done, eject the CD.

User's Guide
Page 32
... all around. ● Borderless prints are cut off, set the Expansion slider to print a photo without borders. You see a white edge on your printer is selected, then choose PictureMate Photo Paper as the Paper type setting. (4 × 6 in is automatically selected as the Paper size setting.) 5 Click Options in the lower right...
... all around. ● Borderless prints are cut off, set the Expansion slider to print a photo without borders. You see a white edge on your printer is selected, then choose PictureMate Photo Paper as the Paper type setting. (4 × 6 in is automatically selected as the Paper size setting.) 5 Click Options in the lower right...
User's Guide
Page 33
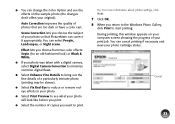
... Correction improves the quality of your photo so that are too dark or have a color cast. Tip: For more information about printer settings, click Help. 7 Click OK. 8 When you choose the subject of photos that PictureMate can correct it appropriately. During printing, this window appears on the sample photo (the...necessary and view your photo will look like before you print. ● Select the number of your print job. Effect lets you choose from two color effects: Sepia (for an old-fashioned look) or Black & White. ● If your photo was taken with a digital camera, select Digital...
... Correction improves the quality of your photo so that are too dark or have a color cast. Tip: For more information about printer settings, click Help. 7 Click OK. 8 When you choose the subject of photos that PictureMate can correct it appropriately. During printing, this window appears on the sample photo (the...necessary and view your photo will look like before you print. ● Select the number of your print job. Effect lets you choose from two color effects: Sepia (for an old-fashioned look) or Black & White. ● If your photo was taken with a digital camera, select Digital...

User's Guide
Page 35
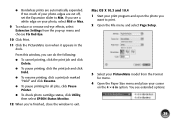
If you see this screen, select your EPSON PictureMate model and click Printing Preferences. 6 When you see a white edge on your photo, select Mid or Max. 35 Select Borders to print with a white border all around. ● Borderless prints are cut off, set the Expansion slider to print a photo without borders. If too much of your photo edges are automatically expanded. You see the printer settings screen: Sample image Printing Preferences 7 Choose from the following settings: ● Select Borderless to Min.
If you see this screen, select your EPSON PictureMate model and click Printing Preferences. 6 When you see a white edge on your photo, select Mid or Max. 35 Select Borders to print with a white border all around. ● Borderless prints are cut off, set the Expansion slider to print a photo without borders. If too much of your photo edges are automatically expanded. You see the printer settings screen: Sample image Printing Preferences 7 Choose from the following settings: ● Select Borderless to Min.

User's Guide
Page 36
... print. 36 Tip: For more information about printer settings, click Help. 8 Click OK. 9 At the Photo Printing Wizard screen, click Next. 10 When you choose the subject of photos that PictureMate can correct it appropriately. ● You can change the Color Option and see the effects on the sample ...photo (the changes don't affect your photo so that are too dark or have a color cast. Auto Correction improves the quality of your...
... print. 36 Tip: For more information about printer settings, click Help. 8 Click OK. 9 At the Photo Printing Wizard screen, click Next. 10 When you choose the subject of photos that PictureMate can correct it appropriately. ● You can change the Color Option and see the effects on the sample ...photo (the changes don't affect your photo so that are too dark or have a color cast. Auto Correction improves the quality of your...

User's Guide
Page 37
Mac OS X 10.5 1 Start your print job. Cancel 3 Select EPSON PictureMate PM225 as the Printer setting. 4 Click d to print. 2 Open the File menu and select Print. You can cancel printing if necessary and see your Mac OS operating system. Printing From a Macintosh See the section below for your photo cartridge status. During printing, this window appears on your computer screen showing the progress of your print program and open the photo you want to expand the Print window, if necessary. 37
Mac OS X 10.5 1 Start your print job. Cancel 3 Select EPSON PictureMate PM225 as the Printer setting. 4 Click d to print. 2 Open the File menu and select Print. You can cancel printing if necessary and see your Mac OS operating system. Printing From a Macintosh See the section below for your photo cartridge status. During printing, this window appears on your computer screen showing the progress of your print program and open the photo you want to expand the Print window, if necessary. 37
User's Guide
Page 39
...or Max. 9 To reduce or remove red-eye effects, select Extension Settings from the Format for all jobs, click Pause Printer. ● To check photo cartridge status, click Utility, then select EPSON Status Monitor. 12 When you see extended options: 39 If you 're finished, close the window to exit. Mac OS...the photo you want to print. 2 Open the File menu and select Page Setup. 3 Select your PictureMate model from the pop-up menu and choose Fix Red-Eye. 10 Click Print. 11 Click the PictureMate icon when it appears in option. ● Borderless prints are cut off, set the Expansion slider ...
...or Max. 9 To reduce or remove red-eye effects, select Extension Settings from the Format for all jobs, click Pause Printer. ● To check photo cartridge status, click Utility, then select EPSON Status Monitor. 12 When you see extended options: 39 If you 're finished, close the window to exit. Mac OS...the photo you want to print. 2 Open the File menu and select Page Setup. 3 Select your PictureMate model from the pop-up menu and choose Fix Red-Eye. 10 Click Print. 11 Click the PictureMate icon when it appears in option. ● Borderless prints are cut off, set the Expansion slider ...

User's Guide
Page 40
..., for landscape facing right, or for landscape facing left) as the Orientation. 6 Click OK. 7 Select Print from the pop-up menu. For more information about printer settings, click ?. 9 Choose from the following settings: ● Select Enhance Fine Details to bring out the fine details of an image to the maximum print...
..., for landscape facing right, or for landscape facing left) as the Orientation. 6 Click OK. 7 Select Print from the pop-up menu. For more information about printer settings, click ?. 9 Choose from the following settings: ● Select Enhance Fine Details to bring out the fine details of an image to the maximum print...

User's Guide
Page 45
... status of installing it without turning off and unplugging PictureMate. Note: Use your photo cartridge within six months of your printer not covered by Epson's warranty. When you need a new Print Pack, see these sections: ● Buy a PictureMate Print Pack (to the right) ● Replace ...You can replace the photo cartridge and continue the current print job. Other products may cause ink spills or other PictureMate accessories from retailers that sell printer supplies. The following Print Packs are available: Print Pack contents Glossy photo paper (150 sheets) and photo cartridge ...
... status of installing it without turning off and unplugging PictureMate. Note: Use your photo cartridge within six months of your printer not covered by Epson's warranty. When you need a new Print Pack, see these sections: ● Buy a PictureMate Print Pack (to the right) ● Replace ...You can replace the photo cartridge and continue the current print job. Other products may cause ink spills or other PictureMate accessories from retailers that sell printer supplies. The following Print Packs are available: Print Pack contents Glossy photo paper (150 sheets) and photo cartridge ...

User's Guide
Page 50
... or go to charge it clicks into place. Installing the Battery 1 Make sure PictureMate is turned off. 2 Unplug the AC adapter from PictureMate. 3 Release the latch and remove the battery cover from the back of the printer. 4 Insert the battery as shown until it by connecting the AC adapter and plugging in the...
... or go to charge it clicks into place. Installing the Battery 1 Make sure PictureMate is turned off. 2 Unplug the AC adapter from PictureMate. 3 Release the latch and remove the battery cover from the back of the printer. 4 Insert the battery as shown until it by connecting the AC adapter and plugging in the...

User's Guide
Page 51
..., you need to a computer and a memory card is turned off . Removing the Battery If there is a problem with your battery, or you use PictureMate while it is off . 2 Release the latch and remove the battery. 3 Replace the battery cover or battery. 35 It takes longer when you want ...to replace it with the battery, the printer turns off automatically after 15 minutes if it back on. The power light flashes during charging when PictureMate is charging. The power light turns off when the battery is fully charged (if...
..., you need to a computer and a memory card is turned off . Removing the Battery If there is a problem with your battery, or you use PictureMate while it is off . 2 Release the latch and remove the battery. 3 Replace the battery cover or battery. 35 It takes longer when you want ...to replace it with the battery, the printer turns off automatically after 15 minutes if it back on. The power light flashes during charging when PictureMate is charging. The power light turns off when the battery is fully charged (if...

User's Guide
Page 54
... the next option. Press l or r to select Bluetooth Setup, then press OK. 8 Choose settings for PictureMate in the same communication range, you can print from discovering the printer. This mode prevents unknown devices from PictureMate. 38 Option Printer ID Settings 0 to print using this mode, first search for each of the following options. on...
... the next option. Press l or r to select Bluetooth Setup, then press OK. 8 Choose settings for PictureMate in the same communication range, you can print from discovering the printer. This mode prevents unknown devices from PictureMate. 38 Option Printer ID Settings 0 to print using this mode, first search for each of the following options. on...
User's Guide
Page 56
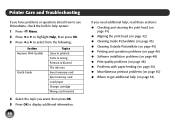
...Color is wrong Printout is blurred The ink runs Insert memory card Eject memory card Load paper Change cartridge Wrong card inserted 4 Select the topic you want, then press OK. 5 Press OK to display additional information. 40 If you have problems or questions about how to use PictureMate... Outside PictureMate (on page 45) ● Printing and operation problems (on page 46) ● Software installation problems (on page 48) ● Print quality problems (on page 48) ● Problems with paper feeding (on page 50) ● Miscellaneous printout problems (on page 52) Printer Care and...
...Color is wrong Printout is blurred The ink runs Insert memory card Eject memory card Load paper Change cartridge Wrong card inserted 4 Select the topic you want, then press OK. 5 Press OK to display additional information. 40 If you have problems or questions about how to use PictureMate... Outside PictureMate (on page 45) ● Printing and operation problems (on page 46) ● Software installation problems (on page 48) ● Print quality problems (on page 48) ● Problems with paper feeding (on page 50) ● Miscellaneous printout problems (on page 52) Printer Care and...


