
Product Brochure
Page 1
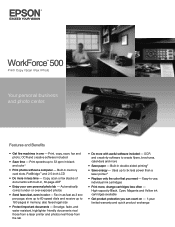
WorkForce™ 500 Print | Copy | Scan | Fax | Photo Your personal business and photo center. Automatically correct under- Fax in double-sided printing2 • Save ... less time - store up to 60 speed dials and receive up to 3x less power than a laser printer3 • Replace only the color that you can count on - 1-year limited warranty and quick product exchange High-capacity Black, Cyan, Magenta and Yellow ink cartridges available &#... a computer - or over-exposed photos • Send faxes fast, even in one - Features and Benefits • Get five machines in color -
WorkForce™ 500 Print | Copy | Scan | Fax | Photo Your personal business and photo center. Automatically correct under- Fax in double-sided printing2 • Save ... less time - store up to 60 speed dials and receive up to 3x less power than a laser printer3 • Replace only the color that you can count on - 1-year limited warranty and quick product exchange High-capacity Black, Cyan, Magenta and Yellow ink cartridges available &#... a computer - or over-exposed photos • Send faxes fast, even in one - Features and Benefits • Get five machines in color -
Product Brochure
Page 2
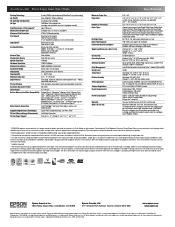
...See www.epson.com/ cartridgeinfo for priming the all rights in as fast as 26 seconds Black up to 31 cpm Color up to 31 cpm Black-and-white and color Modem: 33.6 Kbps - CPD-26451 8/08 and Canada WorkForce 500 color all photos, photo index sheet and color photo restoration ...longevity of functioning black and color ink cartridges. The all prints under glass. Epson disclaims any and all -in -one damage. To send faxes, print or copy requires the installation of prints. All other products may not be used for more information about cartridges. WorkForce 500 Print | Copy | ...
...See www.epson.com/ cartridgeinfo for priming the all rights in as fast as 26 seconds Black up to 31 cpm Color up to 31 cpm Black-and-white and color Modem: 33.6 Kbps - CPD-26451 8/08 and Canada WorkForce 500 color all photos, photo index sheet and color photo restoration ...longevity of functioning black and color ink cartridges. The all prints under glass. Epson disclaims any and all -in -one damage. To send faxes, print or copy requires the installation of prints. All other products may not be used for more information about cartridges. WorkForce 500 Print | Copy | ...
Quick Guide
Page 1
Epson WorkForce™ 500 Series Quick Guide Basic Printing, Copying, Scanning, and Faxing Maintaining Your All-in-One Solving Problems
Epson WorkForce™ 500 Series Quick Guide Basic Printing, Copying, Scanning, and Faxing Maintaining Your All-in-One Solving Problems
Quick Guide
Page 13
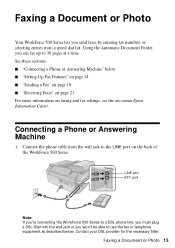
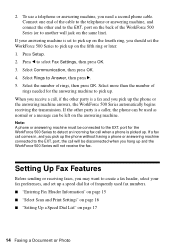
...port EXT. Using the Automatic Document Feeder, you can fax up to the LINE port on -screen Epson Information Center. Connect the phone cable from a speed dial list. port Note: If you're connecting the WorkForce 500 Series to a DSL phone line, you must plug a DSL filter into the wall jack or ...page 21 For more information on faxing and fax settings, see the on the back of the WorkForce 500 Series. Contact your DSL provider for the necessary filter. Faxing a Document or Photo Your WorkForce 500 Series lets you send faxes by entering fax numbers or selecting entries from the wall jack to ...
...port EXT. Using the Automatic Document Feeder, you can fax up to the LINE port on -screen Epson Information Center. Connect the phone cable from a speed dial list. port Note: If you're connecting the WorkForce 500 Series to a DSL phone line, you must plug a DSL filter into the wall jack or ...page 21 For more information on faxing and fax settings, see the on the back of the WorkForce 500 Series. Contact your DSL provider for the necessary filter. Faxing a Document or Photo Your WorkForce 500 Series lets you send faxes by entering fax numbers or selecting entries from the wall jack to ...
Quick Guide
Page 14
...receiving faxes, you need a second phone cable. 2. Press l to the EXT. Select the number of the WorkForce 500 Series (or to pick up on the fourth ring, you pick up on page 17 14 Faxing a Document ...cable to the telephone or answering machine, and connect the other party is set the WorkForce 500 Series to the EXT. port, the call , if the other end to pick up the phone ...or the answering machine answers, the WorkForce 500 Series automatically begins receiving the transmission. If a fax call when a phone is a caller, the ...
...receiving faxes, you need a second phone cable. 2. Press l to the EXT. Select the number of the WorkForce 500 Series (or to pick up on the fourth ring, you pick up on page 17 14 Faxing a Document ...cable to the telephone or answering machine, and connect the other party is set the WorkForce 500 Series to the EXT. port, the call , if the other end to pick up the phone ...or the answering machine answers, the WorkForce 500 Series automatically begins receiving the transmission. If a fax call when a phone is a caller, the ...
Quick Guide
Page 15
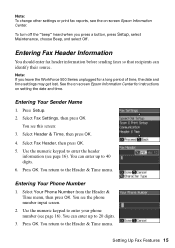
...4. See the on-screen Epson Information Center for a long period of time, the date and time settings may get lost. Use the numeric keypad to enter the header information (see page 16). To turn off the "beep" heard when you leave the WorkForce 500 Series unplugged for instructions on ...-screen Epson Information Center. You see the phone number input screen. 2. Select Fax Header, then press OK. 5. You can identify their...
...4. See the on-screen Epson Information Center for a long period of time, the date and time settings may get lost. Use the numeric keypad to enter the header information (see page 16). To turn off the "beep" heard when you leave the WorkForce 500 Series unplugged for instructions on ...-screen Epson Information Center. You see the phone number input screen. 2. Select Fax Header, then press OK. 5. You can identify their...

Quick Guide
Page 16
... moves the cursor one space to the left or right. Press Setup. 2. Use the # button to type the + symbol when entering a phone number in your WorkForce 500 Series, select the size at which faxes are printed, and select when you want printed reports. 1. Then use the numeric keypad. Press the button repeatedly...
... moves the cursor one space to the left or right. Press Setup. 2. Use the # button to type the + symbol when entering a phone number in your WorkForce 500 Series, select the size at which faxes are printed, and select when you want printed reports. 1. Then use the numeric keypad. Press the button repeatedly...
Quick Guide
Page 17
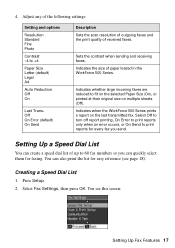
... can quickly select them for easy reference (see this screen: Setting Up Fax Features 17 Select Fax Settings, then press OK. Indicates when the WorkForce 500 Series prints a report on multiple sheets (Off). Indicates whether large incoming faxes are reduced to +4 Paper Size Letter (default) Legal A4 Auto ... 2. Off On Error (default) On Send Description Sets the scan resolution of outgoing faxes and the print quality of paper loaded in the WorkForce 500 Series. You see page 18). Adjust any of up to print reports for every fax you can also print the list for faxing. Select...
... can quickly select them for easy reference (see this screen: Setting Up Fax Features 17 Select Fax Settings, then press OK. Indicates when the WorkForce 500 Series prints a report on multiple sheets (Off). Indicates whether large incoming faxes are reduced to +4 Paper Size Letter (default) Legal A4 Auto ... 2. Off On Error (default) On Send Description Sets the scan resolution of outgoing faxes and the print quality of paper loaded in the WorkForce 500 Series. You see page 18). Adjust any of up to print reports for every fax you can also print the list for faxing. Select...

Quick Guide
Page 18
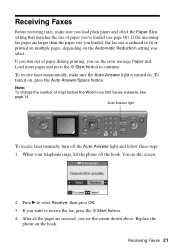
... Entry instead. 5. Printing Your Speed Dial List To print your list. 18 Faxing a Document or Photo Make sure letter-size paper is loaded in the WorkForce 500 Series, then press x Start to print your speed dial list, follow these steps: 1. Select or type the number of available entries. If you want to...
... Entry instead. 5. Printing Your Speed Dial List To print your list. 18 Faxing a Document or Photo Make sure letter-size paper is loaded in the WorkForce 500 Series, then press x Start to print your speed dial list, follow these steps: 1. Select or type the number of available entries. If you want to...

Quick Guide
Page 20
... or Photo Your document is busy, you see the screen at right, select Send, then press OK. When you see a redialing message and the WorkForce 500 Series redials after one minute. Change the setting back to use, then press OK. ■ To redial the last fax number you used, press ... immediately, press Redial/Pause. The last fax number is displayed on the scanner glass or in the Automatic Document Feeder. Then press OK to the WorkForce 500 Series, you 've connected a telephone to continue. Note: If the fax number is faxed. Other Ways to Dial a Fax Number In addition to...
... or Photo Your document is busy, you see the screen at right, select Send, then press OK. When you see a redialing message and the WorkForce 500 Series redials after one minute. Change the setting back to use, then press OK. ■ To redial the last fax number you used, press ... immediately, press Redial/Pause. The last fax number is displayed on the scanner glass or in the Automatic Document Feeder. Then press OK to the WorkForce 500 Series, you 've connected a telephone to continue. Note: If the fax number is faxed. Other Ways to Dial a Fax Number In addition to...
Quick Guide
Page 21
... faxes manually, turn it on the hook. If the incoming fax pages are received, you select. Note: To change the number of rings before the WorkForce 500 Series answers, see this screen: 2. After all the pages are larger than the paper size you loaded, the fax size is turned on the Automatic...
... faxes manually, turn it on the hook. If the incoming fax pages are received, you select. Note: To change the number of rings before the WorkForce 500 Series answers, see this screen: 2. After all the pages are larger than the paper size you loaded, the fax size is turned on the Automatic...

Quick Guide
Page 22
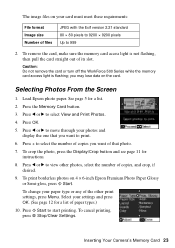
You can also print by connecting your digital camera's memory card. The memory card access light flashes, then stays on -screen Epson Information Center. Inserting Your Camera's Memory Card 1. Left slot: Right slot: Memory card access light SDTM SDHCTM miniSDTM* miniSDHC* ... Card Type M CompactFlash® MicrodriveTM * Adapter required 22 Printing From Your Camera's Memory Card Printing From Your Camera's Memory Card The WorkForce 500 Series lets you print photos directly from the card. You can also print photos using an index sheet or your camera's DPOF™ settings...
You can also print by connecting your digital camera's memory card. The memory card access light flashes, then stays on -screen Epson Information Center. Inserting Your Camera's Memory Card 1. Left slot: Right slot: Memory card access light SDTM SDHCTM miniSDTM* miniSDHC* ... Card Type M CompactFlash® MicrodriveTM * Adapter required 22 Printing From Your Camera's Memory Card Printing From Your Camera's Memory Card The WorkForce 500 Series lets you print photos directly from the card. You can also print photos using an index sheet or your camera's DPOF™ settings...
Quick Guide
Page 23
Caution: Do not remove the card or turn off the WorkForce 500 Series while the memory card access light is not flashing, then pull the...View and Print Photos. 4. To cancel printing, press y Stop/Clear Settings. you may lose data on 4 × 6-inch Epson Premium Photo Paper Glossy or Semi-gloss, press x Start. Press l or r to 999 2. Inserting Your Camera's Memory Card .... 6. To crop the photo, press the Display/Crop button and see page 11 for a list. 2. Load Epson photo paper. To print borderless photos on the card. To change your paper type or any of the other photos...
Caution: Do not remove the card or turn off the WorkForce 500 Series while the memory card access light is not flashing, then pull the...View and Print Photos. 4. To cancel printing, press y Stop/Clear Settings. you may lose data on 4 × 6-inch Epson Premium Photo Paper Glossy or Semi-gloss, press x Start. Press l or r to 999 2. Inserting Your Camera's Memory Card .... 6. To crop the photo, press the Display/Crop button and see page 11 for a list. 2. Load Epson photo paper. To print borderless photos on the card. To change your paper type or any of the other photos...
Quick Guide
Page 24
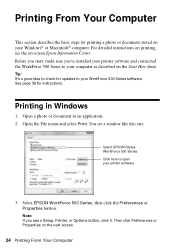
... a Setup, Printer, or Options button, click it. Then click Preferences or Properties on -screen Epson Information Center. Note: If you 've installed your printer software and connected the WorkForce 500 Series to open your Windows® or Macintosh® computer. Printing From Your Computer This section ...a photo or document stored on your printer software 3. For detailed instructions on printing, see a window like this one: Select EPSON Stylus WorkForce 500 Series Click here to your WorkForce 500 Series software. You see the on the next screen. 24 Printing From Your Computer Select...
... a Setup, Printer, or Options button, click it. Then click Preferences or Properties on -screen Epson Information Center. Note: If you 've installed your printer software and connected the WorkForce 500 Series to open your Windows® or Macintosh® computer. Printing From Your Computer This section ...a photo or document stored on your printer software 3. For detailed instructions on printing, see a window like this one: Select EPSON Stylus WorkForce 500 Series Click here to your WorkForce 500 Series software. You see the on the next screen. 24 Printing From Your Computer Select...

Quick Guide
Page 26
Select EPSON WorkForce 500 as the Printer setting. Click OK or Print to expand the Print window, if necessary. 26 Printing From Your Computer This window appears and shows the progress of your Mac operating system. Check ink cartridge status Cancel printing Printing With a Macintosh See the section below for your print job. Click d to start printing. Open a photo or document in an application. 2. Select EPSON WorkForce 500 Click to expand 4. Open the File menu and select Print. 3. Mac OS® X 10.5 1. 10.
Select EPSON WorkForce 500 as the Printer setting. Click OK or Print to expand the Print window, if necessary. 26 Printing From Your Computer This window appears and shows the progress of your Mac operating system. Check ink cartridge status Cancel printing Printing With a Macintosh See the section below for your print job. Click d to start printing. Open a photo or document in an application. 2. Select EPSON WorkForce 500 Click to expand 4. Open the File menu and select Print. 3. Mac OS® X 10.5 1. 10.

Quick Guide
Page 28
.... Cancel printing Pause or resume printing Select the print job Mac OS X 10.3 and 10.4 1. Select the following settings: Select WorkForce 500 Select your Paper Size Select your print job, then select an option to close the Page Setup window. 28 Printing From Your Computer ...Click OK to cancel, pause, or resume printing, if necessary. 7. Click Print. 9. See the on-screen Epson Information Center for your paper size. 3. Borderless option in the dock. Select your document or image orientation For borderless photos, choose a Sheet Feeder...
.... Cancel printing Pause or resume printing Select the print job Mac OS X 10.3 and 10.4 1. Select the following settings: Select WorkForce 500 Select your Paper Size Select your print job, then select an option to close the Page Setup window. 28 Printing From Your Computer ...Click OK to cancel, pause, or resume printing, if necessary. 7. Click Print. 9. See the on-screen Epson Information Center for your paper size. 3. Borderless option in the dock. Select your document or image orientation For borderless photos, choose a Sheet Feeder...
Quick Guide
Page 30
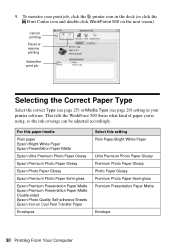
... page 29) setting in the dock (or click the Print Center icon and double-click WorkForce 500 on Cool Peel Transfer Paper Envelopes Select this setting Plain Paper/Bright White Paper Ultra Premium Photo...Epson Bright White Paper Epson Presentation Paper Matte Epson Ultra Premium Photo Paper Glossy Epson Premium Photo Paper Glossy Epson Photo Paper Glossy Epson Premium Photo Paper Semi-gloss Epson Premium Presentation Paper Matte Epson Premium Presentation Paper Matte Double-sided Epson Photo Quality Self-adhesive Sheets Epson Iron-on the next screen). 9. This tells the WorkForce 500...
... page 29) setting in the dock (or click the Print Center icon and double-click WorkForce 500 on Cool Peel Transfer Paper Envelopes Select this setting Plain Paper/Bright White Paper Ultra Premium Photo...Epson Bright White Paper Epson Presentation Paper Matte Epson Ultra Premium Photo Paper Glossy Epson Premium Photo Paper Glossy Epson Photo Paper Glossy Epson Premium Photo Paper Semi-gloss Epson Premium Presentation Paper Matte Epson Premium Presentation Paper Matte Double-sided Epson Photo Quality Self-adhesive Sheets Epson Iron-on the next screen). 9. This tells the WorkForce 500...
Quick Guide
Page 33
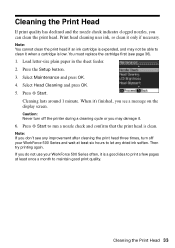
... (see any dried ink soften. Press the Setup button. 3. When it's finished, you can clean the print head. Caution: Never turn off your WorkForce 500 Series and wait at least once a month to let any improvement after cleaning the print head three times, turn off the printer during a cleaning cycle... or you do not use your WorkForce 500 Series often, it . 6. Note: If you don't see page 36). 1. Cleaning the Print Head 33 Note: You cannot clean the print head ...
... (see any dried ink soften. Press the Setup button. 3. When it's finished, you can clean the print head. Caution: Never turn off your WorkForce 500 Series and wait at least once a month to let any improvement after cleaning the print head three times, turn off the printer during a cleaning cycle... or you do not use your WorkForce 500 Series often, it . 6. Note: If you don't see page 36). 1. Cleaning the Print Head 33 Note: You cannot clean the print head ...
Quick Guide
Page 34
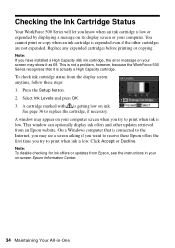
This window can optionally display ink offers and other cartridges are not expended. This is not a problem, however, because the WorkForce 500 Series recognizes that is low or expended by displaying a message on its display screen or your computer. Select Ink Levels and press OK. 3.... try to print when ink is low. Checking the Ink Cartridge Status Your WorkForce 500 Series will let you know when an ink cartridge is connected to the Internet, you may see the instructions in your on-screen Epson Information Center. 34 Maintaining Your All-in-One Press the Setup button. 2....
This window can optionally display ink offers and other cartridges are not expended. This is not a problem, however, because the WorkForce 500 Series recognizes that is low or expended by displaying a message on its display screen or your computer. Select Ink Levels and press OK. 3.... try to print when ink is low. Checking the Ink Cartridge Status Your WorkForce 500 Series will let you know when an ink cartridge is connected to the Internet, you may see the instructions in your on-screen Epson Information Center. 34 Maintaining Your All-in-One Press the Setup button. 2....
Quick Guide
Page 36
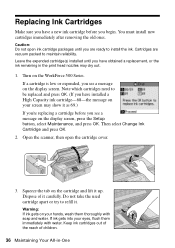
... All-in the print head nozzles may show it . Replacing Ink Cartridges Make sure you have a new ink cartridge before you see a message on the WorkForce 500 Series.
... All-in the print head nozzles may show it . Replacing Ink Cartridges Make sure you have a new ink cartridge before you see a message on the WorkForce 500 Series.

