Network Installation Guide
Page 10
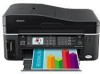
... key set to 1 (usual default), and click Next. 10 Wireless Network Installation Enter your router or access point doesn't broadcast its network name (SSID), select Manually Enter Network Name (SSID) and enter the network name. Select your wireless network doesn't have security enabled, continue with step 11. Click Next. If your...
... key set to 1 (usual default), and click Next. 10 Wireless Network Installation Enter your router or access point doesn't broadcast its network name (SSID), select Manually Enter Network Name (SSID) and enter the network name. Select your wireless network doesn't have security enabled, continue with step 11. Click Next. If your...
Network Installation Guide
Page 11
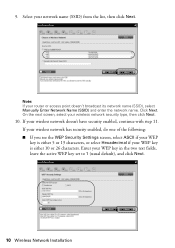
When you see this screen, click Next to enter them correctly. Enter the IP address, subnet mask, and default gateway, then click Next. Wireless Network Installation 11 Note: To configure the IP address manually, click Change. Then click Next. 11. If your passphrase in the two text fields. On the next screen, select Set the IP address manually (advanced), and click Next. or lowercase letters, be sure to configure the printer's IP address automatically (recommended). ■ If you see the WPA Security Settings screen, enter your passphrase contains upper-
When you see this screen, click Next to enter them correctly. Enter the IP address, subnet mask, and default gateway, then click Next. Wireless Network Installation 11 Note: To configure the IP address manually, click Change. Then click Next. 11. If your passphrase in the two text fields. On the next screen, select Set the IP address manually (advanced), and click Next. or lowercase letters, be sure to configure the printer's IP address automatically (recommended). ■ If you see the WPA Security Settings screen, enter your passphrase contains upper-
Network Installation Guide
Page 21
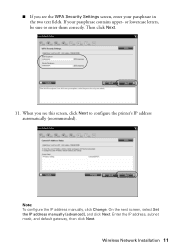
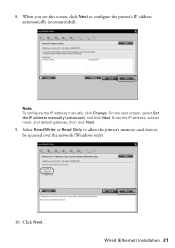
Note: To configure the IP address manually, click Change. When you see this screen, click Next to be accessed over the network (Windows only). 10. Enter the IP address, subnet mask, and default gateway, then click Next. 9. Wired (Ethernet) Installation 21 Click Next. On the next screen, select Set the IP address manually (advanced), and click Next. 8. Select Read/Write or Read Only to allow the printer's memory card slots to configure the printer's IP address automatically (recommended).
Note: To configure the IP address manually, click Change. When you see this screen, click Next to be accessed over the network (Windows only). 10. Enter the IP address, subnet mask, and default gateway, then click Next. 9. Wired (Ethernet) Installation 21 Click Next. On the next screen, select Set the IP address manually (advanced), and click Next. 8. Select Read/Write or Read Only to allow the printer's memory card slots to configure the printer's IP address automatically (recommended).
Network Installation Guide
Page 33
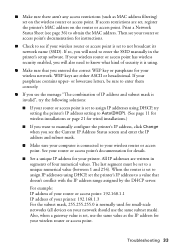
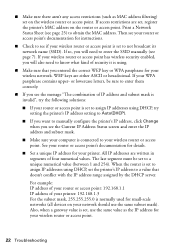
... are either ASCII or hexadecimal. If so, you entered the correct WEP key or passphrase for wired installations.) ■ If you want to manually configure the printer's IP address, click Change when you will need to your wireless router or access point is using DHCP, try the following ... ■ Make sure that doesn't conflict with the IP address range assigned by the DHCP server. or lowercase letters, be set to enter the SSID manually in segments of security it is set to a unique numerical value (between 1 and 254). Also, when a gateway value is normally used for small-...
... are either ASCII or hexadecimal. If so, you entered the correct WEP key or passphrase for wired installations.) ■ If you want to manually configure the printer's IP address, click Change when you will need to your wireless router or access point is using DHCP, try the following ... ■ Make sure that doesn't conflict with the IP address range assigned by the DHCP server. or lowercase letters, be set to enter the SSID manually in segments of security it is set to a unique numerical value (between 1 and 254). Also, when a gateway value is normally used for small-...
Network Installation Guide
Page 34
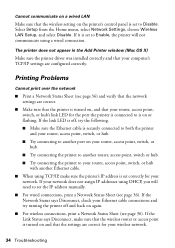
... turned on, and that your router, access point, switch, or hub's link LED for the port the printer is connected to set the IP address manually. ■ For wired connections, print a Network Status Sheet (see page 36) and verify that the network settings are correct for your wireless network. 34 Troubleshooting...
... turned on, and that your router, access point, switch, or hub's link LED for the port the printer is connected to set the IP address manually. ■ For wired connections, print a Network Status Sheet (see page 36) and verify that the network settings are correct for your wireless network. 34 Troubleshooting...
Network Installation Guide
Page 35
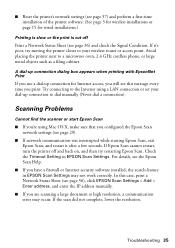
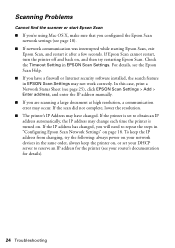
... Status Sheet (see page 36) and check the Signal Condition. Try connecting to dial manually (Never dial a connection). Check the Timeout Setting in EPSON Scan Settings may occur. For details, see the Epson Scan Help. ■ If you print. If it after a few seconds. Troubleshooting ... you will see this case, print a Network Status Sheet (see page 36), click EPSON Scan Settings > Add > Enter address, and enter the IP address manually. ■ If you configured the Epson Scan network settings (see page 29). ■ If network communication was interrupted while starting...
... Status Sheet (see page 36) and check the Signal Condition. Try connecting to dial manually (Never dial a connection). Check the Timeout Setting in EPSON Scan Settings may occur. For details, see the Epson Scan Help. ■ If you print. If it after a few seconds. Troubleshooting ... you will see this case, print a Network Status Sheet (see page 36), click EPSON Scan Settings > Add > Enter address, and enter the IP address manually. ■ If you configured the Epson Scan network settings (see page 29). ■ If network communication was interrupted while starting...

Using the Control Panel for Wireless Network Installation
Page 5
Press u to continue. 9. Press OK to select Yes, then press OK. Press d to Your Wireless Network 5 Connecting to select Enable, then press OK. 7. Press d to select Manual Wireless LAN Setup, then press OK. 8. 6.
Press u to continue. 9. Press OK to select Yes, then press OK. Press d to Your Wireless Network 5 Connecting to select Enable, then press OK. 7. Press d to select Manual Wireless LAN Setup, then press OK. 8. 6.
Using the Control Panel for Wireless Network Installation
Page 22
... either ASCII or hexadecimal. When the router is set the printer's IP address to enter the SSID manually (see page 7). Print a Network Status Sheet (see if your wireless router or access point is set to manually configure the printer's IP address, click Change when you see the message "The combination of four...
... either ASCII or hexadecimal. When the router is set the printer's IP address to enter the SSID manually (see page 7). Print a Network Status Sheet (see if your wireless router or access point is set to manually configure the printer's IP address, click Change when you see the message "The combination of four...
Using the Control Panel for Wireless Network Installation
Page 23
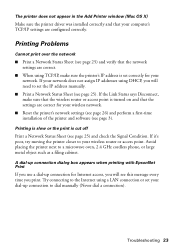
... Print a Network Status Sheet (see page 3). If the Link Status says Disconnect, make sure the printer's IP address is set the IP address manually. ■ Print a Network Status Sheet (see this message every time you will see page 25). Troubleshooting 23 Avoid placing the printer next to ...your computer's TCP/IP settings are correct for Internet access, you will need to dial manually (Never dial a connection). The printer does not appear in the Add Printer window (Mac OS X) Make sure the printer driver was installed ...
... Print a Network Status Sheet (see page 3). If the Link Status says Disconnect, make sure the printer's IP address is set the IP address manually. ■ Print a Network Status Sheet (see this message every time you will see page 25). Troubleshooting 23 Avoid placing the printer next to ...your computer's TCP/IP settings are correct for Internet access, you will need to dial manually (Never dial a connection). The printer does not appear in the Add Printer window (Mac OS X) Make sure the printer driver was installed ...
Using the Control Panel for Wireless Network Installation
Page 24
...in the same order, always keep the printer on, or set to repeat the steps in EPSON Scan Settings. For details, see page 25), click EPSON Scan Settings > Add > Enter address, and enter the IP address manually. ■ If you are scanning a large document at high resolution, a communication error ...may change each time the printer is turned on page 18. In this case, print a Network Status Sheet (see the Epson Scan Help. ■ If you have changed ,...
...in the same order, always keep the printer on, or set to repeat the steps in EPSON Scan Settings. For details, see page 25), click EPSON Scan Settings > Add > Enter address, and enter the IP address manually. ■ If you are scanning a large document at high resolution, a communication error ...may change each time the printer is turned on page 18. In this case, print a Network Status Sheet (see the Epson Scan Help. ■ If you have changed ,...
Product Brochure
Page 2
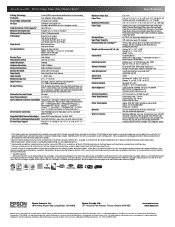
... restoration,scan to PDF, scan to memory card, Auto Photo Correction, print your print quality and longevity and could result in all -in-one, instructional manual, CD-ROM with 802.11n Wired Ethernet (10/100 Mbps) Windows Vista®, XP, XP Professional x64, 2000 Mac OS® X 10.3.9, 10.4.11 and... text up to 38 ppm Color text up to 38 ppm Laser quality black text up to 27 ppm Laser quality color text up to 19 ppm Copy Speed1 Black up to 38 cpm Color up to all prints under glass. Copyright 2008 Epson America, Inc. CPD-26458R1 8/08 WorkForce 600 Print | Copy | Scan | Fax | Photo...
... restoration,scan to PDF, scan to memory card, Auto Photo Correction, print your print quality and longevity and could result in all -in-one, instructional manual, CD-ROM with 802.11n Wired Ethernet (10/100 Mbps) Windows Vista®, XP, XP Professional x64, 2000 Mac OS® X 10.3.9, 10.4.11 and... text up to 38 ppm Color text up to 38 ppm Laser quality black text up to 27 ppm Laser quality color text up to 19 ppm Copy Speed1 Black up to 38 cpm Color up to all prints under glass. Copyright 2008 Epson America, Inc. CPD-26458R1 8/08 WorkForce 600 Print | Copy | Scan | Fax | Photo...

Quick Guide
Page 20
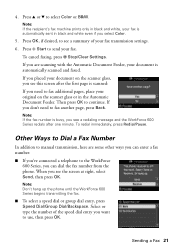
... your list. Press the Home button until Fax is selected, then press OK. 3. Note: To dial the number using your telephone, by redialing, or by manually entering a fax number (as described below), redialing the previous fax number, or selecting an entry from your speed dial list. 1. Select Speed Dial List or...
... your list. Press the Home button until Fax is selected, then press OK. 3. Note: To dial the number using your telephone, by redialing, or by manually entering a fax number (as described below), redialing the previous fax number, or selecting an entry from your speed dial list. 1. Select Speed Dial List or...
Quick Guide
Page 21
...press OK. If you placed your original on the scanner glass, you see a redialing message and the WorkForce 600 Series redials after the first page is busy, you select Color. 5. If you don't need to fax additional pages, place your document on the scanner glass or...Number In addition to manual transmission, here are scanning with the Automatic Document Feeder, your fax is automatically scanned and faxed. 4. To cancel faxing, press y Stop/Clear Settings. When you need to select Color or B&W. Note: Don't hang up the phone until the WorkForce 600 Series begins transmitting ...
...press OK. If you placed your original on the scanner glass, you see a redialing message and the WorkForce 600 Series redials after the first page is busy, you select Color. 5. If you don't need to fax additional pages, place your document on the scanner glass or...Number In addition to manual transmission, here are scanning with the Automatic Document Feeder, your fax is automatically scanned and faxed. 4. To cancel faxing, press y Stop/Clear Settings. When you need to select Color or B&W. Note: Don't hang up the phone until the WorkForce 600 Series begins transmitting ...
Quick Guide
Page 22
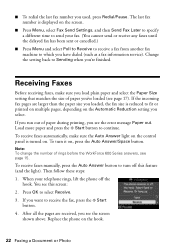
...to fit or printed on multiple pages, depending on the Automatic Reduction setting you have dialed (such as a fax information service). To receive faxes manually, press the Auto Answer button to which you select. The last fax number is turned on , press the Auto Answer/Space button. To ...select Receive. 3. If you see page 15. Note: To change the number of paper during printing, you run out of rings before the WorkForce 600 Series answers, see the error message Paper out. Receiving Faxes Before receiving faxes, make sure the Auto Answer light on the control panel is ...
...to fit or printed on multiple pages, depending on the Automatic Reduction setting you have dialed (such as a fax information service). To receive faxes manually, press the Auto Answer button to which you select. The last fax number is turned on , press the Auto Answer/Space button. To ...select Receive. 3. If you see page 15. Note: To change the number of paper during printing, you run out of rings before the WorkForce 600 Series answers, see the error message Paper out. Receiving Faxes Before receiving faxes, make sure the Auto Answer light on the control panel is ...


