User's Guide
Page 3
... Photos From the PictureMate Print Wizard 39 Viewing the PictureMate Main Menu 40 Selecting the Photos You Want to Print 41 Setting the Number of Copies in the Main Menu 46 Choosing a Layout 47 Confirming and Printing 47 Doing More With Your Prints 48 Adjusting Printer Settings 54 Printing ...Print Head Directly from PictureMate 78 Aligning the Print Head Directly From PictureMate 80 Checking the Print Quality Using the Computer 81 Cleaning the Print Head Using the Computer 82 Aligning the Print Head Using the Computer 84 Solving Problems 87 Control Panel Messages 87 Running a Printer Check 89 2
... Photos From the PictureMate Print Wizard 39 Viewing the PictureMate Main Menu 40 Selecting the Photos You Want to Print 41 Setting the Number of Copies in the Main Menu 46 Choosing a Layout 47 Confirming and Printing 47 Doing More With Your Prints 48 Adjusting Printer Settings 54 Printing ...Print Head Directly from PictureMate 78 Aligning the Print Head Directly From PictureMate 80 Checking the Print Quality Using the Computer 81 Cleaning the Print Head Using the Computer 82 Aligning the Print Head Using the Computer 84 Solving Problems 87 Control Panel Messages 87 Running a Printer Check 89 2
User's Guide
Page 8
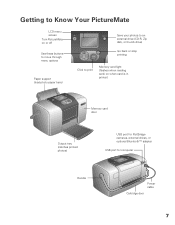
on or off Use these buttons to move through menu options Paper support (load photo paper here) Save your photos to an external drive (CD-R, Zip disk, or thumb drive) Go back or stop printing Click to Know Your PictureMate LCD menu screen Turn PictureMate on when card is in printer) Memory card door Output tray (catches printed photos) USB port for PictBridge cameras, external drives, or optional BluetoothTM adapter USB port for computer Handle Power cable Cartridge door 7 Getting to print Memory card light (flashes when reading card;
on or off Use these buttons to move through menu options Paper support (load photo paper here) Save your photos to an external drive (CD-R, Zip disk, or thumb drive) Go back or stop printing Click to Know Your PictureMate LCD menu screen Turn PictureMate on when card is in printer) Memory card door Output tray (catches printed photos) USB port for PictBridge cameras, external drives, or optional BluetoothTM adapter USB port for computer Handle Power cable Cartridge door 7 Getting to print Memory card light (flashes when reading card;

User's Guide
Page 12
...without any borders or choose Borders to print with a digital camera, select Digital Camera Correction to change the Color Option. Then click Preferences or Properties on the next screen.) You see a Setup, Printer, or Options button, click it. if it is wider than it is long, select Landscape. ■...can change a color photo to a black and white one, or No Correction to leave the photo to print with no adjustment. ■ If your photo was taken with a white border all around. ■ If your photo is longer than it is selected. 4. Make sure EPSON PictureMate is wide, select...
...without any borders or choose Borders to print with a digital camera, select Digital Camera Correction to change the Color Option. Then click Preferences or Properties on the next screen.) You see a Setup, Printer, or Options button, click it. if it is wider than it is long, select Landscape. ■...can change a color photo to a black and white one, or No Correction to leave the photo to print with no adjustment. ■ If your photo was taken with a white border all around. ■ If your photo is longer than it is selected. 4. Make sure EPSON PictureMate is wide, select...
User's Guide
Page 15
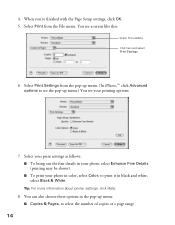
..., select Black & White. You see your photo in the pop-up menu.) You see a screen like this: Select PictureMate Click here and select Print Settings 6. You can also choose these options in color, select Color; Select Print from the pop-up menu. (In iPhoto,™ click Advanced options to see the pop-up... may be slower). ■ To print your printing options: 7. When you're finished with the Page Setup settings, click OK. 5. Tip: For more information about printer settings, click Help. 8.
..., select Black & White. You see your photo in the pop-up menu.) You see a screen like this: Select PictureMate Click here and select Print Settings 6. You can also choose these options in color, select Color; Select Print from the pop-up menu. (In iPhoto,™ click Advanced options to see the pop-up... may be slower). ■ To print your printing options: 7. When you're finished with the Page Setup settings, click OK. 5. Tip: For more information about printer settings, click Help. 8.

User's Guide
Page 21
PictureMate doesn't support these print options. You see three buttons: Note: You can use it with these options because they work only with your photo Select your printer settings here 20 But don't choose Greeting Cards, Stickers or Calendars; Click Standard Prints on the left side of the screen. ...Your Photos in Film Factory 1. When you can also select other print options on the left side of the screen. If you have another printer that supports larger paper sizes, you 're ready to print the date with larger paper sizes. You see this screen: Click to print, ...
PictureMate doesn't support these print options. You see three buttons: Note: You can use it with these options because they work only with your photo Select your printer settings here 20 But don't choose Greeting Cards, Stickers or Calendars; Click Standard Prints on the left side of the screen. ...Your Photos in Film Factory 1. When you can also select other print options on the left side of the screen. If you have another printer that supports larger paper sizes, you 're ready to print the date with larger paper sizes. You see this screen: Click to print, ...
User's Guide
Page 22
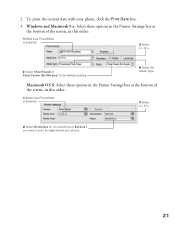
...bottom of the screen, in this order: 1 Make sure PictureMate is selected 3 Select 4 × 6 in 2 Select Sheet Feeder or Sheet Feeder (No Margins) for borderless printing 4 Select the Media Type Macintosh OS X: Select these options in the Printer Settings box at the bottom of the screen, in this... order: 1 Make sure PictureMate is selected 3 Select 4 × 6 in 2 Select Borderless for normal photos or Borders if you ...
...bottom of the screen, in this order: 1 Make sure PictureMate is selected 3 Select 4 × 6 in 2 Select Sheet Feeder or Sheet Feeder (No Margins) for borderless printing 4 Select the Media Type Macintosh OS X: Select these options in the Printer Settings box at the bottom of the screen, in this... order: 1 Make sure PictureMate is selected 3 Select 4 × 6 in 2 Select Borderless for normal photos or Borders if you ...
User's Guide
Page 30
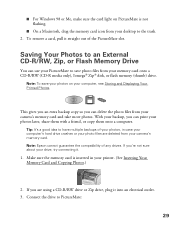
...so you 're not sure about your photo files are using a CD-R/RW drive or Zip drive, plug it . 1. Note: Epson cannot guarantee the compatibility of the PictureMate slot. Make sure the memory card is not flashing. ■ On a Macintosh, drag the memory card icon from your memory card...on your printer. (See Inserting Your Memory Card and Copying Photos.) 2. Tip: It's a good idea to have multiple backups of your photos, in your computer, see Storing and Displaying Your Printed Photos. With your backup, you are deleted from your desktop to save your photos on PictureMate is ...
...so you 're not sure about your photo files are using a CD-R/RW drive or Zip drive, plug it . 1. Note: Epson cannot guarantee the compatibility of the PictureMate slot. Make sure the memory card is not flashing. ■ On a Macintosh, drag the memory card icon from your memory card...on your printer. (See Inserting Your Memory Card and Copying Photos.) 2. Tip: It's a good idea to have multiple backups of your photos, in your computer, see Storing and Displaying Your Printed Photos. With your backup, you are deleted from your desktop to save your photos on PictureMate is ...
User's Guide
Page 35
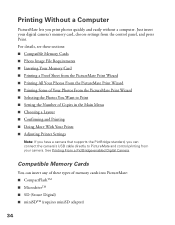
... in the Main Menu ■ Choosing a Layout ■ Confirming and Printing ■ Doing More With Your Prints ■ Adjusting Printer Settings Note: If you have a camera that supports the PictBridge standard, you print photos quickly and easily without a computer. Just insert... your camera. Printing Without a Computer PictureMate lets you can insert any of these sections: ■ Compatible Memory Cards ■ Photo Image File Requirements ■ Inserting Your Memory ...
... in the Main Menu ■ Choosing a Layout ■ Confirming and Printing ■ Doing More With Your Prints ■ Adjusting Printer Settings Note: If you have a camera that supports the PictBridge standard, you print photos quickly and easily without a computer. Just insert... your camera. Printing Without a Computer PictureMate lets you can insert any of these sections: ■ Compatible Memory Cards ■ Photo Image File Requirements ■ Inserting Your Memory ...

User's Guide
Page 55
... Printer Settings You can adjust these settings on . 54 You see this screen: 2. Note: This setting remains in effect for 3 seconds. Press and hold Cancel for 3 seconds or turn it off . Press OK to the original, default settings. Note: PictureMate ...PictureMate off and back on your PictureMate: ■ Resetting PictureMate Print Settings ■ Turning the PictureMate Print Wizard Off or On ■ Turning Print Confirmation Off or On ■ Adjusting the LCD Screen Contrast Resetting PictureMate Print Settings You can reset the PictureMate print settings (such as layout, color...
... Printer Settings You can adjust these settings on . 54 You see this screen: 2. Note: This setting remains in effect for 3 seconds. Press and hold Cancel for 3 seconds or turn it off . Press OK to the original, default settings. Note: PictureMate ...PictureMate off and back on your PictureMate: ■ Resetting PictureMate Print Settings ■ Turning the PictureMate Print Wizard Off or On ■ Turning Print Confirmation Off or On ■ Adjusting the LCD Screen Contrast Resetting PictureMate Print Settings You can reset the PictureMate print settings (such as layout, color...

User's Guide
Page 58
... card slots. Printing From a PictBridge-enabled Digital Camera You can connect your PictBridge-enabled digital camera to the back of PictureMate and use the camera to control printing. (See your camera's documentation to see this message, press OK to highlight Maintenance, then press OK. 3. ...Note: If a memory card is inserted, the printer will read photos from the card, not from a camera. 57 When you see if it supports the PictBridge standard.) 1. 2. Press or to adjust the ...
... card slots. Printing From a PictBridge-enabled Digital Camera You can connect your PictBridge-enabled digital camera to the back of PictureMate and use the camera to control printing. (See your camera's documentation to see this message, press OK to highlight Maintenance, then press OK. 3. ...Note: If a memory card is inserted, the printer will read photos from the card, not from a camera. 57 When you see if it supports the PictBridge standard.) 1. 2. Press or to adjust the ...

User's Guide
Page 59
... can also print photos from a CD with pictures that you get from an external drive. The card light should be in PictureMate's memory card slots. If PictureMate is inserted, the printer will read photos from the card, not from a photo processing lab. (Photos must be off . 58 Printing From an... External CD, Zip Disk, or Flash Memory Drive If you saved your camera's USB cable to the back of PictureMate. 3. Remove the memory ...
... can also print photos from a CD with pictures that you get from an external drive. The card light should be in PictureMate's memory card slots. If PictureMate is inserted, the printer will read photos from the card, not from a photo processing lab. (Photos must be off . 58 Printing From an... External CD, Zip Disk, or Flash Memory Drive If you saved your camera's USB cable to the back of PictureMate. 3. Remove the memory ...
User's Guide
Page 62
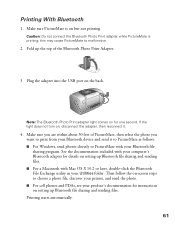
...light does not turn on, disconnect the adapter, then reconnect it to PictureMate as follows: ■ For Windows, send photos directly to malfunction. 2. Then follow the on-screen steps to choose a photo file, discover your printer, and send the photo. ■ For cell phones and PDAs, see...'s Bluetooth adapter for one second. Caution: Do not connect the Bluetooth Photo Print adapter while PictureMate is on the back. Printing starts automatically. 61 this may cause PictureMate to PictureMate with your Utilities folder. Plug the adapter into the USB port on but not printing. See...
...light does not turn on, disconnect the adapter, then reconnect it to PictureMate as follows: ■ For Windows, send photos directly to malfunction. 2. Then follow the on-screen steps to choose a photo file, discover your printer, and send the photo. ■ For cell phones and PDAs, see...'s Bluetooth adapter for one second. Caution: Do not connect the Bluetooth Photo Print adapter while PictureMate is on the back. Printing starts automatically. 61 this may cause PictureMate to PictureMate with your Utilities folder. Plug the adapter into the USB port on but not printing. See...

User's Guide
Page 64
...) (Default = 0) Discoverable Not discoverable Pairing (Bonding) On/Off (Default = Off) Description If multiple Bluetooth-enabled printers are in this mode, first search for PictureMate once in the Bluetooth option menus listed below. Option BT Device Name BT Comm. This mode allows Bluetooth-enabled devices to encrypt communication. This mode ...
...) (Default = 0) Discoverable Not discoverable Pairing (Bonding) On/Off (Default = Off) Description If multiple Bluetooth-enabled printers are in this mode, first search for PictureMate once in the Bluetooth option menus listed below. Option BT Device Name BT Comm. This mode allows Bluetooth-enabled devices to encrypt communication. This mode ...

User's Guide
Page 68
A screen displays the remaining amount of ink remaining in one of the following ways. ■ Double-click the printer icon on your Windows taskbar. ■ Open the printer software (see Printing From a Windows Computer for Windows You can check the amount of ink. 67 PictureMate Status Monitor for instructions), click the Maintenance tab, then click the EPSON Status Monitor 3 button. Open EPSON Status Monitor 3 in the photo cartridge using EPSON Status Monitor 3 or the progress meter.
A screen displays the remaining amount of ink remaining in one of the following ways. ■ Double-click the printer icon on your Windows taskbar. ■ Open the printer software (see Printing From a Windows Computer for Windows You can check the amount of ink. 67 PictureMate Status Monitor for instructions), click the Maintenance tab, then click the EPSON Status Monitor 3 button. Open EPSON Status Monitor 3 in the photo cartridge using EPSON Status Monitor 3 or the progress meter.

User's Guide
Page 69
PictureMate Status Monitor for Macintosh OS X 1. Select PictureMate, then click OK. You can check the remaining amount of ink from this dialog box. The Printer List window appears. 2. Double-click Macintosh HD (the default hard disk name), double-click the Applications folder, then double-click the EPSON Printer Utility icon. The EPSON Printer Utility dialog box appears. 68 The progress meter dialog box appears automatically when you send a print job to the printer.
PictureMate Status Monitor for Macintosh OS X 1. Select PictureMate, then click OK. You can check the remaining amount of ink from this dialog box. The Printer List window appears. 2. Double-click Macintosh HD (the default hard disk name), double-click the Applications folder, then double-click the EPSON Printer Utility icon. The EPSON Printer Utility dialog box appears. 68 The progress meter dialog box appears automatically when you send a print job to the printer.
User's Guide
Page 70
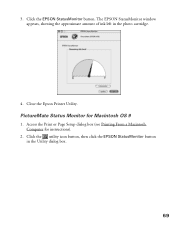
PictureMate Status Monitor for instructions). 2. Access the Print or Page Setup dialog box (see Printing From a Macintosh Computer for Macintosh OS 9 1. Close the Epson Printer Utility. Click the utility icon button, then click the EPSON StatusMonitor button in the photo cartridge. 4. Click the EPSON StatusMonitor button. The EPSON StatusMonitor window appears, showing the approximate amount of ink left in the Utility dialog box. 69 3.
PictureMate Status Monitor for instructions). 2. Access the Print or Page Setup dialog box (see Printing From a Macintosh Computer for Macintosh OS 9 1. Close the Epson Printer Utility. Click the utility icon button, then click the EPSON StatusMonitor button in the photo cartridge. 4. Click the EPSON StatusMonitor button. The EPSON StatusMonitor window appears, showing the approximate amount of ink left in the Utility dialog box. 69 3.
User's Guide
Page 71
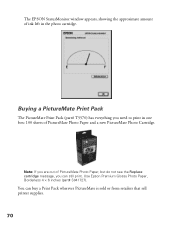
... box: 100 sheets of ink left in the photo cartridge. The EPSON StatusMonitor window appears, showing the approximate amount of PictureMate Photo Paper and a new PictureMate Photo Cartridge. Buying a PictureMate Print Pack The PictureMate Print Pack (part# T5570) has everything you can buy a Print Pack wherever PictureMate is sold or from retailers that sell printer supplies. 70
... box: 100 sheets of ink left in the photo cartridge. The EPSON StatusMonitor window appears, showing the approximate amount of PictureMate Photo Paper and a new PictureMate Photo Cartridge. Buying a PictureMate Print Pack The PictureMate Print Pack (part# T5570) has everything you can buy a Print Pack wherever PictureMate is sold or from retailers that sell printer supplies. 70

User's Guide
Page 82
...appears. Windows: Right-click the printer icon on your taskbar (in the lower right corner of your computer and turned on but not printing. 2. 5. Press or to highlight the number for the best pattern in set #2 (1 to exit the alignment screen. Make sure PictureMate is loaded (see Loading Paper...8. When the pattern prints, look at the print and see the next message. 6. Checking the Print Quality Using the Computer You can check PictureMate's print quality from your computer and clean the print head, if necessary. 1. Make sure a sheet of straightest line pattern 7. Press or ...
...appears. Windows: Right-click the printer icon on your taskbar (in the lower right corner of your computer and turned on but not printing. 2. 5. Press or to highlight the number for the best pattern in set #2 (1 to exit the alignment screen. Make sure PictureMate is loaded (see Loading Paper...8. When the pattern prints, look at the print and see the next message. 6. Checking the Print Quality Using the Computer You can check PictureMate's print quality from your computer and clean the print head, if necessary. 1. Make sure a sheet of straightest line pattern 7. Press or ...

User's Guide
Page 83
... Open the Applications folder and select EPSON Printer Utility. Macintosh OS 9: Open the File menu and choose Page Setup or Print. Click the utility button, then click the Nozzle Check button. 4. Select PictureMate in the lower right corner of your taskbar (in the printer list, click OK, and select... Head Cleaning. Each staggered line should be clogged. Cleaning the Print Head Using the Computer If your PictureMate's print head nozzles may be solid,...
... Open the Applications folder and select EPSON Printer Utility. Macintosh OS 9: Open the File menu and choose Page Setup or Print. Click the utility button, then click the Nozzle Check button. 4. Select PictureMate in the lower right corner of your taskbar (in the printer list, click OK, and select... Head Cleaning. Each staggered line should be clogged. Cleaning the Print Head Using the Computer If your PictureMate's print head nozzles may be solid,...

User's Guide
Page 99
... you are using Windows XP or 2000, go to uninstall and then reinstall your PictureMate software on -screen instructions. 5. This may need to reboot, click No. 7. Then follow the on your EPSON PictureMate printer icon is selected and click OK. Click PictureMate Printer Software in these sections: ■ Uninstalling From a Windows Computer ■ Uninstalling From a Macintosh...
... you are using Windows XP or 2000, go to uninstall and then reinstall your PictureMate software on -screen instructions. 5. This may need to reboot, click No. 7. Then follow the on your EPSON PictureMate printer icon is selected and click OK. Click PictureMate Printer Software in these sections: ■ Uninstalling From a Windows Computer ■ Uninstalling From a Macintosh...


