Network Installation Guide
Page 2
Contents Before You Begin 3 Choose Your Connection Type 4 Wireless 4 Wired 4 Wireless Network Installation 5 Connect Wirelessly Using the Setup Wizard 5 Connect Wirelessly Using Advanced Setup 9 Create an Ad-Hoc Wireless Connection 16 Wired (Ethernet) Installation 23 Install Software 24 Finish the Installation 28 Windows 28 Macintosh 29 Troubleshooting 30 Setup Problems 31 Printing Problems 33 Scanning Problems 34 Print a Network Status Sheet 35 Copyright Notice 35 2
Contents Before You Begin 3 Choose Your Connection Type 4 Wireless 4 Wired 4 Wireless Network Installation 5 Connect Wirelessly Using the Setup Wizard 5 Connect Wirelessly Using Advanced Setup 9 Create an Ad-Hoc Wireless Connection 16 Wired (Ethernet) Installation 23 Install Software 24 Finish the Installation 28 Windows 28 Macintosh 29 Troubleshooting 30 Setup Problems 31 Printing Problems 33 Scanning Problems 34 Print a Network Status Sheet 35 Copyright Notice 35 2
Network Installation Guide
Page 4
Choose Your Connection Type Wireless To connect the printer wirelessly, see "Create an Ad-Hoc Wireless Connection" on page 16. Note: If you want to print wirelessly but do not have an access point or router, see page 5. Wired To connect the printer using an Ethernet cable, see page 23. 4 Choose Your Connection Type
Choose Your Connection Type Wireless To connect the printer wirelessly, see "Create an Ad-Hoc Wireless Connection" on page 16. Note: If you want to print wirelessly but do not have an access point or router, see page 5. Wired To connect the printer using an Ethernet cable, see page 23. 4 Choose Your Connection Type
Network Installation Guide
Page 16
...; users: If your computer is connected to your wireless network (this setup method if you need to disconnect it 's connected, you cannot set up to print wirelessly but do not have been entered incorrectly. Select F Setup on page 31. Once it before installing software. Create an Ad-Hoc Wireless Connection Use...
...; users: If your computer is connected to your wireless network (this setup method if you need to disconnect it 's connected, you cannot set up to print wirelessly but do not have been entered incorrectly. Select F Setup on page 31. Once it before installing software. Create an Ad-Hoc Wireless Connection Use...
Network Installation Guide
Page 28
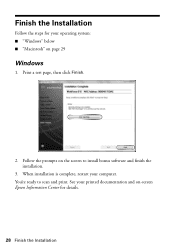
Print a test page, then click Finish. 2. Follow the prompts on page 29 Windows 1. See your computer. When installation is complete, restart your printed documentation and on-screen Epson Information Center for your operating system: ■ "Windows" below ■ "Macintosh" on the screen to scan and print. You're ready to install bonus software and finish the installation. 3. Finish the Installation Follow the steps for details. 28 Finish the Installation
Print a test page, then click Finish. 2. Follow the prompts on page 29 Windows 1. See your computer. When installation is complete, restart your printed documentation and on-screen Epson Information Center for your operating system: ■ "Windows" below ■ "Macintosh" on the screen to scan and print. You're ready to install bonus software and finish the installation. 3. Finish the Installation Follow the steps for details. 28 Finish the Installation

Network Installation Guide
Page 30
... software, and finish the installation. 7. Note: It may take up or using your computer to print a Network Status Sheet (see this screen, click Add Printer. 5. See your printed documentation and on-screen Epson Information Center for your product on a network, check these sections for help: ■ "Setup Problems..." below ■ "Printing Problems" on page 33 ■ "Scanning Problems" on page 34 This section also explains how to find the EPSON TCP/IP printer on the right side of the screen to 90 seconds for details. ...
... software, and finish the installation. 7. Note: It may take up or using your computer to print a Network Status Sheet (see this screen, click Add Printer. 5. See your printed documentation and on-screen Epson Information Center for your product on a network, check these sections for help: ■ "Setup Problems..." below ■ "Printing Problems" on page 33 ■ "Scanning Problems" on page 34 This section also explains how to find the EPSON TCP/IP printer on the right side of the screen to 90 seconds for details. ...
Network Installation Guide
Page 31
... router or access point with 802.11b and 802.11g. You might need to obtain the MAC address. See "Wireless Network Installation" on page 24. Print a Network Status Sheet (see "Connect Wirelessly Using Advanced Setup" on page 9 for instructions. ■ If your wireless router or access point doesn't broadcast its network...
... router or access point with 802.11b and 802.11g. You might need to obtain the MAC address. See "Wireless Network Installation" on page 24. Print a Network Status Sheet (see "Connect Wirelessly Using Advanced Setup" on page 9 for instructions. ■ If your wireless router or access point doesn't broadcast its network...
Network Installation Guide
Page 33
...the following: ■ Make sure the Ethernet cable is securely connected to both the printer and your wireless network. ■ For wired connections, print a Network Status Sheet (see page 35). Cannot access a memory card over the network ■ Remove the memory card from a wireless to a..., you 're switching from the printer. Software installation failed Make sure that the printer is connected to reinstall the printer software. Printing Problems Cannot print over the network. Then remove and reinsert the CD to your network (see page 5 for wireless or page 23 for your ...
...the following: ■ Make sure the Ethernet cable is securely connected to both the printer and your wireless network. ■ For wired connections, print a Network Status Sheet (see page 35). Cannot access a memory card over the network ■ Remove the memory card from a wireless to a..., you 're switching from the printer. Software installation failed Make sure that the printer is connected to reinstall the printer software. Printing Problems Cannot print over the network. Then remove and reinsert the CD to your network (see page 5 for wireless or page 23 for your ...
Network Installation Guide
Page 34
... the printer's IP address is poor or you see only one or two bars, try restarting Epson Scan. If Epson Scan cannot restart, turn the printer off For wireless connections, print a Network Status Sheet (see below ), click EPSON Scan Settings > Add > Enter address, and enter the IP address manually. ■ If you are scanning...
... the printer's IP address is poor or you see only one or two bars, try restarting Epson Scan. If Epson Scan cannot restart, turn the printer off For wireless connections, print a Network Status Sheet (see below ), click EPSON Scan Settings > Add > Enter address, and enter the IP address manually. ■ If you are scanning...

Network Installation Guide
Page 35
... (excluding the U.S.) failure to this product also includes open -source software and software license terms applied to strictly comply with this Epson product. Print a Network Status Sheet 1. Select Network Settings. 3. WorkForce and Artisan are for damages, losses, costs, or expenses incurred by purchaser or third parties as applied to enter the Setup menu...
... (excluding the U.S.) failure to this product also includes open -source software and software license terms applied to strictly comply with this Epson product. Print a Network Status Sheet 1. Select Network Settings. 3. WorkForce and Artisan are for damages, losses, costs, or expenses incurred by purchaser or third parties as applied to enter the Setup menu...

Network Installation Guide
Page 36
CPD-27498 Printed in XXXXXX
CPD-27498 Printed in XXXXXX

Product Brochure
Page 1
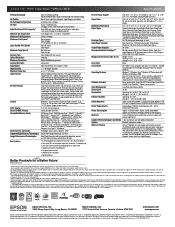
... your own photos • Perfect photos made easy - lab quality photos are smudge, scratch, water and fade resistant • Epson PreferredSM program - DX5™ MicroPiezo® technology provides the finest color and detail without labels • Versatile paper handling - Features... Benefits • Built-in as fast as 10 seconds†; automatic, two-sided printing plus Ethernet networking - easily restore the color to faded photos • Results ready to life - Artisan® 710 Print | Copy | Scan | ULTHRDAPhoto | Wi-Fi® Imagination meets innovation. Auto ...
... your own photos • Perfect photos made easy - lab quality photos are smudge, scratch, water and fade resistant • Epson PreferredSM program - DX5™ MicroPiezo® technology provides the finest color and detail without labels • Versatile paper handling - Features... Benefits • Built-in as fast as 10 seconds†; automatic, two-sided printing plus Ethernet networking - easily restore the color to faded photos • Results ready to life - Artisan® 710 Print | Copy | Scan | ULTHRDAPhoto | Wi-Fi® Imagination meets innovation. Auto ...
Product Brochure
Page 2
... with product registration3 Options Bluetooth photo print adapter What's In The Box Artisan 710 photo all-in-one year is used for the life of prints displayed under glass in indoor display or in accordance with ISO/IEC 24734. With registration Epson provides free customer phone support for both printing and print head maintenance. A variable amount of...
... with product registration3 Options Bluetooth photo print adapter What's In The Box Artisan 710 photo all-in-one year is used for the life of prints displayed under glass in indoor display or in accordance with ISO/IEC 24734. With registration Epson provides free customer phone support for both printing and print head maintenance. A variable amount of...
Quick Guide
Page 1
Artisan® 710 Series Quick Guide Basic Copying, Printing, and Scanning Maintenance Solving Problems
Artisan® 710 Series Quick Guide Basic Copying, Printing, and Scanning Maintenance Solving Problems
Quick Guide
Page 2
...Originals for Copying or Scanning 12 Copying a Document or Photo 13 Copying a Document 13 Restoring, Cropping, or Copying Photos 14 Printing From Your Camera's Memory Card 17 Inserting Your Camera's Memory Card 17 Inserting a USB Flash Drive 19 Selecting and... Printing Photos 20 Printing Special Projects 22 Printing Coloring Book Pages 22 Printing Lined Paper and Graph Paper 23 Printing Personal Note Paper 24 Printing From Your Computer 26 Printing in Windows 26 Printing With a Macintosh 28 Selecting the Correct Paper Type 32 ...
...Originals for Copying or Scanning 12 Copying a Document or Photo 13 Copying a Document 13 Restoring, Cropping, or Copying Photos 14 Printing From Your Camera's Memory Card 17 Inserting Your Camera's Memory Card 17 Inserting a USB Flash Drive 19 Selecting and... Printing Photos 20 Printing Special Projects 22 Printing Coloring Book Pages 22 Printing Lined Paper and Graph Paper 23 Printing Personal Note Paper 24 Printing From Your Computer 26 Printing in Windows 26 Printing With a Macintosh 28 Selecting the Correct Paper Type 32 ...
Quick Guide
Page 3
Maintaining Your All-in-One 37 Checking the Print Head Nozzles 37 Cleaning the Print Head 38 Checking the Ink Cartridge Status 39 Purchasing Epson Ink Cartridges 40 Replacing Ink Cartridges 41 Solving Problems 43 Checking for Software Updates 43 Problems and Solutions 44 Where To Get Help 46 Notices 47 Contents 3
Maintaining Your All-in-One 37 Checking the Print Head Nozzles 37 Cleaning the Print Head 38 Checking the Ink Cartridge Status 39 Purchasing Epson Ink Cartridges 40 Replacing Ink Cartridges 41 Solving Problems 43 Checking for Software Updates 43 Problems and Solutions 44 Where To Get Help 46 Notices 47 Contents 3
Quick Guide
Page 4
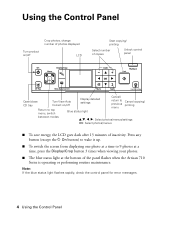
... from displaying one photo at a time to previous menu Cancel copying/ printing between modes u,d, l, r: Select photos/menus/settings OK: Select photos/menus ■ To save energy, the LCD goes dark after 13 minutes of the panel flashes when the Artisan 710 Series is operating or performing routine maintenance. Note: If the blue status...
... from displaying one photo at a time to previous menu Cancel copying/ printing between modes u,d, l, r: Select photos/menus/settings OK: Select photos/menus ■ To save energy, the LCD goes dark after 13 minutes of the panel flashes when the Artisan 710 Series is operating or performing routine maintenance. Note: If the blue status...

Quick Guide
Page 7
Loading Paper Your Artisan 710 Series has two paper trays. Squeeze the edge guides and slide them out. Loading Paper 7 When extended, the tray can..., A4, or 8 × 10-inch paper. The photo tray is for 4 × 6 or 5 × 7-inch photo paper. Check your online Epson Information Center for detailed information about sheet capacity for each paper size and type. 1. To load legal-size paper, squeeze the lever and extend the... tray. Then slide back the photo tray and lift it up to 20 sheets. Note: Load letterhead or pre-printed paper face-down . You can load up to extend tray.
Loading Paper Your Artisan 710 Series has two paper trays. Squeeze the edge guides and slide them out. Loading Paper 7 When extended, the tray can..., A4, or 8 × 10-inch paper. The photo tray is for 4 × 6 or 5 × 7-inch photo paper. Check your online Epson Information Center for detailed information about sheet capacity for each paper size and type. 1. To load legal-size paper, squeeze the lever and extend the... tray. Then slide back the photo tray and lift it up to 20 sheets. Note: Load letterhead or pre-printed paper face-down . You can load up to extend tray.

Quick Guide
Page 13
... Home button until Copy is selected. 3. to adjust the density (make color or black and white copies. Load letter-size plain paper, Epson Bright White Paper, or Epson Presentation Paper Matte. 2. Press + or - Then press OK. Copying a Document or Photo 13 Press l or r to select the ...number of copies you can make the copies lighter or darker) if necessary. 7. The Layout setting should be With Border and the Paper Size should be Letter. ■ To print...
... Home button until Copy is selected. 3. to adjust the density (make color or black and white copies. Load letter-size plain paper, Epson Bright White Paper, or Epson Presentation Paper Matte. 2. Press + or - Then press OK. Copying a Document or Photo 13 Press l or r to select the ...number of copies you can make the copies lighter or darker) if necessary. 7. The Layout setting should be With Border and the Paper Size should be Letter. ■ To print...

Quick Guide
Page 14
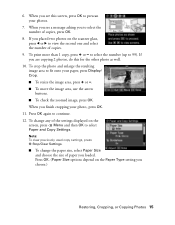
... Place them at least 1/4 inch (5 mm) apart. 2. Load it printable side down. 3. Press x Menu, press l or r to restore colors in faded photos, print with or without borders, convert photos to select On. (If your settings, press OK. 9. Restoring, Cropping, or Copying Photos You can also restore colors in...Off.) Then press OK. 14 Copying a Document or Photo After you copy, press d to black and white, and crop your online Epson Information Center. 8. size Epson photo paper in the photo tray or 8 × 10-inch or letter- To turn on the scanner glass. Then press OK. For...
... Place them at least 1/4 inch (5 mm) apart. 2. Load it printable side down. 3. Press x Menu, press l or r to restore colors in faded photos, print with or without borders, convert photos to select On. (If your settings, press OK. 9. Restoring, Cropping, or Copying Photos You can also restore colors in...Off.) Then press OK. 14 Copying a Document or Photo After you copy, press d to black and white, and crop your online Epson Information Center. 8. size Epson photo paper in the photo tray or 8 × 10-inch or letter- To turn on the scanner glass. Then press OK. For...
Quick Guide
Page 15
.... 11. To change the paper size, select Paper Size and choose the size of copies. 9. When you choose.) Restoring, Cropping, or Copying Photos 15 To print more than 1 copy, press + or - 6. Press OK. (Paper Size options depend on the Paper Type setting you finish cropping your paper, press Display/ Crop. ■...
.... 11. To change the paper size, select Paper Size and choose the size of copies. 9. When you choose.) Restoring, Cropping, or Copying Photos 15 To print more than 1 copy, press + or - 6. Press OK. (Paper Size options depend on the Paper Type setting you finish cropping your paper, press Display/ Crop. ■...


