
User Manual - Hi-Capacity Cut Sheet Feeder
Page 2
... written permission of this publication may be reproduced, stored in a retrival system, or transmitted in the preparation of Seiko Epson Corporation. Neither is a registered trademark of the information contained herein. While every precaution has been taken in any liability assumed for... errors or omissions. EPSON is any form or by Seiko Epson Corporation Nagano, Japan No part of this book, Seiko Epson Corporation assumes no responsibility for damages resulting from the use of Seiko Epson Corporation. All rights reserved.
... written permission of this publication may be reproduced, stored in a retrival system, or transmitted in the preparation of Seiko Epson Corporation. Neither is a registered trademark of the information contained herein. While every precaution has been taken in any liability assumed for... errors or omissions. EPSON is any form or by Seiko Epson Corporation Nagano, Japan No part of this book, Seiko Epson Corporation assumes no responsibility for damages resulting from the use of Seiko Epson Corporation. All rights reserved.
User Manual
Page 2
..., photocopying, recording, or otherwise, without the prior written permission of their respective companies. Copyright © 1991 by Seiko Epson Corporation. No patent liability is any liability assumed for damages, losses, costs, or expenses incurred by purchaser or third parties...options or any consumable products other than those designated as Original Epson Products or Epson Approved Products by Epson America, Inc., Torrance, California. No part of this publication may be trademarks of Seiko Epson Corporation. General Notice: Other product names used herein are registered...
..., photocopying, recording, or otherwise, without the prior written permission of their respective companies. Copyright © 1991 by Seiko Epson Corporation. No patent liability is any liability assumed for damages, losses, costs, or expenses incurred by purchaser or third parties...options or any consumable products other than those designated as Original Epson Products or Epson Approved Products by Epson America, Inc., Torrance, California. No part of this publication may be trademarks of Seiko Epson Corporation. General Notice: Other product names used herein are registered...
User Manual
Page 3
... the equipment into an outlet on , the user is the responsibility of the following measures. WARNING The connection of a non-shielded equipment interface cable to Part 15 of Communications. For Canadian Users This digital apparatus does not exceed the Class B limits for radio noise emissions from that interference will invalidate the...
... the equipment into an outlet on , the user is the responsibility of the following measures. WARNING The connection of a non-shielded equipment interface cable to Part 15 of Communications. For Canadian Users This digital apparatus does not exceed the Class B limits for radio noise emissions from that interference will invalidate the...
User Manual
Page 7
... that could result in the User's Manual, do not attempt to dangerous voltage points or other controls may touch dangerous voltage points or short out parts that the total of other risks. C. If the product does not operate normally when the operating instructions are marked "Do Not Remove" may expose you...
... that could result in the User's Manual, do not attempt to dangerous voltage points or other controls may touch dangerous voltage points or short out parts that the total of other risks. C. If the product does not operate normally when the operating instructions are marked "Do Not Remove" may expose you...
User Manual
Page 8
Contents Introduction 1 Features 1 Options 2 Finding Your Way Around 3 Warnings, Cautions, and Notes 3 Printer Parts 4 Chapter 1 Setting Up the Printer 1-1 Unpacking the Printer 1-2 Choosing a Place for the Printer 1-3 Assembling the Printer 1-5 Testing the Printer 1-10 Connecting the Printer to Your Computer 1-13 Configuring Your Software for the Printer 1-14 Chapter 2 Paper Handling 2-1 Selecting a Paper Feeding Method 2-2 Using Single Sheets 2-4 Using Continuous...
Contents Introduction 1 Features 1 Options 2 Finding Your Way Around 3 Warnings, Cautions, and Notes 3 Printer Parts 4 Chapter 1 Setting Up the Printer 1-1 Unpacking the Printer 1-2 Choosing a Place for the Printer 1-3 Assembling the Printer 1-5 Testing the Printer 1-10 Connecting the Printer to Your Computer 1-13 Configuring Your Software for the Printer 1-14 Chapter 2 Paper Handling 2-1 Selecting a Paper Feeding Method 2-2 Using Single Sheets 2-4 Using Continuous...
User Manual
Page 11
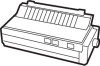
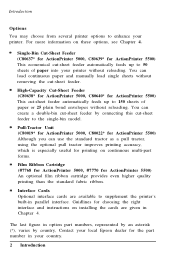
... on continuous multi-part forms. Film Ribbon Cartridge (#7768 for ActionPrinter 5000, #7770 for ActionPrinter 5500) This cut-sheet feeder automatically feeds up to 150 sheets of paper into your printer without removing the ...ActionPrinter 5000, C80022* for ActionPrinter 5500) Although you can use the standard tractor as a pull tractor, using the optional pull tractor improves printing accuracy, which is especially useful for the part number in option part numbers, represented by an asterisk (*), varies by connecting this cut -sheet feeder by country, Contact your local Epson...
... on continuous multi-part forms. Film Ribbon Cartridge (#7768 for ActionPrinter 5000, #7770 for ActionPrinter 5500) This cut-sheet feeder automatically feeds up to 150 sheets of paper into your printer without removing the ...ActionPrinter 5000, C80022* for ActionPrinter 5500) Although you can use the standard tractor as a pull tractor, using the optional pull tractor improves printing accuracy, which is especially useful for the part number in option part numbers, represented by an asterisk (*), varies by connecting this cut -sheet feeder by country, Contact your local Epson...

User Manual
Page 14
Chapter 1 Setting Up the Printer Unpacking the Printer 1-2 Checking the parts 1-2 Choosing a Place for the Printer 1-3 Assembling the Printer 1-5 Removing the protective materials 1-5 Installing the ribbon cartridge 1-6 Attaching the paper guide 1-9 Testing the Printer 1-10 Plugging in the printer 1-10 Running the self test 1-10 Connecting the Printer to Your Computer 1-13 Configuring Your Software for the Printer 1-14 Choosing from a menu 1-14 Setting Up the Printer 1-1
Chapter 1 Setting Up the Printer Unpacking the Printer 1-2 Checking the parts 1-2 Choosing a Place for the Printer 1-3 Assembling the Printer 1-5 Removing the protective materials 1-5 Installing the ribbon cartridge 1-6 Attaching the paper guide 1-9 Testing the Printer 1-10 Plugging in the printer 1-10 Running the self test 1-10 Connecting the Printer to Your Computer 1-13 Configuring Your Software for the Printer 1-14 Choosing from a menu 1-14 Setting Up the Printer 1-1
User Manual
Page 15
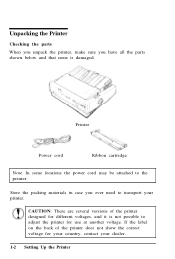
...damaged. Store the packing materials in case you have all the parts shown below and that none is not possible to adjust the printer for your country, contact your printer. CAUTION: There are several versions of the printer does not show the correct voltage for use at another voltage. ...Unpacking the Printer Checking the parts When you unpack the printer, make sure you ever need to transport...
...damaged. Store the packing materials in case you have all the parts shown below and that none is not possible to adjust the printer for your country, contact your printer. CAUTION: There are several versions of the printer does not show the correct voltage for use at another voltage. ...Unpacking the Printer Checking the parts When you unpack the printer, make sure you ever need to transport...
User Manual
Page 25
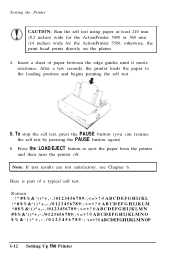
...part of paper between the edge guides until it meets resistance. otherwise, the print head prints directly on the platen. 4. Insert a sheet of a typical self test. After a few seconds, the printer loads the paper to eject the paper from the printer and then turn the printer...and begins printing the self test. 5. Testing the Printer CAUTION: Run the self test using paper at least 210 mm (8.2 inches) wide for the ActionPrinter 5000 or 360 mm (14 inches) wide for the ActionPrinter 5500; Roman 0123456789:;?@ABCDEFGHIJKL 0123456789:;?@ABCDEFGHIJKLM 0123456789:;?@ABCDEFGHIJKLMN ...
...part of paper between the edge guides until it meets resistance. otherwise, the print head prints directly on the platen. 4. Insert a sheet of a typical self test. After a few seconds, the printer loads the paper to eject the paper from the printer and then turn the printer...and begins printing the self test. 5. Testing the Printer CAUTION: Run the self test using paper at least 210 mm (8.2 inches) wide for the ActionPrinter 5000 or 360 mm (14 inches) wide for the ActionPrinter 5500; Roman 0123456789:;?@ABCDEFGHIJKL 0123456789:;?@ABCDEFGHIJKLM 0123456789:;?@ABCDEFGHIJKLMN ...

User Manual
Page 28
... Paper and Single Sheets . . . 2-21 Switching to single sheets 2-21 Switching to continuous paper 2-22 Printing on Special Paper 2-23 Paper-thickness lever 2-23 Multi-part forms 2-24 Labels 2-25 Envelopes 2-26 Paper Handling 2-1
... Paper and Single Sheets . . . 2-21 Switching to single sheets 2-21 Switching to continuous paper 2-22 Printing on Special Paper 2-23 Paper-thickness lever 2-23 Multi-part forms 2-24 Labels 2-25 Envelopes 2-26 Paper Handling 2-1
User Manual
Page 50
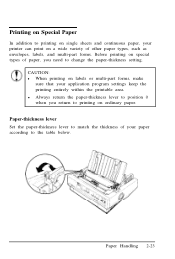
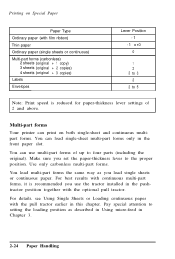
Paper-thickness lever Set the paper-thickness lever to match the thickness of your printer can print on a wide variety of other paper types, such as envelopes, labels, and multi-part forms. Before printing on special types of paper, you return to printing on ordinary paper. Printing on Special Paper In addition to... the paper-thickness lever to position 0 when you need to change the paper-thickness setting. Paper Handling 2-23 CAUTION: l When printing on labels or multi-part forms, make sure that your application program settings keep the printing entirely within the printable area.
Paper-thickness lever Set the paper-thickness lever to match the thickness of your printer can print on a wide variety of other paper types, such as envelopes, labels, and multi-part forms. Before printing on special types of paper, you return to printing on ordinary paper. Printing on Special Paper In addition to... the paper-thickness lever to position 0 when you need to change the paper-thickness setting. Paper Handling 2-23 CAUTION: l When printing on labels or multi-part forms, make sure that your application program settings keep the printing entirely within the printable area.
User Manual
Page 51
... micro-feed in this chapter. Make sure you load single sheets or continuous paper. Pay special attention to the proper position. Multi-part forms Your printer can print on Special Paper Paper Type Ordinary paper (with the pull tractor earlier in Chapter 3. 2-24 Paper Handling Printing on both... single-sheet and continuous multipart forms. You can load single-sheet multi-part forms only in the front paper slot. You can use the...
... micro-feed in this chapter. Make sure you load single sheets or continuous paper. Pay special attention to the proper position. Multi-part forms Your printer can print on Special Paper Paper Type Ordinary paper (with the pull tractor earlier in Chapter 3. 2-24 Paper Handling Printing on both... single-sheet and continuous multipart forms. You can load single-sheet multi-part forms only in the front paper slot. You can use the...
User Manual
Page 52
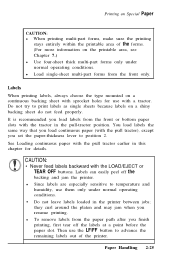
... holes for details. See Loading continuous paper with the pull tractor), except you load continuous paper (with the pull tractor earlier in the printer between jobs; l To remove labels from the front only. l Since labels are especially sensitive to advance the remaining labels out of the.../EJECT or TEAR OFF buttons. Printing on Special Paper CAUTION: l When printing multi-part forms, make sure the printing stays entirely within the printable area of the printer. l Load single-sheet multi-part forms from the paper path after you resume printing. Do not try to position 2....
... holes for details. See Loading continuous paper with the pull tractor), except you load continuous paper (with the pull tractor earlier in the printer between jobs; l To remove labels from the front only. l Since labels are especially sensitive to advance the remaining labels out of the.../EJECT or TEAR OFF buttons. Printing on Special Paper CAUTION: l When printing multi-part forms, make sure the printing stays entirely within the printable area of the printer. l Load single-sheet multi-part forms from the paper path after you resume printing. Do not try to position 2....
User Manual
Page 55
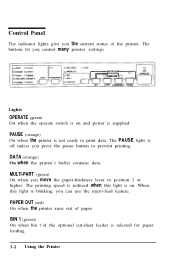
... operate switch is on . The PAUSE light is selected for paper feeding. 3-2 Using the Printer PAPER OUT (red) On when the printer runs out of paper BIN 1 (green) On when bin 1 of the printer. MULTI-PART (green) On when you can use the micro-feed feature. When this light is blinking,... you move the paper-thickness lever to prevent printing. DATA (orange) On when the printer's buffer contains data. Control Panel The indicator lights give ...
... operate switch is on . The PAUSE light is selected for paper feeding. 3-2 Using the Printer PAPER OUT (red) On when the printer runs out of paper BIN 1 (green) On when bin 1 of the printer. MULTI-PART (green) On when you can use the micro-feed feature. When this light is blinking,... you move the paper-thickness lever to prevent printing. DATA (orange) On when the printer's buffer contains data. Control Panel The indicator lights give ...
User Manual
Page 67
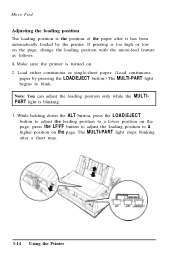
... can adjust the loading position only while the MULTIPART light is turned on. 2. The MULTI-PART light stops blinking after it has been automatically loaded by pressing the LOAD/EJECT button.) The MULTI-PART light begins to blink. If printing is the position of the paper after a short time.... 3-14 Using the Printer Load either continuous or single-sheet paper. (Load continuous paper by the printer. Micro Feed Adjusting the loading position The loading...
... can adjust the loading position only while the MULTIPART light is turned on. 2. The MULTI-PART light stops blinking after it has been automatically loaded by pressing the LOAD/EJECT button.) The MULTI-PART light begins to blink. If printing is the position of the paper after a short time.... 3-14 Using the Printer Load either continuous or single-sheet paper. (Load continuous paper by the printer. Micro Feed Adjusting the loading position The loading...
User Manual
Page 81
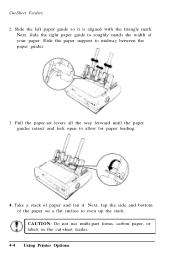
... retract and lock open to roughly match the width of paper and fan it is aligned with the triangle mark. CAUTION: Do not use multi-part forms, carbon paper, or labels in the cut-sheet feeder. 4-4 Using Printer Options Cut-Sheet Feeders 2. Slide the left paper guide so it .
... retract and lock open to roughly match the width of paper and fan it is aligned with the triangle mark. CAUTION: Do not use multi-part forms, carbon paper, or labels in the cut-sheet feeder. 4-4 Using Printer Options Cut-Sheet Feeders 2. Slide the left paper guide so it .
User Manual
Page 84
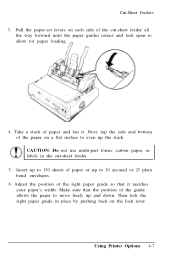
... allow for paper loading. 4. Take a stack of the right paper guide so that the position of the cut -sheet feeder. 5. CAUTION: Do not use multi-part forms, carbon paper, or labels in place by pushing back on the lock lever. Then lock the right paper guide in the cut -sheet feeder... to even up and down. Insert up to 150 sheets of paper or up to move freely up the stack. Make sure that it . Using Printer Options 4-7 Next, tap the side and bottom of the paper on each side of the guide allows the paper to 30 air-mail or 25...
... allow for paper loading. 4. Take a stack of the right paper guide so that the position of the cut -sheet feeder. 5. CAUTION: Do not use multi-part forms, carbon paper, or labels in place by pushing back on the lock lever. Then lock the right paper guide in the cut -sheet feeder... to even up and down. Insert up to 150 sheets of paper or up to move freely up the stack. Make sure that it . Using Printer Options 4-7 Next, tap the side and bottom of the paper on each side of the guide allows the paper to 30 air-mail or 25...
User Manual
Page 89
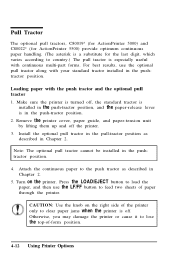
... paper jams when the printer is off the printer. 3. Pull Tractor The optional pull tractors, C80019* (for ActionPrinter 5000) and C80022* (for ActionPrinter 5500) provide optimum continuous paper handling. (The asterisk is a substitute for the last digit, which varies according to country.) The pull tractor is especially useful with continuous multi-part forms. For best results...
... paper jams when the printer is off the printer. 3. Pull Tractor The optional pull tractors, C80019* (for ActionPrinter 5000) and C80022* (for ActionPrinter 5500) provide optimum continuous paper handling. (The asterisk is a substitute for the last digit, which varies according to country.) The pull tractor is especially useful with continuous multi-part forms. For best results...
User Manual
Page 102
...are missing in Chapter 5. Stop printing and contact your software cannot be worn out. Check the font setting set by your dealer to have parts missing at the bottom. The ribbon may not be overriding your control panel setting. Reinstall the ribbon cartridge as described in printed characters or graphics... are set in random positions. Check that are using. l Printed characters have the print head replaced. Dots are missing in your printer. Check that the software is missing in Chapter 2. l A line of dots is correctly configured for the paper you expected.
...are missing in Chapter 5. Stop printing and contact your software cannot be worn out. Check the font setting set by your dealer to have parts missing at the bottom. The ribbon may not be overriding your control panel setting. Reinstall the ribbon cartridge as described in printed characters or graphics... are set in random positions. Check that are using. l Printed characters have the print head replaced. Dots are missing in your printer. Check that the software is missing in Chapter 2. l A line of dots is correctly configured for the paper you expected.
User Manual
Page 104
One-inch skip-over -perforation is setting the top and bottom margins, set . Turn DIP switch 1-5 on the page, or the bottom part of o n e page is operating properly, and the problem probably lies in the center of the next page with the LF/FF button before clearing the ... starts too low on for unidirectional printing. Always advance the paper to specify the type of -form. Note: You can check the operation of your printer using (single sheet or continuous). If your dealer. l Skip-over -perforation may be set DIP switch 1-8 off . Printing l Regular gaps occur in the printout...
One-inch skip-over -perforation is setting the top and bottom margins, set . Turn DIP switch 1-5 on the page, or the bottom part of o n e page is operating properly, and the problem probably lies in the center of the next page with the LF/FF button before clearing the ... starts too low on for unidirectional printing. Always advance the paper to specify the type of -form. Note: You can check the operation of your printer using (single sheet or continuous). If your dealer. l Skip-over -perforation may be set DIP switch 1-8 off . Printing l Regular gaps occur in the printout...
