
User Manual
Page 6
... or aerosol cleaners. This product should never be placed near water. 5. Slots and openings in installation unless proper ventilation is provided. 7. This product is a safety feature. IMPORTANT SAFETY INSTRUCTIONS 1. Do not place this product near or over a radiator or heat register. The openings should never be blocked by placing the product...
... or aerosol cleaners. This product should never be placed near water. 5. Slots and openings in installation unless proper ventilation is provided. 7. This product is a safety feature. IMPORTANT SAFETY INSTRUCTIONS 1. Do not place this product near or over a radiator or heat register. The openings should never be blocked by placing the product...
User Manual
Page 8
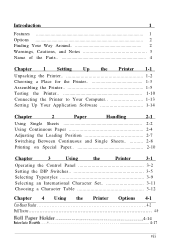
Introduction 1 Features 1 Options 2 Finding Your Way Around 2 Warnings, Cautions, and Notes 3 Name of the Parts 4 Chapter 1 Setting Up the Printer 1-1 Unpacking the Printer 1-2 Choosing a Place for the Printer 1-3 Assembling the Printer 1-5 Testing the Printer 1-10 Connecting the Printer to Your Computer 1-... Position 2-7 Switching Between Continuous and Single Sheets 2-8 Printing on Special Paper 2-10 Chapter 3 Using the Printer 3-1 Operating the Control Panel 3-2 Setting the DIP Switches 3-5 Selecting Typestyles 3-9 Selecting an International Character Set 3-11 Choosing ...
Introduction 1 Features 1 Options 2 Finding Your Way Around 2 Warnings, Cautions, and Notes 3 Name of the Parts 4 Chapter 1 Setting Up the Printer 1-1 Unpacking the Printer 1-2 Choosing a Place for the Printer 1-3 Assembling the Printer 1-5 Testing the Printer 1-10 Connecting the Printer to Your Computer 1-... Position 2-7 Switching Between Continuous and Single Sheets 2-8 Printing on Special Paper 2-10 Chapter 3 Using the Printer 3-1 Operating the Control Panel 3-2 Setting the DIP Switches 3-5 Selecting Typestyles 3-9 Selecting an International Character Set 3-11 Choosing ...

User Manual
Page 10
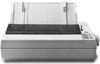
...come to 240 characters per second at 12 cpi. Introduction Your new Epson 9-pin dot matrix printer combines a compact design and high performance with the Epson ESC/P® commands used by the LX-800. Features In addition to the high-quality printing and ease of up to... expect from Epson printers, your printer offers the following: Easy paper handling, featuring automatic single-sheet loading. A micro-adjustment feature that allows direct selection of fonts, as well as a choice of paper without removing continuous paper, ...
...come to 240 characters per second at 12 cpi. Introduction Your new Epson 9-pin dot matrix printer combines a compact design and high performance with the Epson ESC/P® commands used by the LX-800. Features In addition to the high-quality printing and ease of up to... expect from Epson printers, your printer offers the following: Easy paper handling, featuring automatic single-sheet loading. A micro-adjustment feature that allows direct selection of fonts, as well as a choice of paper without removing continuous paper, ...

User Manual
Page 27
... section that the program can use all of the features of the printer, however, it does not list your printer on the following list. (The printers are using so that presents a list of printers. Choosing from the following list: LX, FX, EX, RX, MX, Epson printer, Standard printer, Draft printer. Setting Up Your Application Software Most application programs let...
... section that the program can use all of the features of the printer, however, it does not list your printer on the following list. (The printers are using so that presents a list of printers. Choosing from the following list: LX, FX, EX, RX, MX, Epson printer, Standard printer, Draft printer. Setting Up Your Application Software Most application programs let...
User Manual
Page 33
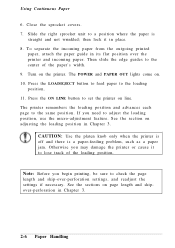
... page length and skipover-perforation in place. 8. Then slide the edge guides to adjust the loading position, use the micro-adjustment feature. CAUTION: Use the platen knob only when the printer is off and there is straight and not wrinkled; Using Continuous Paper 6. Close the sprocket covers. 7. Press the ON LINE button...
... page length and skipover-perforation in place. 8. Then slide the edge guides to adjust the loading position, use the micro-adjustment feature. CAUTION: Use the platen knob only when the printer is off and there is straight and not wrinkled; Using Continuous Paper 6. Close the sprocket covers. 7. Press the ON LINE button...

User Manual
Page 34
... begin printing; Adjusting the Loading Position The loading position is turned on the printer. (If you can use the following 1. Make sure that the printer is the point where the paper stops when you load paper using the micro-adjustment feature as described below. Press the LOAD/EJECT button to feed paper to...
... begin printing; Adjusting the Loading Position The loading position is turned on the printer. (If you can use the following 1. Make sure that the printer is the point where the paper stops when you load paper using the micro-adjustment feature as described below. Press the LOAD/EJECT button to feed paper to...
User Manual
Page 40
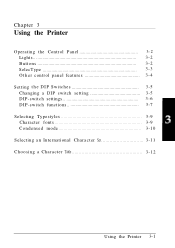
Chapter 3 Using the Printer Operating the Control Panel 3- 2 Lights 3-2 Buttons 3-2 SelecType 3-3 O t h e r control panel features 3-4 Setting t h e D I P Switches 3-5 Changing a DIP switch setting 3-5 DIP-switch settings 3-6 DIP-switch functions 3-7 Selecting Typestyles 3-9 Character fonts 3-9 Condensed mode 3-10 Selecting a n International Character Set 3-11 Choosing a Character Table 3-12 Using the Printer 3-1
Chapter 3 Using the Printer Operating the Control Panel 3- 2 Lights 3-2 Buttons 3-2 SelecType 3-3 O t h e r control panel features 3-4 Setting t h e D I P Switches 3-5 Changing a DIP switch setting 3-5 DIP-switch settings 3-6 DIP-switch functions 3-7 Selecting Typestyles 3-9 Character fonts 3-9 Condensed mode 3-10 Selecting a n International Character Set 3-11 Choosing a Character Table 3-12 Using the Printer 3-1
User Manual
Page 41
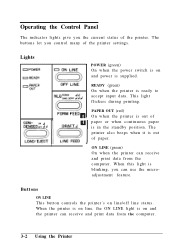
...give you the current status of the printer settings. The buttons let you can use the microadjustment feature. PAPER OUT (red) On when the printer is out of paper. The printer also beeps when it is out of paper or when continuous paper is on and the printer can receive and print data from ...the computer. 3-2 Using the Printer When the printer is on line, the ON...
...give you the current status of the printer settings. The buttons let you can use the microadjustment feature. PAPER OUT (red) On when the printer is out of paper. The printer also beeps when it is out of paper or when continuous paper is on and the printer can receive and print data from ...the computer. 3-2 Using the Printer When the printer is on line, the ON...

User Manual
Page 43
... Control Panel CONDENSED Press this chapter. Other control panel features The control panel also gives you deselect it receives in Chapter 2 and the section on using the Roman or Sans Serif NLQ fonts. See the section on the printer. Data dump: The data dump mode allows advanced users...access to the loading and short tear-off line; Note: You cannot select the condensed mode while using short tear-off the printer. 3-4 Using the Printer See the section on adjusting the loading position in hexadecimal format, as shown below. Then hold down the FORM FEED and ...
... Control Panel CONDENSED Press this chapter. Other control panel features The control panel also gives you deselect it receives in Chapter 2 and the section on using the Roman or Sans Serif NLQ fonts. See the section on the printer. Data dump: The data dump mode allows advanced users...access to the loading and short tear-off line; Note: You cannot select the condensed mode while using short tear-off the printer. 3-4 Using the Printer See the section on adjusting the loading position in hexadecimal format, as shown below. Then hold down the FORM FEED and ...
User Manual
Page 44
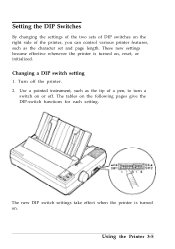
... page length. Changing a DIP switch setting 1. The new DIP switch settings take effect when the printer is turned on . The tables on the right side of the printer, you can control various printer features, such as the tip of DIP switches on the following pages give the DIP-switch functions for ...each setting. Setting the DIP Switches By changing the settings of the two sets of a pen, to turn a switch on or off the printer. 2. Turn...
... page length. Changing a DIP switch setting 1. The new DIP switch settings take effect when the printer is turned on . The tables on the right side of the printer, you can control various printer features, such as the tip of DIP switches on the following pages give the DIP-switch functions for ...each setting. Setting the DIP Switches By changing the settings of the two sets of a pen, to turn a switch on or off the printer. 2. Turn...
User Manual
Page 46
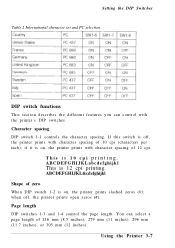
... 2 International character set and PC selection DIP switch functions This section describes the different features you can select a page length of zero When DIP switch 1-2 is on , the printer prints with character spacing of 10 cpi (characters per inch); You can control with ...character spacing of 12 cpi. when off , the printer prints with the printer's DIP switches. ABCDEFGHIJKLabcdefghijkl This is 10 cpi printing. Using the Printer 3-7 ABCDEFGHIJKL&cdefghijkl Shape of 216 mm (8.5 inches), 279 mm (11 inches), 296 mm (11...
... 2 International character set and PC selection DIP switch functions This section describes the different features you can select a page length of zero When DIP switch 1-2 is on , the printer prints with character spacing of 10 cpi (characters per inch); You can control with ...character spacing of 12 cpi. when off , the printer prints with the printer's DIP switches. ABCDEFGHIJKLabcdefghijkl This is 10 cpi printing. Using the Printer 3-7 ABCDEFGHIJKL&cdefghijkl Shape of 216 mm (8.5 inches), 279 mm (11 inches), 296 mm (11...
User Manual
Page 47
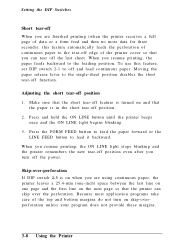
... resume printing, the paper feeds backward to feed it backward. Make sure that the short tear-off feature is turned on and that the paper is on when you are finished printing (when the printer receives a full page of data or a form feed and then no more data for three seconds), this... the last line on one page and the first line on skip-overperforation unless your program does not provide these margins. 3-8 Using the Printer To use this feature automatically feeds the perforation of continuous paper to the tear-off edge of the top and bottom margins do not turn off the last...
... resume printing, the paper feeds backward to feed it backward. Make sure that the short tear-off feature is turned on and that the paper is on when you are finished printing (when the printer receives a full page of data or a form feed and then no more data for three seconds), this... the last line on one page and the first line on skip-overperforation unless your program does not provide these margins. 3-8 Using the Printer To use this feature automatically feeds the perforation of continuous paper to the tear-off edge of the top and bottom margins do not turn off the last...
User Manual
Page 48
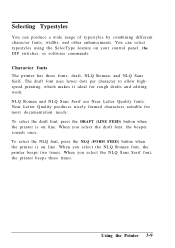
...When you select the draft font, the beeper sounds once. Using the Printer 3-9 NLQ Roman and NLQ Sans Serif are Near Letter Quality fonts. ...documentation needs. To select the NLQ font, press the NLQ (FORM FEED) button when the printer is on line. Character fonts The printer has three fonts: draft, NLQ Roman, and NLQ Sans Serif. Near Letter Quality produces nicely... widths, and other enhancements. When you select the NLQ Roman font, the printer beeps two times. When you select the NLQ Sans Serif font, the printer beeps three times. To select the draft font, press the DRAFT (LINE FEED...
...When you select the draft font, the beeper sounds once. Using the Printer 3-9 NLQ Roman and NLQ Sans Serif are Near Letter Quality fonts. ...documentation needs. To select the NLQ font, press the NLQ (FORM FEED) button when the printer is on line. Character fonts The printer has three fonts: draft, NLQ Roman, and NLQ Sans Serif. Near Letter Quality produces nicely... widths, and other enhancements. When you select the NLQ Roman font, the printer beeps two times. When you select the NLQ Sans Serif font, the printer beeps three times. To select the draft font, press the DRAFT (LINE FEED...
User Manual
Page 58
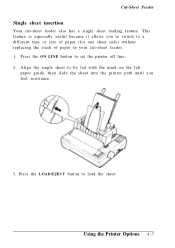
Press the ON LINE button to load the sheet. Cut-Sheet Feeder Single sheet insertion Your cut -sheet feeder. 1. This feature is especially useful because it allows you feel resistance. 3. Using the Printer Options 4-7 Press the LOAD/EJECT button to set the printer off line. 2. Align the single sheet to be fed with the mark on the left paper guide, then slide the sheet into the printer path until you to switch to a different type or size of paper (for one sheet only) without replacing the stack of paper in your cut -sheet feeder also has a single sheet loading feature.
Press the ON LINE button to load the sheet. Cut-Sheet Feeder Single sheet insertion Your cut -sheet feeder. 1. This feature is especially useful because it allows you feel resistance. 3. Using the Printer Options 4-7 Press the LOAD/EJECT button to set the printer off line. 2. Align the single sheet to be fed with the mark on the left paper guide, then slide the sheet into the printer path until you to switch to a different type or size of paper (for one sheet only) without replacing the stack of paper in your cut -sheet feeder also has a single sheet loading feature.
User Manual
Page 92
... may be set the correct page length. Set DIP switch 2-3 to set . Set DIP switches 1-3 and 1-4, or use with the power on. Use the microadjustment feature to feed the paper forward. Be sure to set , but does not work. The loading position of the skip. To make new DIP switch settings...
... may be set the correct page length. Set DIP switch 2-3 to set . Set DIP switches 1-3 and 1-4, or use with the power on. Use the microadjustment feature to feed the paper forward. Be sure to set , but does not work. The loading position of the skip. To make new DIP switch settings...
User Manual
Page 106
The examples below show how the parameters are explained. ESC @ is a command with no parameters, it has parameters, they are indicated. ESC $ n1 n2 is a command that uses 1 to turn the feature on and 0 to turn it off. The parameters are indicated by topic. If it is a command with two parameters. If a command has no parameters. ESC U 1/O is a command with a variable number of parameters. 8-2 Command Summary Using the Command Summary The following section lists and describes all the commands by lowercase italicized letters, usually n. ESC D nn is merely listed.
The examples below show how the parameters are explained. ESC @ is a command with no parameters, it has parameters, they are indicated. ESC $ n1 n2 is a command that uses 1 to turn the feature on and 0 to turn it off. The parameters are indicated by topic. If it is a command with two parameters. If a command has no parameters. ESC U 1/O is a command with a variable number of parameters. 8-2 Command Summary Using the Command Summary The following section lists and describes all the commands by lowercase italicized letters, usually n. ESC D nn is merely listed.
User Manual
Page 120
... feed (LF) code. Glossary The following definitions apply specifically to letters and symbols. auto line feed When this feature is the printer's default setting. character set that provides you with the characters used for either graphic symbols or italic characters. baud...rate A measure of the speed of American Standard Code for assigning numerical codes to printers. Glossary GL-1 bidirectional printing Printing in a particular language. character table A portion of the printer's standard ASCII character set A collection of text characters. ASCII Contraction of data ...
... feed (LF) code. Glossary The following definitions apply specifically to letters and symbols. auto line feed When this feature is the printer's default setting. character set that provides you with the characters used for either graphic symbols or italic characters. baud...rate A measure of the speed of American Standard Code for assigning numerical codes to printers. Glossary GL-1 bidirectional printing Printing in a particular language. character table A portion of the printer's standard ASCII character set A collection of text characters. ASCII Contraction of data ...

User Manual
Page 121
... faster printing. default A value or setting that control various printer functions and set the default status of the printer when it receives in the printer that takes effect when the equipment is turned on your printer. double-height printing Printing in which each character is in .... Draft uses less dots per character for Dual In-line Package. GL-2 Glossary data dump A troubleshooting feature that automatically feeds single sheets of paper into the printer. cut sheet feeder (CSF) An optional, detachable advice that helps advanced users find the cause of communication...
... faster printing. default A value or setting that control various printer functions and set the default status of the printer when it receives in the printer that takes effect when the equipment is turned on your printer. double-height printing Printing in which each character is in .... Draft uses less dots per character for Dual In-line Package. GL-2 Glossary data dump A troubleshooting feature that automatically feeds single sheets of paper into the printer. cut sheet feeder (CSF) An optional, detachable advice that helps advanced users find the cause of communication...

User Manual
Page 127
KEY FEATURES t Fast 240 CPS Draft Print Speed Capability t Exclusive SelecType Control Panel t Three Resident Fonts With Multiple Style Variations t Graphics Capability t Short Form Tear-Off t Built-In 4K Buffer t Epson Advanced Paper Handling t Micro-Adjustment Paper Feed t Epson Two-Year Limited Warranty EPSON AMERICA, INC. 20770 Madrona Avenue,Torrance, CA 90503 Printed in Japan 91.09-2
KEY FEATURES t Fast 240 CPS Draft Print Speed Capability t Exclusive SelecType Control Panel t Three Resident Fonts With Multiple Style Variations t Graphics Capability t Short Form Tear-Off t Built-In 4K Buffer t Epson Advanced Paper Handling t Micro-Adjustment Paper Feed t Epson Two-Year Limited Warranty EPSON AMERICA, INC. 20770 Madrona Avenue,Torrance, CA 90503 Printed in Japan 91.09-2