
User Manual
Page 4
... There are a few lines from 1 to get the results you can also try setting the form length at 10 inches. 5. See Chapter 1 for the right printer to adjust; Some programs also let you indicate whether you are using your maximum lines-per -page setting for paper that is your application program.... Set your file correctly but then prints too low on the next page, or that your printer prints the first page of your top and bottom margins to 0 and then create a file of the settings in print position are easy to choose...
... There are a few lines from 1 to get the results you can also try setting the form length at 10 inches. 5. See Chapter 1 for the right printer to adjust; Some programs also let you indicate whether you are using your maximum lines-per -page setting for paper that is your application program.... Set your file correctly but then prints too low on the next page, or that your printer prints the first page of your top and bottom margins to 0 and then create a file of the settings in print position are easy to choose...
User Manual
Page 8
...Cautions, and Notes 3 Name of the Parts 4 Chapter 1 Setting Up the Printer 1-1 Unpacking the Printer 1-2 Choosing a Place for the Printer 1-3 Assembling the Printer 1-5 Testing the Printer 1-10 Connecting the Printer to Your Computer 1-13 Setting Up Your Application Software 1-14 Chapter 2 Paper Handling... Position 2-7 Switching Between Continuous and Single Sheets 2-8 Printing on Special Paper 2-10 Chapter 3 Using the Printer 3-1 Operating the Control Panel 3-2 Setting the DIP Switches 3-5 Selecting Typestyles 3-9 Selecting an International Character Set 3-11 Choosing ...
...Cautions, and Notes 3 Name of the Parts 4 Chapter 1 Setting Up the Printer 1-1 Unpacking the Printer 1-2 Choosing a Place for the Printer 1-3 Assembling the Printer 1-5 Testing the Printer 1-10 Connecting the Printer to Your Computer 1-13 Setting Up Your Application Software 1-14 Chapter 2 Paper Handling... Position 2-7 Switching Between Continuous and Single Sheets 2-8 Printing on Special Paper 2-10 Chapter 3 Using the Printer 3-1 Operating the Control Panel 3-2 Setting the DIP Switches 3-5 Selecting Typestyles 3-9 Selecting an International Character Set 3-11 Choosing ...

User Manual
Page 9
Chapter 5 Maintenance 5-1 Cleaning the Printer 5-2 Replacing the Ribbon 5-3 Transporting the Printer 5-4 Chapter 6 Troubleshooting 6-1 Problems and Solutions 6-2 Power Supply 6-3 Printing 6-4 Paper Handling 6-8 Options 6-10 Chapter 7 Technical Specification Printer Specifications Interface Specifications Initialization 7-1 7-2 7-7 7-10 Chapter 8 Command Summary 8-1 Using the Command Summary 8-2 Commands Arranged by Topic 8-3 Appendix A-1 Character Tables A-2 Glossary GL-1 . . . Vlll
Chapter 5 Maintenance 5-1 Cleaning the Printer 5-2 Replacing the Ribbon 5-3 Transporting the Printer 5-4 Chapter 6 Troubleshooting 6-1 Problems and Solutions 6-2 Power Supply 6-3 Printing 6-4 Paper Handling 6-8 Options 6-10 Chapter 7 Technical Specification Printer Specifications Interface Specifications Initialization 7-1 7-2 7-7 7-10 Chapter 8 Command Summary 8-1 Using the Command Summary 8-2 Commands Arranged by Topic 8-3 Appendix A-1 Character Tables A-2 Glossary GL-1 . . . Vlll

User Manual
Page 10
Fast draft printing of up to expect from Epson printers, your printer offers the following: Easy paper handling, featuring automatic single-sheet loading. Two built-in Near Letter Quality fonts (Roman and Sans Serif) for producing high-... easy and accurate paper alignment. Features In addition to the high-quality printing and ease of features. Introduction Your new Epson 9-pin dot matrix printer combines a compact design and high performance with the Epson ESC/P® commands used by the LX-800. A micro-adjustment feature that allows you have come to 240 characters...
Fast draft printing of up to expect from Epson printers, your printer offers the following: Easy paper handling, featuring automatic single-sheet loading. Two built-in Near Letter Quality fonts (Roman and Sans Serif) for producing high-... easy and accurate paper alignment. Features In addition to the high-quality printing and ease of features. Introduction Your new Epson 9-pin dot matrix printer combines a compact design and high performance with the Epson ESC/P® commands used by the LX-800. A micro-adjustment feature that allows you have come to 240 characters...

User Manual
Page 11
...include important information on unpacking, setting up, testing, and connecting the printer. It automatically feeds up and operating your printer. • Chapter 1 contains information on paper handling and the day-to-day operation of your printer. Finding Your Way Around This manual provides illustrated, step-by-step instructions... for setting up to 150 sheets of standard bond paper into the printer. It is especially useful with continuous multi-part forms. Roll Paper Holder (#8310) The optional roll paper holder allows...
...include important information on unpacking, setting up, testing, and connecting the printer. It automatically feeds up and operating your printer. • Chapter 1 contains information on paper handling and the day-to-day operation of your printer. Finding Your Way Around This manual provides illustrated, step-by-step instructions... for setting up to 150 sheets of standard bond paper into the printer. It is especially useful with continuous multi-part forms. Roll Paper Holder (#8310) The optional roll paper holder allows...

User Manual
Page 12
... of problems and solutions. Warnings, Cautions, and Notes WARNINGS must be followed carefully to your printer. If the printer does not operate properly or the printed results are not what you expect, see Chapter 6 for a list of printer terms and an index. l Other chapters contain information on the operation of your equipment. Introduction...
... of problems and solutions. Warnings, Cautions, and Notes WARNINGS must be followed carefully to your printer. If the printer does not operate properly or the printed results are not what you expect, see Chapter 6 for a list of printer terms and an index. l Other chapters contain information on the operation of your equipment. Introduction...

User Manual
Page 13
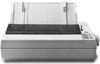
Introduction Names of the Parts paper guide release printer control panel paper tension unit cover ribbon cartridge AC inlet Note: In some locations, the power cord is attached to the printer. 4 Introduction
Introduction Names of the Parts paper guide release printer control panel paper tension unit cover ribbon cartridge AC inlet Note: In some locations, the power cord is attached to the printer. 4 Introduction

User Manual
Page 14
l Chapter 1 Setting Up the Printer Unpacking t h e Printer 1-2 Choosing a Place for t h e Printer 1-3 Assembling t h e Printer 1-5 Installing t h e platen knob 1-5 Installing t h e ribbon cartridge 1-6 Attaching t h e paper guide 1-9 Testing t h e Printer Plugging in the printer Running t h e self test 1-10 1-10 1-10 Connecting t h e Printer to Your Computer 1-13 The parallel interface 1-13 Setting Up Your Application Software 1-14 Choosing from a menu 1-14 Setting Up the Printer l -
l Chapter 1 Setting Up the Printer Unpacking t h e Printer 1-2 Choosing a Place for t h e Printer 1-3 Assembling t h e Printer 1-5 Installing t h e platen knob 1-5 Installing t h e ribbon cartridge 1-6 Attaching t h e paper guide 1-9 Testing t h e Printer Plugging in the printer Running t h e self test 1-10 1-10 1-10 Connecting t h e Printer to Your Computer 1-13 The parallel interface 1-13 Setting Up Your Application Software 1-14 Choosing from a menu 1-14 Setting Up the Printer l -

User Manual
Page 15
... power cable Note: In some locations, the power cord is shown on the label on the back of the printer designed for use at another voltage. After removing the parts, save the packaging materials in case you have all the parts shown below and that ...you ever need to transport your dealer. 1-2 Setting Up the Printer The power supply type is attached to the printer. CAUTION: There are several different versions of the printer. Unpacking the Printer When you unpack the printer, make sure that none has been damaged. It is not possible to adjust the...
... power cable Note: In some locations, the power cord is shown on the label on the back of the printer designed for use at another voltage. After removing the parts, save the packaging materials in case you have all the parts shown below and that ...you ever need to transport your dealer. 1-2 Setting Up the Printer The power supply type is attached to the printer. CAUTION: There are several different versions of the printer. Unpacking the Printer When you unpack the printer, make sure that none has been damaged. It is not possible to adjust the...

User Manual
Page 16
...in line voltage. Avoid electrical outlets controlled by wall switches or automatic timers. Choosing a Place for the Printer When selecting a place to set up your printer. Accidental interruption of power can wipe out information in the memory of cordless telephones. Avoid outlets on a ...flat, stable surface. • Place the printer close enough to the computer for easy operation and maintenance. Setting Up the Printer 1-3 Keep the entire computer system away from potential sources of electromagnetic interference such as ...
...in line voltage. Avoid electrical outlets controlled by wall switches or automatic timers. Choosing a Place for the Printer When selecting a place to set up your printer. Accidental interruption of power can wipe out information in the memory of cordless telephones. Avoid outlets on a ...flat, stable surface. • Place the printer close enough to the computer for easy operation and maintenance. Setting Up the Printer 1-3 Keep the entire computer system away from potential sources of electromagnetic interference such as ...

User Manual
Page 17
...clearance (25 mm or 1 inch) to the printer stand. 1-4 Setting Up the Printer Also see that the distance between the stand's supports is twice the weight of the stand. Position your printer absolutely level. If possible, secure the cables to keep your printer's power cord and interface cable so that they ..., make sure that you install a cut-sheet feeder, keep the paper from horizontal. Choosing a Place for the Printer Note: If you may use a printer stand, follow these guidelines: Use a stand that supports at least 11.6 kg (25½, lbs), which is at an angle of more than...
...clearance (25 mm or 1 inch) to the printer stand. 1-4 Setting Up the Printer Also see that the distance between the stand's supports is twice the weight of the stand. Position your printer absolutely level. If possible, secure the cables to keep your printer's power cord and interface cable so that they ..., make sure that you install a cut-sheet feeder, keep the paper from horizontal. Choosing a Place for the Printer Note: If you may use a printer stand, follow these guidelines: Use a stand that supports at least 11.6 kg (25½, lbs), which is at an angle of more than...
User Manual
Page 18
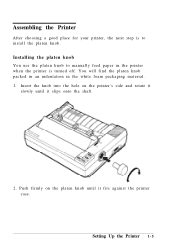
You will find the platen knob packed in an indentation in the printer when the printer is to manually feed paper in the white foam packaging material. 1. Push firmly on the printer's side and rotate it slowly until it slips onto the shaft. 2. Installing the platen knob You use the platen knob to install the platen knob. Insert the knob into the hole on the platen knob until it fits against the printer case. Setting Up the Printer 1 - 5 Assembling the Printer After choosing a good place for your printer, the next step is turned off.
You will find the platen knob packed in an indentation in the printer when the printer is to manually feed paper in the white foam packaging material. 1. Push firmly on the printer's side and rotate it slowly until it slips onto the shaft. 2. Installing the platen knob You use the platen knob to install the platen knob. Insert the knob into the hole on the platen knob until it fits against the printer case. Setting Up the Printer 1 - 5 Assembling the Printer After choosing a good place for your printer, the next step is turned off.

User Manual
Page 19
Then open the paper tension unit cover. 1-6 Setting Up the Printer Raise the printer cover to the middle of the printer. Slide the print head to the upright position. Then lift the cover up and off. 2. Assembling the Printer Installing the ribbon cartridge Before installing the ribbon cartridge, make sure that the printer is not plugged into an electrical outlet. 1.
Then open the paper tension unit cover. 1-6 Setting Up the Printer Raise the printer cover to the middle of the printer. Slide the print head to the upright position. Then lift the cover up and off. 2. Assembling the Printer Installing the ribbon cartridge Before installing the ribbon cartridge, make sure that the printer is not plugged into an electrical outlet. 1.

User Manual
Page 20
Turn the ribbon-tightening knob in the direction of the cartridge to install. 4. Setting Up the Printer 1-7 Hold the ribbon cartridge by its handle and push it easier to make sure the plastic hooks are properly seated. Note: Press lightly on both ends of the arrow. This removes slack from the ribbon, making it firmly down into position, making sure the plastic hooks fit into the slots. Assembling the Printer 3.
Turn the ribbon-tightening knob in the direction of the cartridge to install. 4. Setting Up the Printer 1-7 Hold the ribbon cartridge by its handle and push it easier to make sure the plastic hooks are properly seated. Note: Press lightly on both ends of the arrow. This removes slack from the ribbon, making it firmly down into position, making sure the plastic hooks fit into the slots. Assembling the Printer 3.

User Manual
Page 21
Also check that it moves smoothly. Use a pointed object, such as a ball point pen, to guide the ribbon between the print head and ribbon guide while you turn the ribbon-tightening knob to make sure that the ribbon is not twisted or creased. 7. Assembling the Printer 5. Slide the print head from side to side to help feed the ribbon into place. 6. Close the paper tension unit cover. 1-8
Also check that it moves smoothly. Use a pointed object, such as a ball point pen, to guide the ribbon between the print head and ribbon guide while you turn the ribbon-tightening knob to make sure that the ribbon is not twisted or creased. 7. Assembling the Printer 5. Slide the print head from side to side to help feed the ribbon into place. 6. Close the paper tension unit cover. 1-8

User Manual
Page 22
Setting Up the Printer 1-9 Attach the printer cover. Place the paper guide on the printer. Then raise it up until it locks into place. 2. Assembling the Printer Attaching the paper guide 1.
Setting Up the Printer 1-9 Attach the printer cover. Place the paper guide on the printer. Then raise it up until it locks into place. 2. Assembling the Printer Attaching the paper guide 1.

User Manual
Page 23
..., depending on which button you hold down the LINE FEED button (draft mode) or FORM FEED button (NLQ mode), turn on . 1-10 Setting Up the Printer Check the label on the back of your electrical outlet. The POWER and PAPER OUT lights come on the... assistance. While holding down as you need to connect your printer to an electrical outlet. Before running the self test, you turn on the printer's back panel. 4. Plugging in the power cord. 3. Do not plug in the printer 1. Testing the Printer Before connecting your printer to a computer, use the built-in self-test function to...
..., depending on which button you hold down the LINE FEED button (draft mode) or FORM FEED button (NLQ mode), turn on . 1-10 Setting Up the Printer Check the label on the back of your electrical outlet. The POWER and PAPER OUT lights come on the... assistance. While holding down as you need to connect your printer to an electrical outlet. Before running the self test, you turn on the printer's back panel. 4. Plugging in the power cord. 3. Do not plug in the printer 1. Testing the Printer Before connecting your printer to a computer, use the built-in self-test function to...

User Manual
Page 24
Slide a sheet of 4. Setting Up the Printer 1-11 Testing the Printer 3. CAUTION: Run the self test using paper wider than A4 (210 mm or 8½, inches) or letter size (216 mm or 81/2 inches), to match the width of paper down firmly between the edge guides until it meets resistance. Slide the left edge guide until it locks in place at the guide mark. Next, adjust the right edge guide to prevent the print head from printing directly on the platen.
Slide a sheet of 4. Setting Up the Printer 1-11 Testing the Printer 3. CAUTION: Run the self test using paper wider than A4 (210 mm or 8½, inches) or letter size (216 mm or 81/2 inches), to match the width of paper down firmly between the edge guides until it meets resistance. Slide the left edge guide until it locks in place at the guide mark. Next, adjust the right edge guide to prevent the print head from printing directly on the platen.

User Manual
Page 25
... or LINE FEED button to start the self test. Press the ON LINE button to eject the paper. Then turn off rapidly can damage the printer. Turning the power on . The self test continues until the paper runs out or you wish to load paper. 6. When you press the ON LINE... button. CAUTION: After turning the power off, always wait at least five seconds before turning it back on and off the printer. Press the LOAD/EJECT button to stop the test, press the ON LINE button. Here is not printing. The test prints list of DIP switch...
... or LINE FEED button to start the self test. Press the ON LINE button to eject the paper. Then turn off rapidly can damage the printer. Turning the power on . The self test continues until the paper runs out or you wish to load paper. 6. When you press the ON LINE... button. CAUTION: After turning the power off, always wait at least five seconds before turning it back on and off the printer. Press the LOAD/EJECT button to stop the test, press the ON LINE button. Here is not printing. The test prints list of DIP switch...

User Manual
Page 26
...lock in the next section. The parallel interface Connect the parallel interface cable as described in place on either side of the cable into the printer. To connect such an interface, use a suitable shielded cable as described below: 1. Plug the other end of the connector. Plug the ...cable connector securely into the computer. (If there is a ground wire at the computer end of the computer.) Setting Up the Printer 1-13 Connecting the Printer to Your Computer If the self test printed correctly, you are turned off. Most computers have a parallel interface. Make sure that both...
...lock in the next section. The parallel interface Connect the parallel interface cable as described in place on either side of the cable into the printer. To connect such an interface, use a suitable shielded cable as described below: 1. Plug the other end of the connector. Plug the ...cable connector securely into the computer. (If there is a ground wire at the computer end of the computer.) Setting Up the Printer 1-13 Connecting the Printer to Your Computer If the self test printed correctly, you are turned off. Most computers have a parallel interface. Make sure that both...


