Printer Guide
Page 6
... Under the Epson Stylus Pro 9880 65 Optimizing the Settings for Your Paper 67 Creating Paper Configurations 67 Printing Your Paper Configurations 69 Selecting Paper Configurations 69 3 Printing With Epson Drivers for Macintosh Sizing Images for Borderless Printing on Roll Paper 72 Choosing Page Setup Options 73 Choosing Basic Print Options 76 Selecting the Correct Media Type Setting 78 Choosing Color Management...
... Under the Epson Stylus Pro 9880 65 Optimizing the Settings for Your Paper 67 Creating Paper Configurations 67 Printing Your Paper Configurations 69 Selecting Paper Configurations 69 3 Printing With Epson Drivers for Macintosh Sizing Images for Borderless Printing on Roll Paper 72 Choosing Page Setup Options 73 Choosing Basic Print Options 76 Selecting the Correct Media Type Setting 78 Choosing Color Management...
Printer Guide
Page 16
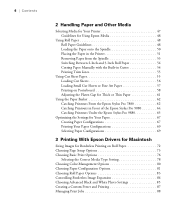
18 | Introduction Printer Parts These illustrations show the Epson Stylus Pro 9880, but the parts are the same for the Pro 7880 unless otherwise noted. Roll paper on spindle Roll paper cover Roll paper mounting bracket Paper lever Front cover Control panel Ink cartridge compartment Ink cartridge compartment Paper basket Casters Network interface Maintenance tank (Pro 9880 includes two tanks, one on each side of printer) 18 USB interface AC inlet Paper straps (Pro 9880 only)
18 | Introduction Printer Parts These illustrations show the Epson Stylus Pro 9880, but the parts are the same for the Pro 7880 unless otherwise noted. Roll paper on spindle Roll paper cover Roll paper mounting bracket Paper lever Front cover Control panel Ink cartridge compartment Ink cartridge compartment Paper basket Casters Network interface Maintenance tank (Pro 9880 includes two tanks, one on each side of printer) 18 USB interface AC inlet Paper straps (Pro 9880 only)

Printer Guide
Page 20
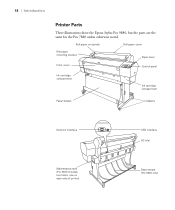
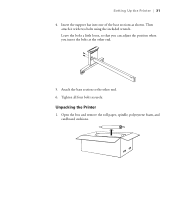
Make sure each part of the stand is tightened securely. 22 | Setting Up the Printer 5. Unpacking the Printer 1. Open the box and remove the roll paper, spindle, polystyrene foam, and cardboard cushions. 22 Attach the top horizontal strut as shown. Use the small hex wrench to fasten the 10 hex screws with washers. 6.
Make sure each part of the stand is tightened securely. 22 | Setting Up the Printer 5. Unpacking the Printer 1. Open the box and remove the roll paper, spindle, polystyrene foam, and cardboard cushions. 22 Attach the top horizontal strut as shown. Use the small hex wrench to fasten the 10 hex screws with washers. 6.
Printer Guide
Page 21
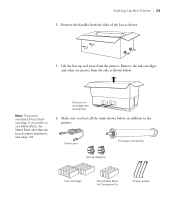
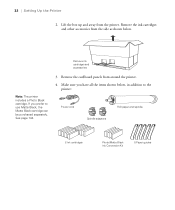
... use Matte Black, the Matte Black cartridge can be purchased separately. Make sure you prefer to the printer: Power cord Roll paper and spindle Spindle adapters 8 Ink cartridges Photo/Matte Black Ink Conversion Kit 23 2 Paper guides Note: The printer includes a Photo Black cartridge. Remove ink cartridges and accessories # " 4. Remove the ink cartridges and other accessories from...
... use Matte Black, the Matte Black cartridge can be purchased separately. Make sure you prefer to the printer: Power cord Roll paper and spindle Spindle adapters 8 Ink cartridges Photo/Matte Black Ink Conversion Kit 23 2 Paper guides Note: The printer includes a Photo Black cartridge. Remove ink cartridges and accessories # " 4. Remove the ink cartridges and other accessories from...
Printer Guide
Page 29
Setting Up the Printer | 31 4. Leave the bolts a little loose, so that you can adjust the position when you insert the bolts at the other end. 6. Attach the base section to the other end. 5. Then attach it with two bolts using the included wrench. Open the box and remove the roll paper, spindle, polystyrene foam, and cardboard cushions. 31 Insert the support bar into one of the base sections as shown. Unpacking the Printer 1. Tighten all four bolts securely.
Setting Up the Printer | 31 4. Leave the bolts a little loose, so that you can adjust the position when you insert the bolts at the other end. 6. Attach the base section to the other end. 5. Then attach it with two bolts using the included wrench. Open the box and remove the roll paper, spindle, polystyrene foam, and cardboard cushions. 31 Insert the support bar into one of the base sections as shown. Unpacking the Printer 1. Tighten all four bolts securely.
Printer Guide
Page 30
Remove the ink cartridges and other accessories from the printer. Remove ink cartridges and accessories # " Note: The printer includes a Photo Black cartridge. Make sure you prefer to the printer: Power cord Spindle adapters Roll paper and spindle 8 Ink cartridges Photo/Matte Black Ink Conversion Kit 5 Paper guides 32 32 | Setting Up the Printer 2. If you have all the items shown...
Remove the ink cartridges and other accessories from the printer. Remove ink cartridges and accessories # " Note: The printer includes a Photo Black cartridge. Make sure you prefer to the printer: Power cord Spindle adapters Roll paper and spindle 8 Ink cartridges Photo/Matte Black Ink Conversion Kit 5 Paper guides 32 32 | Setting Up the Printer 2. If you have all the items shown...
Printer Guide
Page 50
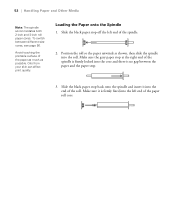
... . 3. Oils from your skin can affect print quality. To switch between the paper and the paper stop off the left end of the paper roll core. 52 Make sure it into the end of the paper as much as shown, then slide the spindle into the core and there is no gap between different size cores...
... . 3. Oils from your skin can affect print quality. To switch between the paper and the paper stop off the left end of the paper roll core. 52 Make sure it into the end of the paper as much as shown, then slide the spindle into the core and there is no gap between different size cores...

Printer Guide
Page 51
... while the P Power light is flashing, or you 're using roll paper. 3. Make sure the printer is not flashing, then release the paper lever. Make sure the P Power light is turned on, then press the l Paper Source button until the (Auto Cut Off) or (Auto Cut On) icon appears on ...the left.) Caution: To avoid feeding excess paper, make sure you don't select when you may damage the printer. 53 Open the roll paper cover. 2. Handling Paper and Other Media | 53 Placing the Paper in the roll holder as shown. (The black end of the spindle goes on the LCD display. 4.
... while the P Power light is flashing, or you 're using roll paper. 3. Make sure the printer is not flashing, then release the paper lever. Make sure the P Power light is turned on, then press the l Paper Source button until the (Auto Cut Off) or (Auto Cut On) icon appears on ...the left.) Caution: To avoid feeding excess paper, make sure you don't select when you may damage the printer. 53 Open the roll paper cover. 2. Handling Paper and Other Media | 53 Placing the Paper in the roll holder as shown. (The black end of the spindle goes on the LCD display. 4.
Printer Guide
Page 53
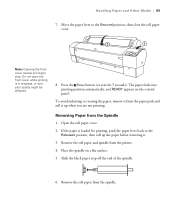
... removing it up when you are not printing. Removing Paper from the printer. 4. Remove the roll paper and spindle from the Spindle 1. Remove the roll paper from the paper path and roll it . 3. Handling Paper and Other Media | 55 7. If the paper is in progress, or your print quality might be affected. 8. Note: Opening the front cover causes printing to stop off...
... removing it up when you are not printing. Removing Paper from the printer. 4. Remove the roll paper and spindle from the Spindle 1. Remove the roll paper from the paper path and roll it . 3. Handling Paper and Other Media | 55 7. If the paper is in progress, or your print quality might be affected. 8. Note: Opening the front cover causes printing to stop off...
Printer Guide
Page 54
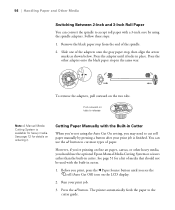
...you may need to cut most types of the spindle. 2. Before you print, press the l Paper Source button until it . 56 | Handling Paper and Other Media Switching Between 2-Inch and 3-Inch Roll Paper You can use the optional Epson Manual Media Cutting System or scissors rather than ...Cutting System is finished. The printer automatically feeds the paper to accept roll paper with a 3-inch core by pressing a button after your print job. 3. Follow these steps: 1. You can convert the spindle to the cutter guide. 56 Press the button. Cutting Paper Manually with the built-in ...
...you may need to cut most types of the spindle. 2. Before you print, press the l Paper Source button until it . 56 | Handling Paper and Other Media Switching Between 2-Inch and 3-Inch Roll Paper You can use the optional Epson Manual Media Cutting System or scissors rather than ...Cutting System is finished. The printer automatically feeds the paper to accept roll paper with a 3-inch core by pressing a button after your print job. 3. Follow these steps: 1. You can convert the spindle to the cutter guide. 56 Press the button. Cutting Paper Manually with the built-in ...
Printer Guide
Page 55
... can also specify trim lines from your roll paper on the spindle when you see page 93 (Mac OS X) or page 110 (Windows). Press the d button to save the setting. For instructions, see the On) icon on cut sheets; Press the l Paper Source button until you print on the ...is cut sheet paper and other media. Press the Menu button. 2. Using Cut Sheet Paper You can leave your printer driver software. The printer accepts sheets in widths from the paper path and rolled up. 57 Press the Pause button to 24 inches (61 cm) [Pro 7880] or 44 inches (112 cm) [Pro 9880]. Press the ...
... can also specify trim lines from your roll paper on the spindle when you see page 93 (Mac OS X) or page 110 (Windows). Press the d button to save the setting. For instructions, see the On) icon on cut sheets; Press the l Paper Source button until you print on the ...is cut sheet paper and other media. Press the Menu button. 2. Using Cut Sheet Paper You can leave your printer driver software. The printer accepts sheets in widths from the paper path and rolled up. 57 Press the Pause button to 24 inches (61 cm) [Pro 7880] or 44 inches (112 cm) [Pro 9880]. Press the ...
Printer Guide
Page 58
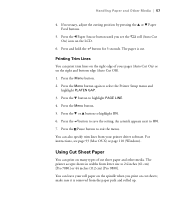
... line on the roll paper cover. 5. Make sure the right edge of the printer. See page 64 (Pro 7880) or page 66 (Pro 9880) for printing. Print your print, press the button or release the paper lever while holding the printed sheet. Printing on Posterboard You can leave roll paper on the LCD ...position automatically and READY appears on the spindle, but make sure you meet resistance. The sheet feeds into the paper slot until you wind it is loaded for instructions. 2. To remove your page. Set the paper basket to print on Epson Enhanced Matte Posterboard or other media ...
... line on the roll paper cover. 5. Make sure the right edge of the printer. See page 64 (Pro 7880) or page 66 (Pro 9880) for printing. Print your print, press the button or release the paper lever while holding the printed sheet. Printing on Posterboard You can leave roll paper on the LCD ...position automatically and READY appears on the spindle, but make sure you meet resistance. The sheet feeds into the paper slot until you wind it is loaded for instructions. 2. To remove your page. Set the paper basket to print on Epson Enhanced Matte Posterboard or other media ...

Printer Guide
Page 143
...printer and wait until the carriage moves to store partially used cartridges in separate, resealable plastic bags. You can choose whether to prevent ink from leaking. 4. Tip: For more secure transportation, tape all doors and covers shut. 161 Remove the following parts: • Power cord and interface cables • Paper basket • Roll paper spindle... • All paper or other media • Optional auto take-up reel (if installed) • Optional ...
...printer and wait until the carriage moves to store partially used cartridges in separate, resealable plastic bags. You can choose whether to prevent ink from leaking. 4. Tip: For more secure transportation, tape all doors and covers shut. 161 Remove the following parts: • Power cord and interface cables • Paper basket • Roll paper spindle... • All paper or other media • Optional auto take-up reel (if installed) • Optional ...

Product Information Guide
Page 1
... inches (1196 mm) Weight (without consumables) Epson Stylus Pro 7880: 108 lb (49 kg) Epson Stylus Pro 9880: 198 lb (90 kg) Stand: 23.1 lb (10.5 kg) Maintenance tank Paper straps (Pro 9880 only) 1 - Front Roll paper on spindle Roll paper cover Roll paper mounting bracket Control panel Paper lever Front cover Left ink cartridge compartment Paper basket Right ink cartridge compartment Printer stand Casters Back Network interface USB interface...
... inches (1196 mm) Weight (without consumables) Epson Stylus Pro 7880: 108 lb (49 kg) Epson Stylus Pro 9880: 198 lb (90 kg) Stand: 23.1 lb (10.5 kg) Maintenance tank Paper straps (Pro 9880 only) 1 - Front Roll paper on spindle Roll paper cover Roll paper mounting bracket Control panel Paper lever Front cover Left ink cartridge compartment Paper basket Right ink cartridge compartment Printer stand Casters Back Network interface USB interface...
Product Information Guide
Page 4
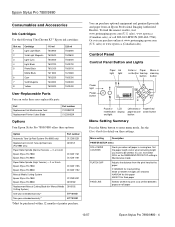
...-inch Take-Up Reel Core (Pro 9880 only) C815121 Paper Roller Spindle (Normal Tension) - 2- You can order these user-replaceable parts: Part Replacement Ink Maintenance Tank Replacement Printer Cutter Blade Part number C12C890191 C12C815291 Options Your Epson Stylus Pro 7880/9880 offers these settings. To find the nearest reseller, visit www.proimaging.epson.com (U.S. Epson Stylus Pro 7880/9880 Consumables and Accessories Ink Cartridges...
...-inch Take-Up Reel Core (Pro 9880 only) C815121 Paper Roller Spindle (Normal Tension) - 2- You can order these user-replaceable parts: Part Replacement Ink Maintenance Tank Replacement Printer Cutter Blade Part number C12C890191 C12C815291 Options Your Epson Stylus Pro 7880/9880 offers these settings. To find the nearest reseller, visit www.proimaging.epson.com (U.S. Epson Stylus Pro 7880/9880 Consumables and Accessories Ink Cartridges...

User's Guide
Page 18
18 | Introduction Printer Parts These illustrations show the Epson Stylus Pro 9880, but the parts are the same for the Pro 7880 unless otherwise noted. Roll paper on spindle Roll paper cover Roll paper mounting bracket Paper lever Front cover Control panel Ink cartridge compartment Ink cartridge compartment Paper basket Casters Network interface Maintenance tank (Pro 9880 includes two tanks, one on each side of printer) 18 USB interface AC inlet Paper straps (Pro 9880 only)
18 | Introduction Printer Parts These illustrations show the Epson Stylus Pro 9880, but the parts are the same for the Pro 7880 unless otherwise noted. Roll paper on spindle Roll paper cover Roll paper mounting bracket Paper lever Front cover Control panel Ink cartridge compartment Ink cartridge compartment Paper basket Casters Network interface Maintenance tank (Pro 9880 includes two tanks, one on each side of printer) 18 USB interface AC inlet Paper straps (Pro 9880 only)

User's Guide
Page 23
... Remove the ink cartridges and other accessories from the printer. See page 141. Make sure you prefer to the printer: Power cord Roll paper and spindle Spindle adapters 8 Ink cartridges Photo/Matte Black Ink Conversion Kit 23 2 Paper guides Lift the box up and away from the side... as shown. 3. Note: The printer includes a Photo Black cartridge. If ...
... Remove the ink cartridges and other accessories from the printer. See page 141. Make sure you prefer to the printer: Power cord Roll paper and spindle Spindle adapters 8 Ink cartridges Photo/Matte Black Ink Conversion Kit 23 2 Paper guides Lift the box up and away from the side... as shown. 3. Note: The printer includes a Photo Black cartridge. If ...

User's Guide
Page 32
... you have all the items shown below . Make sure you prefer to the printer: Power cord Spindle adapters Roll paper and spindle 8 Ink cartridges Photo/Matte Black Ink Conversion Kit 5 Paper guides 32 Remove the ink cartridges and other accessories from the printer. See page 141. 3. Lift the box up and away from the side as shown...
... you have all the items shown below . Make sure you prefer to the printer: Power cord Spindle adapters Roll paper and spindle 8 Ink cartridges Photo/Matte Black Ink Conversion Kit 5 Paper guides 32 Remove the ink cartridges and other accessories from the printer. See page 141. 3. Lift the box up and away from the side as shown...

User's Guide
Page 57
... it is firmly fixed into the left end of the paper roll core. 57 Slide the black paper stop . 3. Handling Paper and Other Media | 57 Note: The spindle accommodates both 2-inch and 3-inch roll paper cores. Avoid touching the printable surface of the roll. Loading the Paper onto the Spindle 1. Oils from your skin can affect print quality. Slide the...
... it is firmly fixed into the left end of the paper roll core. 57 Slide the black paper stop . 3. Handling Paper and Other Media | 57 Note: The spindle accommodates both 2-inch and 3-inch roll paper cores. Avoid touching the printable surface of the roll. Loading the Paper onto the Spindle 1. Oils from your skin can affect print quality. Slide the...

User's Guide
Page 60
... back to the Secured position, then close the roll paper cover. Removing Paper from the paper path and roll it . 3. Remove the roll paper from the printer. 4. The paper feeds into printing position automatically, and READY appears on a flat surface. 5. Remove the roll paper and spindle from the spindle. 60 If the paper is in progress, or your print quality might be affected. 8. Slide...
... back to the Secured position, then close the roll paper cover. Removing Paper from the paper path and roll it . 3. Remove the roll paper from the printer. 4. The paper feeds into printing position automatically, and READY appears on a flat surface. 5. Remove the roll paper and spindle from the spindle. 60 If the paper is in progress, or your print quality might be affected. 8. Slide...


