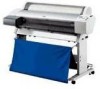
Product Information Guide
Page 3
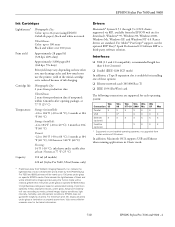
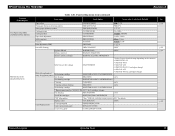
...°F (25 °C) Capacity 110 ml (all prints under glass on specific EPSON media. indicate the lightfastness of color UltraChrome prints made by the EPSON Stylus Pro 7600 and 9600 printers will be rated up to 100 years under glass. Data indicate the lightfastness of ...9600 - 4 EPSON Stylus Pro 7600 and 9600 Ink Cartridges Lightfastness* Photographic Dye: Color: up to 100 years Black and white: over 100 years Print yield Approximately 28 pages/A1 (720 dpi, 40% duty) Approximately 3,800 pages/A4 (360 dpi, 5% duty) Print yield may vary, depending on how often you run cleaning...
...°F (25 °C) Capacity 110 ml (all prints under glass on specific EPSON media. indicate the lightfastness of color UltraChrome prints made by the EPSON Stylus Pro 7600 and 9600 printers will be rated up to 100 years under glass. Data indicate the lightfastness of ...9600 - 4 EPSON Stylus Pro 7600 and 9600 Ink Cartridges Lightfastness* Photographic Dye: Color: up to 100 years Black and white: over 100 years Print yield Approximately 28 pages/A1 (720 dpi, 40% duty) Approximately 3,800 pages/A4 (360 dpi, 5% duty) Print yield may vary, depending on how often you run cleaning...
Product Information Guide
Page 6
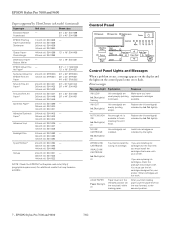
...on You tried to finish cleaning the print head. WRONG INK CARTRIDGE INVALID INK CARTRIDGE Ink Out light(s) on Not enough ink is in the released position (all the way forward, to the secured position. 7 - Replace the ink cartridge(s) indicated by Ink Out light...lever is available to install the wrong ink cartridge. Error messages Message/Light Explanation Response INK LOW Ink Out light(s) flashing Ink cartridge(s) are installing ink cartridges for your printer. LOAD PAPER Paper Out light on or flash. EPSON Stylus Pro 7600 and 9600 7/02 Art Paper* 8.5" × 11":...
...on You tried to finish cleaning the print head. WRONG INK CARTRIDGE INVALID INK CARTRIDGE Ink Out light(s) on Not enough ink is in the released position (all the way forward, to the secured position. 7 - Replace the ink cartridge(s) indicated by Ink Out light...lever is available to install the wrong ink cartridge. Error messages Message/Light Explanation Response INK LOW Ink Out light(s) flashing Ink cartridge(s) are installing ink cartridges for your printer. LOAD PAPER Paper Out light on or flash. EPSON Stylus Pro 7600 and 9600 7/02 Art Paper* 8.5" × 11":...
Product Information Guide
Page 7
.... SERVICE REQ. After cleaning, reload paper. Press the Pause button to lock the ink cartridges. Pull the lever down to exit SelecType mode. Reload paper. EPSON Stylus Pro 7600 and 9600 Error messages (continued) Message/Light Explanation Response LOAD ROLL PAPER LOAD SHEET PAPER Paper Out light on Paper source setting in the printer. Reload paper, making...
.... SERVICE REQ. After cleaning, reload paper. Press the Pause button to lock the ink cartridges. Pull the lever down to exit SelecType mode. Reload paper. EPSON Stylus Pro 7600 and 9600 Error messages (continued) Message/Light Explanation Response LOAD ROLL PAPER LOAD SHEET PAPER Paper Out light on Paper source setting in the printer. Reload paper, making...
Product Information Guide
Page 9
.... 3. Hold the cartridge with the correct cartridges. If you see if the cleaning cycle was successful. 7/02 EPSON Stylus Pro 7600 and 9600 - 10 Remove any cartridges indicated by using 110 ml cartridges, close the ink compartment cover. If your printer (Photographic Dye or UltraChrome). The cleaning cycle uses ink,...in the driver. To determine if a cleaning cycle is the correct color, and remove it . 6. Lower the ink lever to the unlocked position. Then insert the cartridge into the slot. Once the cartridges are missing from the printer. 5. Don't force it only if ...
.... 3. Hold the cartridge with the correct cartridges. If you see if the cleaning cycle was successful. 7/02 EPSON Stylus Pro 7600 and 9600 - 10 Remove any cartridges indicated by using 110 ml cartridges, close the ink compartment cover. If your printer (Photographic Dye or UltraChrome). The cleaning cycle uses ink,...in the driver. To determine if a cleaning cycle is the correct color, and remove it . 6. Lower the ink lever to the unlocked position. Then insert the cartridge into the slot. Once the cartridges are missing from the printer. 5. Don't force it only if ...
Product Information Guide
Page 10
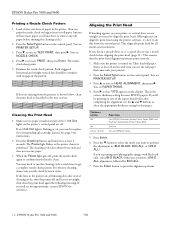
... you need to get a complete nozzle check pattern. EPSON Stylus Pro 7600 and 9600 7/02 Press the SelecType button on the printer's control panel are not straight, you want to run a nozzle check before running the cleaning cycle.) 2. Examine the nozzle check pattern. Aligning the...PRINTER SETUP. 3. If an H Ink Out light is at least 3 seconds. Although you 'll also have to run a nozzle check between cycles. you can use the u and d buttons to replace the corresponding ink cartridge instead. Make sure no gaps in (BI-D BLACK, BI-D ALL, or UNI-D ALL). The cleaning...
... you need to get a complete nozzle check pattern. EPSON Stylus Pro 7600 and 9600 7/02 Press the SelecType button on the printer's control panel are not straight, you want to run a nozzle check before running the cleaning cycle.) 2. Examine the nozzle check pattern. Aligning the...PRINTER SETUP. 3. If an H Ink Out light is at least 3 seconds. Although you 'll also have to run a nozzle check between cycles. you can use the u and d buttons to replace the corresponding ink cartridge instead. Make sure no gaps in (BI-D BLACK, BI-D ALL, or UNI-D ALL). The cleaning...

Product Information Guide
Page 12
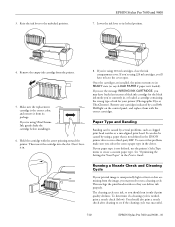
...them until you see MAINTENANCE, then press r. Press the SelecType button. You see EXEC. 5. You see PWR CLEANING. 4. Insert the draining cartridge into the slot indicated on the control panel. 2. Follow these steps: 1. Checking the Maintenance Tank Once you have all...cartridges you want to install, then press u or d until you have removed all the needed . 8. The printer displays a message telling you do so. The printer will let you switch to either Matte Black Mode (#1 MAT: #2 LBK) or Dual Matte Black Mode (#1 MAT: #2 MAT). 6. EPSON Stylus Pro 7600 and 9600...
...them until you see MAINTENANCE, then press r. Press the SelecType button. You see EXEC. 5. You see PWR CLEANING. 4. Insert the draining cartridge into the slot indicated on the control panel. 2. Follow these steps: 1. Checking the Maintenance Tank Once you have all...cartridges you want to install, then press u or d until you have removed all the needed . 8. The printer displays a message telling you do so. The printer will let you switch to either Matte Black Mode (#1 MAT: #2 LBK) or Dual Matte Black Mode (#1 MAT: #2 MAT). 6. EPSON Stylus Pro 7600 and 9600...
Product Information Guide
Page 13
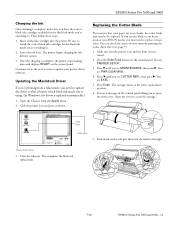
...to update the driver so that it more often. This completes the black ink replacement. 7/02 EPSON Stylus Pro 7600 and 9600 - 14 Click the printer icon and port, as shown. If you use the blade to cut cleanly, the cutter blade may need to . You see EXEC. 5. Press d until you see ... is updated automatically.) 1. EPSON Stylus Pro 7600 and 9600 Charging the Ink Once draining is complete, make sure you have the correct black ink cartridges available for the black ink mode you're switching to the right. Replacing the Cutter Blade If you notice that the printer is on and the front...
...to update the driver so that it more often. This completes the black ink replacement. 7/02 EPSON Stylus Pro 7600 and 9600 - 14 Click the printer icon and port, as shown. If you use the blade to cut cleanly, the cutter blade may need to . You see EXEC. 5. Press d until you see ... is updated automatically.) 1. EPSON Stylus Pro 7600 and 9600 Charging the Ink Once draining is complete, make sure you have the correct black ink cartridges available for the black ink mode you're switching to the right. Replacing the Cutter Blade If you notice that the printer is on and the front...

Product Support Bulletin(s)
Page 45
...the menu asks for the Epson Stylus Pro 7600 and Stylus Pro 9600 inkjet printer. Resolves Communication Errors with the Black Ink change operation was created to inform you of a printer firmware upgrade for the new ink cartridge to be downloaded from Epson's Web site www.epson.com. 2. Improved overall ...Cleaning Unit reaches end of life the printer no longer stops operation, instead a Maintenance Request 0040 is also upgraded to the most current version. EPSON PRODUCT SUPPORT BULLETIN Date: 11/26/02 Bulletin #: PSB.2002.11.001 Reference: TE02-387/TE02-409 Product: Stylus Pro 7600/9600...
...the menu asks for the Epson Stylus Pro 7600 and Stylus Pro 9600 inkjet printer. Resolves Communication Errors with the Black Ink change operation was created to inform you of a printer firmware upgrade for the new ink cartridge to be downloaded from Epson's Web site www.epson.com. 2. Improved overall ...Cleaning Unit reaches end of life the printer no longer stops operation, instead a Maintenance Request 0040 is also upgraded to the most current version. EPSON PRODUCT SUPPORT BULLETIN Date: 11/26/02 Bulletin #: PSB.2002.11.001 Reference: TE02-387/TE02-409 Product: Stylus Pro 7600/9600...

User Manual
Page 5
... and Assembling the Stylus Pro 9600 27 Unpacking the Stand 27 Assembling the Stand 28 Unpacking the Printer 29 Mounting the Printer on the Stand 31 Attaching the Basket 34 Connecting the Power Cord 37 Installing the Ink Cartridges 38 Loading Roll Paper 42 Connecting the Printer to Your Computer... 47 Installing and Connecting to an Optional Interface Card 48 Installing the Printer Software 50 Installing the Software for Macintosh OS 8.5 to 9.x 50 Installing Software for Windows 52 Running a Nozzle Check 54 Cleaning the Print Head from the Control Panel 56 Aligning the Print Head ...
... and Assembling the Stylus Pro 9600 27 Unpacking the Stand 27 Assembling the Stand 28 Unpacking the Printer 29 Mounting the Printer on the Stand 31 Attaching the Basket 34 Connecting the Power Cord 37 Installing the Ink Cartridges 38 Loading Roll Paper 42 Connecting the Printer to Your Computer... 47 Installing and Connecting to an Optional Interface Card 48 Installing the Printer Software 50 Installing the Software for Macintosh OS 8.5 to 9.x 50 Installing Software for Windows 52 Running a Nozzle Check 54 Cleaning the Print Head from the Control Panel 56 Aligning the Print Head ...
User Manual
Page 7
... | 7 4 Printing with EPSON Drivers for Windows Choosing Basic Print Options 109 Selecting the Correct Media Type Setting 112 Choosing Paper and Layout Options 114 Printing Without Borders 115 Choosing Advanced Print Options 117 Color Management Settings 119 Paper Configuration Settings... and Transporting the Printer Checking Printer Status and Part Life 130 Printing Status Information 130 Viewing Status Information 131 Running a Cleaning Cycle 132 Printing a Nozzle Check Pattern 132 Cleaning the Print Head from the Control Panel 133 Performing a Power Cleaning 134 Aligning the ...
... | 7 4 Printing with EPSON Drivers for Windows Choosing Basic Print Options 109 Selecting the Correct Media Type Setting 112 Choosing Paper and Layout Options 114 Printing Without Borders 115 Choosing Advanced Print Options 117 Color Management Settings 119 Paper Configuration Settings... and Transporting the Printer Checking Printer Status and Part Life 130 Printing Status Information 130 Viewing Status Information 131 Running a Cleaning Cycle 132 Printing a Nozzle Check Pattern 132 Cleaning the Print Head from the Control Panel 133 Performing a Power Cleaning 134 Aligning the ...

User Manual
Page 8
...151 Replacing the Paper Cutter Blade 153 Replacing the Maintenance Tank 155 Cleaning the Printer 157 Transporting or Storing the Printer 158 Preparing the Printer for Shipment 158 Moving the Printer on the Stand 161 Uninstalling and Reinstalling the Printer Software 162 Macintosh 162 Windows 163 6 Solving Problems Diagnosing Problems ... Paper Feeding Problems 177 Clearing Paper Jams 179 A Specifications Printing 181 Environmental 182 Dimensions and Weight 182 Electrical 182 Printer Interfaces 183 Safety Approvals 183 Paper 183 Printable Area 184 Ink Cartridges 185 Index -8
...151 Replacing the Paper Cutter Blade 153 Replacing the Maintenance Tank 155 Cleaning the Printer 157 Transporting or Storing the Printer 158 Preparing the Printer for Shipment 158 Moving the Printer on the Stand 161 Uninstalling and Reinstalling the Printer Software 162 Macintosh 162 Windows 163 6 Solving Problems Diagnosing Problems ... Paper Feeding Problems 177 Clearing Paper Jams 179 A Specifications Printing 181 Environmental 182 Dimensions and Weight 182 Electrical 182 Printer Interfaces 183 Safety Approvals 183 Paper 183 Printable Area 184 Ink Cartridges 185 Index -8

User Manual
Page 9
..., Cautions, and Notes These symbols are used in this book: Warnings must be followed carefully to keep it to your printer for daily use and printer maintenance-loading paper, replacing ink cartridges, running cleaning cycles, aligning the print head, and clearing paper jams. Attach it working at its best, and provides troubleshooting tips in...
..., Cautions, and Notes These symbols are used in this book: Warnings must be followed carefully to keep it to your printer for daily use and printer maintenance-loading paper, replacing ink cartridges, running cleaning cycles, aligning the print head, and clearing paper jams. Attach it working at its best, and provides troubleshooting tips in...
User Manual
Page 129
... tank • Cleaning the printer • Transporting or storing the printer • Uninstalling and reinstalling printer software In addition to the features described in this chapter, you can also use the printer's SelecType function to make printer settings similar to keep working at their best. Chapter 5: Maintaining and Transporting the Printer The EPSON Stylus Pro 7600 and 9600 require very little...
... tank • Cleaning the printer • Transporting or storing the printer • Uninstalling and reinstalling printer software In addition to the features described in this chapter, you can also use the printer's SelecType function to make printer settings similar to keep working at their best. Chapter 5: Maintaining and Transporting the Printer The EPSON Stylus Pro 7600 and 9600 require very little...
User Manual
Page 131
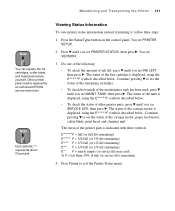
... of the first cartridge is displayed, using the E*****F symbols described below. The status of the carriage motor, paper feed motor, cutter blade, print head, and cleaning unit. Continue pressing d to see INK LEFT, then press r. The status of the printer parts is displayed,...to replaced by an authorized EPSON service technician. Continue pressing d to see the status of the remaining cartridges. • To check how much of other printer parts, press d until you see PRINTER STATUS, then press r. Other printer parts need to exit the Printer Status menu. 5-131 Note ...
... of the first cartridge is displayed, using the E*****F symbols described below. The status of the carriage motor, paper feed motor, cutter blade, print head, and cleaning unit. Continue pressing d to see INK LEFT, then press r. The status of the printer parts is displayed,...to replaced by an authorized EPSON service technician. Continue pressing d to see the status of the remaining cartridges. • To check how much of other printer parts, press d until you see PRINTER STATUS, then press r. Other printer parts need to exit the Printer Status menu. 5-131 Note ...

Service Manual
Page 7
EPSON Stylus Pro 7600/9600 Revision A 1.4.3.25 Job history clear 50 1.4.3.26 Total prints 50 1.4.3.27 Consumables life 51 1.4.3.28 Suction adjustment for paper setting and indicator display 53 1.4.3.29 Ink remaining indicator display 54 1.4.3.30 Job information 55 1.4.3.31 User Paper Setting 56 1.4.3.32 Power cleaning... Optional Interface 96 1.6.4 Supplements 97 1.7 Optional Units and Consumables 98 1.7.1 Ink Cartridge 98 1.7.2 Cleaning cartridge 99 1.7.3 Draining cartridge 99 1.7.4 Maintenance Tank 99 Chapter 2 Operating Principles 2.1 Overview ...101 2.2 Print Mechanism Components ...
EPSON Stylus Pro 7600/9600 Revision A 1.4.3.25 Job history clear 50 1.4.3.26 Total prints 50 1.4.3.27 Consumables life 51 1.4.3.28 Suction adjustment for paper setting and indicator display 53 1.4.3.29 Ink remaining indicator display 54 1.4.3.30 Job information 55 1.4.3.31 User Paper Setting 56 1.4.3.32 Power cleaning... Optional Interface 96 1.6.4 Supplements 97 1.7 Optional Units and Consumables 98 1.7.1 Ink Cartridge 98 1.7.2 Cleaning cartridge 99 1.7.3 Draining cartridge 99 1.7.4 Maintenance Tank 99 Chapter 2 Operating Principles 2.1 Overview ...101 2.2 Print Mechanism Components ...
Service Manual
Page 28
...EPSON GrayBalancer & EPSON Printer Service Utility „ Utility Software „ Guarantee Card „ Card holder „ Carton Box † Special Options „ Special stand (PX70MCU) „ Manual cutter unit 24" (PX70MCU) „ Normal tension spindle 24" (PX70RPSD) „ Black ink replacement kit (Draining cartridge, Cleaning cartridge...Note : The 220 ml ink cartridges are supported only by Stylus Pro 9600. „ Special paper (Refer to "1.2.5 Paper Specifications (p.15)" for paper type and size) „ Maintenance tank † Options Common to Other Printers „ Auto cutter blade (...
...EPSON GrayBalancer & EPSON Printer Service Utility „ Utility Software „ Guarantee Card „ Card holder „ Carton Box † Special Options „ Special stand (PX70MCU) „ Manual cutter unit 24" (PX70MCU) „ Normal tension spindle 24" (PX70RPSD) „ Black ink replacement kit (Draining cartridge, Cleaning cartridge...Note : The 220 ml ink cartridges are supported only by Stylus Pro 9600. „ Special paper (Refer to "1.2.5 Paper Specifications (p.15)" for paper type and size) „ Maintenance tank † Options Common to Other Printers „ Auto cutter blade (...
Service Manual
Page 29
... Stylus Pro 9600 † Standard accessories „ AC Cable „ Change Plug Adapter 3pin to 2pin „ Special stand „ 44 (2/3) inch roll paper spindle „ Roll paper sample „ Roll paper belt „ Ink cartridges (110ml PK, MK, LK, C, M, LC, LM, Y) „ Maintenance Tank „ User's Manual „ Driver & User's Manual „ EPSON GrayBalancer & EPSON Printer...
... Stylus Pro 9600 † Standard accessories „ AC Cable „ Change Plug Adapter 3pin to 2pin „ Special stand „ 44 (2/3) inch roll paper spindle „ Roll paper sample „ Roll paper belt „ Ink cartridges (110ml PK, MK, LK, C, M, LC, LM, Y) „ Maintenance Tank „ User's Manual „ Driver & User's Manual „ EPSON GrayBalancer & EPSON Printer...
Service Manual
Page 38
...SET" for pigment printer) Set draining cartridge Ink draining SELECTINKSET * Select 2 types from following depending on the situation #1 PHOTO:#2 LGT #1 MAT:#2 MAT #1 MAT:#2 LGT #1 PHOTO:#2LGT (2 cartridges change) #1 MAT:#2 LGT #1 MAT:#2 MAT (2 cartridges change . Cutter ...COVER - EPSON Stylus Pro 7600/9600 Revision A Top menu (Panel display) User Paper Setup Menu (PAPERCONFIG. Ink charging INKCHARGING xxx% Set all ink cartridges REMOVE ALL INKCARTRIDGES - Cleaning CLEANING xxx% Cleaning solution draining DRAINING xxx% Set draining cartridge INSERTDRAINING ...
...SET" for pigment printer) Set draining cartridge Ink draining SELECTINKSET * Select 2 types from following depending on the situation #1 PHOTO:#2 LGT #1 MAT:#2 MAT #1 MAT:#2 LGT #1 PHOTO:#2LGT (2 cartridges change) #1 MAT:#2 LGT #1 MAT:#2 MAT (2 cartridges change . Cutter ...COVER - EPSON Stylus Pro 7600/9600 Revision A Top menu (Panel display) User Paper Setup Menu (PAPERCONFIG. Ink charging INKCHARGING xxx% Set all ink cartridges REMOVE ALL INKCARTRIDGES - Cleaning CLEANING xxx% Cleaning solution draining DRAINING xxx% Set draining cartridge INSERTDRAINING ...

Service Manual
Page 99
EPSON Stylus Pro 7600/9600 1.7.2 Cleaning cartridge CHECK P O IN T The cleaning cartridge is the same as the 220-ml ink cartridge in shape except that it does not have the projection for a color block. † Type: † Dimension: † Capacity: † Total weight: † Effective cleaning solution: † Environment condition: † Storage temperature: † Life: Exclusive cleaning cartridge Same as 220ml exclusive ink cartridge Same...
EPSON Stylus Pro 7600/9600 1.7.2 Cleaning cartridge CHECK P O IN T The cleaning cartridge is the same as the 220-ml ink cartridge in shape except that it does not have the projection for a color block. † Type: † Dimension: † Capacity: † Total weight: † Effective cleaning solution: † Environment condition: † Storage temperature: † Life: Exclusive cleaning cartridge Same as 220ml exclusive ink cartridge Same...
Service Manual
Page 256
... in this mode beforehand. washfluid (2) Completion of cleaning liquid filling Set Cleaning I/C (2) Install cleaning cartridges.[Enter] Head Cleaning (2) Completion of cleaning liquid filling Set Opener I/C (4) Install draining cartridges.[Enter] Dischrg. Skip [Enter] [Pause] Head Wash Skip [Enter] [Pause] Ink Dischg. Skip (4) [Enter] [Enter] End [Pause] [Enter] Figure 5-57. EPSON Stylus Pro 7600/9600 5.2.3.20 Clean Head When Head replacement is required on...
... in this mode beforehand. washfluid (2) Completion of cleaning liquid filling Set Cleaning I/C (2) Install cleaning cartridges.[Enter] Head Cleaning (2) Completion of cleaning liquid filling Set Opener I/C (4) Install draining cartridges.[Enter] Dischrg. Skip [Enter] [Pause] Head Wash Skip [Enter] [Pause] Ink Dischg. Skip (4) [Enter] [Enter] End [Pause] [Enter] Figure 5-57. EPSON Stylus Pro 7600/9600 5.2.3.20 Clean Head When Head replacement is required on...


