
Network Guide
Page 31
.... You can distinguish the network interface by its MAC address. Yellow indicates that the printer is low. Network Software 31 Green indicates that either the paper or ink is idle or printing. AppleTalk Configure the desired settings for Printing Control. ...paper jam, the cover is not updated automatically. Displays the current time. The printer status is open, or an error has occurred. Optional Administrator Type the name of the printer attached to a favorite Web site. Configuration - Red indicates that either Auto, MDI, or MDI-X The background color...
.... You can distinguish the network interface by its MAC address. Yellow indicates that the printer is low. Network Software 31 Green indicates that either the paper or ink is idle or printing. AppleTalk Configure the desired settings for Printing Control. ...paper jam, the cover is not updated automatically. Displays the current time. The printer status is open, or an error has occurred. Optional Administrator Type the name of the printer attached to a favorite Web site. Configuration - Red indicates that either Auto, MDI, or MDI-X The background color...
Printer Guide
Page 5
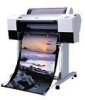
... Important Safety Instructions 13 Ink Cartridge Safety Instructions 15 Printer Parts 16 1 Setting Up the Printer Unpacking and Assembling the Epson Stylus Pro 7880 17 Unpacking and Assembling the Stand 18 Unpacking the Printer 20 Mounting the Printer on the Stand 22 Attaching the Paper Basket 25 Unpacking and Assembling the Epson Stylus Pro 9880 27 Unpacking and Assembling the Stand 28...
... Important Safety Instructions 13 Ink Cartridge Safety Instructions 15 Printer Parts 16 1 Setting Up the Printer Unpacking and Assembling the Epson Stylus Pro 7880 17 Unpacking and Assembling the Stand 18 Unpacking the Printer 20 Mounting the Printer on the Stand 22 Attaching the Paper Basket 25 Unpacking and Assembling the Epson Stylus Pro 9880 27 Unpacking and Assembling the Stand 28...
Printer Guide
Page 6
... for Thick or Thin Paper 61 Using the Paper Basket 62 Catching Printouts From the Epson Stylus Pro 7880 62 Catching Printouts in Front of the Epson Stylus Pro 9880 64 Catching Printouts Under the Epson Stylus Pro 9880 65 Optimizing the Settings for Your Paper 67 Creating Paper Configurations 67 Printing Your Paper Configurations 69 Selecting Paper Configurations 69 3 Printing With Epson Drivers for Macintosh Sizing...
... for Thick or Thin Paper 61 Using the Paper Basket 62 Catching Printouts From the Epson Stylus Pro 7880 62 Catching Printouts in Front of the Epson Stylus Pro 9880 64 Catching Printouts Under the Epson Stylus Pro 9880 65 Optimizing the Settings for Your Paper 67 Creating Paper Configurations 67 Printing Your Paper Configurations 69 Selecting Paper Configurations 69 3 Printing With Epson Drivers for Macintosh Sizing...
Printer Guide
Page 7
...7 4 Printing With Epson Drivers for Windows Sizing Images for Borderless Printing on Roll Paper 90 Choosing Basic Print Options 91 Selecting the Correct Media Type Setting 93 Choosing Color Management Options 95 Choosing Roll Paper Options 97 Choosing Cut Sheet Paper Options 100 Choosing Page...Speed 114 Setting Monitoring Preferences 115 5 Maintaining and Transporting the Printer Checking Printer Status and Part Life 117 Printing Status Information 118 Viewing Status Information 118 Checking Printer Status From the Printer Driver 120 Checking and Cleaning the Print Head 121 Running ...
...7 4 Printing With Epson Drivers for Windows Sizing Images for Borderless Printing on Roll Paper 90 Choosing Basic Print Options 91 Selecting the Correct Media Type Setting 93 Choosing Color Management Options 95 Choosing Roll Paper Options 97 Choosing Cut Sheet Paper Options 100 Choosing Page...Speed 114 Setting Monitoring Preferences 115 5 Maintaining and Transporting the Printer Checking Printer Status and Part Life 117 Printing Status Information 118 Viewing Status Information 118 Checking Printer Status From the Printer Driver 120 Checking and Cleaning the Print Head 121 Running ...
Printer Guide
Page 8
... Operational Problems 156 Solving Miscellaneous Printing Problems 157 Solving Paper Problems 158 Fixing Paper Eject Problems 159 Clearing Paper Jams 160 Uninstalling and Reinstalling the Printer Driver 162 A Specifications Environmental 163 Electrical 163 Dimensions and Weight 164 Printer Interfaces 164 Safety Approvals 164 Media 164 Roll Paper 164 Cut Sheets 165 Printable Area 167 Ink Cartridges...
... Operational Problems 156 Solving Miscellaneous Printing Problems 157 Solving Paper Problems 158 Fixing Paper Eject Problems 159 Clearing Paper Jams 160 Uninstalling and Reinstalling the Printer Driver 162 A Specifications Environmental 163 Electrical 163 Dimensions and Weight 164 Printer Interfaces 164 Safety Approvals 164 Media 164 Roll Paper 164 Cut Sheets 165 Printable Area 167 Ink Cartridges...
Printer Guide
Page 9
... damage to avoid bodily injury. Warnings, Cautions, Notes, and Tips Please follow these guidelines as you how to maintain your printer to your printer for setting up and using your printer, loading paper, using the Epson® printer drivers, and replacing ink cartridges. 11 Introduction This Printer Guide provides important information on setting up and using your...
... damage to avoid bodily injury. Warnings, Cautions, Notes, and Tips Please follow these guidelines as you how to maintain your printer to your printer for setting up and using your printer, loading paper, using the Epson® printer drivers, and replacing ink cartridges. 11 Introduction This Printer Guide provides important information on setting up and using your...

Printer Guide
Page 10
... 44-inch Take-Up Reel Core (Pro 9880 only) Paper Roller Spindle (Normal Tension) - 2- or 3-inch Epson Stylus Pro 7880: Epson Stylus Pro 9880: Paper Roller Spindle (High Tension) - 2- Options and Accessories Your Epson Stylus® Pro 7880/9880 offers these user-replaceable items: Consumables and user-replaceable parts Part Replacement Ink Maintenance Tank (see page 157) Replacement Printer Cutter Blade (see page 154) Ink...
... 44-inch Take-Up Reel Core (Pro 9880 only) Paper Roller Spindle (Normal Tension) - 2- or 3-inch Epson Stylus Pro 7880: Epson Stylus Pro 9880: Paper Roller Spindle (High Tension) - 2- Options and Accessories Your Epson Stylus® Pro 7880/9880 offers these user-replaceable items: Consumables and user-replaceable parts Part Replacement Ink Maintenance Tank (see page 157) Replacement Printer Cutter Blade (see page 154) Ink...

Printer Guide
Page 11
... Or you can purchase online at epson.com/support and select your product for installing the printer software 13 sales) or www.epson.ca (Canadian sales). You'll also need your printer serial number and proof of free ...Epson's support website at www.proimaging.epson.com (U.S. sales), www.epson.ca (Canadian sales), or call (562) 276-1305. Dial (888) 377-6611, 6 AM to common problems. You can purchase optional equipment and genuine Epson ink and paper from an Epson Professional Imaging Authorized Reseller. Introduction | 13 Tip: If you experience difficulty with your printer...
... Or you can purchase online at epson.com/support and select your product for installing the printer software 13 sales) or www.epson.ca (Canadian sales). You'll also need your printer serial number and proof of free ...Epson's support website at www.proimaging.epson.com (U.S. sales), www.epson.ca (Canadian sales), or call (562) 276-1305. Dial (888) 377-6611, 6 AM to common problems. You can purchase optional equipment and genuine Epson ink and paper from an Epson Professional Imaging Authorized Reseller. Introduction | 13 Tip: If you experience difficulty with your printer...
Printer Guide
Page 13
... sure you use the equipment safely and effectively. • The printer weighs about 108 lb (49 kg) [Epson Stylus Pro 7880] or 198 lb (90 kg) [Epson Stylus Pro 9880] without ink or paper. Using it . (See page 19 for the Pro 7880 or page 29 for use a damaged or frayed power cord. 15 Use of another cord may result in...
... sure you use the equipment safely and effectively. • The printer weighs about 108 lb (49 kg) [Epson Stylus Pro 7880] or 198 lb (90 kg) [Epson Stylus Pro 9880] without ink or paper. Using it . (See page 19 for the Pro 7880 or page 29 for use a damaged or frayed power cord. 15 Use of another cord may result in...
Printer Guide
Page 16
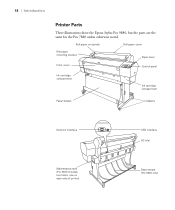
18 | Introduction Printer Parts These illustrations show the Epson Stylus Pro 9880, but the parts are the same for the Pro 7880 unless otherwise noted. Roll paper on spindle Roll paper cover Roll paper mounting bracket Paper lever Front cover Control panel Ink cartridge compartment Ink cartridge compartment Paper basket Casters Network interface Maintenance tank (Pro 9880 includes two tanks, one on each side of printer) 18 USB interface AC inlet Paper straps (Pro 9880 only)
18 | Introduction Printer Parts These illustrations show the Epson Stylus Pro 9880, but the parts are the same for the Pro 7880 unless otherwise noted. Roll paper on spindle Roll paper cover Roll paper mounting bracket Paper lever Front cover Control panel Ink cartridge compartment Ink cartridge compartment Paper basket Casters Network interface Maintenance tank (Pro 9880 includes two tanks, one on each side of printer) 18 USB interface AC inlet Paper straps (Pro 9880 only)

Printer Guide
Page 18
20 | Setting Up the Printer Unpacking and Assembling the Stand 1. Unpack the stand and make sure you have all these items. Parts: 2 Bases 2 Legs Bottom horizontal strut Top horizontal strut Tools and Accessories: 4 Basket hooks Paper basket 2 Hex wrenches 4 Base bolts 10 Hex screws with washers 2 Strut bolts 2 Wing screws with 2 lock washers 20
20 | Setting Up the Printer Unpacking and Assembling the Stand 1. Unpack the stand and make sure you have all these items. Parts: 2 Bases 2 Legs Bottom horizontal strut Top horizontal strut Tools and Accessories: 4 Basket hooks Paper basket 2 Hex wrenches 4 Base bolts 10 Hex screws with washers 2 Strut bolts 2 Wing screws with 2 lock washers 20

Printer Guide
Page 20
Unpacking the Printer 1. 22 | Setting Up the Printer 5. Make sure each part of the stand is tightened securely. Open the box and remove the roll paper, spindle, polystyrene foam, and cardboard cushions. 22 Use the small hex wrench to fasten the 10 hex screws with washers. 6. Attach the top horizontal strut as shown.
Unpacking the Printer 1. 22 | Setting Up the Printer 5. Make sure each part of the stand is tightened securely. Open the box and remove the roll paper, spindle, polystyrene foam, and cardboard cushions. 22 Use the small hex wrench to fasten the 10 hex screws with washers. 6. Attach the top horizontal strut as shown.
Printer Guide
Page 21
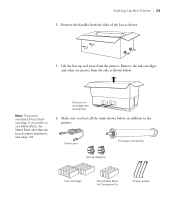
... ink cartridges and other accessories from the printer. Note: The printer includes a Photo Black cartridge. Lift the box up and away from the side as shown. 3. Setting Up the Printer | 23 2. Make sure you prefer to the printer: Power cord Roll paper and spindle Spindle adapters 8 Ink cartridges... Photo/Matte Black Ink Conversion Kit 23 2 Paper guides See page 144. Remove the handles from the sides...
... ink cartridges and other accessories from the printer. Note: The printer includes a Photo Black cartridge. Lift the box up and away from the side as shown. 3. Setting Up the Printer | 23 2. Make sure you prefer to the printer: Power cord Roll paper and spindle Spindle adapters 8 Ink cartridges... Photo/Matte Black Ink Conversion Kit 23 2 Paper guides See page 144. Remove the handles from the sides...

Printer Guide
Page 24
Remove any packing tape. Open the front cover. Bolt 26 Fasten the printer to locate the bolt and bracket securing the print head. Save the bolt and bracket in the printer. 5. Then unscrew the bolt and remove the bracket as shown. 26 | Setting Up the Printer 4. Note: To prevent paper jams, don't place the bolt back in case you need to ship the printer. Follow the red wire to the stand with the wing screws and washers. Check these areas: • the front cover • the ink compartment covers • the maintenance tank (on the right side near the bottom) 6.
Remove any packing tape. Open the front cover. Bolt 26 Fasten the printer to locate the bolt and bracket securing the print head. Save the bolt and bracket in the printer. 5. Then unscrew the bolt and remove the bracket as shown. 26 | Setting Up the Printer 4. Note: To prevent paper jams, don't place the bolt back in case you need to ship the printer. Follow the red wire to the stand with the wing screws and washers. Check these areas: • the front cover • the ink compartment covers • the maintenance tank (on the right side near the bottom) 6.

Printer Guide
Page 25
Attaching the Paper Basket The paper basket is a cloth sheet that attaches to the printer stand and catches your prints as shown. Attach the basket hooks as they come out. 1. Setting Up the Printer | 27 Caution: Do not touch the area shown below or you may damage the printer. The free ends of the hooks should point outward. 27
Attaching the Paper Basket The paper basket is a cloth sheet that attaches to the printer stand and catches your prints as shown. Attach the basket hooks as they come out. 1. Setting Up the Printer | 27 Caution: Do not touch the area shown below or you may damage the printer. The free ends of the hooks should point outward. 27
Printer Guide
Page 27
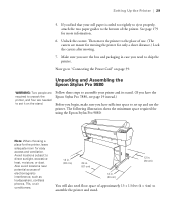
... Cord" on the stand. Follow these steps to assemble your printer and its stand. (If you have the Epson Stylus Pro 7880, see page 19 instead.) Before you begin, make sure you find that your roll paper is curled too tightly to eject properly, attach the two paper guides to direct sunlight, excessive heat, moisture, or dust...
... Cord" on the stand. Follow these steps to assemble your printer and its stand. (If you have the Epson Stylus Pro 7880, see page 19 instead.) Before you begin, make sure you find that your roll paper is curled too tightly to eject properly, attach the two paper guides to direct sunlight, excessive heat, moisture, or dust...

Printer Guide
Page 28
Unpack the stand and make sure you have all these items: Parts: Support bar Base sections Basket hooks Paper basket Tools and Accessories: Hex wrench 4 Bolts 2 Wing nuts with spring washers and plain washers 5 Paper supports 30 30 | Setting Up the Printer Unpacking and Assembling the Stand 1. Open the box and remove the handles from the sides of the box. 2. Lift the box up, then set it aside. 3.
Unpack the stand and make sure you have all these items: Parts: Support bar Base sections Basket hooks Paper basket Tools and Accessories: Hex wrench 4 Bolts 2 Wing nuts with spring washers and plain washers 5 Paper supports 30 30 | Setting Up the Printer Unpacking and Assembling the Stand 1. Open the box and remove the handles from the sides of the box. 2. Lift the box up, then set it aside. 3.
Printer Guide
Page 29
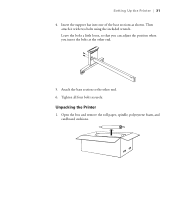
Then attach it with two bolts using the included wrench. Attach the base section to the other end. 5. Insert the support bar into one of the base sections as shown. Tighten all four bolts securely. Setting Up the Printer | 31 4. Leave the bolts a little loose, so that you can adjust the position when you insert the bolts at the other end. 6. Unpacking the Printer 1. Open the box and remove the roll paper, spindle, polystyrene foam, and cardboard cushions. 31
Then attach it with two bolts using the included wrench. Attach the base section to the other end. 5. Insert the support bar into one of the base sections as shown. Tighten all four bolts securely. Setting Up the Printer | 31 4. Leave the bolts a little loose, so that you can adjust the position when you insert the bolts at the other end. 6. Unpacking the Printer 1. Open the box and remove the roll paper, spindle, polystyrene foam, and cardboard cushions. 31
Printer Guide
Page 30
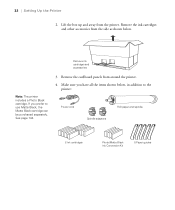
... other accessories from around the printer. 4. Remove the cardboard panels from the side as shown below , in addition to use Matte Black, the Matte Black cartridge can be purchased separately. See page 144. 3. Lift the box up and away from the printer. If you have all the... items shown below . Remove ink cartridges and accessories # " Note: The printer includes a Photo Black cartridge. Make sure you prefer to the printer: Power cord Spindle adapters Roll paper and spindle 8 Ink cartridges Photo/Matte Black Ink ...
... other accessories from around the printer. 4. Remove the cardboard panels from the side as shown below , in addition to use Matte Black, the Matte Black cartridge can be purchased separately. See page 144. 3. Lift the box up and away from the printer. If you have all the... items shown below . Remove ink cartridges and accessories # " Note: The printer includes a Photo Black cartridge. Make sure you prefer to the printer: Power cord Spindle adapters Roll paper and spindle 8 Ink cartridges Photo/Matte Black Ink ...

Printer Guide
Page 34
Unlock the casters, move the printer to the place of use, and lock the casters. (The casters are meant for moving the printer for only a short distance.) Attaching the Paper Basket The paper basket is a cloth sheet that attaches to the upper guides on the left and right sides: 36 36 | Setting Up the Printer Caution: Do not touch the area shown below or you may damage the printer. 7. Attach the basket hooks to the printer stand and catches your prints as they come out. 1. Close the front cover. 8.
Unlock the casters, move the printer to the place of use, and lock the casters. (The casters are meant for moving the printer for only a short distance.) Attaching the Paper Basket The paper basket is a cloth sheet that attaches to the upper guides on the left and right sides: 36 36 | Setting Up the Printer Caution: Do not touch the area shown below or you may damage the printer. 7. Attach the basket hooks to the printer stand and catches your prints as they come out. 1. Close the front cover. 8.

