Product Brochure
Page 2
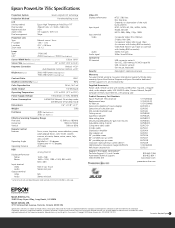
...cable, Owners Manual, EasyMP Software CD-Rom, Start Here Kit, soft carrying case Product/Accessory Part Numbers Epson PowerLite 755c projector Replacement lamp Air filter set Samsonite wheeled soft case w/laptop Samsonite soft shoulder case ATA molded hardshell case... RGB connector); Epson PowerLite 755c Specifications Projection System Epson original LCD technology Projection Method Front/rear/ceiling mount LCD Driving method Pixel number Native resolution Aspect ratio Pixel arrangement Epson High Temperature Poly-Silicon TFT 786,432 dots x 3 (1024 x 768) LCDs XGA 4:3 (supports 16...
...cable, Owners Manual, EasyMP Software CD-Rom, Start Here Kit, soft carrying case Product/Accessory Part Numbers Epson PowerLite 755c projector Replacement lamp Air filter set Samsonite wheeled soft case w/laptop Samsonite soft shoulder case ATA molded hardshell case... RGB connector); Epson PowerLite 755c Specifications Projection System Epson original LCD technology Projection Method Front/rear/ceiling mount LCD Driving method Pixel number Native resolution Aspect ratio Pixel arrangement Epson High Temperature Poly-Silicon TFT 786,432 dots x 3 (1024 x 768) LCDs XGA 4:3 (supports 16...

Product Information Guide
Page 4
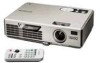
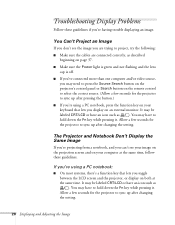
...projecting from a notebook, and you are prompted to display simultaneously on the remote control. You may be labeled CRT/LCD or have to appear, see page 5. Epson PowerLite 755c/765c Projector 3. Warning: Never look into the lens when the lamp is on the remote control to select the correct source.... button.) ❏ If you don't see a New Hardware Wizard saying your computer at the same time. Epson PowerLite 755c/765c Projector 8/05 Press the P Power button on top of the projector or on both at the same time, follow these guidelines. For details, see "You Can't Project an ...
...projecting from a notebook, and you are prompted to display simultaneously on the remote control. You may be labeled CRT/LCD or have to appear, see page 5. Epson PowerLite 755c/765c Projector 3. Warning: Never look into the lens when the lamp is on the remote control to select the correct source.... button.) ❏ If you don't see a New Hardware Wizard saying your computer at the same time. Epson PowerLite 755c/765c Projector 8/05 Press the P Power button on top of the projector or on both at the same time, follow these guidelines. For details, see "You Can't Project an ...
Product Information Guide
Page 5
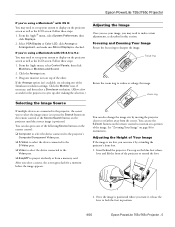
... Image Once you see your system to display on the projector screen as well as the LCD screen. After you select a source, the screen goes dark for instructions. You can raise it , release the lever to lock the foot in position. 8/05 Epson PowerLite 755c/765c Projector - 5 Adjusting the Height of the following Source buttons on...
... Image Once you see your system to display on the projector screen as well as the LCD screen. After you select a source, the screen goes dark for instructions. You can raise it , release the lever to lock the foot in position. 8/05 Epson PowerLite 755c/765c Projector - 5 Adjusting the Height of the following Source buttons on...

Quick Start
Page 2
... adjusted the image as described in the Windows Control Panel. When fully inserted, the end of Seiko Epson Corporation. PowerLite and PrivateLine are for the projector to http://www.presentersonline.com. this sheet. 2 Select EasyMP as , or it may be able to select ...presentations go to sync up.) See your projector appears, select it still doesn't appear, see your projector listed, restart your projector and computer. You may also speak with a projector support specialist by pressing the EasyMP button on both the LCD screen and monitor port are enabled. (...
... adjusted the image as described in the Windows Control Panel. When fully inserted, the end of Seiko Epson Corporation. PowerLite and PrivateLine are for the projector to http://www.presentersonline.com. this sheet. 2 Select EasyMP as , or it may be able to select ...presentations go to sync up.) See your projector appears, select it still doesn't appear, see your projector listed, restart your projector and computer. You may also speak with a projector support specialist by pressing the EasyMP button on both the LCD screen and monitor port are enabled. (...
User's Guide
Page 20
...the projection screen and on your keyboard that lets you toggle between the LCD screen and the projector, or display on an external monitor. You may have to sync up after changing the setting. Allow a few seconds for the projector to hold down the Fn key while pressing it . Allow a ...few seconds for the projector to project, try the following: ■ Make sure the cables are connected correctly, as described beginning on your computer at the same time. You may be labeled CRT/LCD or have an icon such as . If you display on...
...the projection screen and on your keyboard that lets you toggle between the LCD screen and the projector, or display on an external monitor. You may have to sync up after changing the setting. Allow a few seconds for the projector to hold down the Fn key while pressing it . Allow a ...few seconds for the projector to project, try the following: ■ Make sure the cables are connected correctly, as described beginning on your computer at the same time. You may be labeled CRT/LCD or have an icon such as . If you display on...
User's Guide
Page 21
...) tab. Make sure the VGA Display or Color LCD dialog box is checked 4. Make sure the Mirror Displays checkbox is set up your system to make sure both screens, you should check your monitor settings to display on the projector screen as well as your primary display and/or enabled... the Settings tab, then click Advanced. Follow these steps: 1. ■ If the function key doesn't permit you to display simultaneously on both the LCD screen and the external monitor port are enabled. Displaying and Adjusting the Image 21 you may need to click a Monitor tab, then make sure the...
...) tab. Make sure the VGA Display or Color LCD dialog box is checked 4. Make sure the Mirror Displays checkbox is set up your system to make sure both screens, you should check your monitor settings to display on the projector screen as well as your primary display and/or enabled... the Settings tab, then click Advanced. Follow these steps: 1. ■ If the function key doesn't permit you to display simultaneously on both the LCD screen and the external monitor port are enabled. Displaying and Adjusting the Image 21 you may need to click a Monitor tab, then make sure the...

User's Guide
Page 22
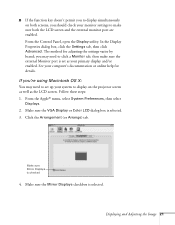
... using OS 8.6 to OS 9.x: You may need to display on top of the other 3. Click the Monitor icon. Select a Simulscan resolution as the LCD screen. Follow these steps: 1. From the Apple menu, select Control Panels, then click Monitors or Monitors and Sound. 2. Click here Select a Simulscan ...resolution 2. Drag one monitor icon on the projector screen as well as shown. (Allow a few seconds for the projector to sync up your system to set up after making the selection.) 22 Displaying and Adjusting the Image Click...
... using OS 8.6 to OS 9.x: You may need to display on top of the other 3. Click the Monitor icon. Select a Simulscan resolution as the LCD screen. Follow these steps: 1. From the Apple menu, select Control Panels, then click Monitors or Monitors and Sound. 2. Click here Select a Simulscan ...resolution 2. Drag one monitor icon on the projector screen as well as shown. (Allow a few seconds for the projector to sync up your system to set up after making the selection.) 22 Displaying and Adjusting the Image Click...
User's Guide
Page 111
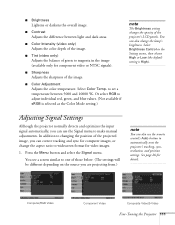
...available only for computer images, or change the lamp's brightness. You can also use the Signal menu to automatically reset the projector's tracking, sync, resolution, and position settings. Press the Menu button and select the Signal menu. You see a screen ...). ■ Sharpness Adjusts the sharpness of the projector's LCD panels. Computer/RGB Video Component Video Composite Video/S-Video Fine-Tuning the Projector 111 See page 26 for video images. 1. Adjusting Signal Settings Although the projector normally detects and optimizes the input signal automatically, ...
...available only for computer images, or change the lamp's brightness. You can also use the Signal menu to automatically reset the projector's tracking, sync, resolution, and position settings. Press the Menu button and select the Signal menu. You see a screen ...). ■ Sharpness Adjusts the sharpness of the projector's LCD panels. Computer/RGB Video Component Video Composite Video/S-Video Fine-Tuning the Projector 111 See page 26 for video images. 1. Adjusting Signal Settings Although the projector normally detects and optimizes the input signal automatically, ...

User's Guide
Page 157
...you toggle between the LCD screen and the projector, or display on both the LCD screen and external monitor port are enabled. Click Displays. 3. If you might need to use the Display utility in the Control Panel to make sure that lets you display on the projector screen as well ...seconds for details. Check your computer's documentation or online help for the projector to sync up after pressing it may have an icon such as the LCD screen. 4. See your notebook's manual or online help for the projector to sync up after making the selection.) Solving Problems 157 Click the...
...you toggle between the LCD screen and the projector, or display on both the LCD screen and external monitor port are enabled. Click Displays. 3. If you might need to use the Display utility in the Control Panel to make sure that lets you display on the projector screen as well ...seconds for details. Check your computer's documentation or online help for the projector to sync up after pressing it may have an icon such as the LCD screen. 4. See your notebook's manual or online help for the projector to sync up after making the selection.) Solving Problems 157 Click the...

User's Guide
Page 159
... using a computer cable longer than 6 feet, or an extension cable, the image quality may be reduced. ■ Keep your notebook computer and the projector, turn off the notebook's LCD display. ■ Make sure the correct input signal is selected in front of the middle of the image is broader, press the or...
... using a computer cable longer than 6 feet, or an extension cable, the image quality may be reduced. ■ Keep your notebook computer and the projector, turn off the notebook's LCD display. ■ Make sure the correct input signal is selected in front of the middle of the image is broader, press the or...


