
User Manual
Page 6
... (PC Interactive Mode 119 PC Interactive Mode System Requirements 121 Using the Interactive Pens ...122 Using the Pens ...122 Pen Calibration ...125 Calibrating Automatically ...126 Calibrating Manually ...128 Using Finger Touch Interactivity ...131 Touch Unit Safety Instructions...132 Calibrating for Finger Touch Interactivity 133 Using Finger Touch Operations 138 Using BrightLink With a Computer 140 6
... (PC Interactive Mode 119 PC Interactive Mode System Requirements 121 Using the Interactive Pens ...122 Using the Pens ...122 Pen Calibration ...125 Calibrating Automatically ...126 Calibrating Manually ...128 Using Finger Touch Interactivity ...131 Touch Unit Safety Instructions...132 Calibrating for Finger Touch Interactivity 133 Using Finger Touch Operations 138 Using BrightLink With a Computer 140 6
User Manual
Page 8
... Function" Message Appears 214 Solutions When the Interactive Pens Do Not Work 214 Solutions When Finger Touch Interactivity Does Not Work 215 Solutions When Manual Calibration Does Not Work 216 8
... Function" Message Appears 214 Solutions When the Interactive Pens Do Not Work 214 Solutions When Finger Touch Interactivity Does Not Work 215 Solutions When Manual Calibration Does Not Work 216 8

User Manual
Page 122
Make sure the pen batteries are installed. 122 Using the Pens Pen Calibration Parent topic: Using the Interactive Features Using the Pens Your projector came with Easy Interactive Tools. except for Service Pack 1 Mac OS X 10.5.x, 10.6.x, or ...
Make sure the pen batteries are installed. 122 Using the Pens Pen Calibration Parent topic: Using the Interactive Features Using the Pens Your projector came with Easy Interactive Tools. except for Service Pack 1 Mac OS X 10.5.x, 10.6.x, or ...

User Manual
Page 125
...Be sure to use the hovering feature, you use the pen as a mouse in PC interactive mode, do not want to calibrate the pen before performing finger touch calibration (BrightLink 595Wi). • To use your cursor. Parent topic: Using the Interactive Pens Related references Projector Setup Settings - Note...the pen. • To move the cursor, hover over the board without touching it off using the Easy Interactive Function in the Pens Pen Calibration Calibration coordinates the position of the following : • To left-click, tap the board with the pen tip. • To double-click, tap...
...Be sure to use the hovering feature, you use the pen as a mouse in PC interactive mode, do not want to calibrate the pen before performing finger touch calibration (BrightLink 595Wi). • To use your cursor. Parent topic: Using the Interactive Pens Related references Projector Setup Settings - Note...the pen. • To move the cursor, hover over the board without touching it off using the Easy Interactive Function in the Pens Pen Calibration Calibration coordinates the position of the following : • To left-click, tap the board with the pen tip. • To double-click, tap...
User Manual
Page 126
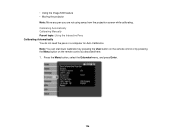
Calibrating Automatically Calibrating Manually Parent topic: Using the Interactive Pens Calibrating Automatically You do not need the pens or a computer for Auto Calibration. Press the Menu button, select the Extended menu, and press Enter. 126 Note: You can start Auto Calibration by pressing the User button on the remote control or by pressing the Menu button on the remote control as described here. 1. • Using the Image Shift feature • Moving the projector Note: Move any pen you are not using away from the projection screen while calibrating.
Calibrating Automatically Calibrating Manually Parent topic: Using the Interactive Pens Calibrating Automatically You do not need the pens or a computer for Auto Calibration. Press the Menu button, select the Extended menu, and press Enter. 126 Note: You can start Auto Calibration by pressing the User button on the remote control or by pressing the Menu button on the remote control as described here. 1. • Using the Image Shift feature • Moving the projector Note: Move any pen you are not using away from the projection screen while calibrating.
User Manual
Page 127
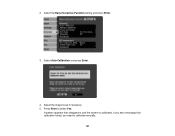
Press Enter to calibrate manually. 127 If you see a message that calibration failed, you need to select Yes. Select the Easy Interactive Function setting and press Enter. 3. Select Auto Calibration and press Enter. 4. Adjust the image focus if necessary. 5. 2. A pattern appears then disappears, and the system is calibrated.
Press Enter to calibrate manually. 127 If you see a message that calibration failed, you need to select Yes. Select the Easy Interactive Function setting and press Enter. 3. Select Auto Calibration and press Enter. 4. Adjust the image focus if necessary. 5. 2. A pattern appears then disappears, and the system is calibrated.
User Manual
Page 128
Parent topic: Pen Calibration Related tasks Calibrating Manually Focusing the Image Calibrating Manually If the cursor location and pen position do not match after calibration. The cursor location and pen position should match after auto calibration, you may need to calibrate manually. Press the Menu button, select the Extended menu, and press Enter. 128 If not, you can calibrate manually. 1.
Parent topic: Pen Calibration Related tasks Calibrating Manually Focusing the Image Calibrating Manually If the cursor location and pen position do not match after calibration. The cursor location and pen position should match after auto calibration, you may need to calibrate manually. Press the Menu button, select the Extended menu, and press Enter. 128 If not, you can calibrate manually. 1.

User Manual
Page 129
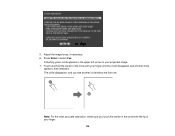
Select Manual Calibration and press Enter. 4. A flashing green circle appears in the upper left corner of the pen. 129 Touch the center of the circle with the tip of your projected image. 6. Press Enter to select Yes. 2. Adjust the image focus if necessary. 5. Select the Easy Interactive Function setting and press Enter. 3.
Select Manual Calibration and press Enter. 4. A flashing green circle appears in the upper left corner of the pen. 129 Touch the center of the circle with the tip of your projected image. 6. Press Enter to select Yes. 2. Adjust the image focus if necessary. 5. Select the Easy Interactive Function setting and press Enter. 3.
User Manual
Page 130
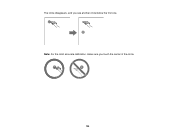
The circle disappears, and you touch the center of the circle. 130 Note: For the most accurate calibration, make sure you see another circle below the first one.
The circle disappears, and you touch the center of the circle. 130 Note: For the most accurate calibration, make sure you see another circle below the first one.
User Manual
Page 131
...perform the same functions as the interactive pens when you install the Touch Unit (BrightLink 595Wi). Parent topic: Pen Calibration Related tasks Focusing the Image Calibrating Automatically Using Finger Touch Interactivity You can use your finger to the projection window on the projector). When you make... a mistake, press the Esc button on installing the Touch Unit and calibrating for finger touch interactivity. 131 If you get to the previous circle. Note: See the Installation Guide for 2 seconds. 8. Continue...
...perform the same functions as the interactive pens when you install the Touch Unit (BrightLink 595Wi). Parent topic: Pen Calibration Related tasks Focusing the Image Calibrating Automatically Using Finger Touch Interactivity You can use your finger to the projection window on the projector). When you make... a mistake, press the Esc button on installing the Touch Unit and calibrating for finger touch interactivity. 131 If you get to the previous circle. Note: See the Installation Guide for 2 seconds. 8. Continue...

User Manual
Page 132
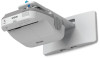
..., high-power laser is emitted from the Touch Unit to pass through or be accompanied by any other projectors or devices. Touch Unit Safety Instructions Calibrating for Finger Touch Interactivity Using Finger Touch Operations Parent topic: Using the Interactive Features Touch Unit Safety Instructions The Touch Unit enables finger touch interactivity...
..., high-power laser is emitted from the Touch Unit to pass through or be accompanied by any other projectors or devices. Touch Unit Safety Instructions Calibrating for Finger Touch Interactivity Using Finger Touch Operations Parent topic: Using the Interactive Features Touch Unit Safety Instructions The Touch Unit enables finger touch interactivity...
User Manual
Page 133
The labels indicating the Class 1 laser product and warnings are located in the following areas on the Touch Unit: Parent topic: Using Finger Touch Interactivity Calibrating for finger touch interactivity. 133 The Touch Unit is a Class 1 laser product that complies with the location of your finger with IEC/EN60825-1:2007. Note: Make sure you have calibrated the pens before calibrating for Finger Touch Interactivity Finger touch calibration coordinates the positioning of the cursor (BrightLink 595Wi).
The labels indicating the Class 1 laser product and warnings are located in the following areas on the Touch Unit: Parent topic: Using Finger Touch Interactivity Calibrating for finger touch interactivity. 133 The Touch Unit is a Class 1 laser product that complies with the location of your finger with IEC/EN60825-1:2007. Note: Make sure you have calibrated the pens before calibrating for Finger Touch Interactivity Finger touch calibration coordinates the positioning of the cursor (BrightLink 595Wi).

User Manual
Page 135
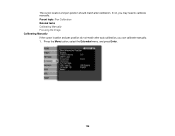
Select Touch Unit Setup and press Enter. 4. Select Touch Calibration and press Enter. The following screen appears: 135 3.
Select Touch Unit Setup and press Enter. 4. Select Touch Calibration and press Enter. The following screen appears: 135 3.
User Manual
Page 136
Touch and hold the center of the circle with the tip of your finger. 136 Note: For the most accurate calibration, make sure you see another circle appears, then release it. The circle disappears, and you touch the center of the circle with your finger until the circle disappears and another circle below the first one. 5. A flashing green circle appears in the upper left corner of your projected image. 7. Press Enter to select Yes. Adjust the image focus, if necessary. 6.
Touch and hold the center of the circle with the tip of your finger. 136 Note: For the most accurate calibration, make sure you see another circle appears, then release it. The circle disappears, and you touch the center of the circle with your finger until the circle disappears and another circle below the first one. 5. A flashing green circle appears in the upper left corner of your projected image. 7. Press Enter to select Yes. Adjust the image focus, if necessary. 6.

User Manual
Page 137
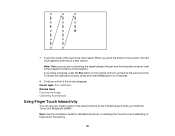
Note: If you get to calibrate again. To restart the calibration process, press and hold the Esc button for 2 seconds. 9. Parent topic: Using Finger Touch Interactivity 137 If the cursor location and your finger and continue ...
Note: If you get to calibrate again. To restart the calibration process, press and hold the Esc button for 2 seconds. 9. Parent topic: Using Finger Touch Interactivity 137 If the cursor location and your finger and continue ...
User Manual
Page 138
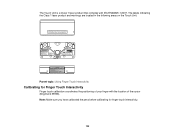
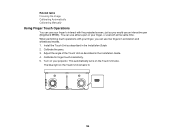
...light on the Touch Unit also. Install the Touch Unit as described in the Installation Guide. 4. Calibrate for finger touch interactivity. 5. This automatically turns on the Touch Unit remains lit. 138 Calibrate the pens. 3. You can use two fingers in the Installation Guide. 2. Turn on your ...projector. Related tasks Focusing the Image Calibrating Automatically Calibrating Manually Using Finger Touch Operations You can use your finger to interact with your finger, you would use an interactive pen ...
...light on the Touch Unit also. Install the Touch Unit as described in the Installation Guide. 4. Calibrate for finger touch interactivity. 5. This automatically turns on the Touch Unit remains lit. 138 Calibrate the pens. 3. You can use two fingers in the Installation Guide. 2. Turn on your ...projector. Related tasks Focusing the Image Calibrating Automatically Calibrating Manually Using Finger Touch Operations You can use your finger to interact with your finger, you would use an interactive pen ...

User Manual
Page 140
... Easy Interactive Function." You can connect a computer to the projector and install the software from the CD labeled "Epson Projector Software for Finger Touch Interactivity Calibrating Automatically Calibrating Manually Using BrightLink With a Computer You can then do the following: • Use the pens or your finger (BrightLink 595Wi) as a mouse to control your...
... Easy Interactive Function." You can connect a computer to the projector and install the software from the CD labeled "Epson Projector Software for Finger Touch Interactivity Calibrating Automatically Calibrating Manually Using BrightLink With a Computer You can then do the following: • Use the pens or your finger (BrightLink 595Wi) as a mouse to control your...

User Manual
Page 163
Setting User Button Pattern Options Power Consumption Info Progressive Closed Caption Test Pattern Resolution Mic Input Level Pattern Display Auto Calibration Pattern Display Pattern Type User Pattern Test Pattern Description Assigns a menu option to the User button on the screen to aid in presentation Pattern Type: ...
Setting User Button Pattern Options Power Consumption Info Progressive Closed Caption Test Pattern Resolution Mic Input Level Pattern Display Auto Calibration Pattern Display Pattern Type User Pattern Test Pattern Description Assigns a menu option to the User button on the screen to aid in presentation Pattern Type: ...
User Manual
Page 164
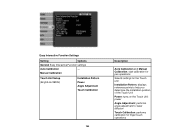
... Unit Setup (BrightLink 595Wi) Installation Pattern Power Angle Adjustment Touch Calibration 164 Description Auto Calibration and Manual Calibration: start calibration for pen operations Selects settings for the Touch unit Installation Pattern: displays reference points to help you determine the ...of the Touch Unit Power: turns on the Touch Unit power Angle Adjustment: performs angle adjustment for laser diffusion Touch Calibration: performs calibration for finger touch operations Easy Interactive Function Settings Setting Options General Easy Interactive Function settings Auto...
... Unit Setup (BrightLink 595Wi) Installation Pattern Power Angle Adjustment Touch Calibration 164 Description Auto Calibration and Manual Calibration: start calibration for pen operations Selects settings for the Touch unit Installation Pattern: displays reference points to help you determine the ...of the Touch Unit Power: turns on the Touch Unit power Angle Adjustment: performs angle adjustment for laser diffusion Touch Calibration: performs calibration for finger touch operations Easy Interactive Function Settings Setting Options General Easy Interactive Function settings Auto...
User Manual
Page 170
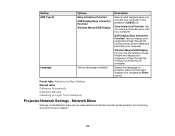
... not available) Selects the language for projector menu and message displays (not changed by Reset option) Parent topic: Adjusting the Menu Settings Related tasks Calibrating Automatically Calibrating Manually Calibrating for monitoring and control over a network. 170 Setting USB Type B Language Options Easy Interactive Function USB Display/Easy Interactive Function Wireless Mouse/USB Display...
... not available) Selects the language for projector menu and message displays (not changed by Reset option) Parent topic: Adjusting the Menu Settings Related tasks Calibrating Automatically Calibrating Manually Calibrating for monitoring and control over a network. 170 Setting USB Type B Language Options Easy Interactive Function USB Display/Easy Interactive Function Wireless Mouse/USB Display...

