
Installation Guide - Express Digital. Darkroom
Page 3
... Advanced tab, select the Manual setting from the Profile Settings menu. 4. When you need to finish setting up your Darkroom Core Edition for Epson software. To view the guides, navigate to reconfigure the printer for Epson software is open the Epson printer driver and select Advanced B&W Photo under the Color setting. Configuring Your Printer for Black and White...
... Advanced tab, select the Manual setting from the Profile Settings menu. 4. When you need to finish setting up your Darkroom Core Edition for Epson software. To view the guides, navigate to reconfigure the printer for Epson software is open the Epson printer driver and select Advanced B&W Photo under the Color setting. Configuring Your Printer for Black and White...

Installation Guide - Express Digital. Darkroom
Page 4
The contents of this manual are registered trademarks of their respective owners. Epson disclaims any and all rights in USA CPD-23621R1 Epson and Epson Stylus are subject to change without notice. © 2007 Epson America, Inc. 11/07 Printed in those marks. General Notice: Other product names used herein are for identification purposes only and may be trademarks of Seiko Epson Corporation.
The contents of this manual are registered trademarks of their respective owners. Epson disclaims any and all rights in USA CPD-23621R1 Epson and Epson Stylus are subject to change without notice. © 2007 Epson America, Inc. 11/07 Printed in those marks. General Notice: Other product names used herein are for identification purposes only and may be trademarks of Seiko Epson Corporation.
Getting Started - ColorBurst RIP installation
Page 2
...computer that is running the RIP server. 1 If you are using the Epson Stylus Pro 7880 or 9880 printer, you need to attach the included USB key to set up the Epson Stylus Pro printer on your printer model. To set up the RIP server, double-click the installer icon... RIP, see one of the following files: ■ Mac OS® X: Applications > ColorBurst Epson > Epson Quick Start Mac.pdf ■ Windows®: C:\ColorBurst Epson > Epson Quick Start Windows.pdf For linearization instructions, see your Epson Stylus® Pro manual to the computer that will run the RIP server.
...computer that is running the RIP server. 1 If you are using the Epson Stylus Pro 7880 or 9880 printer, you need to attach the included USB key to set up the Epson Stylus Pro printer on your printer model. To set up the RIP server, double-click the installer icon... RIP, see one of the following files: ■ Mac OS® X: Applications > ColorBurst Epson > Epson Quick Start Mac.pdf ■ Windows®: C:\ColorBurst Epson > Epson Quick Start Windows.pdf For linearization instructions, see your Epson Stylus® Pro manual to the computer that will run the RIP server.

Getting Started - ColorBurst RIP installation
Page 12
Epson disclaims any and all rights in those marks. ColorBurst is a registered trademark and SpectralVision is a trademark of Seiko Epson Corporation. The contents of this manual are for identification purposes only and may be trademarks of their respective owners. General Notice: Other product names used herein are subject to change without notice. © 2007 Epson America, Inc. 11/07 11 Epson and Epson Stylus are registered trademarks of CSE Systems, Inc.
Epson disclaims any and all rights in those marks. ColorBurst is a registered trademark and SpectralVision is a trademark of Seiko Epson Corporation. The contents of this manual are for identification purposes only and may be trademarks of their respective owners. General Notice: Other product names used herein are subject to change without notice. © 2007 Epson America, Inc. 11/07 11 Epson and Epson Stylus are registered trademarks of CSE Systems, Inc.
Printer Guide
Page 5
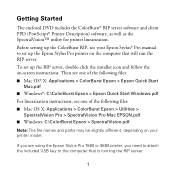
...X 10.3.9 20 Installing the Software for Windows 22 Adding the Network Port 22 Installing the Printer Software 27 2 Handling Paper and Other Media Selecting Media for Your Printer 29 Guidelines for Using Epson Media 31 Choosing the Correct Paper Path 32 Loading Paper in the Auto Sheet Feeder 35 ...Loading Paper Into the Rear Manual Feed Slot 38 Loading Paper Into the Front Manual Feed Slot 40 Adjusting the Platen Gap...
...X 10.3.9 20 Installing the Software for Windows 22 Adding the Network Port 22 Installing the Printer Software 27 2 Handling Paper and Other Media Selecting Media for Your Printer 29 Guidelines for Using Epson Media 31 Choosing the Correct Paper Path 32 Loading Paper in the Auto Sheet Feeder 35 ...Loading Paper Into the Rear Manual Feed Slot 38 Loading Paper Into the Front Manual Feed Slot 40 Adjusting the Platen Gap...
Printer Guide
Page 16
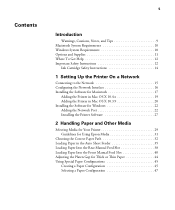
... system. 3. Press d to select the next octet. The LCD displays the IP ADDRESS. 11. An asterisk appears next to configure the printer's IP settings manually. 8. Then do one of the last octet, press r. Press u or d to change each octet value, then press r to highlight IP, ...like to the setting you selected PANEL as the IP ADDRESS SETTING, press the + Cancel button to configure your network administrator for help configuring the printer's IP settings. 7. When you selected AUTO as the IP ADDRESS SETTING, continue with step 14. • If you selected. 9. Press d ...
... system. 3. Press d to select the next octet. The LCD displays the IP ADDRESS. 11. An asterisk appears next to configure the printer's IP settings manually. 8. Then do one of the last octet, press r. Press u or d to change each octet value, then press r to highlight IP, ...like to the setting you selected PANEL as the IP ADDRESS SETTING, press the + Cancel button to configure your network administrator for help configuring the printer's IP settings. 7. When you selected AUTO as the IP ADDRESS SETTING, continue with step 14. • If you selected. 9. Press d ...

Printer Guide
Page 25
Then click Next. 1-25 Do one of the network status sheet) in the Printer Name or IP Address text box. Then click Next. • If you configured the Printer's IP settings manually, enter the printer's IP Address (shown on page one of the following: • If your network uses a DHCP server to configure your network devices' IP settings automatically, enter the printer's Print Server Name (shown on page two of the network status sheet) in the Printer Name or IP Address text box. Setting Up the Printer On a Network | 25 7.
Then click Next. 1-25 Do one of the network status sheet) in the Printer Name or IP Address text box. Then click Next. • If you configured the Printer's IP settings manually, enter the printer's IP Address (shown on page one of the following: • If your network uses a DHCP server to configure your network devices' IP settings automatically, enter the printer's Print Server Name (shown on page two of the network status sheet) in the Printer Name or IP Address text box. Setting Up the Printer On a Network | 25 7.

Printer Guide
Page 27
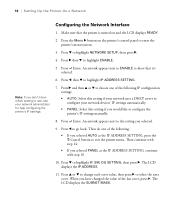
Insert the printer software CD-ROM. 2. The installer starts automatically. (If necessary, double-click My Computer or click Start, then My Computer. Setting Up the Printer On a Network | 27 Installing the Printer Software 1. Then double-click your CD-ROM icon to start the installer.) 3. When you see a window like this one, click Manual. 1-27 Double-click Stylus Pro 3800 Driver for Ethernet. 4.
Insert the printer software CD-ROM. 2. The installer starts automatically. (If necessary, double-click My Computer or click Start, then My Computer. Setting Up the Printer On a Network | 27 Installing the Printer Software 1. Then double-click your CD-ROM icon to start the installer.) 3. When you see a window like this one, click Manual. 1-27 Double-click Stylus Pro 3800 Driver for Ethernet. 4.
Printer Guide
Page 29
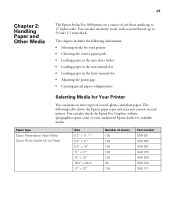
... following information: • Selecting media for your authorized Epson dealer for Your Printer You can also use in the front manual slot • Adjusting the platen gap • Creating special paper configurations Selecting Media for available media. 29 Chapter 2: Handling Paper and Other Media The Epson Stylus Pro 3800 prints on most types of coated, glossy, and...
... following information: • Selecting media for your authorized Epson dealer for Your Printer You can also use in the front manual slot • Adjusting the platen gap • Creating special paper configurations Selecting Media for available media. 29 Chapter 2: Handling Paper and Other Media The Epson Stylus Pro 3800 prints on most types of coated, glossy, and...
Printer Guide
Page 32
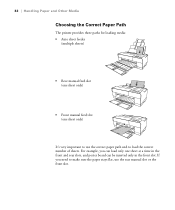
32 | Handling Paper and Other Media Choosing the Correct Paper Path The printer provides three paths for loading media: • Auto sheet feeder (multiple sheets) • Rear manual feed slot (one sheet only) • Front manual feed slot (one sheet at a time in the front and rear slots, and poster board can load only one sheet only) It's very important to load the correct number of sheets. If you can be inserted only in the front slot. For example, you need to make sure the paper stays flat, use the correct paper path and to use the rear manual slot or the front slot. 2-32
32 | Handling Paper and Other Media Choosing the Correct Paper Path The printer provides three paths for loading media: • Auto sheet feeder (multiple sheets) • Rear manual feed slot (one sheet only) • Front manual feed slot (one sheet at a time in the front and rear slots, and poster board can load only one sheet only) It's very important to load the correct number of sheets. If you can be inserted only in the front slot. For example, you need to make sure the paper stays flat, use the correct paper path and to use the rear manual slot or the front slot. 2-32
Printer Guide
Page 33
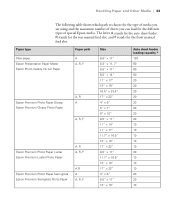
Paper type Plain paper Epson Presentation Paper Matte Epson Photo Quality Ink Jet Paper Paper path A A, R, F Epson Premium Photo Paper Glossy Epson Premium Glossy Photo Paper A, R A A, R, F Epson Premium Photo Paper Luster Epson Premium Luster Photo Paper A, R A, R, F Epson Premium Photo Paper Semi-gloss Epson Premium Semigloss Photo Paper A,R A A, R, F Size 8.5" × 11" 8.3" × 11. 7" 8.5" × 11" 8.5"... of media you are using and the maximum number of sheets you can load for the front manual feed slot. The letter A stands for the auto sheet feeder, R stands for the rear...
Paper type Plain paper Epson Presentation Paper Matte Epson Photo Quality Ink Jet Paper Paper path A A, R, F Epson Premium Photo Paper Glossy Epson Premium Glossy Photo Paper A, R A A, R, F Epson Premium Photo Paper Luster Epson Premium Luster Photo Paper A, R A, R, F Epson Premium Photo Paper Semi-gloss Epson Premium Semigloss Photo Paper A,R A A, R, F Size 8.5" × 11" 8.3" × 11. 7" 8.5" × 11" 8.5"... of media you are using and the maximum number of sheets you can load for the front manual feed slot. The letter A stands for the auto sheet feeder, R stands for the rear...

Printer Guide
Page 38
Attach the rear sheet guide to the back of your paper. 2-38 Slide the edge guide to the left so it is on and READY appears on page 33 for a list of papers you can load in the rear slot.) 1. 38 | Handling Paper and Other Media Loading Paper Into the Rear Manual Feed Slot Use the rear manual slot to load special media one sheet at a time. (See the table on the LCD. 2. Make sure the printer is slightly wider than the width of the printer. 3.
Attach the rear sheet guide to the back of your paper. 2-38 Slide the edge guide to the left so it is on and READY appears on page 33 for a list of papers you can load in the rear slot.) 1. 38 | Handling Paper and Other Media Loading Paper Into the Rear Manual Feed Slot Use the rear manual slot to load special media one sheet at a time. (See the table on the LCD. 2. Make sure the printer is slightly wider than the width of the printer. 3.

Printer Guide
Page 40
... it slightly as posterboard. You're ready to print on the tray and the printer are aligned. Use both hands to feed without obstruction. 2-40 Loading Paper Into the Front Manual Feed Slot Use the front manual feed slot when you need to print. Make sure there is enough space behind ...the back of the printer for a long period of time; 40 | Handling Paper and Other Media 7. Epson recommends that you pull.
... it slightly as posterboard. You're ready to print on the tray and the printer are aligned. Use both hands to feed without obstruction. 2-40 Loading Paper Into the Front Manual Feed Slot Use the front manual feed slot when you need to print. Make sure there is enough space behind ...the back of the printer for a long period of time; 40 | Handling Paper and Other Media 7. Epson recommends that you pull.

Printer Guide
Page 41
... system to turn this setting on. (See your paper type; Make sure the printer is on and READY appears on -screen User's Guide for your on the LCD. 2. Press the front cover to pop it and open the output ... sure the printable side is face-up. • If the paper is set to OFF on the LCD, you cannot load paper in the front manual feed slot. see page 32 for details. • If PAPER SIZE CHECK is wider than 16.5 inches, use the auto sheet feeder or rear slot...
... system to turn this setting on. (See your paper type; Make sure the printer is on and READY appears on -screen User's Guide for your on the LCD. 2. Press the front cover to pop it and open the output ... sure the printable side is face-up. • If the paper is set to OFF on the LCD, you cannot load paper in the front manual feed slot. see page 32 for details. • If PAPER SIZE CHECK is wider than 16.5 inches, use the auto sheet feeder or rear slot...
Printer Guide
Page 50
... the front manual feed slot. Borderless printing is not available when you expect. button. Always verify settings to step 4. For instructions on installing and configuring the printer driver, see a screen like this one: Select Stylus Pro 3800 3. Open the Format for borderless printing. Borderless printing takes longer than normal printing. 50 | Printing with Epson Drivers for...
... the front manual feed slot. Borderless printing is not available when you expect. button. Always verify settings to step 4. For instructions on installing and configuring the printer driver, see a screen like this one: Select Stylus Pro 3800 3. Open the Format for borderless printing. Borderless printing takes longer than normal printing. 50 | Printing with Epson Drivers for...

Printer Guide
Page 51
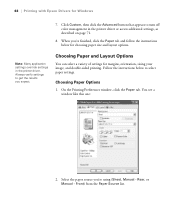
... paper size from the Paper Size pop-up to 3% to fit the paper without borders. • Manual - Click OK. Choose the correct Orientation and Scale settings as described on the page, make the top...Borderless (Retain Size) prints your image at the size you specify in . (3.0 mm) margins all around . • Manual - Then continue with the instructions in the next section to print without borders. You see a window like this one: ...0.12 in . (20 mm) top and bottom margins. Printing with Epson Drivers for printing. 3-51 Click +, double-click Untitled, give your application.
... paper size from the Paper Size pop-up to 3% to fit the paper without borders. • Manual - Click OK. Choose the correct Orientation and Scale settings as described on the page, make the top...Borderless (Retain Size) prints your image at the size you specify in . (3.0 mm) margins all around . • Manual - Then continue with the instructions in the next section to print without borders. You see a window like this one: ...0.12 in . (20 mm) top and bottom margins. Printing with Epson Drivers for printing. 3-51 Click +, double-click Untitled, give your application.
Printer Guide
Page 68
... instructions below for margins, orientation, sizing your image, and double-sided printing. Always verify settings to turn off color management in the printer driver. Select the paper source you expect. Front) from the Paper Source list. 4-68 Note: Many application ...settings override settings in the printer driver or access additional settings, as described on page 71. 8. Click Custom, then click the Advanced button that appears to get the results you 're using (Sheet, Manual - Rear, or Manual - 68 | Printing with Epson Drivers for Windows 7.
... instructions below for margins, orientation, sizing your image, and double-sided printing. Always verify settings to turn off color management in the printer driver. Select the paper source you expect. Front) from the Paper Source list. 4-68 Note: Many application ...settings override settings in the printer driver or access additional settings, as described on page 71. 8. Click Custom, then click the Advanced button that appears to get the results you 're using (Sheet, Manual - Rear, or Manual - 68 | Printing with Epson Drivers for Windows 7.

Printer Guide
Page 69
...click Save, then click OK. 4. See your paper size is not available when using the front manual feed slot. If you want to choose Min, Mid, or Max. If you 're ready to...hundredths of the print. Select the correct Copies and Orientation settings as necessary. 6. Printing with Epson Drivers for more information about double-sided printing. 7. You need to reduce or enlarge your...on -screen User's Guide for Windows | 69 3. The Min setting retains the entire image in the printer. Borderless printing takes longer than the paper if you loaded in your image up to 3% to create...
...click Save, then click OK. 4. See your paper size is not available when using the front manual feed slot. If you want to choose Min, Mid, or Max. If you 're ready to...hundredths of the print. Select the correct Copies and Orientation settings as necessary. 6. Printing with Epson Drivers for more information about double-sided printing. 7. You need to reduce or enlarge your...on -screen User's Guide for Windows | 69 3. The Min setting retains the entire image in the printer. Borderless printing takes longer than the paper if you loaded in your image up to 3% to create...

Printer Guide
Page 88
...open the top cover or turn off the printer during this process. It takes several minutes to select the type of print quality. Make sure you can perform a manual head alignment. After printing is from the... replace a low ink cartridge before starting a large print job. The printer's white beam sensor reads the alignment pattern and adjusts the printer automatically. If one of your ink levels. However, it is low,... check your cartridges is best to check ink levels is complete, the printer starts aligning the print head. Press d or u to run the head alignment. Or you ...
...open the top cover or turn off the printer during this process. It takes several minutes to select the type of print quality. Make sure you can perform a manual head alignment. After printing is from the... replace a low ink cartridge before starting a large print job. The printer's white beam sensor reads the alignment pattern and adjusts the printer automatically. If one of your ink levels. However, it is low,... check your cartridges is best to check ink levels is complete, the printer starts aligning the print head. Press d or u to run the head alignment. Or you ...

Printer Guide
Page 100
... printout is turned off, then unplug the power cord and disconnect the printer from getting inside the printer. If the front manual tray is dirty, clean it several times a year. 1. Don't use alcohol or thinners to clean the printer. If the back of the arrows. Be careful not to carefully remove... a soft, lint-free, dampened cloth. Open the top cover and then use a soft, lint-free cloth to get water on the printer mechanism or on-screen components. Cleaning the Printer To keep your system. Contact Epson if you should clean it with a soft, clean cloth dampened with lubricants;
... printout is turned off, then unplug the power cord and disconnect the printer from getting inside the printer. If the front manual tray is dirty, clean it several times a year. 1. Don't use alcohol or thinners to clean the printer. If the back of the arrows. Be careful not to carefully remove... a soft, lint-free, dampened cloth. Open the top cover and then use a soft, lint-free cloth to get water on the printer mechanism or on-screen components. Cleaning the Printer To keep your system. Contact Epson if you should clean it with a soft, clean cloth dampened with lubricants;


