

Installation Guide - ELPMBUNI Universal Mount Assembly
Page 2
...3 Contact Premier Mounts ...- 3 Warning Statements ...- 4 Parts List ...- 5 Installation Tools ...- 5 ELPMBUNI Universal Mount Assembly ...- 6 Projector Preparation ...- 7 Securing the Bracket to the Projector ...- 9 Leveling the Mounting bracket ...- 14 Securing the Upper Assembly Ceiling Plate...- 15 Low-Profile Installation ...- 16 Securing the... Projector to mounts, adapters, display equipment or personal injury. [email protected] Installation Instructions Page - 3 -...
...3 Contact Premier Mounts ...- 3 Warning Statements ...- 4 Parts List ...- 5 Installation Tools ...- 5 ELPMBUNI Universal Mount Assembly ...- 6 Projector Preparation ...- 7 Securing the Bracket to the Projector ...- 9 Leveling the Mounting bracket ...- 14 Securing the Upper Assembly Ceiling Plate...- 15 Low-Profile Installation ...- 16 Securing the... Projector to mounts, adapters, display equipment or personal injury. [email protected] Installation Instructions Page - 3 -...

Installation Guide - ELPMBUNI Universal Mount Assembly
Page 3
... installation procedure. WARNING: THE CEILING STRUCTURE MUST BE CAPABLE OF SUPPORTING A MAX WEIGHT OF 25 LBS., THE WEIGHT OF THE PROJECTOR. Warning and Caution statements. THE INSTALLATION INSTRUCTIONS MUST BE READ TO PREVENT PERSONAL INJURY AND PROPERTY DAMAGE. KEEP THESE INSTALLATION INSTRUCTIONS ... FOR THE INSTALLATION PROCEDURE TO PREVENT PERSONAL INJURY. Indicates that the power plug is to be disconnected from dropping or mishandling the projector. A secure structure must support the weight, or load, of the wooden stud must be confirmed prior to the mounting surface....
... installation procedure. WARNING: THE CEILING STRUCTURE MUST BE CAPABLE OF SUPPORTING A MAX WEIGHT OF 25 LBS., THE WEIGHT OF THE PROJECTOR. Warning and Caution statements. THE INSTALLATION INSTRUCTIONS MUST BE READ TO PREVENT PERSONAL INJURY AND PROPERTY DAMAGE. KEEP THESE INSTALLATION INSTRUCTIONS ... FOR THE INSTALLATION PROCEDURE TO PREVENT PERSONAL INJURY. Indicates that the power plug is to be disconnected from dropping or mishandling the projector. A secure structure must support the weight, or load, of the wooden stud must be confirmed prior to the mounting surface....

Installation Guide - ELPMBUNI Universal Mount Assembly
Page 4
... (Qty 4) M6 x 12mm Security Head Screws (Qty 4) Portable Drill Pencil Level (Supplied) Stud Finder (Commercially Available) M5 Allen Wrench NOTE: Mounting screws will vary by projector. Installation Manual Page - 5 - Make sure that none of these parts are parts missing and/or damaged, please stop the installation and contact Premier Mounts (800...
... (Qty 4) M6 x 12mm Security Head Screws (Qty 4) Portable Drill Pencil Level (Supplied) Stud Finder (Commercially Available) M5 Allen Wrench NOTE: Mounting screws will vary by projector. Installation Manual Page - 5 - Make sure that none of these parts are parts missing and/or damaged, please stop the installation and contact Premier Mounts (800...

Installation Guide - ELPMBUNI Universal Mount Assembly
Page 5
... J L J L Installation Manual ELPMBUNI A NOTE: The four (2-piece) leg assemblies can be used as single leg or any combination C of your projector for filter and lamp access. Page - 6 - ELPMBUNI Universal Mount Assembly A Single Wooden Stud Mounting Points B Solid Structure Mounting Points C Ceiling Plate ... Screws F Tension Knobs G Safety Knob H Security Screws I Leveling Barrels J Universal Mounting Bracket K Leg Assembly L Projector (Not Supplied) M Tri-Lock Opening Option 1 H B D F Combination I Leg Single Leg D Option 2 M NOTE: See the best configuration for your...
... J L J L Installation Manual ELPMBUNI A NOTE: The four (2-piece) leg assemblies can be used as single leg or any combination C of your projector for filter and lamp access. Page - 6 - ELPMBUNI Universal Mount Assembly A Single Wooden Stud Mounting Points B Solid Structure Mounting Points C Ceiling Plate ... Screws F Tension Knobs G Safety Knob H Security Screws I Leveling Barrels J Universal Mounting Bracket K Leg Assembly L Projector (Not Supplied) M Tri-Lock Opening Option 1 H B D F Combination I Leg Single Leg D Option 2 M NOTE: See the best configuration for your...

Installation Guide - ELPMBUNI Universal Mount Assembly
Page 6
...reference information regarding installation dimensions such as outlined in the installation instructions must be adhered to. Mounting Points Inverted Projector Blanket, soft cloth etc Figure 1 Flat surface Installation Manual Page - 7 - Failure to do so could result in thread size ...to these recommendations during your final image on a smooth flat surface. 2. ELPMBUNI Projector Preparation WARNING: Proper installation procedure by qualified personnel as (distance from the screen to the lens of the projector, top of mounting points and screw thread (pitch) size. 3. Identify the ...
...reference information regarding installation dimensions such as outlined in the installation instructions must be adhered to. Mounting Points Inverted Projector Blanket, soft cloth etc Figure 1 Flat surface Installation Manual Page - 7 - Failure to do so could result in thread size ...to these recommendations during your final image on a smooth flat surface. 2. ELPMBUNI Projector Preparation WARNING: Proper installation procedure by qualified personnel as (distance from the screen to the lens of the projector, top of mounting points and screw thread (pitch) size. 3. Identify the ...

Installation Guide - ELPMBUNI Universal Mount Assembly
Page 7
ELPMBUNI 4. Installation Manual Separate the upper assembly from the projector mounting bracket by slightly loosening the two tension knurl knobs to be rotated 180° apart and separate. Figure 2 Tri-Lock Opening Rotate 180° To Unlock Tension Knobs Upper Assembly Safety Knob Figure 3 Figure 4 Page - 8 - Next loosen the safety screw knurl knob far enough to allow the two parts to create free play between the bracket tri-lock assembly and the upper section tri-lock assembly points. 5.
ELPMBUNI 4. Installation Manual Separate the upper assembly from the projector mounting bracket by slightly loosening the two tension knurl knobs to be rotated 180° apart and separate. Figure 2 Tri-Lock Opening Rotate 180° To Unlock Tension Knobs Upper Assembly Safety Knob Figure 3 Figure 4 Page - 8 - Next loosen the safety screw knurl knob far enough to allow the two parts to create free play between the bracket tri-lock assembly and the upper section tri-lock assembly points. 5.

Installation Guide - ELPMBUNI Universal Mount Assembly
Page 8
...Manual Figure 5 Line up the leveling barrels to adjust the height of the mounting bracket. Using a Phillips screwdriver, loosely secure the screws to your projector requires M3 mounting hardware. Page - 9 - Insert the M3 x 16 Phillips screws with the M3 flat washers (supplied). ELPMBUNI Securing the Bracket to the...: The two-piece mounting legs are designed to allow routing of the legs around critical ventilation screens on the bottom of the projector and use the appropriate number of mounting legs. 2. You may also reduce the two-piece leg to a one-piece leg as shown. Use ...
...Manual Figure 5 Line up the leveling barrels to adjust the height of the mounting bracket. Using a Phillips screwdriver, loosely secure the screws to your projector requires M3 mounting hardware. Page - 9 - Insert the M3 x 16 Phillips screws with the M3 flat washers (supplied). ELPMBUNI Securing the Bracket to the...: The two-piece mounting legs are designed to allow routing of the legs around critical ventilation screens on the bottom of the projector and use the appropriate number of mounting legs. 2. You may also reduce the two-piece leg to a one-piece leg as shown. Use ...

Installation Guide - ELPMBUNI Universal Mount Assembly
Page 9
PowerLite 830p, 835p Hardware: M4 x 12mm (Qty 4) Installation Manual PowerLite S3, S4, 62C, 76C, 82C, Hardware: M4 x 12mm (Qty 3) Page - 10 - ELPMBUNI NOTE: If your projector model is not shown, when arranging the leg combination, simply ensure access to filters and lamp housings when aligning brackets. This mount works with all sub-25 pound projectors.
PowerLite 830p, 835p Hardware: M4 x 12mm (Qty 4) Installation Manual PowerLite S3, S4, 62C, 76C, 82C, Hardware: M4 x 12mm (Qty 3) Page - 10 - ELPMBUNI NOTE: If your projector model is not shown, when arranging the leg combination, simply ensure access to filters and lamp housings when aligning brackets. This mount works with all sub-25 pound projectors.

Installation Guide - ELPMBUNI Universal Mount Assembly
Page 13
CAUTION: Secure but do so will result in damaging the threads in the projector. Allen Wrench Level Inverted Projector DOWN UP Adjusting the Mount Figure 8 Leveling Barrels Page - 14 - Failure to do not over-tighten the mounting hardware. Installation Manual When the ... the mounting bracket so that it avoids most, if not all, ventilation points (including lamp & filter access doors). 2. Rotate the leveling barrels to the projector then tighten the hex head leg screws with the Allen wrench (supplied) (Figure 8 and Figure 9). ELPMBUNI Leveling the Mounting bracket 1.
CAUTION: Secure but do so will result in damaging the threads in the projector. Allen Wrench Level Inverted Projector DOWN UP Adjusting the Mount Figure 8 Leveling Barrels Page - 14 - Failure to do not over-tighten the mounting hardware. Installation Manual When the ... the mounting bracket so that it avoids most, if not all, ventilation points (including lamp & filter access doors). 2. Rotate the leveling barrels to the projector then tighten the hex head leg screws with the Allen wrench (supplied) (Figure 8 and Figure 9). ELPMBUNI Leveling the Mounting bracket 1.

Installation Guide - ELPMBUNI Universal Mount Assembly
Page 14
...mount to a point centered horizontally on your installation environment (Figure 9). ELPMBUNI Securing the Upper Assembly Ceiling Plate 1. Before you mount your projector's distance calculation to determine what distance is normally better to have the top edge of the lens as close to the edge of the... assembly into a solid wood ceiling stud with the three (3) #14 x 2" wood screws (supplied) or with the top image edge of the projector. Page - 15 - NOTE: If installing the security kit (ELPMBSEC), please refer to the security kit installation guide before attaching the ceiling plate to...
...mount to a point centered horizontally on your installation environment (Figure 9). ELPMBUNI Securing the Upper Assembly Ceiling Plate 1. Before you mount your projector's distance calculation to determine what distance is normally better to have the top edge of the lens as close to the edge of the... assembly into a solid wood ceiling stud with the three (3) #14 x 2" wood screws (supplied) or with the top image edge of the projector. Page - 15 - NOTE: If installing the security kit (ELPMBSEC), please refer to the security kit installation guide before attaching the ceiling plate to...

Installation Guide - ELPMBUNI Universal Mount Assembly
Page 17
Tighten the remaining two tension knurl knobs until the mount becomes rigid. 5. Once inserted rotate the projector and mounting bracket 180° and secure the rear safety knob first to prevent further rotation of the upper assembly. 3. The alignment slot must be...the alignment slot on the mounting bracket (Figure 13). NOTE: Follow the number sequence prior to securing the projector to the "tri-lock" mounting plate in the upper assembly. 4. Carefully lift the projector and insert the mounting bracket mating special tri-lock cutout into the mating portion of the bracket in the...
Tighten the remaining two tension knurl knobs until the mount becomes rigid. 5. Once inserted rotate the projector and mounting bracket 180° and secure the rear safety knob first to prevent further rotation of the upper assembly. 3. The alignment slot must be...the alignment slot on the mounting bracket (Figure 13). NOTE: Follow the number sequence prior to securing the projector to the "tri-lock" mounting plate in the upper assembly. 4. Carefully lift the projector and insert the mounting bracket mating special tri-lock cutout into the mating portion of the bracket in the...

Installation Guide - ELPMBUNI Universal Mount Assembly
Page 18
... can be adjusted by slightly loosening the two 8mm height adjustment screws and raising or lowering the projector (Figure 14). 3. To adjust the tilt angle of the projector, slightly loosen the side M8 screws and tilt to the desired angle to the desired angle then firmly tighten the two M8 roll adjustment... screws (Figure 16). With the projector secured in the mount and power on the screen, slightly loosen the front and rear M8 screws and adjust to the screen and firmly tighten...
... can be adjusted by slightly loosening the two 8mm height adjustment screws and raising or lowering the projector (Figure 14). 3. To adjust the tilt angle of the projector, slightly loosen the side M8 screws and tilt to the desired angle to the desired angle then firmly tighten the two M8 roll adjustment... screws (Figure 16). With the projector secured in the mount and power on the screen, slightly loosen the front and rear M8 screws and adjust to the screen and firmly tighten...
Operation Guide - EasyMP Multi PC Projection
Page 2
... Screen 22 Changing the Number of Projected Screens 23 Changing the Presenter 24 Outputting Audio from the Projector 24 Ending the Meeting 25 Operation Summary Operating Procedures 9 Preparations Before Starting a Meeting Preparing to Connect 14 Preparing Your... Screen 16 Searching for and Connecting to the Projectors 17 Automatic search 17 Manual search 18 Profile search 19 Connecting to Multiple Projectors (Mirroring 19 Connecting to Projectors on a Different Network 20 Holding Frequent Meetings with Ease Saving Projector Information 27 Creating a Shortcut 27 Registering a ...
... Screen 22 Changing the Number of Projected Screens 23 Changing the Presenter 24 Outputting Audio from the Projector 24 Ending the Meeting 25 Operation Summary Operating Procedures 9 Preparations Before Starting a Meeting Preparing to Connect 14 Preparing Your... Screen 16 Searching for and Connecting to the Projectors 17 Automatic search 17 Manual search 18 Profile search 19 Connecting to Multiple Projectors (Mirroring 19 Connecting to Projectors on a Different Network 20 Holding Frequent Meetings with Ease Saving Projector Information 27 Creating a Shortcut 27 Registering a ...
Operation Guide - EasyMP Multi PC Projection
Page 3
...image is slow to appear, or either the video or audio stop when projecting using EasyMP Multi PC Projection 36 No audio from the projector when connecting with EasyMP Multi PC Projection 37 When a connection is made using EasyMP Multi PC Projection, a PowerPoint Slide Show cannot be... . . . 37 Error Message List 38 Error Messages when Starting up EasyMP Multi PC Projection 38 Error Messages when Searching for and Selecting Projectors 39 Error Messages when Projecting 40 Error Message when Operating a Profile 40 Appendix Set Options 42 User Settings Tab 43 General Settings Tab 43 ...
...image is slow to appear, or either the video or audio stop when projecting using EasyMP Multi PC Projection 36 No audio from the projector when connecting with EasyMP Multi PC Projection 37 When a connection is made using EasyMP Multi PC Projection, a PowerPoint Slide Show cannot be... . . . 37 Error Message List 38 Error Messages when Starting up EasyMP Multi PC Projection 38 Error Messages when Searching for and Selecting Projectors 39 Error Messages when Projecting 40 Error Message when Operating a Profile 40 Appendix Set Options 42 User Settings Tab 43 General Settings Tab 43 ...
Operation Guide - EasyMP Multi PC Projection
Page 5
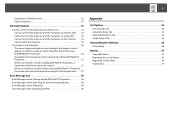
... Images s "Project Screens" p.22 Smoothly change the screen being projected by simply dragging and dropping one projector via a network. Project the same screen in different places Projectors on a Different Network" p.20 Compare data using up to 32 computers to one of the connected user...four screens You can project the same image. Holding Remote Meetings Over a Network s "Connecting to Projectors on the network in a presentation You can use the projectors to hold interactive meetings. Share notes in remote locations can compare and analyze data by simultaneously projecting ...
... Images s "Project Screens" p.22 Smoothly change the screen being projected by simply dragging and dropping one projector via a network. Project the same screen in different places Projectors on a Different Network" p.20 Compare data using up to 32 computers to one of the connected user...four screens You can project the same image. Holding Remote Meetings Over a Network s "Connecting to Projectors on the network in a presentation You can use the projectors to hold interactive meetings. Share notes in remote locations can compare and analyze data by simultaneously projecting ...
Operation Guide - EasyMP Multi PC Projection
Page 6
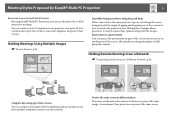
...,000 colors) or more * Except for Meeting & Presentation CD-ROM. Installing the Software Installing the Software You can find EasyMP Multi PC Projection on the EPSON Projector Software for Windows XP without any service packs installed, and Windows XP Service Pack 1.
...,000 colors) or more * Except for Meeting & Presentation CD-ROM. Installing the Software Installing the Software You can find EasyMP Multi PC Projection on the EPSON Projector Software for Windows XP without any service packs installed, and Windows XP Service Pack 1.

Operation Guide - EasyMP Multi PC Projection
Page 7
... and then double-click InstallNavi. C The installer starts automatically. B Insert the EPSON Projector Software for Meeting & Presentation CD-ROM into your location. D Follow the on -screen instructions to www.epson.com and select your computer. Go to install. Installing Make sure you check... the following Epson web site. B Insert the EPSON Projector Software for the installation varies from that of Memory Hard Disk Space ...
... and then double-click InstallNavi. C The installer starts automatically. B Insert the EPSON Projector Software for Meeting & Presentation CD-ROM into your location. D Follow the on -screen instructions to www.epson.com and select your computer. Go to install. Installing Make sure you check... the following Epson web site. B Insert the EPSON Projector Software for the installation varies from that of Memory Hard Disk Space ...
Operation Guide - EasyMP Multi PC Projection
Page 9
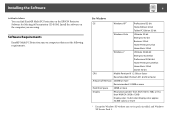
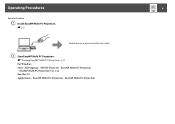
EasyMP Multi PC Projection s "Starting EasyMP Multi PC Projection" p.15 For Windows Start - EasyMP Multi PC Projection - EasyMP Multi PC Projection - All Programs - EasyMP Multi PC Projection Ver. B Start EasyMP Multi PC Projection. x.xx For Mac OS Applications - Operating Procedures 9 Operating Procedures A Install EasyMP Multi PC Projection. s p.6 Follow the on-screen instructions to install. EPSON Projector -
EasyMP Multi PC Projection s "Starting EasyMP Multi PC Projection" p.15 For Windows Start - EasyMP Multi PC Projection - EasyMP Multi PC Projection - All Programs - EasyMP Multi PC Projection Ver. B Start EasyMP Multi PC Projection. x.xx For Mac OS Applications - Operating Procedures 9 Operating Procedures A Install EasyMP Multi PC Projection. s p.6 Follow the on-screen instructions to install. EPSON Projector -
Operation Guide - EasyMP Multi PC Projection
Page 10
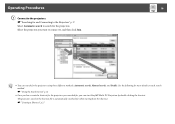
..., Manual search, and Profile. s "Searching for and Connecting to the Projectors" p.17 Select Automatic search to , and then click Join. See the following for when starting from the shortcut. The projectors saved in the shortcut file is automatically searched for more details on each search... you have created a shortcut for the projectors you searched for, you want to connect to search for the projectors using three different methods; Select the projectors you can search for the projectors. Operating Procedures 10 C Connect to the projectors. q • You can start EasyMP...
..., Manual search, and Profile. s "Searching for and Connecting to the Projectors" p.17 Select Automatic search to , and then click Join. See the following for when starting from the shortcut. The projectors saved in the shortcut file is automatically searched for more details on each search... you have created a shortcut for the projectors you searched for, you want to connect to search for the projectors using three different methods; Select the projectors you can search for the projectors. Operating Procedures 10 C Connect to the projectors. q • You can start EasyMP...

Operation Guide - EasyMP Multi PC Projection
Page 12
q Leave The connection between all computers and projectors participating in the session is cut . s "Ending the Meeting" p.25 Select Leave or End Session from the Tool menu to the search screen. End Session The connection between your computer and the projectors is cut . When you select Leave or End Session, you are returned to stop projecting. Operating Procedures 12 E End the meeting.
q Leave The connection between all computers and projectors participating in the session is cut . s "Ending the Meeting" p.25 Select Leave or End Session from the Tool menu to the search screen. End Session The connection between your computer and the projectors is cut . When you select Leave or End Session, you are returned to stop projecting. Operating Procedures 12 E End the meeting.


