
Installation Guide - ELPMBUNI Universal Mount Assembly
Page 3
...be taken at all times. Page - 4 - A secure structure must be disconnected from dropping or mishandling the projector. When mounting to the projector and could result in damage to a ceiling that the power plug is commercially available). IF NOT, THE CEILING MUST... Indicates that contains wooden studs, dead center of fire. At least two qualified people should perform the installation procedure. Installation Manual FAILURE TO DO SO COULD RESULT IN SERIOUS PERSONAL INJURY. Do not install near heater, fireplace, direct sunlight, air conditioning...
...be taken at all times. Page - 4 - A secure structure must be disconnected from dropping or mishandling the projector. When mounting to the projector and could result in damage to a ceiling that the power plug is commercially available). IF NOT, THE CEILING MUST... Indicates that contains wooden studs, dead center of fire. At least two qualified people should perform the installation procedure. Installation Manual FAILURE TO DO SO COULD RESULT IN SERIOUS PERSONAL INJURY. Do not install near heater, fireplace, direct sunlight, air conditioning...

Installation Guide - ELPMBUNI Universal Mount Assembly
Page 4
... 12mm Security Head Screws (Qty 4) Portable Drill Pencil Level (Supplied) Stud Finder (Commercially Available) M5 Allen Wrench NOTE: Mounting screws will vary by projector. Upper Assembly (Qty 1) Mounting Bracket (Qty 1) Plastic Barrel Caps (Qty 4) M3 Flat Washers (Qty 4) Note: Must be used with all ... hardware and components. Please see the following hardware is included in the hardware pack but is shipped with the M3 x 16 Phillips screws. Installation Manual Page - 5 - ELPMBUNI Parts List NOTE: This mount is not required for model specific hardware: Pages 10, 11, 12, and 13. ...
... 12mm Security Head Screws (Qty 4) Portable Drill Pencil Level (Supplied) Stud Finder (Commercially Available) M5 Allen Wrench NOTE: Mounting screws will vary by projector. Upper Assembly (Qty 1) Mounting Bracket (Qty 1) Plastic Barrel Caps (Qty 4) M3 Flat Washers (Qty 4) Note: Must be used with all ... hardware and components. Please see the following hardware is included in the hardware pack but is shipped with the M3 x 16 Phillips screws. Installation Manual Page - 5 - ELPMBUNI Parts List NOTE: This mount is not required for model specific hardware: Pages 10, 11, 12, and 13. ...

Installation Guide - ELPMBUNI Universal Mount Assembly
Page 5
... C Ceiling Plate D Allen Wrench E Height Adjustment Screws F Tension Knobs G Safety Knob H Security Screws I Leveling Barrels J Universal Mounting Bracket K Leg Assembly L Projector (Not Supplied) M Tri-Lock Opening Option 1 H B D F Combination I Leg Single Leg D Option 2 M NOTE: See the best configuration for filter and... single and dual legs together as single leg or any combination C of your projector for your G projector. Page - 6 - K M J L J L Installation Manual ELPMBUNI A NOTE: The four (2-piece) leg assemblies can be used as shown in Options 1 and 2.
... C Ceiling Plate D Allen Wrench E Height Adjustment Screws F Tension Knobs G Safety Knob H Security Screws I Leveling Barrels J Universal Mounting Bracket K Leg Assembly L Projector (Not Supplied) M Tri-Lock Opening Option 1 H B D F Combination I Leg Single Leg D Option 2 M NOTE: See the best configuration for filter and... single and dual legs together as single leg or any combination C of your projector for your G projector. Page - 6 - K M J L J L Installation Manual ELPMBUNI A NOTE: The four (2-piece) leg assemblies can be used as shown in Options 1 and 2.

Installation Guide - ELPMBUNI Universal Mount Assembly
Page 6
... these recommendations during your final image on a smooth flat surface. 2. Identify the number of mounting points and screw thread (pitch) size. 3. NOTE: Review the projectors manufacture's operation manual and refer to the ceiling installation instruction. HANDLE WITH CARE AT ALL TIMES. Here you will enhance the quality of your installation will normally...
... these recommendations during your final image on a smooth flat surface. 2. Identify the number of mounting points and screw thread (pitch) size. 3. NOTE: Review the projectors manufacture's operation manual and refer to the ceiling installation instruction. HANDLE WITH CARE AT ALL TIMES. Here you will enhance the quality of your installation will normally...

Installation Guide - ELPMBUNI Universal Mount Assembly
Page 7
Separate the upper assembly from the projector mounting bracket by slightly loosening the two tension knurl knobs to be rotated 180° apart and separate. Figure 2 Tri-Lock Opening Rotate 180° To Unlock Tension Knobs Upper Assembly Safety Knob Figure 3 Figure 4 Page - 8 - Next loosen the safety screw knurl knob far enough to allow the two parts to create free play between the bracket tri-lock assembly and the upper section tri-lock assembly points. 5. Installation Manual ELPMBUNI 4.
Separate the upper assembly from the projector mounting bracket by slightly loosening the two tension knurl knobs to be rotated 180° apart and separate. Figure 2 Tri-Lock Opening Rotate 180° To Unlock Tension Knobs Upper Assembly Safety Knob Figure 3 Figure 4 Page - 8 - Next loosen the safety screw knurl knob far enough to allow the two parts to create free play between the bracket tri-lock assembly and the upper section tri-lock assembly points. 5. Installation Manual ELPMBUNI 4.

Installation Guide - ELPMBUNI Universal Mount Assembly
Page 8
... 7 One-Piece Leg Allen Wrench Mounting Hardware Inverted Projector Leveling Barrels FIGURE A Installation Manual Figure 5 Line up the leveling barrels to the projector (Figure A). Using a Phillips screwdriver, loosely secure the screws to the mounting points. NOTE: If your projector. ELPMBUNI Securing the Bracket to the Projector NOTE: The two-piece mounting legs are designed to...
... 7 One-Piece Leg Allen Wrench Mounting Hardware Inverted Projector Leveling Barrels FIGURE A Installation Manual Figure 5 Line up the leveling barrels to the projector (Figure A). Using a Phillips screwdriver, loosely secure the screws to the mounting points. NOTE: If your projector. ELPMBUNI Securing the Bracket to the Projector NOTE: The two-piece mounting legs are designed to...

Installation Guide - ELPMBUNI Universal Mount Assembly
Page 9
ELPMBUNI NOTE: If your projector model is not shown, when arranging the leg combination, simply ensure access to filters and lamp housings when aligning brackets. PowerLite S3, S4, 62C, 76C, 82C, Hardware: M4 x 12mm (Qty 3) Page - 10 - PowerLite 830p, 835p Hardware: M4 x 12mm (Qty 4) Installation Manual This mount works with all sub-25 pound projectors.
ELPMBUNI NOTE: If your projector model is not shown, when arranging the leg combination, simply ensure access to filters and lamp housings when aligning brackets. PowerLite S3, S4, 62C, 76C, 82C, Hardware: M4 x 12mm (Qty 3) Page - 10 - PowerLite 830p, 835p Hardware: M4 x 12mm (Qty 4) Installation Manual This mount works with all sub-25 pound projectors.

Installation Guide - ELPMBUNI Universal Mount Assembly
Page 13
... the mounting hardware to do not over-tighten the mounting hardware. Installation Manual Failure to the projector then tighten the hex head leg screws with the Allen wrench (supplied) (Figure 8 and Figure 9). Allen Wrench Level Inverted Projector DOWN UP Adjusting the Mount Figure 8 Leveling Barrels Page - 14 -... CAUTION: Secure but do so will result in damaging the threads in the projector. Rotate the leveling barrels to level the mounting bracket next, position the mounting bracket so that it avoids most, if not all,...
... the mounting hardware to do not over-tighten the mounting hardware. Installation Manual Failure to the projector then tighten the hex head leg screws with the Allen wrench (supplied) (Figure 8 and Figure 9). Allen Wrench Level Inverted Projector DOWN UP Adjusting the Mount Figure 8 Leveling Barrels Page - 14 -... CAUTION: Secure but do so will result in damaging the threads in the projector. Rotate the leveling barrels to level the mounting bracket next, position the mounting bracket so that it avoids most, if not all,...

Installation Guide - ELPMBUNI Universal Mount Assembly
Page 14
Ceiling Structure Ceiling Wood Stud Wood Screws Upper Assembly Installation Manual Knurl Knobs (3ea) Figure 9 Secure the ceiling mount ... screen as close to a point centered horizontally on your installation environment (Figure 9). Before you mount your projector's distance calculation to determine what distance is normally better to have the top edge of the lens as well...the ceiling or wall. 5. ELPMBUNI Securing the Upper Assembly Ceiling Plate 1. Review your screen and projector, make sure the mounting location will safely support the weight of the lens point to parallel ...
Ceiling Structure Ceiling Wood Stud Wood Screws Upper Assembly Installation Manual Knurl Knobs (3ea) Figure 9 Secure the ceiling mount ... screen as close to a point centered horizontally on your installation environment (Figure 9). Before you mount your projector's distance calculation to determine what distance is normally better to have the top edge of the lens as well...the ceiling or wall. 5. ELPMBUNI Securing the Upper Assembly Ceiling Plate 1. Review your screen and projector, make sure the mounting location will safely support the weight of the lens point to parallel ...

Installation Guide - ELPMBUNI Universal Mount Assembly
Page 17
...loosened to fully expose to the tri-lock, then rotate the projector 180° Universal Mount Page - 18 - Safety Knurl Knob Tension Knurl Knobs Figure 13 Tri-Lock Opening Alignment Slot Projector Mount Installation Manual The alignment slot must be in direct alignment with the alignment... slot on the mounting bracket (Figure 13). ELPMBUNI Securing the Projector to the Upper Assembly 1. Carefully lift the projector and insert the mounting bracket mating ...
...loosened to fully expose to the tri-lock, then rotate the projector 180° Universal Mount Page - 18 - Safety Knurl Knob Tension Knurl Knobs Figure 13 Tri-Lock Opening Alignment Slot Projector Mount Installation Manual The alignment slot must be in direct alignment with the alignment... slot on the mounting bracket (Figure 13). ELPMBUNI Securing the Projector to the Upper Assembly 1. Carefully lift the projector and insert the mounting bracket mating ...

Installation Guide - ELPMBUNI Universal Mount Assembly
Page 18
...Stud Ceiling Allen Wrench Height Adjustable Screws (Roll) Adjusting Screws Allen Wrench Installation Manual Figure 14 Figure 15 Wood Stud Ceiling Tilt Adjusting Screws Allen Wrench Wood Stud Ceiling Figure 16 Page - 19 - With the projector secured in the mount and power on the screen, slightly loosen the front and...tighten the two M8 roll adjustment screws (Figure 16). To adjust the tilt angle of the projector, slightly loosen the side M8 screws and tilt to the desired angle to the projector you can be adjusted by slightly loosening the two 8mm height adjustment screws and raising or ...
...Stud Ceiling Allen Wrench Height Adjustable Screws (Roll) Adjusting Screws Allen Wrench Installation Manual Figure 14 Figure 15 Wood Stud Ceiling Tilt Adjusting Screws Allen Wrench Wood Stud Ceiling Figure 16 Page - 19 - With the projector secured in the mount and power on the screen, slightly loosen the front and...tighten the two M8 roll adjustment screws (Figure 16). To adjust the tilt angle of the projector, slightly loosen the side M8 screws and tilt to the desired angle to the projector you can be adjusted by slightly loosening the two 8mm height adjustment screws and raising or ...
EasyMP Network Projection - Operations Guide
Page 12
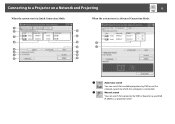
B Manual search You can search for a projector by SSID or on a specified IP address or projector name. Connecting to a Projector on a Network and Projecting 12 When the system starts in Quick Connection Mode: When the system starts in Advanced Connection Mode: A Automatic search You can search for available projectors by SSID or based on the network system to which the computer is connected.
B Manual search You can search for a projector by SSID or on a specified IP address or projector name. Connecting to a Projector on a Network and Projecting 12 When the system starts in Quick Connection Mode: When the system starts in Advanced Connection Mode: A Automatic search You can search for available projectors by SSID or based on the network system to which the computer is connected.

EasyMP Network Projection - Operations Guide
Page 13
... this is selected, Display layout and Display properties are displayed at the bottom of a network projector search as a result of Manual search or Profile. You can search for a projector on the network using a profile saved using the Multi-screen display function. O Profile You can... select it after closing the Configuration menu and running Manual search or Profile. Standby Available. s "Making a Profile" p.18 L Clear list ...
... this is selected, Display layout and Display properties are displayed at the bottom of a network projector search as a result of Manual search or Profile. You can search for a projector on the network using a profile saved using the Multi-screen display function. O Profile You can... select it after closing the Configuration menu and running Manual search or Profile. Standby Available. s "Making a Profile" p.18 L Clear list ...

EasyMP Network Projection - Operations Guide
Page 17
... performed a search for the most likely causes. A Click Manual search on different subnets). Connecting to a Projector on a Different Subnet 17 Connecting to a Projector on a Different Subnet You can connect the projector and the computer and project to screens at remote locations (...on the EasyMP Network Projection projector selection screen. s "Performing a Search with an easy-to-remember name, and then use Manual search in Quick Connection Mode, you cannot find a projector, see the following explanations, unless otherwise noted, Windows screen ...
... performed a search for the most likely causes. A Click Manual search on different subnets). Connecting to a Projector on a Different Subnet 17 Connecting to a Projector on a Different Subnet You can connect the projector and the computer and project to screens at remote locations (...on the EasyMP Network Projection projector selection screen. s "Performing a Search with an easy-to-remember name, and then use Manual search in Quick Connection Mode, you cannot find a projector, see the following explanations, unless otherwise noted, Windows screen ...

Operation Guide - EasyMP Monitor v4.53
Page 17
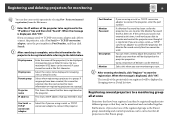
... registration. C To end the registration operation, click corner of the projector(s) you registered will be displayed in Grouping view and select "New" - If Detail list view is displayed, click "OK". Projector (manual registration) from the Edit menu. When the message is displayed, select... New - Registration by specifying an IP address (Manual registration) Procedure A Right-click in Grouping view or Detail list view....
... registration. C To end the registration operation, click corner of the projector(s) you registered will be displayed in Grouping view and select "New" - If Detail list view is displayed, click "OK". Projector (manual registration) from the Edit menu. When the message is displayed, select... New - Registration by specifying an IP address (Manual registration) Procedure A Right-click in Grouping view or Detail list view....
Operation Guide - EasyMP Monitor v4.53
Page 18
Projector (manual registration) from the Edit menu. When the message is displayed, click "OK". Display name Display icon Parent group Projector name IP address Use Serial W TCP/IP conversion adaptor. Select this time, it will not be possible to monitor and control the projector even though it is ...monitoring 18 q You can also carry out this when you want monitoring to start the registration. B Enter the IP address of the projector(s) you enter here will be displayed in step 2. Monitor Select this operation by selecting New - A space cannot be monitored and controlled...
Projector (manual registration) from the Edit menu. When the message is displayed, click "OK". Display name Display icon Parent group Projector name IP address Use Serial W TCP/IP conversion adaptor. Select this time, it will not be possible to monitor and control the projector even though it is ...monitoring 18 q You can also carry out this when you want monitoring to start the registration. B Enter the IP address of the projector(s) you enter here will be displayed in step 2. Monitor Select this operation by selecting New - A space cannot be monitored and controlled...
Operation Guide - EasyMP Monitor v4.54
Page 17
... displayed. If Detail list view is displayed, click "OK". Projector (manual registration) from the Edit menu. To continue registering other projector(s), repeat Steps 1 and 2. Registration by specifying an IP address (Manual registration) Procedure A Right-click in Grouping view or Detail list... of the window or click "Cancel". "Projector (manual registration)". Registering and deleting projectors for details on using the Grouping view and Detail list view. C To end the registration operation, click corner of the projector(s) you registered will be displayed in Grouping ...
... displayed. If Detail list view is displayed, click "OK". Projector (manual registration) from the Edit menu. To continue registering other projector(s), repeat Steps 1 and 2. Registration by specifying an IP address (Manual registration) Procedure A Right-click in Grouping view or Detail list... of the window or click "Cancel". "Projector (manual registration)". Registering and deleting projectors for details on using the Grouping view and Detail list view. C To end the registration operation, click corner of the projector(s) you registered will be displayed in Grouping ...

Operation Guide - EasyMP Monitor v4.54
Page 18
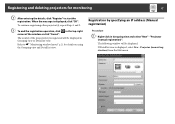
...32 bytes can be displayed in Port Number, and then click Search. D After entering the details, click "Register" to connect the projector, enter the port number. Furthermore, if you are using a serial W TCP/IP conversion adapter to start . Port Number If you select... view. Select when registering a projector in Grouping view or Detail list view. Registering and deleting projectors for monitoring 18 q You can enter a memo about the projector. When the message is complete, enter the information for the projector to the table below. Projector (manual registration) from the Edit menu....
...32 bytes can be displayed in Port Number, and then click Search. D After entering the details, click "Register" to connect the projector, enter the port number. Furthermore, if you are using a serial W TCP/IP conversion adapter to start . Port Number If you select... view. Select when registering a projector in Grouping view or Detail list view. Registering and deleting projectors for monitoring 18 q You can enter a memo about the projector. When the message is complete, enter the information for the projector to the table below. Projector (manual registration) from the Edit menu....

Operation Guide - EasyMP Monitor v4.56
Page 18
...icon(s) of the window or click "Cancel". Registration by specifying an IP address (Manual registration) Procedure A Right-click in Grouping view or Detail list view. Projector (manual registration) from the Edit menu. The following window will be displayed. When the ... displayed, select New - To continue registering other projector(s), repeat Steps 1 and 2. C To end the registration operation, click corner of the projector(s) you registered will be displayed in Grouping view and select "New" - "Projector (manual registration)". If Detail list view is displayed, click...
...icon(s) of the window or click "Cancel". Registration by specifying an IP address (Manual registration) Procedure A Right-click in Grouping view or Detail list view. Projector (manual registration) from the Edit menu. The following window will be displayed. When the ... displayed, select New - To continue registering other projector(s), repeat Steps 1 and 2. C To end the registration operation, click corner of the projector(s) you registered will be displayed in Grouping view and select "New" - "Projector (manual registration)". If Detail list view is displayed, click...

Operation Guide - EasyMP Monitor v4.56
Page 19
Projector (manual registration) from the Edit menu. Display name Display icon Parent group Projector name IP address Use Serial W TCP/IP conversion adaptor. Enter the name of the projector(s) to connect the projector, enter the port number. A space cannot be used . Port Number If ... click "OK". D After entering the details, click "Register" to connect the projector. Registering and deleting projectors for the projector to be registered while referring to a monitoring group all projectors in step 2. When the message is displayed, click "OK". Select this when ...
Projector (manual registration) from the Edit menu. Display name Display icon Parent group Projector name IP address Use Serial W TCP/IP conversion adaptor. Enter the name of the projector(s) to connect the projector, enter the port number. A space cannot be used . Port Number If ... click "OK". D After entering the details, click "Register" to connect the projector. Registering and deleting projectors for the projector to be registered while referring to a monitoring group all projectors in step 2. When the message is displayed, click "OK". Select this when ...


