Users Guide
Page 4
...37 Threshold 37 Edge Fill 38 Correct Document Skew 38 Saving as a Searchable PDF 38 Using the Transparency Unit Unpacking the Transparency Unit 40 Unlocking the transportation lock 40 Installing the Transparency Unit 41 Setting and Placing Films 43 35 mm film strips 44 Mounted slides 45 Medium format (120... 53 Solving Problems Scanner Problems 55 Scanner Lights Indicate an Error 55 Problems Starting Scanning 55 Cannot Start Epson Scan 2 56 Cannot Scan Using the Button 56 Cannot Scan Using the Transparency Unit. . . . . .56 Cannot Scan Using Scanning Software Other Than...
...37 Threshold 37 Edge Fill 38 Correct Document Skew 38 Saving as a Searchable PDF 38 Using the Transparency Unit Unpacking the Transparency Unit 40 Unlocking the transportation lock 40 Installing the Transparency Unit 41 Setting and Placing Films 43 35 mm film strips 44 Mounted slides 45 Medium format (120... 53 Solving Problems Scanner Problems 55 Scanner Lights Indicate an Error 55 Problems Starting Scanning 55 Cannot Start Epson Scan 2 56 Cannot Scan Using the Button 56 Cannot Scan Using the Transparency Unit. . . . . .56 Cannot Scan Using Scanning Software Other Than...
Users Guide
Page 12
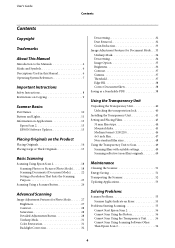
Lights The status light indicates whether the product is completely closed. If you have occurred. An error has occurred. Make sure the optional Transparency Unit is operating normally. A a button B . Turns the product on if pressed once. The product is off . Initializing or scanning. Press again to scan images. An error ...
Lights The status light indicates whether the product is completely closed. If you have occurred. An error has occurred. Make sure the optional Transparency Unit is operating normally. A a button B . Turns the product on if pressed once. The product is off . Initializing or scanning. Press again to scan images. An error ...
Users Guide
Page 19
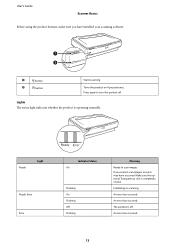
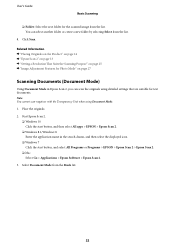
Make the following settings on the Main Settings tab. ❏ Image Type: Select the color for saving the scanned image. ❏ Resolution: Select the resolution. Note: When scanning films using the Transparency Unit, set the Document Source and Document Type as well. 19 User's Guide Basic Scanning 4.
Make the following settings on the Main Settings tab. ❏ Image Type: Select the color for saving the scanned image. ❏ Resolution: Select the resolution. Note: When scanning films using the Transparency Unit, set the Document Source and Document Type as well. 19 User's Guide Basic Scanning 4.
Users Guide
Page 22
...Windows 10 Click the start button, and select All Programs or Programs > EPSON > Epson Scan 2 > Epson Scan 2. ❏ Mac Select Go > Applications > Epson Software > Epson Scan 2. 3. Related Information & "Placing Originals on the Product" on page 14 & "Epson Scan 2" on page 13 & "Setting a Resolution That Suits the ...> EPSON > Epson Scan 2. ❏ Windows 8.1/Windows 8 Enter the application name in Epson Scan 2, you can select another folder or create a new folder by selecting Select from the Mode list. 22 Click Scan. Note: You cannot scan negatives with the Transparency Unit when ...
...Windows 10 Click the start button, and select All Programs or Programs > EPSON > Epson Scan 2 > Epson Scan 2. ❏ Mac Select Go > Applications > Epson Software > Epson Scan 2. 3. Related Information & "Placing Originals on the Product" on page 14 & "Epson Scan 2" on page 13 & "Setting a Resolution That Suits the ...> EPSON > Epson Scan 2. ❏ Windows 8.1/Windows 8 Enter the application name in Epson Scan 2, you can select another folder or create a new folder by selecting Select from the Mode list. 22 Click Scan. Note: You cannot scan negatives with the Transparency Unit when ...
Users Guide
Page 40
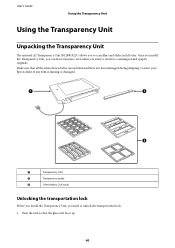
... Epson dealer if any item is missing or damaged. Once you install the Transparency Unit, you can leave it in full color. Turn the unit so that all the items shown below are included and have not been damaged during shipping. A Transparency Unit B Transparency guide C Film holders (2 of each) Unlocking the transportation lock Before you install the Transparency Unit...
... Epson dealer if any item is missing or damaged. Once you install the Transparency Unit, you can leave it in full color. Turn the unit so that all the items shown below are included and have not been damaged during shipping. A Transparency Unit B Transparency guide C Film holders (2 of each) Unlocking the transportation lock Before you install the Transparency Unit...
Users Guide
Page 41
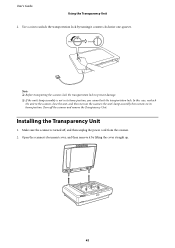
... its home position, you cannot lock the transportation lock. User's Guide Using the Transparency Unit 2. Installing the Transparency Unit 1. Use a coin to prevent damage. ❏ If the unit's lamp assembly is turned off the scanner and remove the Transparency Unit. Note: ❏ Before transporting the scanner, lock the transportation lock to unlock the transportation lock by turning...
... its home position, you cannot lock the transportation lock. User's Guide Using the Transparency Unit 2. Installing the Transparency Unit 1. Use a coin to prevent damage. ❏ If the unit's lamp assembly is turned off the scanner and remove the Transparency Unit. Note: ❏ Before transporting the scanner, lock the transportation lock to unlock the transportation lock by turning...
Users Guide
Page 42
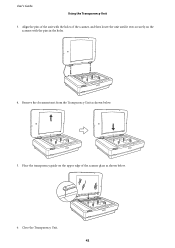
Align the pins of the scanner glass as shown below . 6. Remove the document mat from the Transparency Unit as shown below . 5. User's Guide Using the Transparency Unit 3. Close the Transparency Unit. 42 Place the transparency guide on the scanner with the holes of the scanner, and then lower the unit until it rests securely on the upper edge of the unit with the pins in the holes. 4.
Align the pins of the scanner glass as shown below . 6. Remove the document mat from the Transparency Unit as shown below . 5. User's Guide Using the Transparency Unit 3. Close the Transparency Unit. 42 Place the transparency guide on the scanner with the holes of the scanner, and then lower the unit until it rests securely on the upper edge of the unit with the pins in the holes. 4.
Users Guide
Page 43
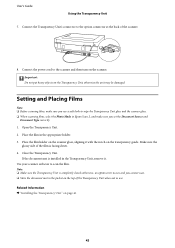
... Use your scanner software to the option connector at the back of the scanner. 8. Related Information & "Installing the Transparency Unit" on the Transparency Unit; Place the film in Epson Scan 2, and make sure you cannot scan. ❏ Store the document mat in the pocket on the top of...you use . Make sure the glossy side of the Transparency Unit when not in the Transparency Unit, remove it with the notch on the transparency guide. Place the film holder on the scanner. Connect the power cord to wipe the Transparency Unit glass and the scanner glass. ❏ When scanning ...
... Use your scanner software to the option connector at the back of the scanner. 8. Related Information & "Installing the Transparency Unit" on the Transparency Unit; Place the film in Epson Scan 2, and make sure you cannot scan. ❏ Store the document mat in the pocket on the top of...you use . Make sure the glossy side of the Transparency Unit when not in the Transparency Unit, remove it with the notch on the transparency guide. Place the film holder on the scanner. Connect the power cord to wipe the Transparency Unit glass and the scanner glass. ❏ When scanning ...
Users Guide
Page 44
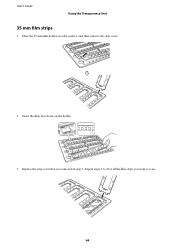
User's Guide Using the Transparency Unit 35 mm film strips 1. Replace the strip cover that you want to scan. 44 Repeat steps 1 to 3 for all the film strips you removed in the holder. 3. Insert the film, face down, in step 1. Place the 35 mm film holder on a flat surface, and then remove the strip cover. 2.
User's Guide Using the Transparency Unit 35 mm film strips 1. Replace the strip cover that you want to scan. 44 Repeat steps 1 to 3 for all the film strips you removed in the holder. 3. Insert the film, face down, in step 1. Place the 35 mm film holder on a flat surface, and then remove the strip cover. 2.
Users Guide
Page 45
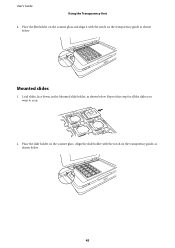
Mounted slides 1. Place the slide holder on the transparency guide, as shown below. 45 Repeat this step for all the slides you want to scan. 2. Align the slide holder with the notch on the transparency guide as shown below . Load slides, face down, in the Mounted slide holder, as shown below . Place the film holder on the scanner glass and align it with the notch on the scanner glass. User's Guide Using the Transparency Unit 4.
Mounted slides 1. Place the slide holder on the transparency guide, as shown below. 45 Repeat this step for all the slides you want to scan. 2. Align the slide holder with the notch on the transparency guide as shown below . Load slides, face down, in the Mounted slide holder, as shown below . Place the film holder on the scanner glass and align it with the notch on the scanner glass. User's Guide Using the Transparency Unit 4.
Users Guide
Page 46
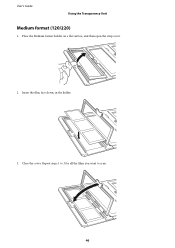
Place the Medium format holder on a flat surface, and then open the strip cover. 2. Insert the film, face down, in the holder. 3. Close the cover. Repeat steps 1 to 3 for all the films you want to scan. 46 User's Guide Using the Transparency Unit Medium format (120/220) 1.
Place the Medium format holder on a flat surface, and then open the strip cover. 2. Insert the film, face down, in the holder. 3. Close the cover. Repeat steps 1 to 3 for all the films you want to scan. 46 User's Guide Using the Transparency Unit Medium format (120/220) 1.
Users Guide
Page 47
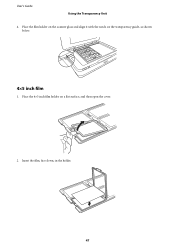
Place the film holder on the scanner glass and align it with the notch on a flat surface, and then open the cover. 2. Place the 4×5 inch film holder on the transparency guide, as shown below. 4×5 inch film 1. Insert the film, face down, in the holder. 47 User's Guide Using the Transparency Unit 4.
Place the film holder on the scanner glass and align it with the notch on a flat surface, and then open the cover. 2. Place the 4×5 inch film holder on the transparency guide, as shown below. 4×5 inch film 1. Insert the film, face down, in the holder. 47 User's Guide Using the Transparency Unit 4.
Users Guide
Page 48
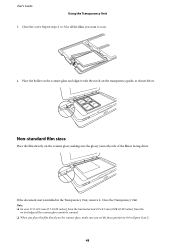
... 2.0 ±0.5 mm (0.08 ±0.02 inches) from the vertical edges of the film is installed in the Transparency Unit, remove it with the notch on the scanner glass, make sure you want to 0.0 in Epson Scan 2. 48 Non-standard film sizes Place the film directly on the scanner glass, making sure the glossy...
... 2.0 ±0.5 mm (0.08 ±0.02 inches) from the vertical edges of the film is installed in the Transparency Unit, remove it with the notch on the scanner glass, make sure you want to 0.0 in Epson Scan 2. 48 Non-standard film sizes Place the film directly on the scanner glass, making sure the glossy...
Users Guide
Page 49
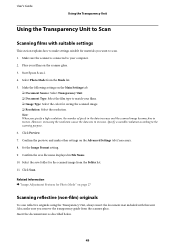
Click Preview. 7. Click Scan. Start Epson Scan 2. 4. Note: When you specify a high resolution, the...the resolution causes the data size to the scanning purpose. 6. User's Guide Using the Transparency Unit Using the Transparency Unit to Scan Scanning films with this unit. Place your computer. 2. Also, make sure you want to make settings suitable for ... settings on page 27 Scanning reflective (non-film) originals To scan reflective originals using the Transparency Unit, always insert the document mat included with suitable settings This section explains how to scan. 1. Insert the ...
Click Preview. 7. Click Scan. Start Epson Scan 2. 4. Note: When you specify a high resolution, the...the resolution causes the data size to the scanning purpose. 6. User's Guide Using the Transparency Unit Using the Transparency Unit to Scan Scanning films with this unit. Place your computer. 2. Also, make sure you want to make settings suitable for ... settings on page 27 Scanning reflective (non-film) originals To scan reflective originals using the Transparency Unit, always insert the document mat included with suitable settings This section explains how to scan. 1. Insert the ...
Users Guide
Page 50
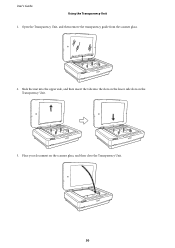
Open the Transparency Unit, and then remove the transparency guide from the scanner glass. 2. User's Guide Using the Transparency Unit 1. Place your document on the Transparency Unit. 3. Slide the mat into the upper side, and then insert the tabs into the slots on the lower side slots on the scanner glass, and then close the Transparency Unit. 50
Open the Transparency Unit, and then remove the transparency guide from the scanner glass. 2. User's Guide Using the Transparency Unit 1. Place your document on the Transparency Unit. 3. Slide the mat into the upper side, and then insert the tabs into the slots on the lower side slots on the scanner glass, and then close the Transparency Unit. 50
Users Guide
Page 56
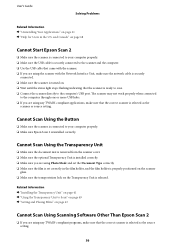
... film holder, and the film holder is properly positioned on the scanner glass. ❏ Make sure the transportation lock on the Transparency Unit is installed correctly. Cannot Scan Using the Button ❏ Make sure the scanner is connected to your computer properly. ❏ ... is set correctly in the U.S. Related Information & "Installing the Transparency Unit" on page 41 & "Using the Transparency Unit to Scan" on page 49 & "Setting and Placing Films" on page 43 Cannot Scan Using Scanning Software Other Than Epson Scan 2 ❏ If you are using any TWAIN-compliant programs...
... film holder, and the film holder is properly positioned on the scanner glass. ❏ Make sure the transportation lock on the Transparency Unit is installed correctly. Cannot Scan Using the Button ❏ Make sure the scanner is connected to your computer properly. ❏ ... is set correctly in the U.S. Related Information & "Installing the Transparency Unit" on page 41 & "Using the Transparency Unit to Scan" on page 49 & "Setting and Placing Films" on page 43 Cannot Scan Using Scanning Software Other Than Epson Scan 2 ❏ If you are using any TWAIN-compliant programs...
Users Guide
Page 65
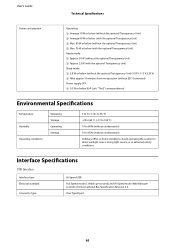
...Transparency Unit) ❏ Average 40 W or below (with the optional Transparency Unit) ❏ Max. 40 W or below (without the optional Transparency Unit) ❏ Max. 50 W or below (with the optional Transparency Unit) Ready mode: ❏ Approx. 20 W (without the optional Transparency Unit) ❏ Approx. 22 W (with the optional Transparency Unit...) 10 to 85% (without ESC! Command) Power supply OFF: ❏ 0.5 W or below (without the optional Transparency Unit) (100 V, 115 V, 230 V) ❏ After approx 14 minutes from no operation (without condensation) Ordinary office or...
...Transparency Unit) ❏ Average 40 W or below (with the optional Transparency Unit) ❏ Max. 40 W or below (without the optional Transparency Unit) ❏ Max. 50 W or below (with the optional Transparency Unit) Ready mode: ❏ Approx. 20 W (without the optional Transparency Unit) ❏ Approx. 22 W (with the optional Transparency Unit...) 10 to 85% (without ESC! Command) Power supply OFF: ❏ 0.5 W or below (without the optional Transparency Unit) (100 V, 115 V, 230 V) ❏ After approx 14 minutes from no operation (without condensation) Ordinary office or...


