Users Guide
Page 4
... in this Manual 6 Operating System References 7 Important Instructions Safety Instructions 8 Restrictions on Copying 9 Scanner Basics Part Names 10 Buttons and Lights 11 Information on Applications 13 Epson Scan 2 13 EPSON Software Updater 13 Placing Originals on the Product Placing Originals 14 Placing Large or Thick Originals 15 Basic Scanning Scanning Using Epson Scan 2 18 Scanning Photos or Pictures (Photo Mode). . . . . 18 Scanning Documents (Document Mode 22 Setting a Resolution That Suits the Scanning Purpose 25 Scanning Using a Scanner Button 26 Advanced Scanning Image...
... in this Manual 6 Operating System References 7 Important Instructions Safety Instructions 8 Restrictions on Copying 9 Scanner Basics Part Names 10 Buttons and Lights 11 Information on Applications 13 Epson Scan 2 13 EPSON Software Updater 13 Placing Originals on the Product Placing Originals 14 Placing Large or Thick Originals 15 Basic Scanning Scanning Using Epson Scan 2 18 Scanning Photos or Pictures (Photo Mode). . . . . 18 Scanning Documents (Document Mode 22 Setting a Resolution That Suits the Scanning Purpose 25 Scanning Using a Scanner Button 26 Advanced Scanning Image...
Users Guide
Page 5
... and Approvals for Australian Model. . . . 67 Where to Get Help Help for Users in Scanned Images of Film or Slides 60 Colors Differ From the Original Colors for Film or Slide Images 60 Negative Film Preview Images Look Strange. . . . 61 Problems With Scanning Time 61 Uninstalling and Installing Applications 61 Uninstalling Your Applications 61 Installing Your Applications 63 Technical Specifications General Scanner Specifications 64 Dimensional Specifications 64 Electrical Specifications 64 Environmental Specifications 65 Interface Specifications 65 System Requirements...
... and Approvals for Australian Model. . . . 67 Where to Get Help Help for Users in Scanned Images of Film or Slides 60 Colors Differ From the Original Colors for Film or Slide Images 60 Negative Film Preview Images Look Strange. . . . 61 Problems With Scanning Time 61 Uninstalling and Installing Applications 61 Uninstalling Your Applications 61 Installing Your Applications 63 Technical Specifications General Scanner Specifications 64 Dimensional Specifications 64 Electrical Specifications 64 Environmental Specifications 65 Interface Specifications 65 System Requirements...

Users Guide
Page 8
...locations subject to shocks, vibrations, high temperature or humidity, direct sunlight, strong light sources, or rapid changes in the wrong orientation may damage both devices connected by the operating instructions.) 8 If you place the product by yourself except as specifically explained in the product's guides. ❏ Do not insert objects into the extension cord...close enough to the computer for the interface cable to the plug, replace the cord set or consult a qualified electrician. Also, make sure the total ampere rating of all devices plugged into the wall outlet does not exceed...
...locations subject to shocks, vibrations, high temperature or humidity, direct sunlight, strong light sources, or rapid changes in the wrong orientation may damage both devices connected by the operating instructions.) 8 If you place the product by yourself except as specifically explained in the product's guides. ❏ Do not insert objects into the extension cord...close enough to the computer for the interface cable to the plug, replace the cord set or consult a qualified electrician. Also, make sure the total ampere rating of all devices plugged into the wall outlet does not exceed...
Users Guide
Page 12
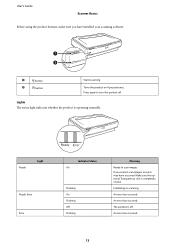
button Starts scanning. Ready Light Ready, Error Error Indicator Status On Flashing On Flashing Off Flashing Meaning Ready to turn the product off . User's Guide Scanner Basics Before using the product buttons, make sure you cannot scan images, an error may have installed your scanning software. A a button B . Lights The status light indicates whether the product is completely closed. An error has occurred. An error has occurred. Press again to scan images. The product is off . If you have occurred. An...
button Starts scanning. Ready Light Ready, Error Error Indicator Status On Flashing On Flashing Off Flashing Meaning Ready to turn the product off . User's Guide Scanner Basics Before using the product buttons, make sure you cannot scan images, an error may have installed your scanning software. A a button B . Lights The status light indicates whether the product is completely closed. An error has occurred. An error has occurred. Press again to scan images. The product is off . If you have occurred. An...
Users Guide
Page 13
User's Guide Scanner Basics Related Information & "Scanning Using a Scanner Button" on page 26 & "Scanner Lights Indicate an Error" on page 55 Information on Applications This section introduces the software products available for your scanner, enabling a variety of scan settings. Related Information & "Updating Applications" on using TWAIN-compliant application software. Epson Scan 2 Epson Scan 2 is an application that checks for new or updated applications on the internet and installs them. This also allows you to start either as a standalone application...
User's Guide Scanner Basics Related Information & "Scanning Using a Scanner Button" on page 26 & "Scanner Lights Indicate an Error" on page 55 Information on Applications This section introduces the software products available for your scanner, enabling a variety of scan settings. Related Information & "Updating Applications" on using TWAIN-compliant application software. Epson Scan 2 Epson Scan 2 is an application that checks for new or updated applications on the internet and installs them. This also allows you to start either as a standalone application...
Users Guide
Page 19
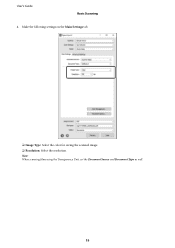
Note: When scanning films using the Transparency Unit, set the Document Source and Document Type as well. 19 Make the following settings on the Main Settings tab. ❏ Image Type: Select the color for saving the scanned image. ❏ Resolution: Select the resolution. User's Guide Basic Scanning 4.
Note: When scanning films using the Transparency Unit, set the Document Source and Document Type as well. 19 Make the following settings on the Main Settings tab. ❏ Image Type: Select the color for saving the scanned image. ❏ Resolution: Select the resolution. User's Guide Basic Scanning 4.
Users Guide
Page 23
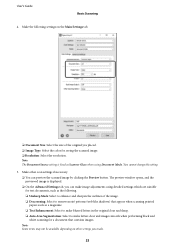
... to make letters clear and images smooth when performing black and white scanning for a document that appear when scanning printed papers such as a magazine. ❏ Text Enhancement: Select to make image adjustments using Document Mode. Make other settings you can preview the scanned image by clicking the Preview button. Note: The Document Source setting is displayed. ❏ On the Advanced Settings tab, you made. 23 The preview window opens, and the previewed image is fixed as...
... to make letters clear and images smooth when performing black and white scanning for a document that appear when scanning printed papers such as a magazine. ❏ Text Enhancement: Select to make image adjustments using Document Mode. Make other settings you can preview the scanned image by clicking the Preview button. Note: The Document Source setting is displayed. ❏ On the Advanced Settings tab, you made. 23 The preview window opens, and the previewed image is fixed as...
Users Guide
Page 26
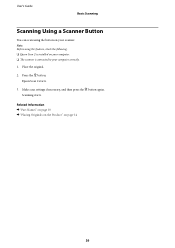
Scanning starts. User's Guide Basic Scanning Scanning Using a Scanner Button You can scan using this feature, check the following. ❏ Epson Scan 2 is installed on your computer. ❏ The scanner is connected to your scanner. Make scan settings if necessary, and then press the a button again. Press the a button. Related Information & "Part Names" on page 10 & "Placing Originals on the Product" on your computer correctly. 1. Epson Scan 2 starts. 3. Note: Before using the button on page 14 26 Place the original. 2.
Scanning starts. User's Guide Basic Scanning Scanning Using a Scanner Button You can scan using this feature, check the following. ❏ Epson Scan 2 is installed on your computer. ❏ The scanner is connected to your scanner. Make scan settings if necessary, and then press the a button again. Press the a button. Related Information & "Part Names" on page 10 & "Placing Originals on the Product" on your computer correctly. 1. Epson Scan 2 starts. 3. Note: Before using the button on page 14 26 Place the original. 2.
Users Guide
Page 30
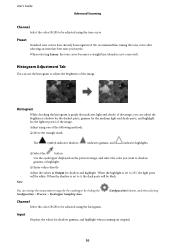
..., the tone curve becomes a straight line (density is set to 255, the light parts will be adjusted using the histogram. When the highlight is set to 0, the dark parts will be adjusted using one of the image. User's Guide Advanced Scanning Channel Select the color (RGB) to be white. When the shadow is not corrected). You can change the measurement range for shadow and...
..., the tone curve becomes a straight line (density is set to 255, the light parts will be adjusted using the histogram. When the highlight is set to 0, the dark parts will be adjusted using one of the image. User's Guide Advanced Scanning Channel Select the color (RGB) to be white. When the shadow is not corrected). You can change the measurement range for shadow and...
Users Guide
Page 43
... in Epson Scan 2, and make sure you use . Close the Transparency Unit. Use your scanner software to wipe the Transparency Unit glass and the scanner glass. ❏ When scanning films, select the Photo Mode in use a soft cloth to scan the film. Setting and Placing Films Note: ❏ Before scanning films, make sure you set the Document Source and Document Type correctly. 1. Note: ❏ Make sure the Transparency Unit is installed in the appropriate holder. 3. Open the Transparency Unit. 2. Place the film in...
... in Epson Scan 2, and make sure you use . Close the Transparency Unit. Use your scanner software to wipe the Transparency Unit glass and the scanner glass. ❏ When scanning films, select the Photo Mode in use a soft cloth to scan the film. Setting and Placing Films Note: ❏ Before scanning films, make sure you set the Document Source and Document Type correctly. 1. Note: ❏ Make sure the Transparency Unit is installed in the appropriate holder. 3. Open the Transparency Unit. 2. Place the film in...
Users Guide
Page 49
... this unit. Make the following settings on page 27 Scanning reflective (non-film) originals To scan reflective originals using the Transparency Unit, always insert the document mat included with suitable settings This section explains how to make settings suitable for materials you specify a high resolution, the number of pixels in the data increases and the scanned image becomes fine in File Name. 10. Click Preview. 7. Confirm the save folder for Photo Mode...
... this unit. Make the following settings on page 27 Scanning reflective (non-film) originals To scan reflective originals using the Transparency Unit, always insert the document mat included with suitable settings This section explains how to make settings suitable for materials you specify a high resolution, the number of pixels in the data increases and the scanned image becomes fine in File Name. 10. Click Preview. 7. Confirm the save folder for Photo Mode...
Users Guide
Page 55
... & "Buttons and Lights" on installing the scanning software. ❏ Check the status light and make sure it is connected to your computer it as described in the scanner unit may not work properly when connected to the computer through one USB hub. The product may not work . For details, contact Epson. 55 The scanner returns to normal when it must be replaced. See the Start Here sheet for instructions on page 11 Problems Starting Scanning...
... & "Buttons and Lights" on installing the scanning software. ❏ Check the status light and make sure it is connected to your computer it as described in the scanner unit may not work properly when connected to the computer through one USB hub. The product may not work . For details, contact Epson. 55 The scanner returns to normal when it must be replaced. See the Start Here sheet for instructions on page 11 Problems Starting Scanning...
Users Guide
Page 56
Related Information & "Installing the Transparency Unit" on page 41 & "Using the Transparency Unit to Scan" on page 49 & "Setting and Placing Films" on page 43 Cannot Scan Using Scanning Software Other Than Epson Scan 2 ❏ If you are using the scanner with the Network Interface Unit, make sure the network cable is securely connected. ❏ Make sure the scanner is turned on. ❏ Wait until the status light stops flashing indicating that the scanner is ready to scan. ❏ Connect the scanner directly to the scanner and...
Related Information & "Installing the Transparency Unit" on page 41 & "Using the Transparency Unit to Scan" on page 49 & "Setting and Placing Films" on page 43 Cannot Scan Using Scanning Software Other Than Epson Scan 2 ❏ If you are using the scanner with the Network Interface Unit, make sure the network cable is securely connected. ❏ Make sure the scanner is turned on. ❏ Wait until the status light stops flashing indicating that the scanner is ready to scan. ❏ Connect the scanner directly to the scanner and...

Users Guide
Page 57
... page 51 The Image Quality is low, try increasing the resolution and then scanning. ❏ In Epson Scan 2, adjust the image using a TWAIN-compliant scanning program, uninstall the TWAIN-compliant scanning program and then reinstall it. User's Guide Solving Problems ❏ If you cannot scan using items on the Advanced Settings tab. ❏ In Document Mode in Epson Scan 2, select the Advanced Settings tab, and then Image Option > Text Enhancement. ❏ When scanning from the Scanner Glass ❏ Clean...
... page 51 The Image Quality is low, try increasing the resolution and then scanning. ❏ In Epson Scan 2, adjust the image using a TWAIN-compliant scanning program, uninstall the TWAIN-compliant scanning program and then reinstall it. User's Guide Solving Problems ❏ If you cannot scan using items on the Advanced Settings tab. ❏ In Document Mode in Epson Scan 2, select the Advanced Settings tab, and then Image Option > Text Enhancement. ❏ When scanning from the Scanner Glass ❏ Clean...
Users Guide
Page 58
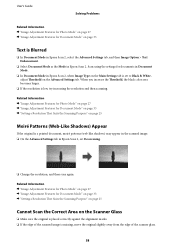
Related Information & "Image Adjustment Features for Photo Mode" on page 27 & "Image Adjustment Features for documents in Document Mode. ❏ In Document Mode in Epson Scan 2, when Image Type on the Main Settings tab is set Descreening. ❏ Change the resolution, and then scan again. Scan using the settings for Document Mode" on page 33 & "Setting a Resolution That Suits the Scanning Purpose" on page 25 Cannot Scan the Correct Area on the Scanner Glass ❏ Make sure the original is placed...
Related Information & "Image Adjustment Features for Photo Mode" on page 27 & "Image Adjustment Features for documents in Document Mode. ❏ In Document Mode in Epson Scan 2, when Image Type on the Main Settings tab is set Descreening. ❏ Change the resolution, and then scan again. Scan using the settings for Document Mode" on page 33 & "Setting a Resolution That Suits the Scanning Purpose" on page 25 Cannot Scan the Correct Area on the Scanner Glass ❏ Make sure the original is placed...
Users Guide
Page 59
... ❏ Originals with ruled lines or underlining over the text ❏ Originals with hand-written text ❏ Originals with creases or wrinkles ❏ In Document Mode in Epson Scan 2, when Image Type on the Main Settings tab is set to Black & White, adjust Threshold on the Advanced Settings tab. User's Guide Solving Problems ❏ When placing multiple originals on the scanner glass, make sure there is a gap...
... ❏ Originals with ruled lines or underlining over the text ❏ Originals with hand-written text ❏ Originals with creases or wrinkles ❏ In Document Mode in Epson Scan 2, when Image Type on the Main Settings tab is set to Black & White, adjust Threshold on the Advanced Settings tab. User's Guide Solving Problems ❏ When placing multiple originals on the scanner glass, make sure there is a gap...
Users Guide
Page 60
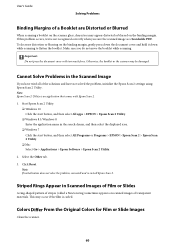
... Film or Slide Images Clean the scanner. 60 Note: Epson Scan 2 Utility is not recognized correctly when you save the scanned image as a Searchable PDF. User's Guide Solving Problems Binding Margins of a Booklet are Distorted or Blurred When scanning a booklet on the scanner glass, characters may appear distorted or blurred on the binding margin, gently press down the document cover and hold it down while scanning to flatten the booklet. Click Reset...
... Film or Slide Images Clean the scanner. 60 Note: Epson Scan 2 Utility is not recognized correctly when you save the scanned image as a Searchable PDF. User's Guide Solving Problems Binding Margins of a Booklet are Distorted or Blurred When scanning a booklet on the scanner glass, characters may appear distorted or blurred on the binding margin, gently press down the document cover and hold it down while scanning to flatten the booklet. Click Reset...
Users Guide
Page 61
... instead of the film holder is saved in the following location. The TWAIN.log file is perceived as white. C:\Users\(user name)\AppData\Local\Temp Uninstalling and Installing Applications Uninstalling Your Applications You may need to uninstall and then reinstall your operating system. Disconnect the scanner from monitoring, or set correctly for Windows 1. If you are using security software, exclude the TWAIN.log file from your computer...
... instead of the film holder is saved in the following location. The TWAIN.log file is perceived as white. C:\Users\(user name)\AppData\Local\Temp Uninstalling and Installing Applications Uninstalling Your Applications You may need to uninstall and then reinstall your operating system. Disconnect the scanner from monitoring, or set correctly for Windows 1. If you are using security software, exclude the TWAIN.log file from your computer...

Users Guide
Page 62
... menu > Printers & Scanners (or Print & Scan, Print & Fax), and then remove the scanner from your computer. Uninstall the applications: Click Uninstall/Change or Uninstall. Follow the on-screen instructions. Open the Control Panel: ❏ Windows 10 Right-click the start button or press and hold it is displayed, make sure I want to restart my computer now is displayed, click Continue. 7. Note: A message may be displayed prompting you installed EPSON Software Updater. 1. Download the Uninstaller using EPSON Software Updater...
... menu > Printers & Scanners (or Print & Scan, Print & Fax), and then remove the scanner from your computer. Uninstall the applications: Click Uninstall/Change or Uninstall. Follow the on-screen instructions. Open the Control Panel: ❏ Windows 10 Right-click the start button or press and hold it is displayed, make sure I want to restart my computer now is displayed, click Continue. 7. Note: A message may be displayed prompting you installed EPSON Software Updater. 1. Download the Uninstaller using EPSON Software Updater...

Users Guide
Page 66
User's Guide Technical Specifications System Requirements Windows Windows 10 (32-bit, 64-bit) Windows 8.1 (32-bit, 64-bit) Windows 8 (32-bit, 64-bit) Windows 7 (32-bit, 64-bit) Mac *1 *2 macOS v10.12.x Mac OS X v10.11.x Mac OS X v10.10.x Mac OS X v10.9.x Mac OS X v10.8.x Mac OS X v10.7.x Mac OS X v10.6.8 *1 Fast User Switching on Mac is not supported. *2 The UNIX File System (UFS) for Mac is not supported. 66
User's Guide Technical Specifications System Requirements Windows Windows 10 (32-bit, 64-bit) Windows 8.1 (32-bit, 64-bit) Windows 8 (32-bit, 64-bit) Windows 7 (32-bit, 64-bit) Mac *1 *2 macOS v10.12.x Mac OS X v10.11.x Mac OS X v10.10.x Mac OS X v10.9.x Mac OS X v10.8.x Mac OS X v10.7.x Mac OS X v10.6.8 *1 Fast User Switching on Mac is not supported. *2 The UNIX File System (UFS) for Mac is not supported. 66


