Datasheet
Page 1
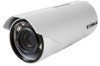
... Outdoor IR 25m PoE True Day & Night Bullet Network Camera Description The Edimax IR-123E is f=3.3~12mm, and can record crisp and clear videos and images even in the world with the EdiView32 software, a 32-channel viewing, recording and management program that allows for simultaneous live monitoring and high-resolution video recording. With these capabilities, the IR-123E can be able to install an additional power cable and adapter. Additionally, with a SD/SDHC memory card slot...
... Outdoor IR 25m PoE True Day & Night Bullet Network Camera Description The Edimax IR-123E is f=3.3~12mm, and can record crisp and clear videos and images even in the world with the EdiView32 software, a 32-channel viewing, recording and management program that allows for simultaneous live monitoring and high-resolution video recording. With these capabilities, the IR-123E can be able to install an additional power cable and adapter. Additionally, with a SD/SDHC memory card slot...

Datasheet
Page 2
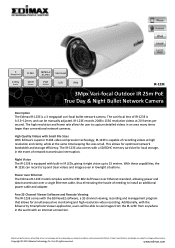
...-485 Support Smartphone Monitoring WDR Support Storage Audio Interface Network Power Supply Operating Temperature Dimensions (mm) Weigh (g) Weather-proof Vandal-proof Certification (EMI, IP, RoHS) ONVIF Support 1/2.5" CMOS Vari-focal Lens, f = 3.3- 12mm, F1.4 Mechanical ICR, IR 25 Meters 0.2 Lux at real-time 30fps • H.264, MPEG-4 & M-JPEG multi-stream output • Supports IEEE802.3af Power over Ethernet (PoE) standard • Simultaneous live monitoring and high resolution recording • Comprehensive I/O ports: audio in IR LED...
...-485 Support Smartphone Monitoring WDR Support Storage Audio Interface Network Power Supply Operating Temperature Dimensions (mm) Weigh (g) Weather-proof Vandal-proof Certification (EMI, IP, RoHS) ONVIF Support 1/2.5" CMOS Vari-focal Lens, f = 3.3- 12mm, F1.4 Mechanical ICR, IR 25 Meters 0.2 Lux at real-time 30fps • H.264, MPEG-4 & M-JPEG multi-stream output • Supports IEEE802.3af Power over Ethernet (PoE) standard • Simultaneous live monitoring and high resolution recording • Comprehensive I/O ports: audio in IR LED...
Quick Install Guide
Page 3
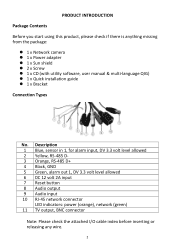
... (with utility software, user manual & multi-language QIG) 1 x Quick installation guide 1 x Bracket Connection Types No. Description 1 Blue, sensor in 1, for alarm input, DV 3.3 volt level allowed 2 Yellow, RS-485 D3 Orange, RS-485 D+ 4 Black, GND 5 Green, alarm out 1, DV 3.3 volt level allowed 6 DC 12 volt 2A input 7 Reset button 8 Audio output 9 Audio input 10 RJ-45 network connector LED indicators: power (orange), network (green) 11 TV output, BNC connector Note...
... (with utility software, user manual & multi-language QIG) 1 x Quick installation guide 1 x Bracket Connection Types No. Description 1 Blue, sensor in 1, for alarm input, DV 3.3 volt level allowed 2 Yellow, RS-485 D3 Orange, RS-485 D+ 4 Black, GND 5 Green, alarm out 1, DV 3.3 volt level allowed 6 DC 12 volt 2A input 7 Reset button 8 Audio output 9 Audio input 10 RJ-45 network connector LED indicators: power (orange), network (green) 11 TV output, BNC connector Note...
Quick Install Guide
Page 5
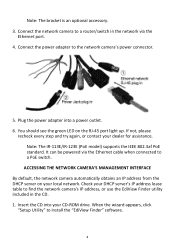
... power adapter into your local network. It can be powered via the Ethernet port. 4. You should see the green LED on your CD-ROM drive. Note: The IR-113E/IR-123E (PoE model) supports the IEEE 802.3af PoE standard. Check your dealer for assistance. When the wizard appears, click "Setup Utility" to find the network camera's IP address, or use the EdiView Finder utility included in the network via the Ethernet cable when connected to the network camera's power connector. 5. Connect the power adapter...
... power adapter into your local network. It can be powered via the Ethernet port. 4. You should see the green LED on your CD-ROM drive. Note: The IR-113E/IR-123E (PoE model) supports the IEEE 802.3af PoE standard. Check your dealer for assistance. When the wizard appears, click "Setup Utility" to find the network camera's IP address, or use the EdiView Finder utility included in the network via the Ethernet cable when connected to the network camera's power connector. 5. Connect the power adapter...
Quick Install Guide
Page 7
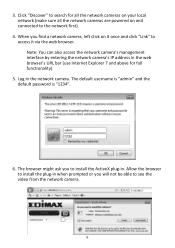
... also access the network camera's management interface by entering the network camera's IP address in the web browser's URL bar (use Internet Explorer 7 and above for all the network cameras on your local network (make sure all the network cameras are powered on it via the web browser. 3. Click "Discover" to see the video from the network camera. 6 When you will not be able to search for full functionality). 5. The default username is "admin" and the default password...
... also access the network camera's management interface by entering the network camera's IP address in the web browser's URL bar (use Internet Explorer 7 and above for all the network cameras on your local network (make sure all the network cameras are powered on it via the web browser. 3. Click "Discover" to see the video from the network camera. 6 When you will not be able to search for full functionality). 5. The default username is "admin" and the default password...
Quick Install Guide
Page 8
... used in a residential installation. EU Countries Not Intended for help. However, there is connected. 4. Operation is subject to Part 15 of March 9, 1999 on a circuit different from that to radio or television reception, which the receiver is no guarantee that may cause undesired operation. Federal Communications Commission (FCC) Radiation Exposure Statement This equipment complies with FCC radiation exposure set...
... used in a residential installation. EU Countries Not Intended for help. However, there is connected. 4. Operation is subject to Part 15 of March 9, 1999 on a circuit different from that to radio or television reception, which the receiver is no guarantee that may cause undesired operation. Federal Communications Commission (FCC) Radiation Exposure Statement This equipment complies with FCC radiation exposure set...
Manual
Page 2
... IP Camera 7 1.6 Locate the SD card slot 9 Chapter II Using Network IP Camera by Web Interface 11 2.1 Locate the IP address of Network IP Camera 11 2.2 Connect to IP Camera's Web User Interface and Install ActiveX Plugin 14 2.3 Viewing Live Video 16 2.4 Client Settings ...20 Chapter III Advanced Configuration 22 3-1 System...23 3-2 Security...25 3-3 Network...27 3-3-1 "General" Setup Page 27 3-3-2 "Advanced" Setup Page 30 3-4 IP Filter ...33 3-5 Video ...35 3-5-1 Image Setting ...35 3-5-2 Video Setting...37 3-5-3 Overlay Setting...39 3-6 Audio...40 3-7 Motion...41 3-8 PTZ Control (RS...
... IP Camera 7 1.6 Locate the SD card slot 9 Chapter II Using Network IP Camera by Web Interface 11 2.1 Locate the IP address of Network IP Camera 11 2.2 Connect to IP Camera's Web User Interface and Install ActiveX Plugin 14 2.3 Viewing Live Video 16 2.4 Client Settings ...20 Chapter III Advanced Configuration 22 3-1 System...23 3-2 Security...25 3-3 Network...27 3-3-1 "General" Setup Page 27 3-3-2 "Advanced" Setup Page 30 3-4 IP Filter ...33 3-5 Video ...35 3-5-1 Image Setting ...35 3-5-2 Video Setting...37 3-5-3 Overlay Setting...39 3-6 Audio...40 3-7 Motion...41 3-8 PTZ Control (RS...

Manual
Page 4
... video devices such as TV Monitors, analog DVRs, etc. Digital input / output interface lets you connect peripherals such as external alarm, sensor, etc. Audio input / output interface, you can act like a stand-alone DVR. Two Way audio. 3GPP Mobile Surveillance Supported. RS-485 communication supported. ONVIF Compliant. The IR-113E/IR-123E (PoE model) Supports IEEE802.3af Power over Ethernet (PoE...
... video devices such as TV Monitors, analog DVRs, etc. Digital input / output interface lets you connect peripherals such as external alarm, sensor, etc. Audio input / output interface, you can act like a stand-alone DVR. Two Way audio. 3GPP Mobile Surveillance Supported. RS-485 communication supported. ONVIF Compliant. The IR-113E/IR-123E (PoE model) Supports IEEE802.3af Power over Ethernet (PoE...
Manual
Page 12
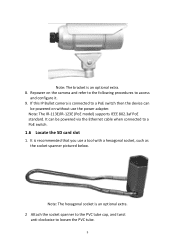
... twist anti-clockwise to a PoE switch. 1.6 Locate the SD card slot 1. Note: The hexagonal socket is connected to access and configure it. 9. Repower on the camera and refer to the following procedures to a PoE switch then the device can be powered on without use a tool with a hexagonal socket, such as the socket spanner pictured below. Note: The IR-113E/IR-123E (PoE model) supports IEEE 802.3af...
... twist anti-clockwise to a PoE switch. 1.6 Locate the SD card slot 1. Note: The hexagonal socket is connected to access and configure it. 9. Repower on the camera and refer to the following procedures to a PoE switch then the device can be powered on without use a tool with a hexagonal socket, such as the socket spanner pictured below. Note: The IR-113E/IR-123E (PoE model) supports IEEE 802.3af...

Manual
Page 14
... server's IP address lease table to install the "EdiView Finder" software. 11 Chapter II Using Network IP Camera by its web user interface via web browser. When the wizard appears, click "Setup Utility" to find the network camera's IP address, or use the EdiView Finder utility included in the CD. Insert the CD into your new Network IP Camera by Web Interface 2.1 Locate the IP address of Network IP Camera You can use Microsoft Windows Internet Explorer 7, 8, or 9. By default, the network camera...
... server's IP address lease table to install the "EdiView Finder" software. 11 Chapter II Using Network IP Camera by its web user interface via web browser. When the wizard appears, click "Setup Utility" to find the network camera's IP address, or use the EdiView Finder utility included in the CD. Insert the CD into your new Network IP Camera by Web Interface 2.1 Locate the IP address of Network IP Camera You can use Microsoft Windows Internet Explorer 7, 8, or 9. By default, the network camera...
Manual
Page 17
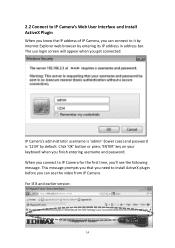
... connect to IP Camera for the first time, you'll see the video from IP Camera. This message prompts you that you need to install ActiveX plugin before you can see the following message. The use login screen will appear when you finish entering username and password. 2.2 Connect to IP Camera's Web User Interface and Install ActiveX Plugin When you know the IP address of IP Camera, you can connect to it by Internet Explorer web browser by default...
... connect to IP Camera for the first time, you'll see the video from IP Camera. This message prompts you that you need to install ActiveX plugin before you can see the following message. The use login screen will appear when you finish entering username and password. 2.2 Connect to IP Camera's Web User Interface and Install ActiveX Plugin When you know the IP address of IP Camera, you can connect to it by Internet Explorer web browser by default...
Manual
Page 19
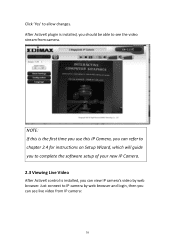
After ActiveX plugin is installed, you can view IP camera's video by web browser and login, then you should be able to IP camera by web browser. Just connect to see live video from camera. Click 'Yes' to complete the software setup of your new IP Camera. 2.3 Viewing Live Video After ActiveX control is installed, you can see the video stream from IP camera: 16 NOTE: If this is the first time you use this IP Camera, you can refer to chapter 2.4 for instructions on Setup Wizard, which will guide you to allow changes.
After ActiveX plugin is installed, you can view IP camera's video by web browser and login, then you should be able to IP camera by web browser. Just connect to see live video from camera. Click 'Yes' to complete the software setup of your new IP Camera. 2.3 Viewing Live Video After ActiveX control is installed, you can see the video stream from IP camera: 16 NOTE: If this is the first time you use this IP Camera, you can refer to chapter 2.4 for instructions on Setup Wizard, which will guide you to allow changes.
Manual
Page 20
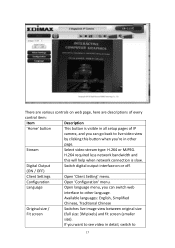
... are various controls on or off. (ON / OFF) Client Settings Open 'Client Setting' menu. If you 're in detail, switch to 17 Available languages: English, Simplified Chinese, Traditional Chinese Original size / Switches live video view by clicking this will help when network connection is visible in all setup pages of IP camera, and you can go back to live image view between original size Fit screen (full size: 3M...
... are various controls on or off. (ON / OFF) Client Settings Open 'Client Setting' menu. If you 're in detail, switch to 17 Available languages: English, Simplified Chinese, Traditional Chinese Original size / Switches live video view by clicking this will help when network connection is visible in all setup pages of IP camera, and you can go back to live image view between original size Fit screen (full size: 3M...
Manual
Page 35
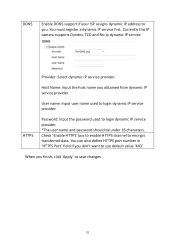
DDNS Enable DDNS support if your ISP assigns dynamic IP address to login dynamic IP service provider. Currently this IP camera supports Dyndns, TZO and No-ip dynamic IP service. Host Name: Input the host name you don't want to encrypt transferred data. User name: Input user name used to save changes. 32 HTTPS Password: Input the password used to you finish, click 'Apply' to login dynamic IP service provider. *The user name...
DDNS Enable DDNS support if your ISP assigns dynamic IP address to login dynamic IP service provider. Currently this IP camera supports Dyndns, TZO and No-ip dynamic IP service. Host Name: Input the host name you don't want to encrypt transferred data. User name: Input user name used to save changes. 32 HTTPS Password: Input the password used to you finish, click 'Apply' to login dynamic IP service provider. *The user name...
Manual
Page 41
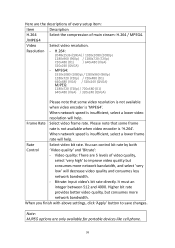
... 5 levels of main stream: H.264 / MPEG4. /MPEG4 Video Select video resolution. Frame Rate Select video frame rate. Higher bit rate provides better video quality, but consumes more network bandwidth. You can control bit rate by both Control 'Video quality' and 'Bitrate': - It must an integer between 512 and 4000. When you finish with above settings, click 'Apply' button to improve video quality but consumes more...
... 5 levels of main stream: H.264 / MPEG4. /MPEG4 Video Select video resolution. Frame Rate Select video frame rate. Higher bit rate provides better video quality, but consumes more network bandwidth. You can control bit rate by both Control 'Video quality' and 'Bitrate': - It must an integer between 512 and 4000. When you finish with above settings, click 'Apply' button to improve video quality but consumes more...

Manual
Page 47
... refer to pan-tilt camera cradle's user manual to pan-tilt camera cradle's address code. When you can also click 'Test' button to enable RS-485 functionality. You have also input pan-tilt camera cradle's address code in Pelco-D format. Stop Bit: Select stop bit: 1 or 2. - Home/Up/Down/Left/Right: Input the command string used to move pan-tilt camera cradle to save changes. 44 When the length of RS-485 connection is widely...
... refer to pan-tilt camera cradle's user manual to pan-tilt camera cradle's address code. When you can also click 'Test' button to enable RS-485 functionality. You have also input pan-tilt camera cradle's address code in Pelco-D format. Stop Bit: Select stop bit: 1 or 2. - Home/Up/Down/Left/Right: Input the command string used to move pan-tilt camera cradle to save changes. 44 When the length of RS-485 connection is widely...
Manual
Page 52
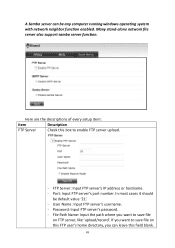
... windows operating system with network neighbor function enabled. Many stand-alone network file server also support samba server function. A Samba server can leave this box to save file on FTP server, like 'upload/record'. Port: Input FTP server's port number. Here are the descriptions of every setup item: Item Description FTP Server Check this field blank. 49 Password: Input FTP server's password. - User Name: Input FTP server's username. - File Path Name: Input the path where you want to save file on this FTP user's home directory, you want to enable FTP server...
... windows operating system with network neighbor function enabled. Many stand-alone network file server also support samba server function. A Samba server can leave this box to save file on FTP server, like 'upload/record'. Port: Input FTP server's port number. Here are the descriptions of every setup item: Item Description FTP Server Check this field blank. 49 Password: Input FTP server's password. - User Name: Input FTP server's username. - File Path Name: Input the path where you want to save file on this FTP user's home directory, you want to enable FTP server...
Manual
Page 54
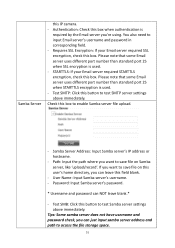
... this user's home directory, you 're using. Password: Input Samba server's password. * Username and password can just input samba server address and path to access the file storage space. 51 Please note that some Email server uses different port number than standard port 25 when STARTTLS encryption is used . - STARTTLS: If your Email server required SSL encryption, check this field blank. - Test SMTP: Click this box. Test SMB: Click this IP camera. - Samba Server this button to test Samba server settings...
... this user's home directory, you 're using. Password: Input Samba server's password. * Username and password can just input samba server address and path to access the file storage space. 51 Please note that some Email server uses different port number than standard port 25 when STARTTLS encryption is used . - STARTTLS: If your Email server required SSL encryption, check this field blank. - Test SMTP: Click this box. Test SMB: Click this IP camera. - Samba Server this button to test Samba server settings...
Manual
Page 62
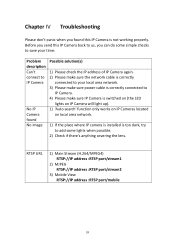
... lights when possible. 2) Check if there's anything covering the lens. RTSP URL 1) Main Stream (H.264/MPEG4) RTSP://IP address :RTSP port/stream1 2) MJPEG RTSP://IP address :RTSP port/stream2 3) Mobile View RTSP://IP address :RTSP port/mobile 59 Chapter IV Troubleshooting Please don't panic when you can do some simple checks to save your time: Problem description Can't connect to IP Camera No IP Camera found this IP Camera back to us, you found No image...
... lights when possible. 2) Check if there's anything covering the lens. RTSP URL 1) Main Stream (H.264/MPEG4) RTSP://IP address :RTSP port/stream1 2) MJPEG RTSP://IP address :RTSP port/stream2 3) Mobile View RTSP://IP address :RTSP port/mobile 59 Chapter IV Troubleshooting Please don't panic when you can do some simple checks to save your time: Problem description Can't connect to IP Camera No IP Camera found this IP Camera back to us, you found No image...
Manual
Page 63
... equipment and receiver. 3. Federal Communications Commission (FCC) Radiation Exposure Statement This equipment complies with Part 15 of the FCC Rules. Use in other devices such as tested in the application for certification, and can be co-located or operating in conjunction with any other antenna or transmitter. The R&TTE Directive repeals and replaces in the application for...
... equipment and receiver. 3. Federal Communications Commission (FCC) Radiation Exposure Statement This equipment complies with Part 15 of the FCC Rules. Use in other devices such as tested in the application for certification, and can be co-located or operating in conjunction with any other antenna or transmitter. The R&TTE Directive repeals and replaces in the application for...

