
Datasheet
Page 1
... a simplistic design, allowing it easy for easy home monitoring. With Plug-n-View technology, you are subject to access the network camera without notice. Copyright © 2012 Edimax Technology Co. This viewer software supports manual, cycle, and scheduled video recording for iPhone and Android phones allows users to change without a computer at 30 frames per second. Additionally, the IC-3115W network camera's free EdiView viewer app for every surveillance application. Product specifications and design are .
... a simplistic design, allowing it easy for easy home monitoring. With Plug-n-View technology, you are subject to access the network camera without notice. Copyright © 2012 Edimax Technology Co. This viewer software supports manual, cycle, and scheduled video recording for iPhone and Android phones allows users to change without a computer at 30 frames per second. Additionally, the IC-3115W network camera's free EdiView viewer app for every surveillance application. Product specifications and design are .

Datasheet
Page 2
... (Windows/Mac) 16-channel viewer Web management interface Firmware upgradable iPhone & iPad viewer app Android phone viewer app Frequency Band 2.4000-2.4835GHz Power 5V DC Dimensions & Weight 65mm x 80mm x 27mm 86g SOFTWARE FEATURES • 3-level user access (administrator/operator/guest) • Multi-area motion detection • Sends motion-detected snapshots to email and FTP • Recording upon detected motion • SXVGA (1280 x 960) resolution at 30fps • WPS support for iPhone & Android phones IC-3115W Interface 1 Ethernet (RJ-45) port 1 Power jack 1 Reset/WPS button...
... (Windows/Mac) 16-channel viewer Web management interface Firmware upgradable iPhone & iPad viewer app Android phone viewer app Frequency Band 2.4000-2.4835GHz Power 5V DC Dimensions & Weight 65mm x 80mm x 27mm 86g SOFTWARE FEATURES • 3-level user access (administrator/operator/guest) • Multi-area motion detection • Sends motion-detected snapshots to email and FTP • Recording upon detected motion • SXVGA (1280 x 960) resolution at 30fps • WPS support for iPhone & Android phones IC-3115W Interface 1 Ethernet (RJ-45) port 1 Power jack 1 Reset/WPS button...

Quick Install Guide
Page 2
...., Ltd. You can download the firmware‐files at http://www.edimax.com under "Download" page. 1 Edimax Technology Co., Ltd. Please visit our website www.edimax.com for any person of such revision or changes. makes no representations or warranties, either expressed or implied, with respect to GNU General Public License Version 2 Certain Edimax products include software code developed by any means...
...., Ltd. You can download the firmware‐files at http://www.edimax.com under "Download" page. 1 Edimax Technology Co., Ltd. Please visit our website www.edimax.com for any person of such revision or changes. makes no representations or warranties, either expressed or implied, with respect to GNU General Public License Version 2 Certain Edimax products include software code developed by any means...

Quick Install Guide
Page 3
...(s): z Network camera (1 pcs) z Power adapter (1 pcs) z Ethernet cable (1 pcs) z Mounting kit (1 pcs) z CD with an Ethernet cable, then turn on , the power/cloud LED will stay solid for access over the cloud. When it stops flashing, the camera is ready for 30 seconds while the camera initializes. The LAN LED indicates whether there is connecting to a router or switch's "LAN" port with utility software and user manual (1 pcs) z Quick installation guide (1 pcs) z Cloud ID card...
...(s): z Network camera (1 pcs) z Power adapter (1 pcs) z Ethernet cable (1 pcs) z Mounting kit (1 pcs) z CD with an Ethernet cable, then turn on , the power/cloud LED will stay solid for access over the cloud. When it stops flashing, the camera is ready for 30 seconds while the camera initializes. The LAN LED indicates whether there is connecting to a router or switch's "LAN" port with utility software and user manual (1 pcs) z Quick installation guide (1 pcs) z Cloud ID card...

Quick Install Guide
Page 4
... the network camera, found on the included Cloud ID card. When myedimax.com loads, enter the camera's password. Configuring the Smartphone Surveillance Software: 2. To access myedimax.com, enter [Cloud ID].myedimax.com into the web browser's address bar, where [Cloud ID] is 1234 3 Note: Each network camera comes with a Cloud ID card which contains the camera's Cloud ID (MAC address), username and password. Enter the Cloud ID, Username and Password to download "Ediview". Configuring...
... the network camera, found on the included Cloud ID card. When myedimax.com loads, enter the camera's password. Configuring the Smartphone Surveillance Software: 2. To access myedimax.com, enter [Cloud ID].myedimax.com into the web browser's address bar, where [Cloud ID] is 1234 3 Note: Each network camera comes with a Cloud ID card which contains the camera's Cloud ID (MAC address), username and password. Enter the Cloud ID, Username and Password to download "Ediview". Configuring...

Quick Install Guide
Page 7
Launch IE and type the IP address of the camera (found by your new Edimax network camera. to see the video images captured by running EdiView), and enter "admin" in the username field, and "1234" in the password field to log in , the browser may prompt you are logged in . 8. You should then be able to continue. 9. If it does, click "Install ActiveX Control..." Configuring the Web‐Based Management Interface 7. Once you to the user manual included in the CD. 6 For advanced settings, please refer to install ActiveX.
Launch IE and type the IP address of the camera (found by your new Edimax network camera. to see the video images captured by running EdiView), and enter "admin" in the username field, and "1234" in the password field to log in , the browser may prompt you are logged in . 8. You should then be able to continue. 9. If it does, click "Install ActiveX Control..." Configuring the Web‐Based Management Interface 7. Once you to the user manual included in the CD. 6 For advanced settings, please refer to install ActiveX.
Quick Install Guide
Page 9
... harmful interference to ensure the safe use in the laptop computer(s) configurations with all times to radio communications. If this transmitter must accept any other devices such as tested in the application for certification, and can be paid to avoid the possibility of the FCC Rules. The antenna(s) used in accordance with the instructions, may cause undesired operation.
... harmful interference to ensure the safe use in the laptop computer(s) configurations with all times to radio communications. If this transmitter must accept any other devices such as tested in the application for certification, and can be paid to avoid the possibility of the FCC Rules. The antenna(s) used in accordance with the instructions, may cause undesired operation.

Manual
Page 2
... such revision or changes. Add: No. 3, Wu-Chuan 3rd Rd., Wu-Ku Industrial Park, New Taipei City, Taiwan Tel: +886-2-77396888 Email: sales@edimax.com.tw Notice According to the GNU General Public License ("GPL") or GNU Lesser General Public License ("LGPL"). You can download the firmware-files at http://www.edimax.com under "Download" page. 1 Any software described in the...
... such revision or changes. Add: No. 3, Wu-Chuan 3rd Rd., Wu-Ku Industrial Park, New Taipei City, Taiwan Tel: +886-2-77396888 Email: sales@edimax.com.tw Notice According to the GNU General Public License ("GPL") or GNU Lesser General Public License ("LGPL"). You can download the firmware-files at http://www.edimax.com under "Download" page. 1 Any software described in the...

Manual
Page 3
... II: Accessing the Camera's Web Interface...9 2.1 Installing EdiView Finder ...10 2.2 Connecting to the Camera's Web User Interface and Installing the ActiveX Plugin (IE only 11 2.3 Live Video Monitoring...16 Chapter III: Setting Up the Network Camera ...19 3.1 Basic Network Settings...20 3.2 Wireless...23 3.3 Dynamic DNS...28 3.4 Date & Time ...30 3.5 Users ...32 3.6 UPnP...35 3.7 Bonjour...36 Chapter IV: Video Configuration ...37 4.1 Video Settings ...37 4.2 Image...38 Chapter V: Event Configuration ...40 5.1 Motion Detection Setup...40 5.1.1 Detection Region...41 5.1.2 FTP...44 5.1.3 SMTP...
... II: Accessing the Camera's Web Interface...9 2.1 Installing EdiView Finder ...10 2.2 Connecting to the Camera's Web User Interface and Installing the ActiveX Plugin (IE only 11 2.3 Live Video Monitoring...16 Chapter III: Setting Up the Network Camera ...19 3.1 Basic Network Settings...20 3.2 Wireless...23 3.3 Dynamic DNS...28 3.4 Date & Time ...30 3.5 Users ...32 3.6 UPnP...35 3.7 Bonjour...36 Chapter IV: Video Configuration ...37 4.1 Video Settings ...37 4.2 Image...38 Chapter V: Event Configuration ...40 5.1 Motion Detection Setup...40 5.1.1 Detection Region...41 5.1.2 FTP...44 5.1.3 SMTP...
Manual
Page 4
... IX: Windows Surveillance Utility ...64 9.1 Installing the Network Camera Administration Software 64 9.2 Using the Network Camera Surveillance Software 68 9.3 Configuring the Network Camera Surveillance Software 71 9.3.1 Camera Configuration ...71 9.3.2 General Settings ...80 9.4 Changing the Display Layout ...87 9.5 Full-Screen Mode ...90 9.6 Scan ...91 9.7 Zoom-In/Zoom-Out ...92 9.8 PTZ...93 9.9 Snapshot...94 9.10 Recording ...95 9.11 Video Playback ...96 Chapter X: Accessing the Network Camera remotely...97 10.1 Configuring the iOS Surveillance Software ...97 10.2 Configuring the Android...
... IX: Windows Surveillance Utility ...64 9.1 Installing the Network Camera Administration Software 64 9.2 Using the Network Camera Surveillance Software 68 9.3 Configuring the Network Camera Surveillance Software 71 9.3.1 Camera Configuration ...71 9.3.2 General Settings ...80 9.4 Changing the Display Layout ...87 9.5 Full-Screen Mode ...90 9.6 Scan ...91 9.7 Zoom-In/Zoom-Out ...92 9.8 PTZ...93 9.9 Snapshot...94 9.10 Recording ...95 9.11 Video Playback ...96 Chapter X: Accessing the Network Camera remotely...97 10.1 Configuring the iOS Surveillance Software ...97 10.2 Configuring the Android...

Manual
Page 9
.... 2. 1.5 Installing the Network Camera Please follow the following instructions to the LAN port. Connect an Ethernet cable to set up your new network camera. 1. Connect the DC power cable to DC Jack 8 Connect DC power cable to the network camera's DC power connector. However, if this network camera is configured to the tripod or camera stand using WPS, you 'll generally need an Ethernet cable to a power outlet in the wall. 4. Connect Ethernet net cable 3. Plug the DC power adapter to perform configuration. For first-time installation you...
.... 2. 1.5 Installing the Network Camera Please follow the following instructions to the LAN port. Connect an Ethernet cable to set up your new network camera. 1. Connect the DC power cable to DC Jack 8 Connect DC power cable to the network camera's DC power connector. However, if this network camera is configured to the tripod or camera stand using WPS, you 'll generally need an Ethernet cable to a power outlet in the wall. 4. Connect Ethernet net cable 3. Plug the DC power adapter to perform configuration. For first-time installation you...

Manual
Page 22
... network administrator or ISP. Item Network Type Description Select the type of the IP address. Netmask: Please input the netmask of Ethernet connection: Static IP, DHCP, and PPPoE. Gateway: Please input the gateway address of a secondary (backup) DNS. When you 're not sure, please consult your DNS server. HTTP port: The default web port number is available. Please select one from 1024 to 65535 in this network camera next 21 Secondary DNS...
... network administrator or ISP. Item Network Type Description Select the type of the IP address. Netmask: Please input the netmask of Ethernet connection: Static IP, DHCP, and PPPoE. Gateway: Please input the gateway address of a secondary (backup) DNS. When you 're not sure, please consult your DNS server. HTTP port: The default web port number is available. Please select one from 1024 to 65535 in this network camera next 21 Secondary DNS...
Manual
Page 23
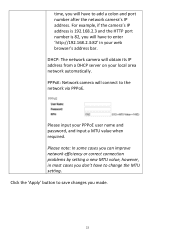
...' button to save changes you don't have to change the MTU setting. PPPoE: Network camera will obtain its IP address from a DHCP server on your local area network automatically. Please input your PPPoE user name and password, and input a MTU value when required. Please note: In some cases you can improve network efficiency or correct connection problems by setting a new MTU value, however, in your web browser's address bar. time...
...' button to save changes you don't have to change the MTU setting. PPPoE: Network camera will obtain its IP address from a DHCP server on your local area network automatically. Please input your PPPoE user name and password, and input a MTU value when required. Please note: In some cases you can improve network efficiency or correct connection problems by setting a new MTU value, however, in your web browser's address bar. time...
Manual
Page 34
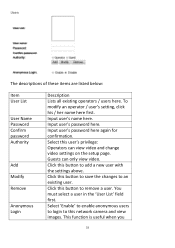
... can view video and change video settings on the setup page. Select 'Enable' to enable anonymous users to login to add a new user with the settings above. This function is useful when you 33 Select this network camera and view images. The descriptions of these items are listed below: Item User List User Name Password Confirm password Authority Add Modify Remove Anonymous Login Description Lists all existing operators / users here. Input user's name here. You must select a user...
... can view video and change video settings on the setup page. Select 'Enable' to enable anonymous users to login to add a new user with the settings above. This function is useful when you 33 Select this network camera and view images. The descriptions of these items are listed below: Item User List User Name Password Confirm password Authority Add Modify Remove Anonymous Login Description Lists all existing operators / users here. Input user's name here. You must select a user...

Manual
Page 41
... camera as a security alarm, and send the image to you by email or upload the image to an FTP server when there's motion. 5.1 Motion Detection Setup You can use this feature to use this network camera detects motion. To detect minor motions, select a shorter 40 The descriptions of these items are listed below: Item Motion Detection enable Motion Detection Interval Description Select 'Enable' to enable motion detection, or 'Disable' to detect motion. Chapter V: Event Configuration This network camera is able to disable it. You can enable or disable motion detection settings...
... camera as a security alarm, and send the image to you by email or upload the image to an FTP server when there's motion. 5.1 Motion Detection Setup You can use this feature to use this network camera detects motion. To detect minor motions, select a shorter 40 The descriptions of these items are listed below: Item Motion Detection enable Motion Detection Interval Description Select 'Enable' to enable motion detection, or 'Disable' to detect motion. Chapter V: Event Configuration This network camera is able to disable it. You can enable or disable motion detection settings...
Manual
Page 46
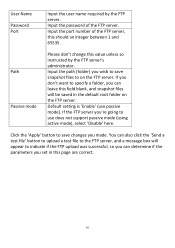
... 'Send a test file' button to upload a test file to the FTP server, and a message box will be saved in this value unless so instructed by the FTP server. Input the password of the FTP server, this field blank, and snapshot files will appear to save snapshot files to use passive mode). Path Passive mode Please don't change this page are correct. 45 User Name Password Port Input the user name required by the FTP server's administrator. Default setting is 'Enable' (use does not support passive mode (using active mode), select 'Disable...
... 'Send a test file' button to upload a test file to the FTP server, and a message box will be saved in this value unless so instructed by the FTP server. Input the password of the FTP server, this field blank, and snapshot files will appear to save snapshot files to use passive mode). Path Passive mode Please don't change this page are correct. 45 User Name Password Port Input the user name required by the FTP server's administrator. Default setting is 'Enable' (use does not support passive mode (using active mode), select 'Disable...

Manual
Page 66
Please check if everything's correct here. If you don't want to change any settings, click 'Back' to go back to the previous page, or click 'Install' to continue. 4. You can uncheck the boxes here if you want to create a desktop / quick launch icon, and click 'Next' to start installation. 65 2. Click 'Next' to continue. 3.
Please check if everything's correct here. If you don't want to change any settings, click 'Back' to go back to the previous page, or click 'Install' to continue. 4. You can uncheck the boxes here if you want to create a desktop / quick launch icon, and click 'Next' to start installation. 65 2. Click 'Next' to continue. 3.
Manual
Page 71
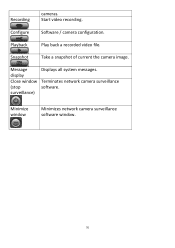
Terminates network camera surveillance software. Minimize window Minimizes network camera surveillance software window. 70 Snapshot Take a snapshot of current the camera image. Start video recording. Playback Play back a recorded video file. Message display Close window (stop surveillance) Displays all system messages. Configure Software / camera configuration. Recording cameras.
Terminates network camera surveillance software. Minimize window Minimizes network camera surveillance software window. 70 Snapshot Take a snapshot of current the camera image. Start video recording. Playback Play back a recorded video file. Message display Close window (stop surveillance) Displays all system messages. Configure Software / camera configuration. Recording cameras.
Manual
Page 74
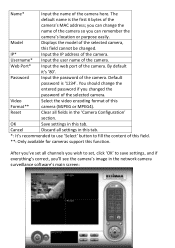
... IP address of the camera here. OK Save settings in the network camera surveillance software's main screen: 73 Name* Input the name of the camera. After you've set all settings in the 'Camera Configuration' section. Web Port* Input the web port of the camera. you can change the entered password if you 'll see the camera's image in this field cannot be changed the password of the camera. Username* Input the user name of the camera. Password Input the password...
... IP address of the camera here. OK Save settings in the network camera surveillance software's main screen: 73 Name* Input the name of the camera. After you've set all settings in the 'Camera Configuration' section. Web Port* Input the web port of the camera. you can change the entered password if you 'll see the camera's image in this field cannot be changed the password of the camera. Username* Input the user name of the camera. Password Input the password...
Manual
Page 140
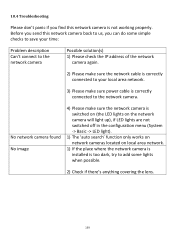
... network camera. No network camera found No image 4) Please make sure power cable is correctly connected to add some simple checks to save your time: Problem description Can't connect to the network camera Possible solution(s) 1) Please check the IP address of the network camera again. 2) Please make sure the network cable is correctly connected to your local area network. 3) Please make sure the network camera is switched on (the LED lights on the network camera will light...
... network camera. No network camera found No image 4) Please make sure power cable is correctly connected to add some simple checks to save your time: Problem description Can't connect to the network camera Possible solution(s) 1) Please check the IP address of the network camera again. 2) Please make sure the network cable is correctly connected to your local area network. 3) Please make sure the network camera is switched on (the LED lights on the network camera will light...


