
Manual
Page 3
... Contents 4 1.2 Basic Introduction 5 1.3 Product Highlights 6 1.4 Familiar with Key Components 7 1.5 Descriptions for LED Indicators 11 1.6 Camera Installation 12 1.7 Locate the IP Address of this IP Camera 13 1.8 Using Camera Admin Software to Locate Camera 17 2.1 Camera Settings 29 2.1.1 MJPEG 34 2.1.2 MPEG4 35 2.1.3 H.264 36 2.1.4 OSD...37 2.1.5 Night Vision 38 2.2 Network Settings 39 2.2.1 LAN...40 2.2.2 WLAN 43 2.2.3 Dynamic DNS...
... Contents 4 1.2 Basic Introduction 5 1.3 Product Highlights 6 1.4 Familiar with Key Components 7 1.5 Descriptions for LED Indicators 11 1.6 Camera Installation 12 1.7 Locate the IP Address of this IP Camera 13 1.8 Using Camera Admin Software to Locate Camera 17 2.1 Camera Settings 29 2.1.1 MJPEG 34 2.1.2 MPEG4 35 2.1.3 H.264 36 2.1.4 OSD...37 2.1.5 Night Vision 38 2.2 Network Settings 39 2.2.1 LAN...40 2.2.2 WLAN 43 2.2.3 Dynamic DNS...

Manual
Page 4
3-2 Using IP camera surveillance software 79 3-3 Configure IP camera surveillance software 82 3-3-1 Configure cameras 82 3-3-2 General Settings 91 3-4 Change Display Layout 97 3-5 Full-screen mode 100 3-6 Scan...101 3-7 Zoom-in / Zoom-out 102 3-8 PTZ ...... Specification 107 4.2 Troubleshooting 108 4.3 Obtain a free Dyndns account 111 4.4 Use this IPCAM with a router or firewall 117 4.4.1 Setup Dyndns Dynamic IP address Mapping 117 4.4.2 Open Ports Required by IP CAM 118 4.5 Using Cellphone as Image Viewer 120 4.5.1 iPhone 120 4.6 Windows Vista / Windows 7 UAC Configuration 123 3
3-2 Using IP camera surveillance software 79 3-3 Configure IP camera surveillance software 82 3-3-1 Configure cameras 82 3-3-2 General Settings 91 3-4 Change Display Layout 97 3-5 Full-screen mode 100 3-6 Scan...101 3-7 Zoom-in / Zoom-out 102 3-8 PTZ ...... Specification 107 4.2 Troubleshooting 108 4.3 Obtain a free Dyndns account 111 4.4 Use this IPCAM with a router or firewall 117 4.4.1 Setup Dyndns Dynamic IP address Mapping 117 4.4.2 Open Ports Required by IP CAM 118 4.5 Using Cellphone as Image Viewer 120 4.5.1 iPhone 120 4.6 Windows Vista / Windows 7 UAC Configuration 123 3
Manual
Page 5
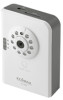
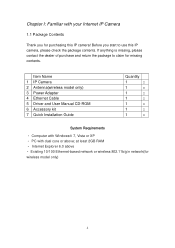
...1 □ 1 □ 1 □ 1 □ 1 □ 1 □ 1 □ System Requirements • Computer with Windows® 7, Vista or XP • PC with your Internet IP Camera 1.1 Package Contents Thank you start to claim for missing contents. at least 2GB RAM • Internet Explorer 6.0 above ; Chapter I: Familiar with dual core or above... network(for wireless model only) 4 If anything is missing, please contact the dealer of purchase and return the package to use this IP camera! Before you for purchasing this IP camera, please check the package contents.
...1 □ 1 □ 1 □ 1 □ 1 □ 1 □ 1 □ System Requirements • Computer with Windows® 7, Vista or XP • PC with your Internet IP Camera 1.1 Package Contents Thank you start to claim for missing contents. at least 2GB RAM • Internet Explorer 6.0 above ; Chapter I: Familiar with dual core or above... network(for wireless model only) 4 If anything is missing, please contact the dealer of purchase and return the package to use this IP camera! Before you for purchasing this IP camera, please check the package contents.

Manual
Page 6
...of cable! Worry about the content will be intercepted by anyone who got a compatible video receiver, this IP camera with 12V power by the IP camera, expect yourself. Unlink conventional close-circuit video camera; If you have problem installing a new cable from anywhere in the world where Internet access is an... wireless network, that comes with the product package, and you ‟re not limited to set a new network cable between the IP camera and monitoring computer. You only have to the length of video-surveillance purposes, like home/office safety, kid/pet monitoring, and remote...
...of cable! Worry about the content will be intercepted by anyone who got a compatible video receiver, this IP camera with 12V power by the IP camera, expect yourself. Unlink conventional close-circuit video camera; If you have problem installing a new cable from anywhere in the world where Internet access is an... wireless network, that comes with the product package, and you ‟re not limited to set a new network cable between the IP camera and monitoring computer. You only have to the length of video-surveillance purposes, like home/office safety, kid/pet monitoring, and remote...

Manual
Page 7
...XGA (1024 x 768), VGA (640 x 480), and QVGA (320 x 240). Configurable motion detection sensitivity (6 levels from most sensitive to allocate the IP camera‟s Internet address, when the ISP you‟re using does not assign you can set different password to 16 video... Anti-flicker function (eliminates flash caused by Email or FTP when motion is a browser like Internet Explorer 6 (and above ) will discover this IP camera in real-time clock, date and time information will be recorded with every captured picture / video clip (also supports auto time synchronization via network ...
...XGA (1024 x 768), VGA (640 x 480), and QVGA (320 x 240). Configurable motion detection sensitivity (6 levels from most sensitive to allocate the IP camera‟s Internet address, when the ISP you‟re using does not assign you can set different password to 16 video... Anti-flicker function (eliminates flash caused by Email or FTP when motion is a browser like Internet Explorer 6 (and above ) will discover this IP camera in real-time clock, date and time information will be recorded with every captured picture / video clip (also supports auto time synchronization via network ...

Manual
Page 10
Bottom View Ethernet Connector Reset to Default /WPS Power Connector Microphone Audio Connector WPS: click the button on IP Cam and click it on the AP you want to connect wireless connection.(works on wired model with USB wifi dongle plugged or wireless model) ...Reset to Default Button: Press and hold for more than 10 seconds to reset the camera settings to external speaker for audio output Microphone: Built-in microphone for voice pick-up 9 Power Connector: Connects to 12V DC power adapter Ethernet Connector...
Bottom View Ethernet Connector Reset to Default /WPS Power Connector Microphone Audio Connector WPS: click the button on IP Cam and click it on the AP you want to connect wireless connection.(works on wired model with USB wifi dongle plugged or wireless model) ...Reset to Default Button: Press and hold for more than 10 seconds to reset the camera settings to external speaker for audio output Microphone: Built-in microphone for voice pick-up 9 Power Connector: Connects to 12V DC power adapter Ethernet Connector...

Manual
Page 11
MAC Address Label: Shows the MAC address of this IP camera. Back View Tripod Connector: Connects to any standard tripod / camera wall holder. Useful when you can‟t locate the camera on the network. 10
MAC Address Label: Shows the MAC address of this IP camera. Back View Tripod Connector: Connects to any standard tripod / camera wall holder. Useful when you can‟t locate the camera on the network. 10

Manual
Page 13
... the product package and check if anything‟s missing. 2. NOTE: You can skip this IP camera. If you wish to hang the camera on your computer, and following instructions to set the IP camera. 12 Place the camera at the back of this step if you wish to monitor. Connect the Ethernet cable to your... local area network, and connect the other end to the LAN jack of this IP camera. 5. Connect two antennas to the antenna bases, which is located at a secure place, and point the camera to the place you plan to use the tripod connector (located at the bottom of the...
... the product package and check if anything‟s missing. 2. NOTE: You can skip this IP camera. If you wish to hang the camera on your computer, and following instructions to set the IP camera. 12 Place the camera at the back of this step if you wish to monitor. Connect the Ethernet cable to your... local area network, and connect the other end to the LAN jack of this IP camera. 5. Connect two antennas to the antenna bases, which is located at a secure place, and point the camera to the place you plan to use the tripod connector (located at the bottom of the...

Manual
Page 14
If you wish to assign another IP address to this IP camera is not 192.168.2, you have to log onto the web configuration interface of your computer first: 1. If the left three fields of the IP address of your computer is 192.168.2.3. Click „Start‟ -> „Control Panel‟ 13 1.7 Locate the IP Address of this IP Camera Default IP address of this IP camera, you ‟ll have to change the IP address of the camera first.
If you wish to assign another IP address to this IP camera is not 192.168.2, you have to log onto the web configuration interface of your computer first: 1. If the left three fields of the IP address of your computer is 192.168.2.3. Click „Start‟ -> „Control Panel‟ 13 1.7 Locate the IP Address of this IP Camera Default IP address of this IP camera, you ‟ll have to change the IP address of the camera first.

Manual
Page 17
...8223; button located at the bottom of this IP camera and you changed the IP address of the IP camera and reset the IP address back to clear all settings in the picture „192.168.2.339‟). In „IP address‟ field, please fill in any IP address begins with „192.168.2‟, and....255.255.0‟. Ask network administrator to check the DHCP release table, if the camera was set to obtain the IP address by DHCP, a new record will be added to DHCP release table on DHCP server when the IP camera is connected to recover it: a. If you forget it, there‟re 2 ...
...8223; button located at the bottom of this IP camera and you changed the IP address of the IP camera and reset the IP address back to clear all settings in the picture „192.168.2.339‟). In „IP address‟ field, please fill in any IP address begins with „192.168.2‟, and....255.255.0‟. Ask network administrator to check the DHCP release table, if the camera was set to obtain the IP address by DHCP, a new record will be added to DHCP release table on DHCP server when the IP camera is connected to recover it: a. If you forget it, there‟re 2 ...

Manual
Page 18
...Wizard to guide you want to install or click „EXIT‟ to your local area network. Insert the CD shipped along with the IP Internet Camera into your local area network. The admin software is also capable to run "Autorun.exe" manually from "Autorun" folder in Windows 2000/XP.../Vista/7 are the demonstration of „Install Administrator Utility & Camera Viewer‟. 17 The following installation is connected to install the program later. Follow the simple steps below to locate multiple...
...Wizard to guide you want to install or click „EXIT‟ to your local area network. Insert the CD shipped along with the IP Internet Camera into your local area network. The admin software is also capable to run "Autorun.exe" manually from "Autorun" folder in Windows 2000/XP.../Vista/7 are the demonstration of „Install Administrator Utility & Camera Viewer‟. 17 The following installation is connected to install the program later. Follow the simple steps below to locate multiple...

Manual
Page 21
7. If you see this message, the installation of camera admin software is launched, all cameras found on your local area network will be displayed: 20 When you wish to launch camera admin software now, keep „Launch IP Cam Admin Utility‟ box checked, and click „Finish‟ to close installation utility. After the camera admin software is complete.
7. If you see this message, the installation of camera admin software is launched, all cameras found on your local area network will be displayed: 20 When you wish to launch camera admin software now, keep „Launch IP Cam Admin Utility‟ box checked, and click „Finish‟ to close installation utility. After the camera admin software is complete.
Manual
Page 23
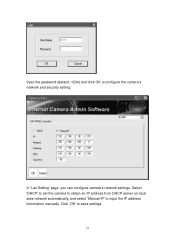
Click „OK‟ to configure the camera‟s network and security setting: In „Lan Setting‟ page, you can configure camera‟s network settings. Input the password (default: 1234) and click OK to save settings. 22 Select „DHCP‟ to set the camera to obtain an IP address from DHCP server on local area network automatically, and select „Manual IP‟ to input the IP address information manually.
Click „OK‟ to configure the camera‟s network and security setting: In „Lan Setting‟ page, you can configure camera‟s network settings. Input the password (default: 1234) and click OK to save settings. 22 Select „DHCP‟ to set the camera to obtain an IP address from DHCP server on local area network automatically, and select „Manual IP‟ to input the IP address information manually.

Manual
Page 25
... name is „admin‟ and password is „1234‟. 1.9 Log Onto Web Management Interface Make sure the IP camera is correctly powered (Power LED is a newly-purchased camera, however, if you ‟re rejected, maybe the password has been modified previously. You should not happen if this is... on), and then launch Internet Explorer and type the IP address of the IP camera in address bar of Internet Explorer. This should be changed. If you get the camera from someone else, the password would be prompted to reset the camera. 24 Click „OK‟ to continue after ...
... name is „admin‟ and password is „1234‟. 1.9 Log Onto Web Management Interface Make sure the IP camera is correctly powered (Power LED is a newly-purchased camera, however, if you ‟re rejected, maybe the password has been modified previously. You should not happen if this is... on), and then launch Internet Explorer and type the IP address of the IP camera in address bar of Internet Explorer. This should be changed. If you get the camera from someone else, the password would be prompted to reset the camera. 24 Click „OK‟ to continue after ...

Manual
Page 29
Note: If you see one of these messages (or both): OR Your computer may not have Microsoft DirectX® installed. If this IP camera requires, or you 'll still see these messages. Please download Microsoft DirectX® from IP camera correctly, but you don't have the display capability that this happens, just ignore them. 28 In some cases, your computer is able to display the image from Microsoft's website (http://www.microsoft.com), and try again.
Note: If you see one of these messages (or both): OR Your computer may not have Microsoft DirectX® installed. If this IP camera requires, or you 'll still see these messages. Please download Microsoft DirectX® from IP camera correctly, but you don't have the display capability that this happens, just ignore them. 28 In some cases, your computer is able to display the image from Microsoft's website (http://www.microsoft.com), and try again.

Manual
Page 31
.... In this case, you change (s) will take effect right away. If you‟re not putting this camera on a horizontal surface but hang the camera on the ceiling or wall, you should use this IP camera points to save image file is current date and time). Select brightness, saturation, and sharpness from dropdown menu...
.... In this case, you change (s) will take effect right away. If you‟re not putting this camera on a horizontal surface but hang the camera on the ceiling or wall, you should use this IP camera points to save image file is current date and time). Select brightness, saturation, and sharpness from dropdown menu...

Manual
Page 32
... button to record the displaying image as a video file in full-screen 31 Click this button and the image size will be connected to this camera. You can also change the directory by clicking the text input box located at the right of „Snapshot‟ button: Recording Speak to... IP Cam Digital Zoom and you can drag the slide bar to adjust zoom ratio. Please note that external speaker must be adjusted to fit the ...
... button to record the displaying image as a video file in full-screen 31 Click this button and the image size will be connected to this camera. You can also change the directory by clicking the text input box located at the right of „Snapshot‟ button: Recording Speak to... IP Cam Digital Zoom and you can drag the slide bar to adjust zoom ratio. Please note that external speaker must be adjusted to fit the ...

Manual
Page 34
There are 5 types of a certain video setting, put mouse cursor on the top of web management interface. You can change video-related settings of this IP camera in „Video‟ menu. 2.2 Video You can access this menu by clicking „Video‟ on it and its options will appear. 33 To set the option of video settings for this IP camera.
There are 5 types of a certain video setting, put mouse cursor on the top of web management interface. You can change video-related settings of this IP camera in „Video‟ menu. 2.2 Video You can access this menu by clicking „Video‟ on it and its options will appear. 33 To set the option of video settings for this IP camera.

Manual
Page 42
...‟s not 80, you have to disable it. If you a nice network 41 Input the MTU (Maximum Transmission Unit) given by your ISP for this IP camera here. Ask your ISP if you don‟t know the address of DNS server, ask network administrator or your ISP here. Specify the subnet mask... for this IP camera, select „Disable‟ to input 'http://10.20.20.30:90' in this menu will be given below will be grayed out. Please input...
...‟s not 80, you have to disable it. If you a nice network 41 Input the MTU (Maximum Transmission Unit) given by your ISP for this IP camera here. Ask your ISP if you don‟t know the address of DNS server, ask network administrator or your ISP here. Specify the subnet mask... for this IP camera, select „Disable‟ to input 'http://10.20.20.30:90' in this menu will be given below will be grayed out. Please input...

Manual
Page 44
... become a stand-alone wireless network point, other wireless computers / devices can discover this IP camera, select „Disable‟ to it . Select the network type of this IP camera and connect to disable it without wireless access 43 Available options are „Infrastructure‟...; (Connect the IP camera to a wireless access point), and „Adhoc‟ (This IP camera will be given below: Item Wireless Connection ...
... become a stand-alone wireless network point, other wireless computers / devices can discover this IP camera, select „Disable‟ to it . Select the network type of this IP camera and connect to disable it without wireless access 43 Available options are „Infrastructure‟...; (Connect the IP camera to a wireless access point), and „Adhoc‟ (This IP camera will be given below: Item Wireless Connection ...
